2005 KIA CERATO bulb replacement
[x] Cancel search: bulb replacementPage 246 of 318

1 23456789Battery / 7-43
Tyres and wheels / 7-46
Bulb replacement / 7-53
Lubricant specifications / 7-60 Exterior care / 7-62Interior care / 7-66
Maintenance
1 23456789
Page 297 of 318

753
Maintenance
1 23456789
BULB REPLACEMENT
Use only the bulbs of the specifiedwattage.
✽✽ NOTICE
If you don’t have necessary tools,
the correct bulbs and the expertise,
consult an Authorized Kia Dealer. In
many cases, it is difficult to replacevehicle light bulbs because other
parts of the vehicle must be removed
before you can get to the bulb. Thisis especially true if you have to
remove the front bumper to get tothe bulb(s).
Removing/installing the front
bumper or bumper hardware can
result in damage to the vehicle.
Headlight bulb replacement
✽✽ NOTICE
After heavy, driving rain or washing, headlight and taillight lenses could
appear frosty. This condition is
caused by the temperature differencebetween the lamp inside and outside.
This is similar to the condensation on
your windows inside your vehicleduring the rain and doesn’t indicate
a problem with your vehicle. If the
water leaks into the lamp bulb cir-
cuitry, have the vehicle checked by
an Authorized Kia Dealer.
WARNING - Working on
the lights
Prior to working on the light,
firmly apply the parking brake,
ensure that the ignition switch
is turned to the “LOCK” position
and turn off the lights to avoid
sudden movement of the vehi-
cle and burning your fingers or
receiving an electric shock.
➀ Headlight (High/Low)
➁ Position light
➂ Front turn signal light
➃ Front fog light (if equipped)
1LDN5032/1LDE5032
4 Door5 Door
Page 299 of 318

755
Maintenance
1 23456789
6. Install a new headlight bulb andsnap the headlight bulb retaining
wire into position by aligning the
wire with the groove on the bulb.
7. Connect the headlight bulb socket- connector.
8. Install the headlight bulb cover by turning it clockwise.
Front turn signal/position light
bulb replacement
1. Open the hood.
2. Remove the socket from theassembly by turning the socket
counterclockwise until the tabs on
the socket align with the slots on
the assembly.
3. Remove the bulb from the socket by pressing it in and rotating it until
the tabs on the bulb align with the
slots in the socket. Pull the bulb
out of the socket.
4. Insert a new bulb by inserting it into the socket and rotating it until
it locks into place. 5. Install the socket in the assembly
by aligning the tabs on the socket
with the slots in the assembly.
Insert the socket into the assembly
and turn the socket clockwise.
Front fog light bulb replace- ment
If the light bulb is not operating, have
the vehicle checked by an authorized
Kia Dealer.
1LDA5033
Page 301 of 318

757
Maintenance
1 23456789
License plate lights bulb replacement
1. Loosen the lens retaining screwswith a cross-tip screwdriver.
2. Remove the lens.
3. Remove the bulb by pulling it straight out.
4. Install a new bulb.
5. Reinstall the lens securely with the lens retaining screws. Rear combination light bulb replacement
1. Open the trunk lid or rear hatch.
2. Remove the service cover by turn-
ing the plastic screw counterclock-
wise and removing the cover.
1LDA50431LDA5035
➀Rear fog light (if equipped)
➁ Rear turn signal light
➂ Back-up light
④ Stop and tail light
1LDE5034/1LDA5034
Type A Type B
Page 302 of 318

Maintenance
58
7
1 23456789
3. Remove the socket from the
assembly by turning the socket
counterclockwise until the tabs on
the socket align with the slots on
the assembly. 4. Remove the bulb from the socket
by pressing it in and rotating it until
the tabs on the bulb align with the
slots in the socket. Pull the bulb
out of the socket.
5. Insert a new bulb by inserting it into the socket and rotating it until
it locks into place.
6. Install the socket in the assembly by aligning the tabs on the socket
with the slots in the assembly.
Push the socket into the assembly
and turn the socket clockwise.
7. Replace the service cover and tighten the screws. High mounted stop light bulb replacement
Ty p e A
If the light bulb is not operating, have
the vehicle checked by an authorized
Kia Dealer.
Ty p e B
1. Open the trunk lid.
1LDA50371LDE5036
Type A
Page 303 of 318

759
Maintenance
1 23456789
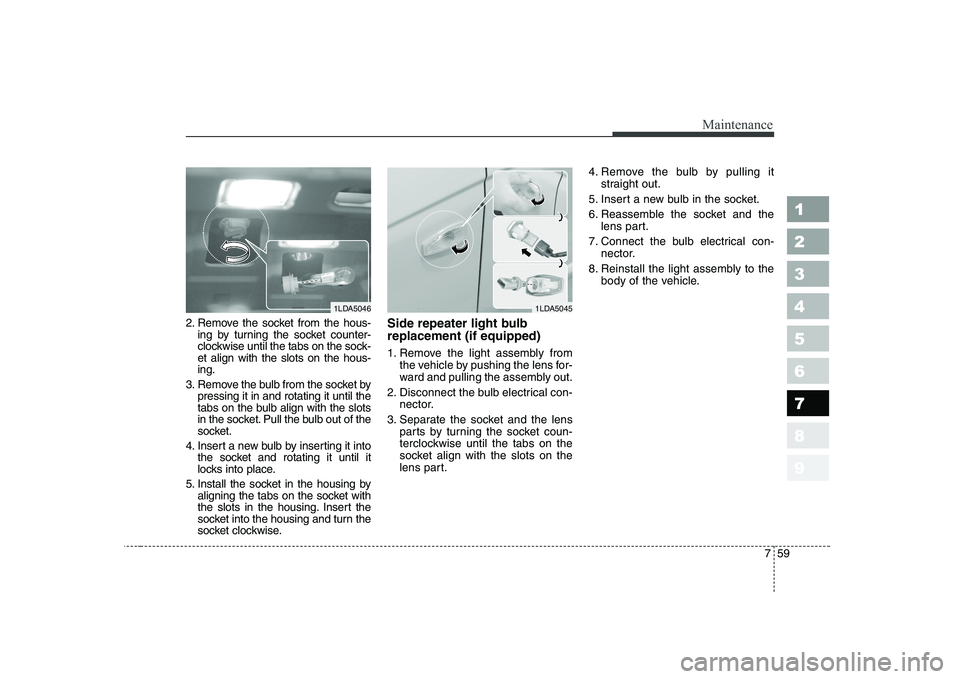
2. Remove the socket from the hous-ing by turning the socket counter-
clockwise until the tabs on the sock-et align with the slots on the hous-ing.
3. Remove the bulb from the socket by pressing it in and rotating it until the
tabs on the bulb align with the slots
in the socket. Pull the bulb out of the
socket.
4. Insert a new bulb by inserting it into the socket and rotating it until it
locks into place.
5. Install the socket in the housing by aligning the tabs on the socket with
the slots in the housing. Insert the
socket into the housing and turn the
socket clockwise. Side repeater light bulb replacement (if equipped)
1. Remove the light assembly from
the vehicle by pushing the lens for-
ward and pulling the assembly out.
2. Disconnect the bulb electrical con- nector.
3. Separate the socket and the lens parts by turning the socket coun-
terclockwise until the tabs on the
socket align with the slots on the
lens part. 4. Remove the bulb by pulling it
straight out.
5. Insert a new bulb in the socket.
6. Reassemble the socket and the lens part.
7. Connect the bulb electrical con- nector.
8. Reinstall the light assembly to the body of the vehicle.
1LDA50461LDA5045
Page 316 of 318

Index
2
9
1 23456789
Air cleaner ····································································7-37
Air conditioner air filter··············································7-39
Airbags-supplemental restraint system ·····················3-56
Antenna ·······································································3-100
Automatic climate control system ······························4-66
Automatic transaxle ·············································4-8, 7-32
Battery···········································································7-43
Before driving·································································5-5
Brake system ································································4-15
Brakes and clutch ························································7-25
Bulb replacement ·························································7-53
Cruise control system ··················································4-25
Defroster ·······································································4-55
Door locks ·······································································3-8
Drive belts ·····································································7-27
Electrical circuit protection ··········································6-7
Emergency starting························································6-4 Emission control system ················································5-3
Engine compartment ···················································7-16
Engine cooling system ·················································7-22
Engine oil and oil filter················································7-19
Exterior care·································································7-62
Exterior overview···························································2-2
Fuel filler lid ·································································3-79
Fuel filter ······································································7-36
Fuel requirements ··························································5-2
Gauges ···········································································4-34
Hazard warning flasher ··············································4-56
Hood ··············································································3-77
How to use this manual ·················································1-2
If you have a flat tyre ··················································6-19
Ignition switch ································································4-2
Immobilizer system ························································3-7
Instrument cluster ·······················································4-33
Instrument panel overview ···········································2-5
Interior care··································································7-66
A
B
C
D
E
F
G
H
I