Page 223 of 318
In case of an emergency
2
6
ROAD WARNING
Hazard warning flasher
The hazard warning flasher serves
as a warning to other drivers to exercise
extreme caution when approaching,
overtaking, or passing your vehicle. It should be used whenever emer-gency repairs are being made or
when the vehicle is stopped near the
edge of a roadway.
Depress the flasher switch with the
ignition switch in any position. The
flasher switch is located in the centre
console switch panel. All turn signal
lights will flash simultaneously.
• The hazard warning flasher oper-
ates whether your vehicle is run- ning or not.
The turn signals do not work when the hazard flasher is on.
Care must be taken when using the hazard warning flasher while
the vehicle is being towed.
1 23456789
1LDA2100
RLDN3206
4 Door
5 Door
Page 225 of 318
In case of an emergency
4
6
EMERGENCY STARTING
Jump starting
Jump starting can be dangerous if
done incorrectly. Therefore, to avoid
harm to yourself or damage to your
vehicle or battery, follow the jump
starting procedures listed on page
6-6. If in doubt, we strongly recom-
mend that you have a competent
technician or towing service jump
start your vehicle.
✽✽ NOTICE
Use only a 12-volt jumper system.
You can damage a 12-volt starting
motor, ignition system, and other
electrical parts beyond repair by use
of a 24-volt power supply (either two
12-volt batteries in series or a 24-
volt motor generator set).
1 23456789
WARNING - Battery
• Keep all flames or sparks away from the battery. The bat-
tery produces hydrogen gas
which may explode if exposedto flame or sparks.
Do not attempt to jump start the vehicle if the discharged
battery is frozen or if the elec-
trolyte level is low; the battery
may rupture or explode.
WARNING - Battery
Never attempt to check the elec-
trolyte level of the battery as
this may cause the battery to
rupture or explode causing seri-
ous injury.
Page 229 of 318
In case of an emergency
8
6
Fuse replacement
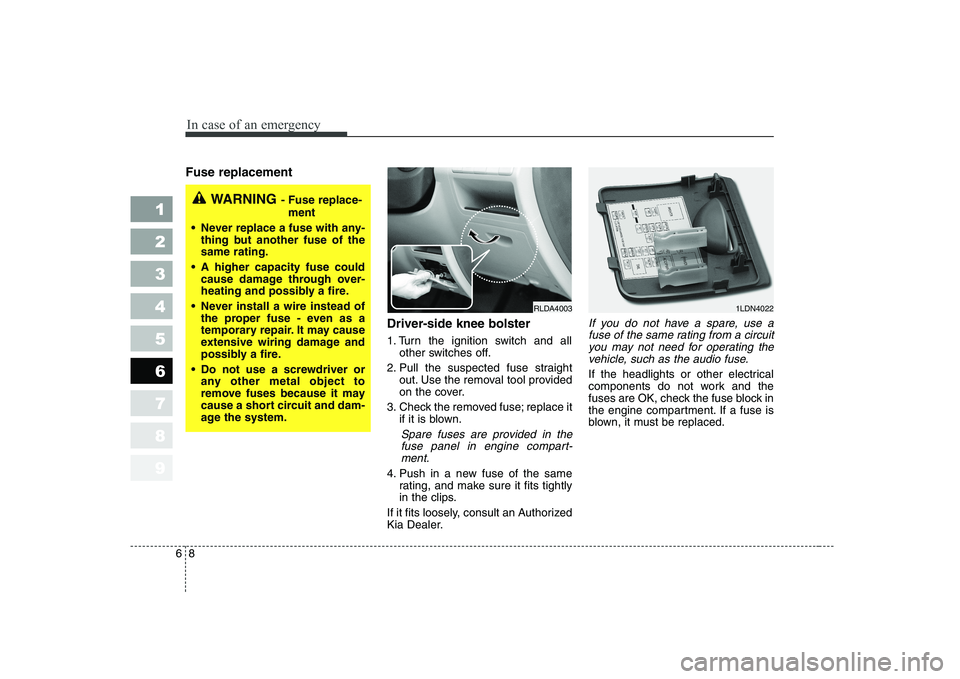
Driver-side knee bolster
1. Turn the ignition switch and allother switches off.
2. Pull the suspected fuse straight out. Use the removal tool provided
on the cover.
3. Check the removed fuse; replace it if it is blown.
Spare fuses are provided in the
fuse panel in engine compart-ment.
4. Push in a new fuse of the same rating, and make sure it fits tightly
in the clips.
If it fits loosely, consult an Authorized
Kia Dealer.
If you do not have a spare, use a fuse of the same rating from a circuityou may not need for operating thevehicle, such as the audio fuse.
If the headlights or other electrical
components do not work and the
fuses are OK, check the fuse block in
the engine compartment. If a fuse is
blown, it must be replaced.
1 23456789
RLDA40031LDN4022
WARNING - Fuse replace-
ment
Never replace a fuse with any- thing but another fuse of the same rating.
A higher capacity fuse could cause damage through over-
heating and possibly a fire.
Never install a wire instead of the proper fuse - even as a
temporary repair. It may cause
extensive wiring damage and
possibly a fire.
Do not use a screwdriver or any other metal object to
remove fuses because it may
cause a short circuit and dam-
age the system.
Page 230 of 318
69
In case of an emergency
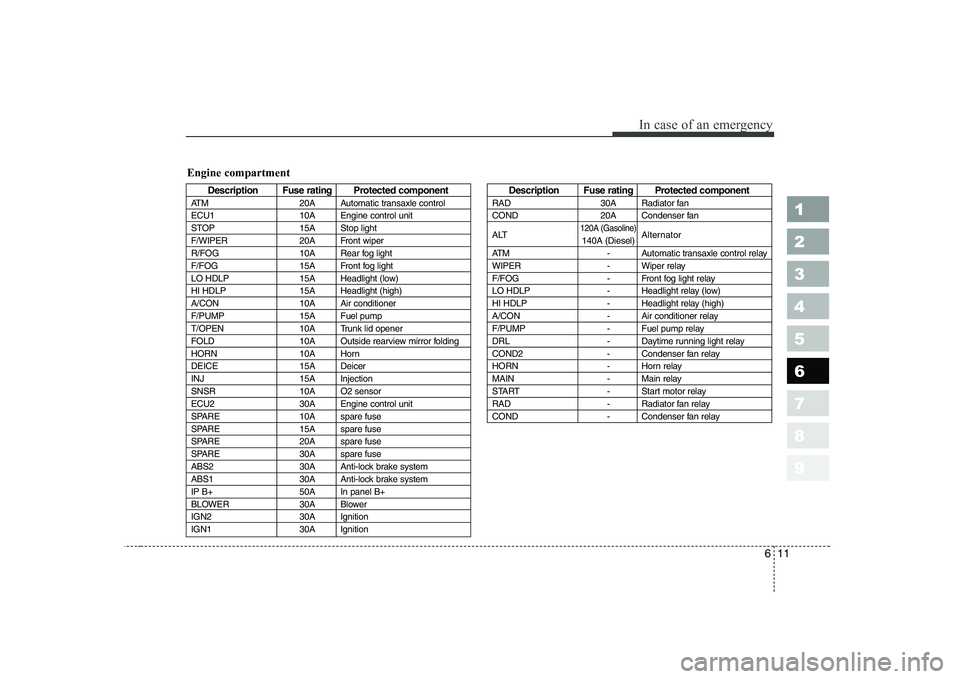
Engine compartment
1. Turn the ignition switch and allother switches off.
2. Remove the fuse box cover by pressing the taps on both ends
and pulling up.
3. Check the removed fuse; replace it if it is blown.
4. Push in a new fuse of the same rating, and make sure it fits tightly
in the clips.
If it fits loosely, consult an Authorized
Kia Dealer.✽✽ NOTICE
After checking the fuse box in the
engine compartment, securely
install the fuse box cover. If not,
electrical failures may occur from
water leaking in.Main fuse
If the ALT (120A-Gasoline Engine,
140A-Diesel Engine) fuse is blown, it
must be removed as follows:
1. Disconnect the negative battery cable.
2. Remove the screws shown in the picture above.
3. Replace the fuse with a new one of the same rating.
4. Reinstall in the reverse order of removal.
1 23456789
1LDA40051LDE40051LDA4006
Diesel only
Page 232 of 318
611
In case of an emergency
1 23456789
Description Fuse rating Protected component
ATM 20A Automatic transaxle control
ECU1 10A Engine control unit
STOP 15A Stop light
F/WIPER 20A Front wiper
R/FOG 10A Rear fog light
F/FOG 15A Front fog light
LO HDLP 15A Headlight (low)
HI HDLP 15A Headlight (high)
A/CON 10A Air conditioner
F/PUMP 15A Fuel pump
T/OPEN 10A Trunk lid opener
FOLD 10A Outside rearview mirror folding
HORN 10A Horn
DEICE 15A Deicer
INJ 15A Injection
SNSR 10A O2 sensor
ECU2 30A Engine control unit
SPARE 10A spare fuse
SPARE 15A spare fuse
SPARE 20A spare fuse
SPARE 30A spare fuse
ABS2 30A Anti-lock brake system
ABS1 30A Anti-lock brake system
IP B+ 50A In panel B+
BLOWER 30A Blower
IGN2 30A Ignition
IGN1 30A IgnitionDescription Fuse rating Protected component
RAD 30A Radiator fan
COND 20A Condenser fan
ALT
120A (Gasoline)Alternator
140A (Diesel)
ATM - Automatic transaxle control relay
WIPER - Wiper relay
F/FOG - Front fog light relay
LO HDLP - Headlight relay (low)
HI HDLP - Headlight relay (high)
A/CON - Air conditioner relay
F/PUMP - Fuel pump relay
DRL - Daytime running light relay
COND2 - Condenser fan relay
HORN - Horn relay
MAIN - Main relay
START - Start motor relay
RAD - Radiator fan relay
COND - Condenser fan relay
Engine compartment
Page 233 of 318
In case of an emergency
12
6
1 23456789
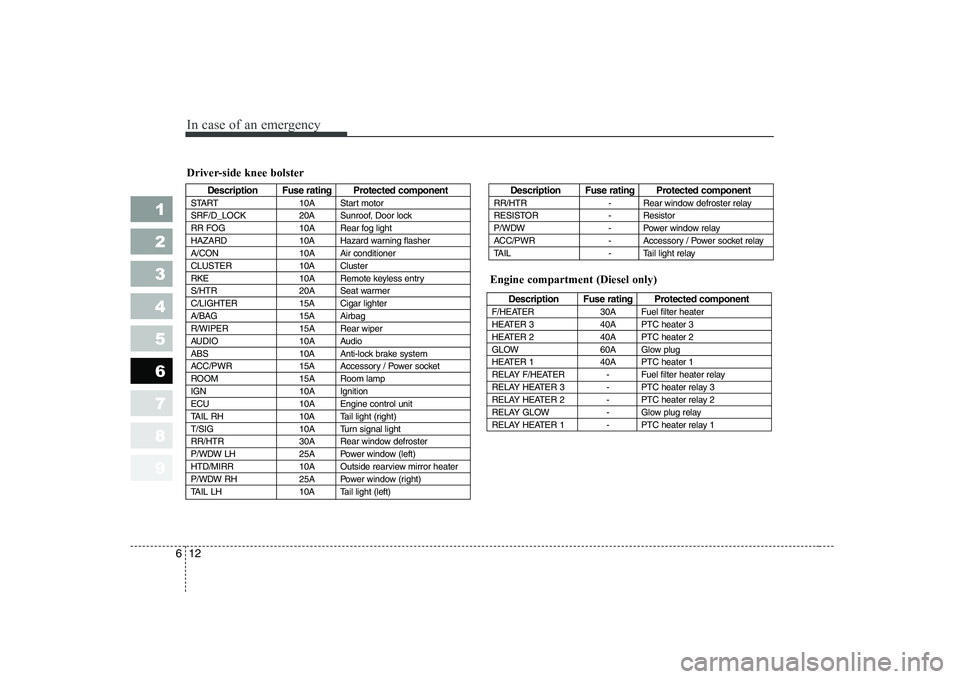
Driver-side knee bolster
Description Fuse rating Protected component
START 10A Start motor
SRF/D_LOCK 20A Sunroof, Door lock
RR FOG 10A Rear fog light
HAZARD 10A Hazard warning flasher
A/CON 10A Air conditioner
CLUSTER 10A Cluster
RKE 10A Remote keyless entry
S/HTR 20A Seat warmer
C/LIGHTER 15A Cigar lighter
A/BAG 15A Airbag
R/WIPER 15A Rear wiper
AUDIO 10A Audio
ABS 10A Anti-lock brake system
ACC/PWR 15A Accessory / Power socket
ROOM 15A Room lamp
IGN 10A Ignition
ECU 10A Engine control unit
TAIL RH 10A Tail light (right)
T/SIG 10A Turn signal light
RR/HTR 30A Rear window defroster
P/WDW LH 25A Power window (left)
HTD/MIRR 10A Outside rearview mirror heater
P/WDW RH 25A Power window (right)
TAIL LH 10A Tail light (left)Description Fuse rating Protected component
RR/HTR - Rear window defroster relay
RESISTOR - Resistor
P/WDW - Power window relay
ACC/PWR - Accessory / Power socket relay
TAIL - Tail light relay
Description Fuse rating Protected component
F/HEATER 30A Fuel filter heater
HEATER 3 40A PTC heater 3
HEATER 2 40A PTC heater 2
GLOW 60A Glow plug
HEATER 1 40A PTC heater 1
RELAY F/HEATER - Fuel filter heater relay
RELAY HEATER 3 - PTC heater relay 3
RELAY HEATER 2 - PTC heater relay 2
RELAY GLOW - Glow plug relay
RELAY HEATER 1 - PTC heater relay 1
Engine compartment (Diesel only)
Page 236 of 318
615
In case of an emergency
1 23456789
When towing your vehicle in an emergency without wheel dollies :
1. Set the ignition switch in the ACCposition.
2. Place the transaxle shift lever in N (Neutral).
3. Release the parking brake.
✽✽ NOTICE
Failure to place the transaxle shift
lever in N (Neutral) may cause inter-nal damage to the transaxle.
Tie-down hook
(for flatbed towing)
RLDN4019
Tie-down hook
CAUTION
Do not use the hooks under the
front of the vehicle for towingpurposes. These hooks aredesigned ONLY for transport tie- down. If the tie-down hooks areused for towing, the tie-downhooks will be damaged and this could lead to serious injury.
Page 239 of 318
In case of an emergency
18
6
1 23456789
When your vehicle is being
towed by another vehicle
other than a tow truck (in case
of an emergency)
Turn the ignition switch to ACC so
the steering wheel isn’t locked.
Place the transaxle shift lever in N (Neutral).
Release the parking bake.
Vehicles equipped with automatic transaxles should not exceed 45 km/h (28 mph) and should not be
towed more than 80 km (50 miles).
Vehicles equipped with manual transaxle should not be towed in
excess of 88 km/h (55 mph) and
should not be towed more than645 km (400 miles). Press the brake pedal with more
force than normal since you will
have reduced brake performance.
More steering effort will be required because the power steer-
ing system will be disabled.
If you are driving down a long hill, the brakes may overheat and brake
performance will be reduced. Stop
often and let the brakes cool off.
✽✽ NOTICE
To prevent internal damage to the
transaxle, never tow your vehicle
from the rear (backwards) with all
four tyres in contact with the sur-face.
Tips for towing a stuck vehicle
The following methods are effective
when your vehicle is stuck in mud,sand or similar substances that pre-
vent the vehicle from being driven
out under its own power.
Remove the soil and sand, etc. from the front and the back of the
tyres.
Place a stone or wood under the tyres.