Page 299 of 424

JUMP STARTING PROCEDURE
NOTE:Check the charge indicator on the battery. If the
indicator is light or yellow, replace the battery.
1. Wear eye protection and remove any metal jewelry
such as watch bands or bracelets that might make an
unintended electrical contact.
2. When boost is provided by a battery in another
vehicle, park that vehicle within booster cable reach but
without letting the vehicles touch. Set the parking brake,
place the automatic transmission in P (Park), or manual
transmission in N (Neutral), and turn the ignition to OFF
for both vehicles.
3. Turn off the heater, radio and all unnecessary electrical
loads.4. Connect one end of a jumper cable to the positive
terminal of the discharged battery. Connect the other end
of the same cable to the positive terminal of the booster
battery.
5. Connect the other cable, first to the negative terminal
of the booster battery and then connect the other end to
a non-paint metal surface on the engine of the vehicle
with the discharged battery. Make sure you have a good
contact on the engine.
6. Start the engine in the vehicle which has the booster
battery, let the engine idle a few minutes, then start the
engine in the vehicle with the discharged battery.
7. When removing the jumper cables, reverse the above
sequence exactly. Be careful of the moving belts and fan.
WHAT TO DO IN EMERGENCIES 299
6
Page 304 of 424

▫Maintenance-Free Battery................320
▫Air Conditioner Maintenance.............321
▫Power Steering Fluid Check..............322
▫Driveline And Steering Component
Lubrication..........................322
▫Body Lubrication.....................323
▫Windshield Wiper Blades................323
▫Windshield Washers...................324
▫Exhaust System......................324
▫Cooling System.......................325
▫Hoses And Vacuum/Vapor Harnesses.......330
▫Brake System........................330
▫Automatic Transmission................333▫Hydraulic Clutch Fluid —
Manual Transmission..................335
▫Manual Transmission..................335
▫Transfer Case........................336
▫Front/Rear Axle Fluid..................337
▫Appearance Care And Protection From
Corrosion...........................337
�Fuse Panel...........................342
▫Interior Fuses........................342
▫Underhood Fuses
(Power Distribution Center)..............345
�Vehicle Storage........................349
�Replacement Bulbs......................350
304 MAINTAINING YOUR VEHICLE
Page 309 of 424

ONBOARD DIAGNOSTIC SYSTEM — OBD II
Your vehicle is equipped with a sophisticated onboard
diagnostic system called OBD II. This system monitors
the performance of the emissions, engine, and automatic
transmission control systems. When these systems are
operating properly, your vehicle will provide excellent
performance and fuel economy, as well as engine emis-
sions well within current government regulations.
If any of these systems require service, the OBD II system
will turn on the “Malfunction Indicator Light.” It will
also store diagnostic codes and other information to
assist your service technician in making repairs. Al-
though your vehicle will usually be drivable and not
need towing, see your dealer for service as soon as
possible.CAUTION!
•Prolonged driving with the “Malfunction Indicator
Light” on could cause further damage to the emis-
sion control system. It could also affect fuel economy
and driveability. The vehicle must be serviced before
any emissions tests can be performed.
•If the “Malfunction Indicator Light” is flashing
while the engine is running, severe catalytic con-
verter damage and power loss will soon occur.
Immediate service is required.
Loose Fuel Filler Cap Message
After fuel is added, the vehicle diagnostic system can
determine if the fuel filler cap is loose, improperly
installed, or damaged. A loose fuel filler cap message will
be displayed in the instrument cluster. Tighten the gas
cap until a�clicking�sound is heard. This is an indication
MAINTAINING YOUR VEHICLE 309
7
Page 333 of 424

Use only manufacturer’s recommended brake fluid, refer
to Recommended Fluids, Lubricants, and Genuine Parts
for correct fluid type.
WARNING!
Use of a brake fluid that may have a lower initial
boiling point or unidentified as to specification, may
result in sudden brake failure during hard pro-
longed braking. You could have an accident.
WARNING!
Overfilling the brake fluid reservoir can result in
spilling brake fluid on hot engine parts and the
brake fluid catching fire.
Use only brake fluid that has been in a tightly closed
container to avoid contamination from foreign matter. Do
not allow petroleum base fluid to contaminate the brake
fluid as seal damage will result.
Automatic Transmission
Selection of Lubricant
It is important that the proper lubricant is used in the
transmission to assure optimum transmission perfor-
mance. Use only manufacturer’s recommended transmis-
sion fluid, refer to Recommended Fluids, Lubricants, and
Genuine Parts for correct fluid type. It is important that
the transmission fluid be maintained at the prescribed
level using the recommended fluid.
MAINTAINING YOUR VEHICLE 333
7
Page 334 of 424

CAUTION!
Using a transmission fluid other than the manufac-
turer’s recommended fluid may cause deterioration
in transmission shift quality and/or torque converter
shudder. Using a transmission fluid other than the
manufacturer’s recommended fluid will result in
more frequent fluid and filter changes. Refer to
Recommended Fluids, Lubricants, and Genuine
Parts for correct fluid type.
Fluid Level Check – 3.7L Gasoline Engine (42RLE)
and 2.8L Diesel Engine (545RFE)
This fluid level should be checked when the engine is
fully warmed up and the fluid in the transmission is
heated to its normal operating temperature. Operation of
the transmission with an improper fluid level will greatly
reduce the life of the transmission and of the fluid.To check the automatic transmission fluid level properly,
the following procedure must be used:
1. The vehicle must be on level ground.
2. The engine should be running at curb idle speed for a
minimum of 60 seconds.
3. Fully apply parking brake.
4. Apply the brakes and shift the transmission into P
(Park).
5. The fluidMUSTbe checked with the transmission in
P (Park) to be sure that the fluid level is accurate.
6. Wipe the dipstick clean and reinsert until seated.
Remove dipstick and note reading.
At normal operating temperature (approximately 180° F
(82° C), the fluid level is correct if it is in the HOT region
334 MAINTAINING YOUR VEHICLE
Page 345 of 424
Cavity Fuse Description
38 10 Amp Red ABS Controller/Shifter As-
sembly
39 10 Amp Red Hazard Flasher (Turn
Signals)/Backup Lamp
Switch (Manual Transmission
Only)/Transmission Range
Switch (Automatic Transmis-
sion Only)
Underhood Fuses (Power Distribution Center)
Your vehicle is equipped with an electrical power distri-
bution center located in the engine compartment near the
battery. This power center houses plug-in “Cartridge”
fuses which replace in-line fusible links. The power
center also contains “Mini” fuses and plug-in full and
micro ISO relays. A label inside the latching cover of the
center identifies each component for ease of replacement,
if necessary. “Cartridge” fuses and relays can be obtained
from your authorized dealer.Power Distribution Center (Gasoline Engines)
Cavity Fuse Description
F1 40 Amp
GreenBlower Motor
F2 40 Amp
GreenRadiator Fan
Power Distribution Center
MAINTAINING YOUR VEHICLE 345
7
Page 358 of 424
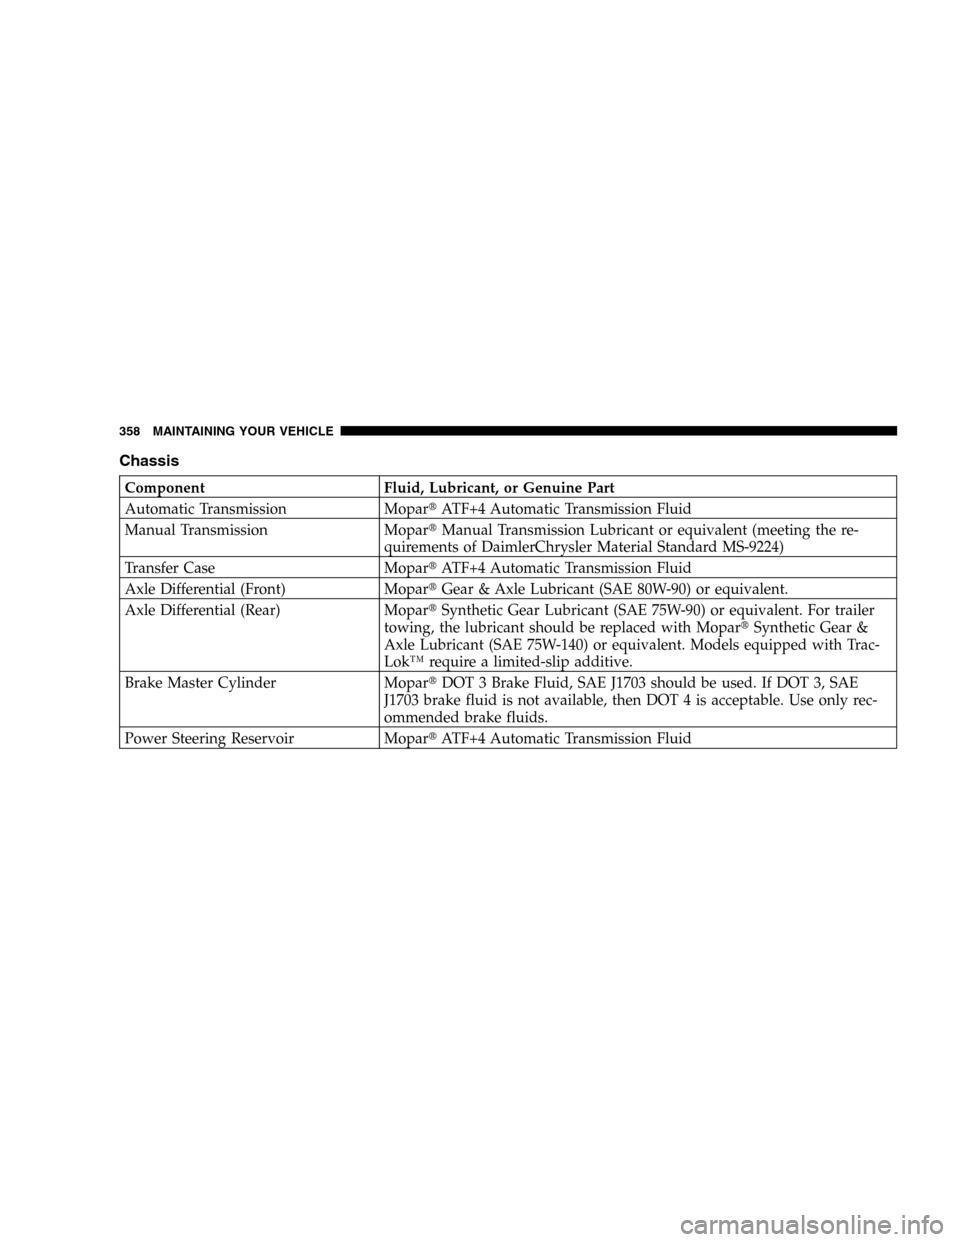
Chassis
Component Fluid, Lubricant, or Genuine Part
Automatic Transmission Mopar�ATF+4 Automatic Transmission Fluid
Manual Transmission Mopar�Manual Transmission Lubricant or equivalent (meeting the re-
quirements of DaimlerChrysler Material Standard MS-9224)
Transfer Case Mopar�ATF+4 Automatic Transmission Fluid
Axle Differential (Front) Mopar�Gear & Axle Lubricant (SAE 80W-90) or equivalent.
Axle Differential (Rear) Mopar�Synthetic Gear Lubricant (SAE 75W-90) or equivalent. For trailer
towing, the lubricant should be replaced with Mopar�Synthetic Gear &
Axle Lubricant (SAE 75W-140) or equivalent. Models equipped with Trac-
Lok™ require a limited-slip additive.
Brake Master Cylinder Mopar�DOT 3 Brake Fluid, SAE J1703 should be used. If DOT 3, SAE
J1703 brake fluid is not available, then DOT 4 is acceptable. Use only rec-
ommended brake fluids.
Power Steering Reservoir Mopar�ATF+4 Automatic Transmission Fluid
358 MAINTAINING YOUR VEHICLE
Page 367 of 424
Miles 48,000 51,000 54,000 57,000 60,000
(Kilometers) (77 000) (82 000) (86 000) (91 000) (96 000)
Change the engine oil and engine oil filter, if not replaced at
3 months.XXXXX
Rotate the tires. X X X
Inspect the engine air filter element, replace if necessary.X
Replace the spark plugs.X
Inspect and replace the PCV valve, if necessary. X
Replace the ignition cables (2.4L Only).X
Inspect the brake linings. X X
Drain and refill the front and rear axle fluid‡ X X
Drain and refill the automatic transmission fluid, and replace
main sump filter.†X
Inspect the drive belt and replace as needed. Not required if
belt was previouslyX
Drain and refill the transfer case fluid. X
Flush and replace the engine coolant/anti-freeze at 60
months, if not done at 102,000 miles (163 000 km).X
SCHEDULE “B” — GASOLINE ENGINES 367
8
M
A
I
N
T
E
N
A
N
C
E
S
C
H
E
D
U
L
E
S
/Backup Lamp
Switch (Manual Transmission
Only)/Transmission Range
Switch (Automatic T")
 (77 000) (82 000) (86 000) (91 000) (96 000)
Change the engine oil and engine oil filter, if not replaced at
3 months.XXXXX
Rotate the tires. X X")