Page 1 of 4731

ABCDEFGHIJKMLQUICK REFERENCE INDEX AGENERAL INFORMATIONGIGeneral InformationBENGINEEMEngine MechanicalLUEngine Lubrication SystemCOEngine Cooling SystemECEngine Control SystemFLFuel SystemEXExhaust SystemACCAccelerator Control SystemCTRANSMISSION/
TRANSAXLEATAutomatic TransmissionDDRIVELINE/AXLETFTransferPRPropeller ShaftFFDFront Final DriveRFDRear Final DriveFAXFront AxleRAXRear AxleESUSPENSIONFSUFront SuspensionRSURear SuspensionWTRoad Wheels & TiresFBRAKESBRBrake SystemPBParking Brake SystemBRCBrake Control SystemGSTEERINGPSPower Steering SystemHRESTRAINTSSBSeat BeltsSRSSupplemental Restraint System
(SRS)IBODYBLBody, Lock & Security SystemGWGlasses, Window System & Mir-
rorsRFRoofEIExterior & InteriorIPInstrument PanelSESeatJAIR CONDITIONERATCAutomatic Air ConditionerKELECTRICALSCStarting & Charging SystemLTLighting SystemDIDriver Information SystemWWWiper, Washer & HornBCSBody Control SystemLANLAN SystemAVAudio Visual, Navigation & Tele-
phone SystemACSAuto Cruise Control SystemPGPower Supply, Ground & Circuit Ele-
mentsLMAINTENANCEMAMaintenanceMINDEXIDXAlphabetical IndexEdition: August 2004
Revision: July 2005
Page 326 of 4731
ON-VEHICLE SERVICE AT-243
D E
F
G H
I
J
K L
M A
B
AT
Revision: 2005 July 2005 FX
ON-VEHICLE SERVICEPFP:00000
Control Valve with TCM and A/T Fluid Temperature Sensor 2ACS0081E
COMPONENTS
CONTROL VALVE WITH TCM ASSEMBLY REMOVAL AND INSTALLATION
Removal
1. Disconnect the battery cable from negative terminal.
2. Drain ATF through drain plug.
3. Remove front cross bar. Refer to FSU-8, "
Components" .
4. Disconnect heated oxygen sensor 2 harness connector.
5. Disconnect A/T assembly harness connector.
1. Transmission 2. Snap ring 3. Sub-harness
4. Control valve with TCM 5. Bracket 6. A/T fluid temperature sensor 2
7. Oil pan gasket 8. Oil pan 9. Magnet
10. Drain plug 11. Drain plug gasket 12. Oil pan mounting bolt
13. Terminal cord assembly 14. O-ring
SCIA5478E
Page 334 of 4731

ON-VEHICLE SERVICE AT-251
D E
F
G H
I
J
K L
M A
B
AT
Revision: 2005 July 2005 FX
c. Tighten oil pan mounting bolts to the specified torque in numeri-
cal order shown in the figure after temporarily tightening them.
CAUTION:
Do not reuse oil pan mounting bolts.
16. Install drain plug to oil pan. CAUTION:
Do not reuse drain plug gasket.
17. Pull up A/T assembly harness connector. CAUTION:
Be careful not to damage connector.
18. Install snap ring to A/T assembly harness connector.
19. Connect A/T assembly harness connector.
20. Connect heated oxygen sensor 2 harness connector.
21. Install front cross bar. Refer to FSU-8, "
Components" .
22. Pour ATF into transmission assembly. Refer to AT- 1 2 , "
Chang-
ing A/T Fluid" .
23. Connect the battery cable to the negative terminal.
A/T FLUID TEMPERATURE SENSOR 2 REMOVAL AND INSTALLATION
Removal
1. Disconnect the battery cable from negative terminal.
2. Remove front cross bar. Refer to FSU-8, "
Components" .
3. Disconnect heated oxygen sensor 2 harness connector.
4. Drain ATF through drain plug.
5. Remove oil pan and oil pan gasket. : 7.9 N·m (0.81 kg-m, 70 in-lb)
: 34 N·m (3.5 kg-m, 25 ft-lb)
SCIA4113E
SCIA5038E
SCIA5039E
SCIA2308E
Page 337 of 4731
AT-254
ON-VEHICLE SERVICE
Revision: 2005 July 2005 FX
b. Install oil pan (with oil pan gasket) to transmission case.
CAUTION:
�Install it so that drain plug comes to the position as
shown in the figure.
�Be careful not to pinch harnesses.
�Completely remove all moisture, oil and old gasket, etc.
from oil pan mounting surface.
c. Tighten oil pan mounting bolts to the specified torque in numeri- cal order shown in the figure after temporarily tightening them.
CAUTION:
Do not reuse oil pan mounting bolts.
6. Install drain plug to oil pan. CAUTION:
Do not reuse drain plug gasket.
7. Connect heated oxygen sensor 2 harness connector.
8. Install front cross bar. Refer to FSU-8, "
Components" .
9. Pour ATF into transmission assembly. Refer to AT- 1 2 , "
Changing A/T Fluid" .
10. Connect the battery cable to the negative terminal.
SCIA2308E
: 7.9 N·m (0.81 kg-m, 70 in-lb)
: 34 N·m (3.5 kg-m, 25 ft-lb)
SCIA4113E
Page 346 of 4731

ON-VEHICLE SERVICE AT-263
D E
F
G H
I
J
K L
M A
B
AT
Revision: 2005 July 2005 FX
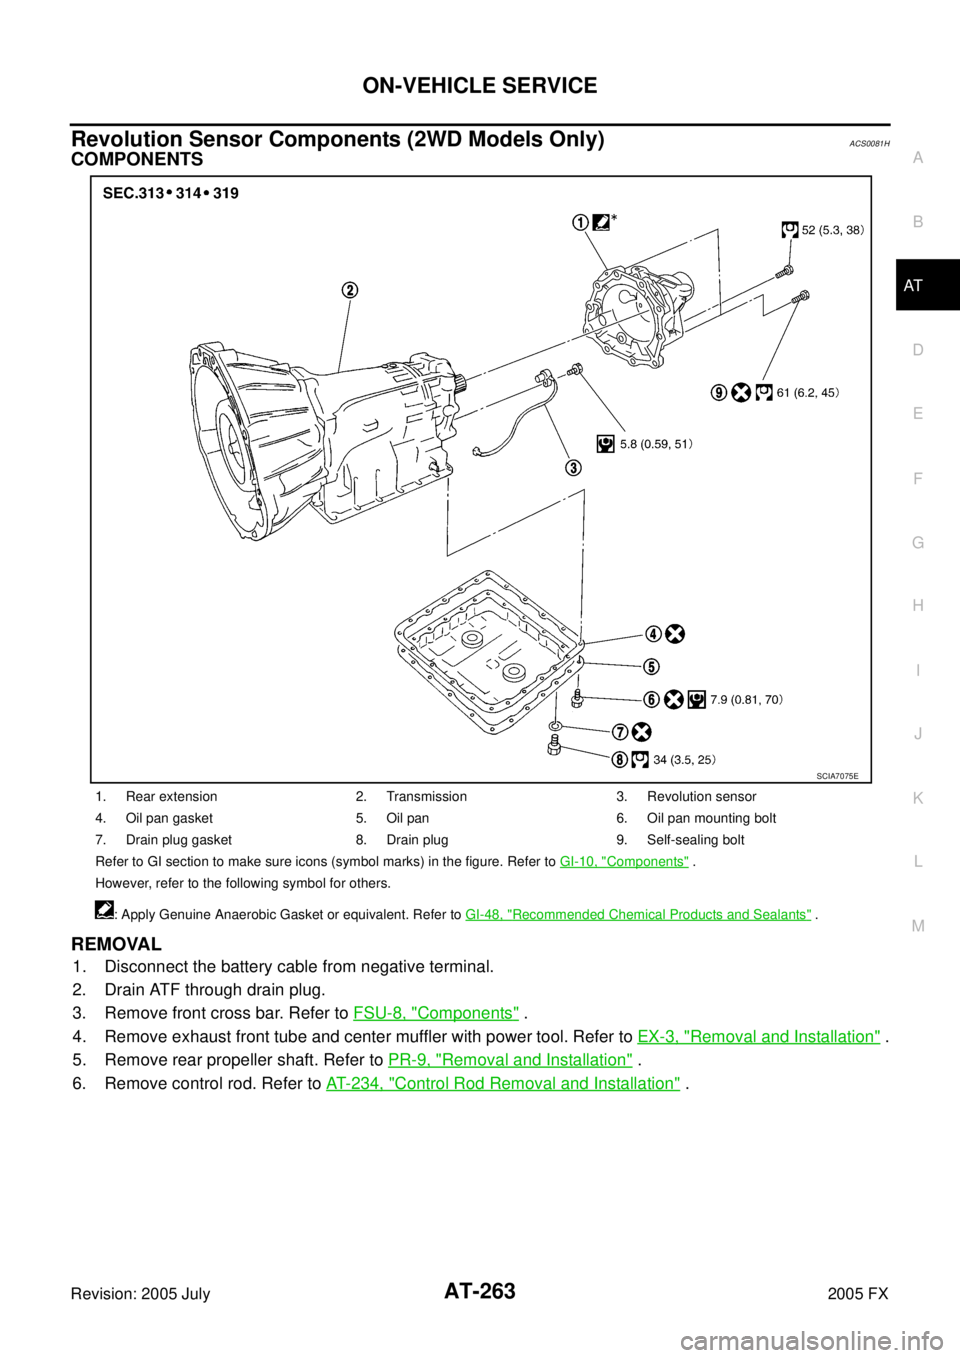
Revolution Sensor Components (2WD Models Only)ACS0081H
COMPONENTS
REMOVAL
1. Disconnect the battery cable from negative terminal.
2. Drain ATF through drain plug.
3. Remove front cross bar. Refer to FSU-8, "
Components" .
4. Remove exhaust front tube and center muffler with power tool. Refer to EX-3, "
Removal and Installation" .
5. Remove rear propeller shaft. Refer to PR-9, "
Removal and Installation" .
6. Remove control rod. Refer to AT- 2 3 4 , "
Control Rod Removal and Installation" .
1. Rear extension 2. Transmission 3. Revolution sensor
4. Oil pan gasket 5. Oil pan 6. Oil pan mounting bolt
7. Drain plug gasket 8. Drain plug 9. Self-sealing bolt
Refer to GI section to make sure icons (symbol marks) in the figure. Refer to GI-10, "
Components" .
However, refer to the following symbol for others.
: Apply Genuine Anaerobic Gasket or equivalent. Refer to GI-48, "
Recommended Chemical Products and Sealants" .
SCIA7075E
Page 350 of 4731
ON-VEHICLE SERVICE AT-267
D E
F
G H
I
J
K L
M A
B
AT
Revision: 2005 July 2005 FX
c. Tighten oil pan mounting bolts to the specified torque in numeri-
cal order shown in the figure after temporarily tightening them.
CAUTION:
Do not reuse oil pan mounting bolts.
9. Install drain plug to oil pan. CAUTION:
Do not reuse drain plug gasket.
10. Install control rod. Refer to AT- 2 3 4 , "
Control Rod Removal and Installation" .
11. Install rear propeller shaft. Refer to PR-9, "
Removal and Installation" .
12. Install exhaust front tube and center muffler. Refer to EX-3, "
Removal and Installation" .
13. Install front cross bar. Refer to FSU-8, "
Components" .
14. Pour ATF into transmission assembly. Refer to AT- 1 2 , "
Changing A/T Fluid" .
15. Connect the battery cable to the negative terminal. : 7.9 N·m (0.81 kg-m, 70 in-lb)
: 34 N·m (3.5 kg-m, 25 ft-lb)
SCIA4113E
Page 353 of 4731

AT-270
TRANSMISSION ASSEMBLY
Revision: 2005 July 2005 FX
TRANSMISSION ASSEMBLYPFP:31020
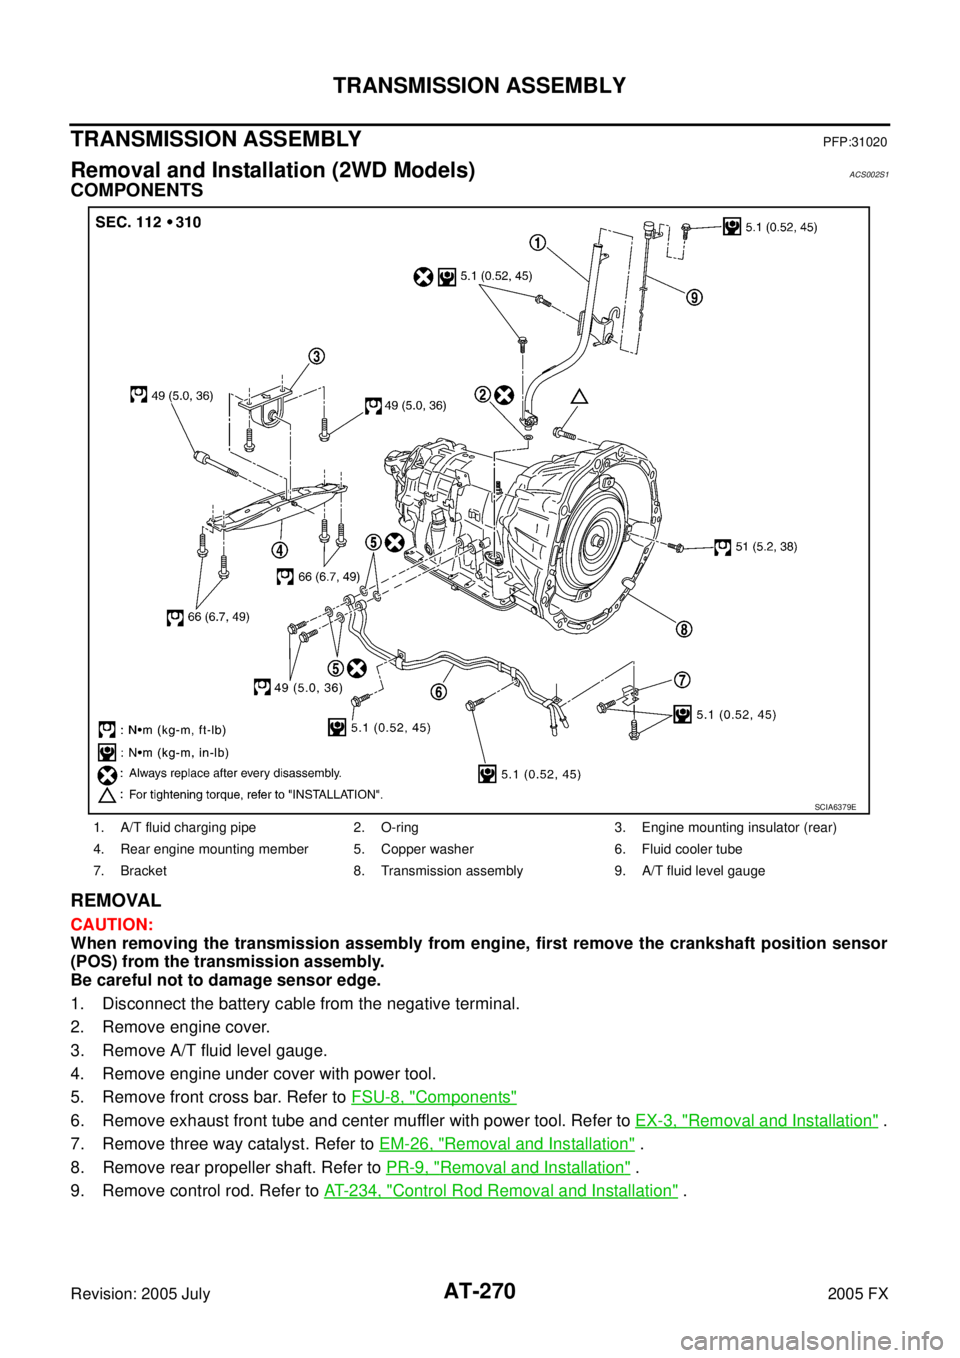
Removal and Installation (2WD Models)ACS002S1
COMPONENTS
REMOVAL
CAUTION:
When removing the transmission assembly from engine, first remove the crankshaft position sensor
(POS) from the transmission assembly.
Be careful not to damage sensor edge.
1. Disconnect the battery cable from the negative terminal.
2. Remove engine cover.
3. Remove A/T fluid level gauge.
4. Remove engine under cover with power tool.
5. Remove front cross bar. Refer to FSU-8, "
Components"
6. Remove exhaust front tube and center muffler with power tool. Refer to EX-3, "Removal and Installation" .
7. Remove three way catalyst. Refer to EM-26, "
Removal and Installation" .
8. Remove rear propeller shaft. Refer to PR-9, "
Removal and Installation" .
9. Remove control rod. Refer to AT- 2 3 4 , "
Control Rod Removal and Installation" .
1. A/T fluid charging pipe 2. O-ring 3. Engine mounting insulator (rear)
4. Rear engine mounting member 5. Copper washer 6. Fluid cooler tube
7. Bracket 8. Transmission assembly 9. A/T fluid level gauge
SCIA6379E
Page 357 of 4731

AT-274
TRANSMISSION ASSEMBLY
Revision: 2005 July 2005 FX
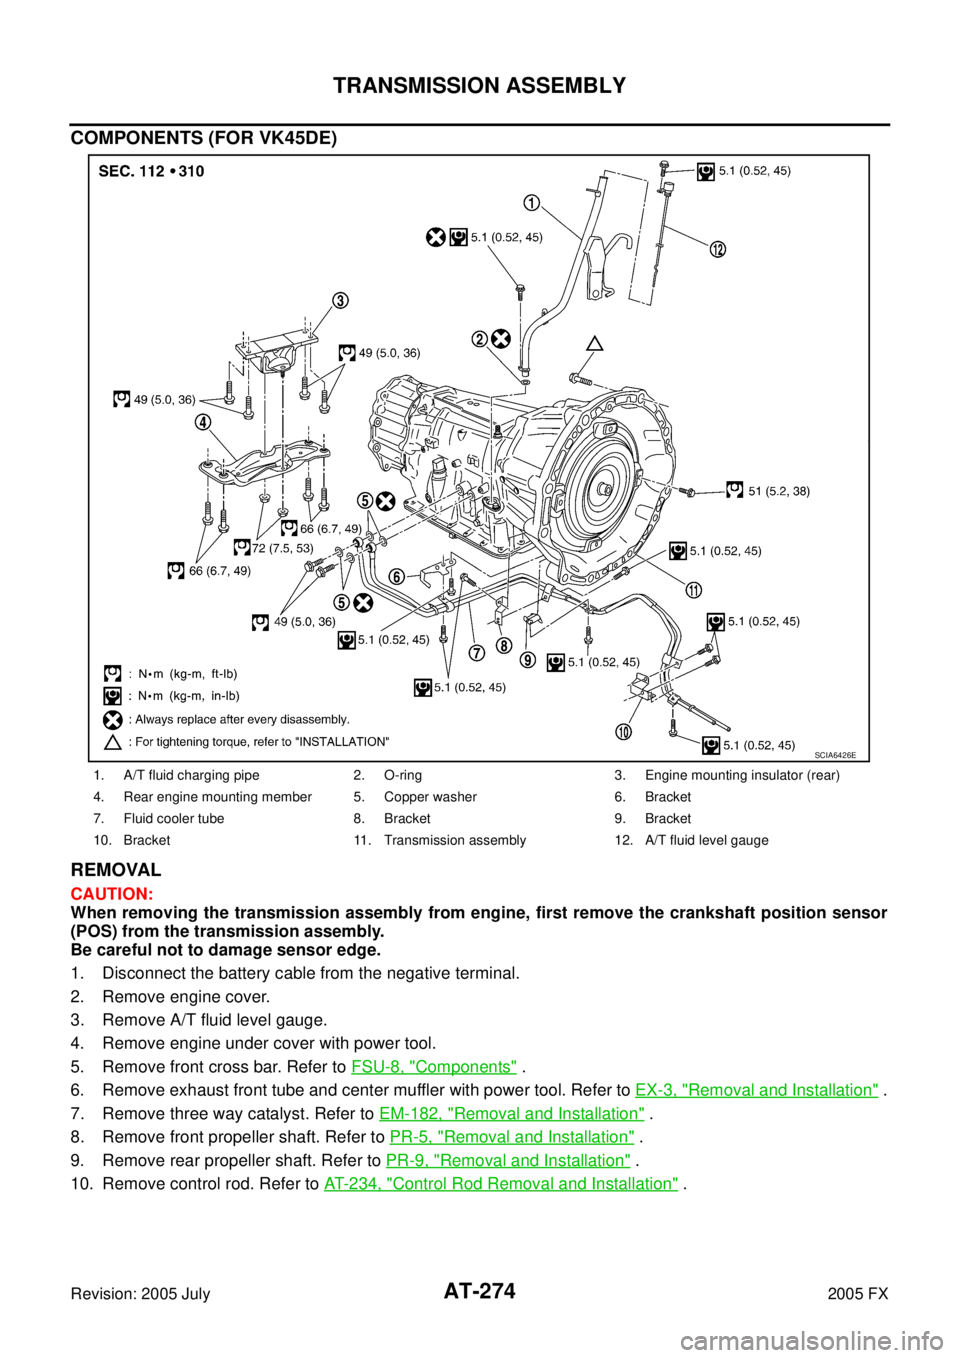
COMPONENTS (FOR VK45DE)
REMOVAL
CAUTION:
When removing the transmission assembly from engine, first remove the crankshaft position sensor
(POS) from the transmission assembly.
Be careful not to damage sensor edge.
1. Disconnect the battery cable from the negative terminal.
2. Remove engine cover.
3. Remove A/T fluid level gauge.
4. Remove engine under cover with power tool.
5. Remove front cross bar. Refer to FSU-8, "
Components" .
6. Remove exhaust front tube and center muffler with power tool. Refer to EX-3, "
Removal and Installation" .
7. Remove three way catalyst. Refer to EM-182, "
Removal and Installation" .
8. Remove front propeller shaft. Refer to PR-5, "
Removal and Installation" .
9. Remove rear propeller shaft. Refer to PR-9, "
Removal and Installation" .
10. Remove control rod. Refer to AT- 2 3 4 , "
Control Rod Removal and Installation" .
1. A/T fluid charging pipe 2. O-ring 3. Engine mounting insulator (rear)
4. Rear engine mounting member 5. Copper washer 6. Bracket
7. Fluid cooler tube 8. Bracket 9. Bracket
10. Bracket 11. Transmission assembly 12. A/T fluid level gauge
SCIA6426E