Page 3161 of 4731
FFD-10
FRONT OIL SEAL
Revision: 2005 July 2005 FX
INSTALLATION
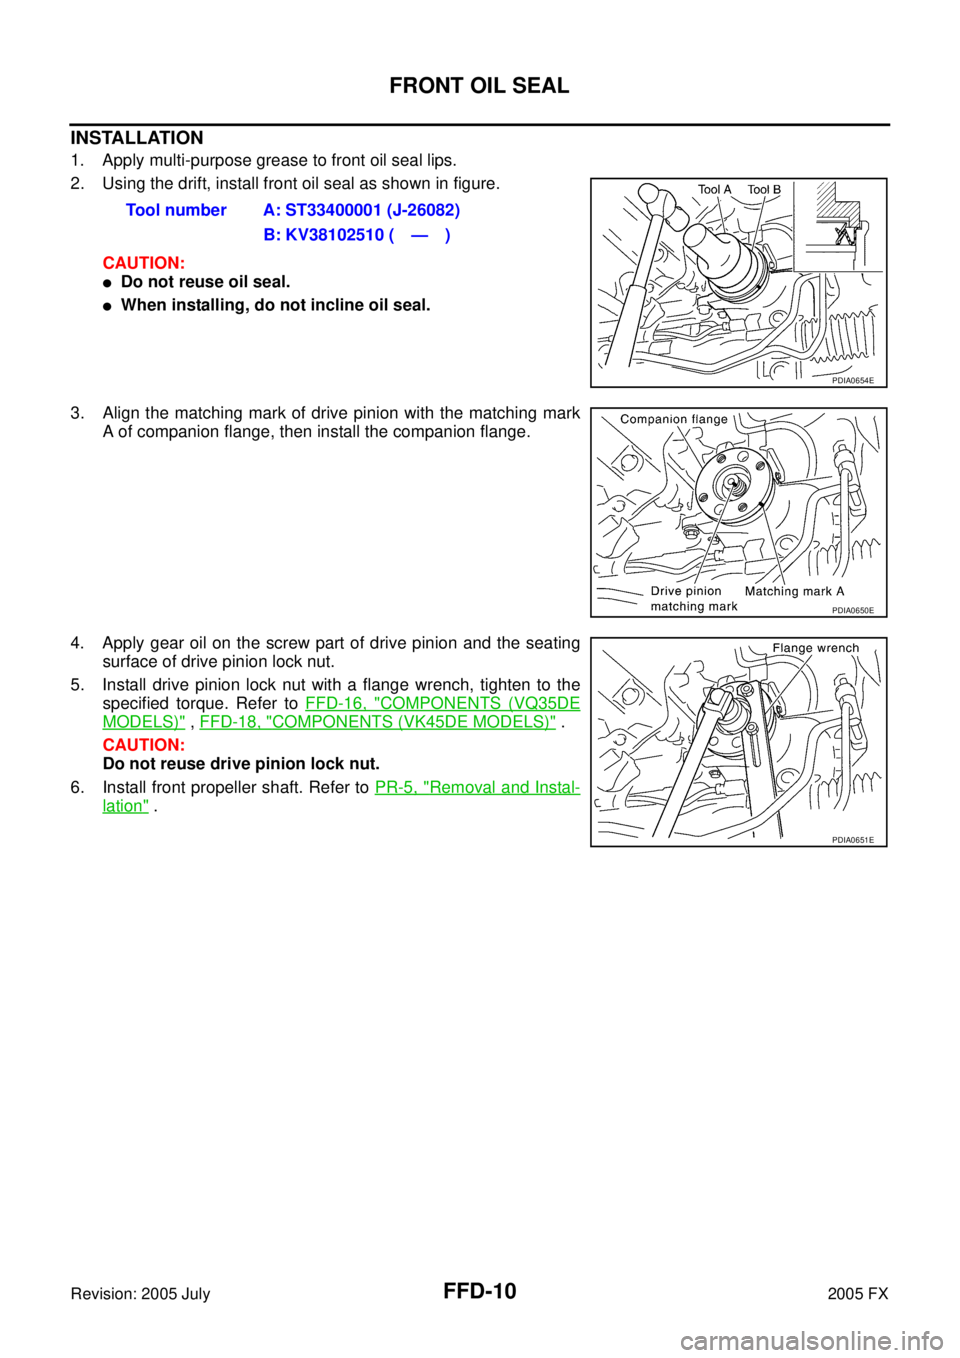
1. Apply multi-purpose grease to front oil seal lips.
2. Using the drift, install front oil seal as shown in figure.
CAUTION:
�Do not reuse oil seal.
�When installing, do not incline oil seal.
3. Align the matching mark of drive pinion with the matching mark A of companion flange, then install the companion flange.
4. Apply gear oil on the screw part of drive pinion and the seating surface of drive pinion lock nut.
5. Install drive pinion lock nut with a flange wrench, tighten to the specified torque. Refer to FFD-16, "
COMPONENTS (VQ35DE
MODELS)" , FFD-18, "COMPONENTS (VK45DE MODELS)" .
CAUTION:
Do not reuse drive pinion lock nut.
6. Install front propeller shaft. Refer to PR-5, "
Removal and Instal-
lation" .
Tool number A: ST33400001 (J-26082)
B: KV38102510 ( — )
PDIA0654E
PDIA0650E
PDIA0651E
Page 3162 of 4731

SIDE OIL SEAL FFD-11
C E F
G H
I
J
K L
M A
B
FFD
Revision: 2005 July 2005 FX
SIDE OIL SEALPFP:33142
Removal and InstallationADS0019O
NOTE:
Left side oil seal is attached to engine assembly. Replace it when front final drive assembly is removed
from vehicle.
REMOVAL
Right Side:
1. Remove the front drive shaft. Refer to FAX-13, "Removal and Installation (Right Side)" .
2. Remove the side oil seal using a flat-bladed screwdriver. CAUTION:
Be careful not to damage gear carrier.
Left Side:
1. Remove the front final drive assembly from vehicle. Refer to FFD-12, "Removal and Installation (VQ35DE
Models)" or FFD-14, "Removal and Installation (VK45DE Models)" .
2. Remove the side oil seal using a flat-bladed screwdriver. CAUTION:
Be careful not to damage gear carrier.
INSTALLATION
Right Side:
1. Apply multi-purpose grease to sealing lips of side oil seal.
2. Using the drift, press-fit side oil seal so that its surface comes face to face with the end surface of the side retainer.
CAUTION:
�Do not reuse oil seal.
�When installing, do not incline oil seal.
3. Install the front drive shaft. Refer to FAX-13, "
Removal and
Installation (Right Side)" .
Left Side:
1. Apply multi-purpose grease to sealing lips of side oil seal.
2. Using the drift, press-fit side oil seal so that its surface comes face to face with the end surface of the gear carrier.
CAUTION:
�Do not reuse oil seal.
�When installing, do not incline oil seal.
3. Install the front final drive assembly on vehicle. Refer to FFD-12,
"Removal and Installation (VQ35DE Models)" or FFD-14,
"Removal and Installation (VK45DE Models)" .
4. Install the front drive shaft. Refer to FAX-12, "
Removal and
Installation (Left Side)" .
PDIA0655E
Tool number : ST33400001 (J-26082)
SDIA1646E
Tool number : KV38102100 (J-25803-01)
SDIA1662E
Page 3163 of 4731
ADS0019P
COMPONENTS
REMOVAL
1. Remove three engine mounting b")
FFD-12
FRONT FINAL DRIVE ASSEMBLY
Revision: 2005 July 2005 FX
FRONT FINAL DRIVE ASSEMBLYPFP:38500
Removal and Installation (VQ35DE Models)ADS0019P
COMPONENTS
REMOVAL
1. Remove three engine mounting bracket upper bolts. Refer to EM-117, "Components (AWD Model)" .
2. Remove three way catalyst (right bank). Refer to EM-26, "
EXHAUST MANIFOLD AND THREE WAY CAT-
ALYST" .
3. Remove stabilizer assembly with power tool. Refer to FSU-16, "
STABILIZER BAR" .
4. Remove steering gearbox mounting bolts with power tool. Refer to PS-19, "
POWER STEERING GEAR
AND LINKAGE" .
5. Remove front drive shaft both. Refer to FAX-12, "
FRONT DRIVE SHAFT" .
6. Remove side shaft assembly.
7. Remove front propeller shaft. Refer to PR-4, "
FRONT PROPELLER SHAFT" .
8. Remove front suspension member with power tool. Refer to FSU-17, "
FRONT SUSPENSION MEMBER" .
9. Remove breather hose and tube.
10. Remove mounting bolts and remove front final drive assembly from the vehicle.
INSTALLATION
Note the following, and installation is in the reverse order of removal.
�Refer to FFD-12, "COMPONENTS" about each tightening torque.
�When installing the side shaft, apply multi-purpose grease to contact surface of side shaft and side shaft
oil seal.
1. Front final drive assembly 2. Side shaft 3. Bushing
4. Front propeller shaft 5. Breather hose 6. Breather tube
7. Breather connector 8. Engine mounting bracket 9. Insulator
PDIA0658E
Page 3167 of 4731
FFD-16
FRONT FINAL DRIVE ASSEMBLY
Revision: 2005 July 2005 FX
Disassembly and AssemblyADS0019Y
COMPONENTS (VQ35DE MODELS)
1. Drive pinion lock nut 2. Companion flange 3. Front oil seal
4. Pinion front bearing 5. Drive pinion bearing adjusting washer 6. Drive pinion adjusting washer
7. Gear carrier 8. Pinion rear bearing 9. Pinion height adjusting washer
10. Drive pinion 11. Drive gear 12. Side oil seal (right side)
13. Side retainer 14. O-ring 15. Side bearing adjusting shim
16. Side bearing 17. Differential case 18. Breather connector
19. Dowel pin 20. Filler plug 21. Drain plug
22. Gasket 23. Carrier cover 24. Gear oil defence
25. Side gear thrust washer 26. Side gear 27. Circular clip
28. Pinion mate thrust washer 29. Pinion mate gear 30. Pinion mate shaft
31. Lock pin 32. Side bearing adjusting washer 33. Side oil seal (left side)
PDIA0662E
Page 3181 of 4731

FFD-30
FRONT FINAL DRIVE ASSEMBLY
Revision: 2005 July 2005 FX
3. Press-fit side bearing outer race into gear carrier with tool.
CAUTION:
�At first, using a hammer, tap bearing outer race until it
becomes flat to gear carrier.
�Do not reuse side bearing outer race.
4. Place the differential case assembly into gear carrier.
5. Install side bearing adjusting shim before disassembling or shim which thickness is the same as the one before disassembling.
6. Install side retainer assembly to gear carrier.
CAUTION:
Do not install O-ring.
7. Install side retainer mounting bolts to the specified torque. Refer to FFD-16, "
COMPONENTS (VQ35DE MODELS)" , FFD-18,
"COMPONENTS (VK45DE MODELS)" .
8. Measure the turning torque of the gear carrier at the drive gear mounting bolts with a spring gauge. Tool number A: KV31103000 ( — )
B: ST30611000 (J-25742-1)
PDIA0824E
PDIA0671E
PDIA0678E
PDIA0669E
Tool number : — (J-8129)
Specification:
0.78 - 1.08 N (0.08 - 0.11 kg, 0.57 - 0.80 lb) of pulling
force at the drive gear bolt
SPD194A
Page 3187 of 4731
\" ,")
FFD-36
FRONT FINAL DRIVE ASSEMBLY
Revision: 2005 July 2005 FX
9. Install drive gear on the mounting bolts, and then tighten to the
specified torque. Refer to FFD-16, "
COMPONENTS (VQ35DE
MODELS)" , FFD-18, "COMPONENTS (VK45DE MODELS)" .
CAUTION:
Tighten bolts in a crisscross fashion.
10. Press side bearing inner races to differential case, using the drift and the base.
CAUTION:
Do not reuse side bearing inner race.
11. Press-fit side bearing outer race into side retainer with the drift and the drift bar.
CAUTION:
�At first, using a hammer, tap bearing outer race until it
becomes flat to side retainer.
�Do not reuse side bearing outer race.
12. Press-fit side bearing outer race into gear carrier with the drift and the drift bar.
CAUTION:
�At first, using a hammer, tap bearing outer race until it
becomes flat to gear carrier.
�Do not reuse side bearing outer race.
13. Place the differential case assembly into gear carrier.
14. Measure side bearing preload. If necessary, select the appropri- ate side bearing adjusting shim. Refer to FFD-29, "
Side Bearing
Preload" .
SDIA0247J
Tool number A: ST33230000 (J-25805-01)
B: ST33061000 (J-8107-2)
SDIA1678E
Tool number A: KV31103000 (J-38982)B: ST30611000 (J-25742-1)
PDIA0679E
Tool number A: KV31103000 (J-38982)B: ST30611000 (J-25742-1)
PDIA0824E
PDIA0671E
Page 3188 of 4731

FRONT FINAL DRIVE ASSEMBLY FFD-37
C E F
G H
I
J
K L
M A
B
FFD
Revision: 2005 July 2005 FX
15. Install selected side bearing adjusting shim.
16. Apply multi-purpose grease to O-ring, and install it to side retainer.
CAUTION:
Do not reuse O-ring.
17. Install side retainer assembly to gear carrier.
18. Install side retainer mounting bolts to the specified torque. Refer to FFD-16, "
COMPONENTS (VQ35DE MODELS)" , FFD-18,
"COMPONENTS (VK45DE MODELS)" .
19. Using the drift, press-fit side oil seal so that its surface comes face to face with the end surface of the side retainer.
CAUTION:
�Do not reuse oil seal.
�When installing, do not incline oil seal.
�Apply multi-purpose grease onto oil seal lips, and gear
oil onto the circumference of oil seal.
20. Using the drift, press-fit side oil seal so that its surface comes face to face with the end surface of gear carrier.
CAUTION:
�Do not reuse oil seal.
�When installing, do not incline oil seal.
�Apply multi-purpose grease onto oil seal lips, and gear
oil onto the circumference of oil seal.
21. Apply multi-purpose grease to O-ring, and install it to gear car- rier.
CAUTION:
Do not reuse O-ring.
22. Check and adjust drive gear runout, tooth contact, drive gear to drive pinion backlash, and total preload torque. Refer to FFD-20, "
Drive Gear Runout" , FFD-21, "Tooth Contact" , FFD-23, "Backlash" , FFD-20,
"Total Preload Torque" .
Recheck above items. Readjust the above description, if necessary.
PDIA0685E
PDIA0669E
Tool number : ST33400001 (J-26082)
SDIA1646E
Tool number : KV38102100 (J-25803-01)
SDIA1662E
Page 3189 of 4731

FFD-38
FRONT FINAL DRIVE ASSEMBLY
Revision: 2005 July 2005 FX
23. Apply sealant to mating surface of carrier cover.
�Use Genuine Silicone RTV or equivalent. Refer to GI-48,
"Recommended Chemical Products and Sealants" .
CAUTION:
Remove old sealant adhering to mounting surfaces. Also
remove any moisture, oil, or foreign material adhering to
application and mounting surfaces.
24. Install carrier cover on gear carrier and tighten mounting bolts with the specified torque. Refer to FFD-16, "
COMPONENTS
(VQ35DE MODELS)" , FFD-18, "COMPONENTS (VK45DE
MODELS)" .
Side Shaft Assembly
1. Using the drift, install side shaft oil seal.
CAUTION:
�Do not reuse oil seal.
�When installing, do not incline oil seal.
�Apply multi-purpose grease onto oil seal lips, and gear
oil onto the circumference of oil seal.
2. Install dust sealed.
3. Support side shaft bearing with the drift, then press side shaft into the side shaft bearing using a press.
4. Apply multi-purpose grease to O-ring, and install it to extension tube retainer.
CAUTION:
Do not reuse O-ring.
PDIA0742E
SDIA1648E
Tool number :KV38100200 ( — )
PDIA0665E
Tool number : ST30032000 (J-26010-01)
SDIA1631E

1. Drive pinion lock nut 2. Companion flange 3. Front oil seal
4. Pinion fro")