Page 159 of 247
3
WHAT TO DO IN AN EMERGENCY
7
D060C01A-AAT2. Block the Wheel
Block the wheel that is diagonally oppo-
site from the flat to keep the vehicle
from rolling when the car is raised on the
jack.
D060B01E-AAT1. Obtain Spare Tire and Tool
Remove the spare tire and take out the
jack and tool bag from the trunk.
NOTE:
The jack is located beneath the lug-
gage mat in the vehicle trunk.
I100A03LHXG549J
Flat tire
D060D01A-AAT3. Loosen Wheel Nuts
The wheel nuts should be loosened
slightly before raising the car. To loosen
the nuts, turn the wrench handle coun-
terclockwise. When doing this, be sure
that the socket is seated completely
over the nut so it cannot slip off. For
maximum leverage, position the wrench
so the handle is to the right as shown in
the drawing. Then, while holding the
wrench near the end of the handle, pull
up on it with steady pressure. Do not
remove the nuts at this time. Just
loosen them about one-half turn.
HXGS413
xgflhma-3.p656/16/04, 3:00 PM 7
Page 160 of 247

38WHAT TO DO IN AN EMERGENCY
!
WARNING:
Do not get under the car when it is
supported by the jack! This is very
dangerous as the vehicle could fall
and cause serious injury or death.
No one should stay in the car while
the jack is being used.
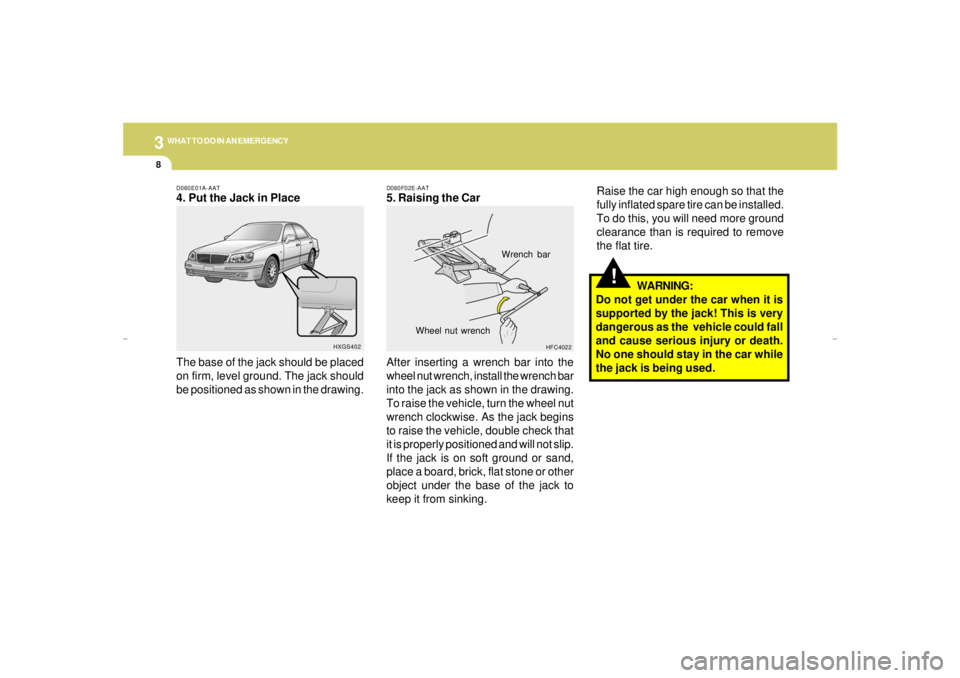
D060E01A-AAT4. Put the Jack in Place
The base of the jack should be placed
on firm, level ground. The jack should
be positioned as shown in the drawing.
HXGS402
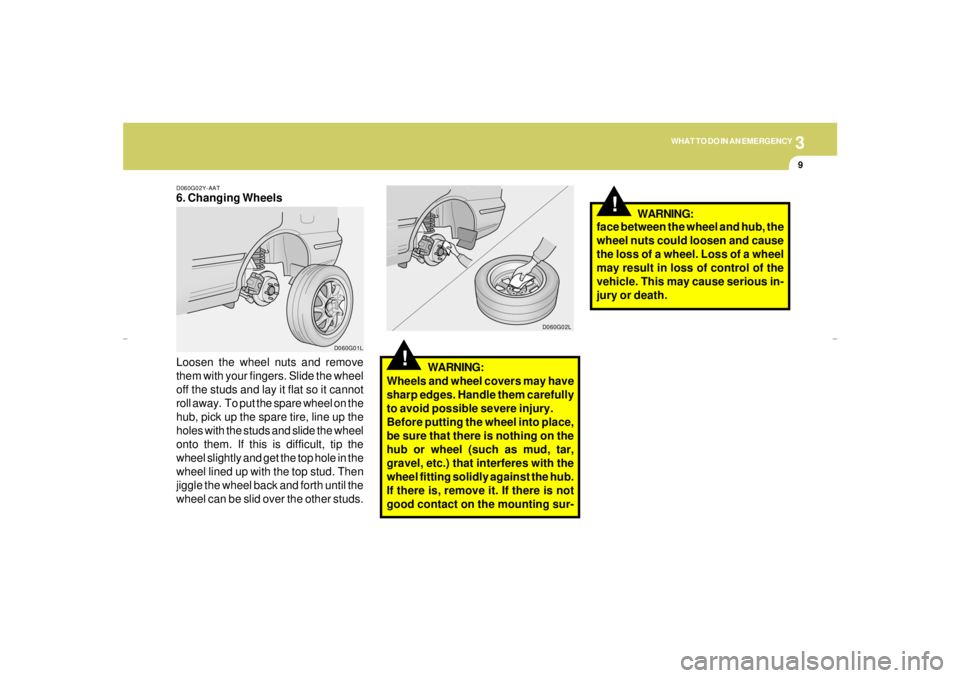
D060F02E-AAT5. Raising the Car
After inserting a wrench bar into the
wheel nut wrench, install the wrench bar
into the jack as shown in the drawing.
To raise the vehicle, turn the wheel nut
wrench clockwise. As the jack begins
to raise the vehicle, double check that
it is properly positioned and will not slip.
If the jack is on soft ground or sand,
place a board, brick, flat stone or other
object under the base of the jack to
keep it from sinking.
HFC4022
Wrench bar
Wheel nut wrench
Raise the car high enough so that the
fully inflated spare tire can be installed.
To do this, you will need more ground
clearance than is required to remove
the flat tire.
xgflhma-3.p656/16/04, 3:00 PM 8
Page 161 of 247

3
WHAT TO DO IN AN EMERGENCY
9
!
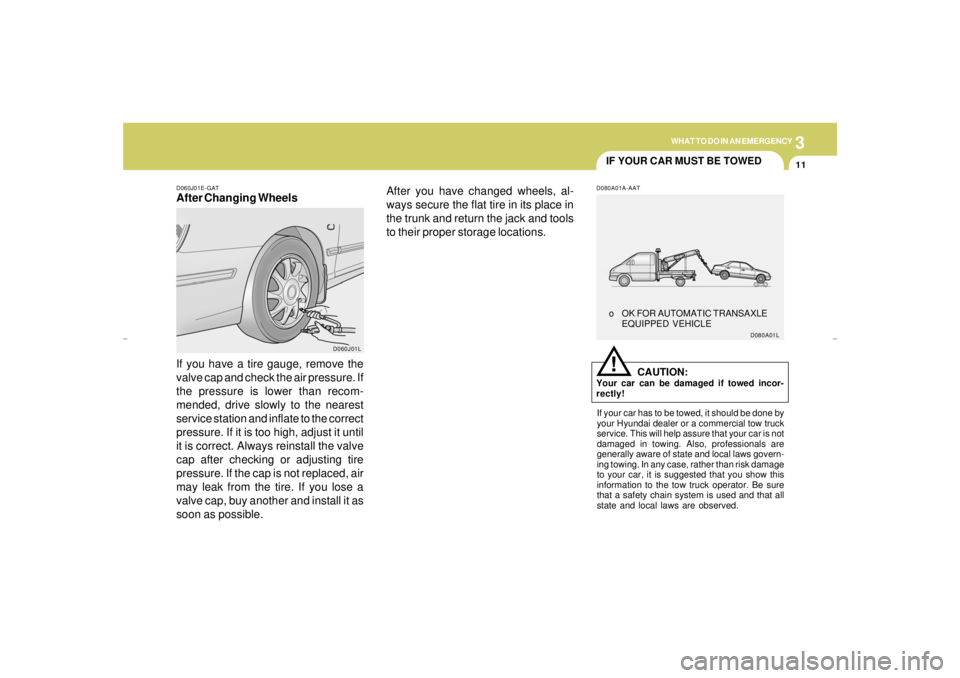
D060G02Y-AAT6. Changing Wheels
Loosen the wheel nuts and remove
them with your fingers. Slide the wheel
off the studs and lay it flat so it cannot
roll away. To put the spare wheel on the
hub, pick up the spare tire, line up the
holes with the studs and slide the wheel
onto them. If this is difficult, tip the
wheel slightly and get the top hole in the
wheel lined up with the top stud. Then
jiggle the wheel back and forth until the
wheel can be slid over the other studs.WARNING:
Wheels and wheel covers may have
sharp edges. Handle them carefully
to avoid possible severe injury.
Before putting the wheel into place,
be sure that there is nothing on the
hub or wheel (such as mud, tar,
gravel, etc.) that interferes with the
wheel fitting solidly against the hub.
If there is, remove it. If there is not
good contact on the mounting sur-
!
D060G01LD060G02L
face between the wheel and hub, the
wheel nuts could loosen and cause
the loss of a wheel. Loss of a wheel
may result in loss of control of the
vehicle. This may cause serious in-
jury or death.WARNING:
xgflhma-3.p656/16/04, 3:00 PM 9
Page 163 of 247

3
WHAT TO DO IN AN EMERGENCY
11
IF YOUR CAR MUST BE TOWED
D060J01E-GATAfter Changing Wheels
If you have a tire gauge, remove the
valve cap and check the air pressure. If
the pressure is lower than recom-
mended, drive slowly to the nearest
service station and inflate to the correct
pressure. If it is too high, adjust it until
it is correct. Always reinstall the valve
cap after checking or adjusting tire
pressure. If the cap is not replaced, air
may leak from the tire. If you lose a
valve cap, buy another and install it as
soon as possible.
D060J01L
D080A01A-AAT
CAUTION:
Your car can be damaged if towed incor-
rectly!
If your car has to be towed, it should be done by
your Hyundai dealer or a commercial tow truck
service. This will help assure that your car is not
damaged in towing. Also, professionals are
generally aware of state and local laws govern-
ing towing. In any case, rather than risk damage
to your car, it is suggested that you show this
information to the tow truck operator. Be sure
that a safety chain system is used and that all
state and local laws are observed.
!o OK FOR AUTOMATIC TRANSAXLE
EQUIPPED VEHICLE
D080A01L
After you have changed wheels, al-
ways secure the flat tire in its place in
the trunk and return the jack and tools
to their proper storage locations.
xgflhma-3.p656/16/04, 3:00 PM 11
Page 201 of 247

6
DO-IT-YOURSELF MAINTENANCE
21
HEADLIGHT AIMING ADJUSTMENT
!
!
G290A03L-AATHID Type (If Installed)Before performing aiming adjustment, make
sure of the following.
G290A02L-A
Vertical
aiming1. Keep all tires inflated to the correct pressure.
2. Place the vehicle on level ground and press
the front bumper & rear bumper down sev-
eral times. Place vehicle at a distance of 118
in. (3m) from the test wall.
3. See that the vehicle is unloaded (except for
full levels of coolant, engine oil and fuel, and
spare tire, jack, and tools). Have the driver
or equivalent weight placed in driver's seat.
4. Clean the head light lenses and turn on the
headlights (Low beam).
5. Open the hood.
6. Draw the vertical line (through the center of
each headlight) and the horizontal line
(through the center of each headlight) on the
aiming screen.
And then, draw a parallel line at 0.8in.(21mm.)
under the horizontal line.
7. Adjust each cut-off line of the low beam to the
parallel line with a phillips screwdriver -
VERTICAL AIMING
WARNING:
If you need headlight aiming adjustment,
have your vehicle inspected by your Hyundai
Dealer.
Don't attempt to replace or inspect the HID
headlight bulb to prevent danger of an
electric shock.General Type
WARNING:
Horizontal aiming should be adjusted by an
authorized Hyundai Dealer.
G290B02L-AATAdjustment After Headlight Assembly
ReplacementIf the vehicle has had front body repair and the
headlight assembly has been replaced, the
headlight aiming should be checked using an
aiming screen as shown in the illustration. Turn
on the headlight switch. (Low Beam Position)
1. Adjust headlights so that main axis of light is
parallel to center line of the body and is
aligned with point "P" shown in the illustration.
2. Dotted lines in the illustration show center of
headlights.
G290B01L-A
LW
H
HCut-off line
Ground
line
"P" Horizontal lineVertical line
0.83 in. (21 mm)
xgflhma-6.p656/16/04, 2:59 PM 21
Page 221 of 247

Vehicle Identification Number (VIN) .............................. 8-2
Engine Number ............................................................. 8-3
Recommended Inflation Pressures ............................... 8-4
Snow Tires..................................................................8-10
Tire Chains ..................................................................8-10
Tire Rotation................................................................8-10
Tire Balancing.............................................................8-11
Tire Traction................................................................8-11
When to Replace Tires ...............................................8-11
Spare Tire and Tools ...................................................8-12
Warranties for Your Hyundai Vehicle..........................8-12
Consumer Information.................................................8-13
Reporting Safety Defects............................................8-16
CONSUMER INFORMATION &
REPORTING SAFETY DEFECTS
8
8
xgflhma-8.p656/16/04, 2:57 PM 1
Page 224 of 247

8
CONSUMER INFORMATION & REPORTING SAFETY DEFECTS4
!
RECOMMENDED INFLATION
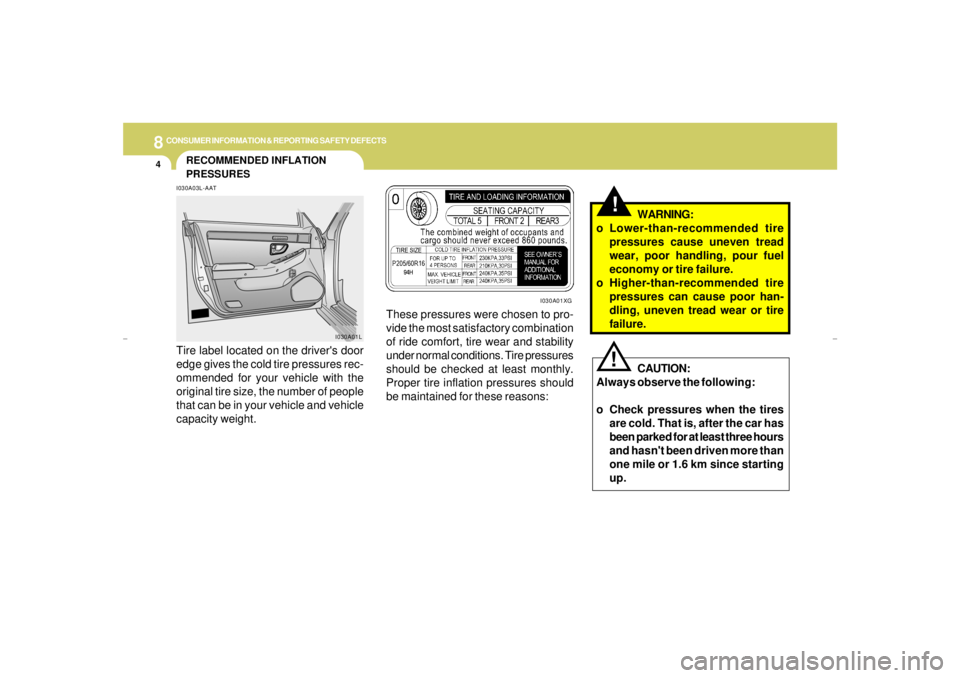
PRESSURESI030A03L-AATTire label located on the driver's door
edge gives the cold tire pressures rec-
ommended for your vehicle with the
original tire size, the number of people
that can be in your vehicle and vehicle
capacity weight.
I030A01L
These pressures were chosen to pro-
vide the most satisfactory combination
of ride comfort, tire wear and stability
under normal conditions. Tire pressures
should be checked at least monthly.
Proper tire inflation pressures should
be maintained for these reasons:
!
CAUTION:
Always observe the following:
o Check pressures when the tires
are cold. That is, after the car has
been parked for at least three hours
and hasn't been driven more than
one mile or 1.6 km since starting
up.WARNING:
o Lower-than-recommended tire
pressures cause uneven tread
wear, poor handling, pour fuel
economy or tire failure.
o Higher-than-recommended tire
pressures can cause poor han-
dling, uneven tread wear or tire
failure.
I030A01XG
xgflhma-8.p656/16/04, 2:57 PM 4
Page 225 of 247

8
CONSUMER INFORMATION & REPORTING SAFETY DEFECTS
5
I035A01JM-AATCHECKING TIRE INFLATION PRES-
SURE
Check your tires once a month or more.
Also, check the tire pressure of the
spare tire.
How to Check
Use a good quality gage to check tire
pressure. You can not tell if your tires
are properly inflated simply by looking
at them. Radial tires may look properly
inflated even when they're underinflated.
Check the tire's inflation pressure when
the tires are cold. - "Cold" means your
vehicle has been sitting for at least
three hours or driven no more than 1
mile (1.6 km).
Remove the valve cap from the tire
valve stem. Press the tire gage firmly
onto the valve to get a pressure mea-
surement. If the cold tire inflation pres-
sure matches the recommended pres-
sure on the tire and loading information o Check the pressure of your spare
tire each time you check the pres-
sure of other tires.
o Never overload your car. Be espe-
cially careful about overloading if
you equip your car with a luggage
rack or car top carrier.
o Worn, old tires can cause acci-
dents. If your tread is badly worn,
or if your tires have been dam-
aged, replace them.
label, no further adjustment is neces-
sary. If the pressure is low, add air until
you reach the recommended amount.
If you overfill the tire, release air by
pushing on the metal stem in the center
of the tire valve. Recheck the tire pres-
sure with the tire gage. Be sure to put
the valve caps back on the valve stems.
They help prevent leaks by keeping out
dirt and moisture.
xgflhma-8.p656/16/04, 2:57 PM 5