2005 HYUNDAI XG350 check engine light
[x] Cancel search: check engine lightPage 148 of 247

2
DRIVING YOUR HYUNDAI
18
9. If the trailer has electric brakes, start your
vehicle and trailer moving, and then apply the
trailer brake controller by hand to be sure the
brakes are working. This lets you check
your electrical connection at the same time.
10.During your trip, check occasionally to be
sure that the load is secure, and that the
lights and any trailer brakes are still working.
11.Avoid jerky starts, sudden acceleration or
sudden stops.
12.Avoid sharp turns and rapid lane changes.
13.Avoid holding the brake pedal down too long
or too frequently. This could cause the brakes
to overheat, resulting in reduced braking
efficiency.
14.When going down a hill, shift into a lower gear
and use the engine braking effect.
When ascending a long grade, downshift the
transaxle to a lower gear and reduce speed
to reduce chances of engine overloading
and/or overheating.
15.If you have to stop while going uphill, do not
hold the vehicle in place by pressing on the
accelerator. This can cause the automatic
transaxle to overheat. Use the parking brake
or footbrake.
NOTE:When towing check transaxle fluid more
frequently.
CAUTION:
If overheating should occur when towing,
(the temperature gauge reads near red zone),
taking the following action may reduce or
eliminate the problem.
1. Turn off the air conditioner.
2. Reduce highway speed.
3. Select a lower gear when going uphill.
4. While in stop and go traffic, place the
gear selector in park or neutral and idle
the engine at a higher speed.
!
C190F01L-AATTrailer or Vehicle Towing Tips1. Before towing, check hitch and safety chain
connections as well as proper operation of
the trailer running lights, brake lights, and
turn signals.
2. Always drive your vehicle at a moderate
speed (Less than 60 mph)
3. Trailer towing requires more fuel than normal
conditions.
4. To maintain engine braking efficiency, do not
tow a trailer with the transaxle engaged in an
overdrive gear.
5. Always secure items in the trailer to prevent
load shift while driving.
6. Check the condition and air pressure of all
tires on the trailer and your car. Low tire
pressure can seriously affect the handling.
Also check the spare tire.
7. The vehicle/trailer combination is more af-
fected by crosswind and buffeting.
When being passed by a large vehicle, keep
a constant speed and steer straight ahead.
If there is too much wind buffeting, slow down
to get out of the other vehicle's air turbulence.
8. When parking your car and trailer, especially
on a hill, be sure to follow all the normal
precautions. Turn your front wheel into the
curb, set the parking brake firmly, and put the
transaxle in Park. In addition, place wheel
chocks at each of the trailer's tires.
xgflhma-2.p656/16/04, 3:00 PM 18
Page 154 of 247

32WHAT TO DO IN AN EMERGENCY
IF THE ENGINE WILL NOT START!
D010A01A-AAT D010B01L-AAT
If Engine Doesn't Turn Over or Turns
Over Slowly
D010C02A-AATIf Engine Turns Over Normally but Does
Not Start1. Check fuel level.
2. With the key in the "OFF" position, check all
connectors at ignition coil and spark plugs.
Reconnect any that may be disconnected or
loose.
3. Check the fuel line in the engine compart-
ment.
4. If the engine still does not start, call a Hyundai
dealer or seek other qualified assistance.D010D01A-AATIf Engine Stalls While Driving1. Reduce your speed gradually, keeping a
straight line. Move cautiously off the road to
a safe place.
2. Turn on your emergency flashers.
3. Try to start the engine again. If your vehicle
will not start, contact a Hyundai dealer or
seek other qualified assistance.
WARNING:
If the engine will not start, do not push or
pull the car to start it. This could result in a
collision or cause other damage. In addi-
tion, push or pull starting may cause the
catalytic converter to be overloaded and
create a fire hazard.
1. Be sure the gear selector lever is in "N" or "P"
and the emergency brake is set.
2. Check the battery connections to be sure
they are clean and tight.
3. Turn on the interior light. If the light dims or
goes out when you operate the starter, the
battery is discharged.
4. Check the starter connections to be sure
they are securely tightened.
5. Do not push or pull the vehicle to start it. See
instructions for "Jump Starting" on the fol-
lowing pages.
D010B01L
xgflhma-3.p656/16/04, 3:00 PM 2
Page 155 of 247

3
WHAT TO DO IN AN EMERGENCY
3
JUMP STARTINGD020A03A-AAT
WARNING:
The gas produced by the battery during the
jump-start operation is highly explosive. If
these instructions are not followed exactly,
serious personal injury and damage to the
vehicle may occur! If you are not sure how
to follow this procedure, seek qualified
assistance. Automobile batteries contain
sulfuric acid. This is poisonous and highly
corrosive. When jump starting, wear pro-
tective glasses and be careful not to get
acid on yourself, your clothing or on the car.
!
D020A01L-1
Booster batteryDischarged
battery
o If you should accidentally get acid on your
skin or in your eyes, immediately remove
any contaminated clothing and flush the area
with clear water for at least 15 minutes. Then
promptly obtain medical attention. If you
must be transported to an emergency facil-
ity, continue to apply water to the affected
area with a sponge or cloth.
o The gas produced by the battery during the
jump-start operation is highly explosive. Do
not smoke or allow a spark or an open flame
in the vicinity.
o The battery being used to provide the jump
start must be 12-volt. If you cannot deter-
mine that it is a 12-volt battery, do not attempt
to use it for the jump start.
o To jump start a car with a discharged battery,
follow this procedure exactly:
1. If the booster battery is installed in another
vehicle, be sure the two vehicles are not
touching.
2. Turn off all unnecessary lights and acces-
sories in both vehicles.
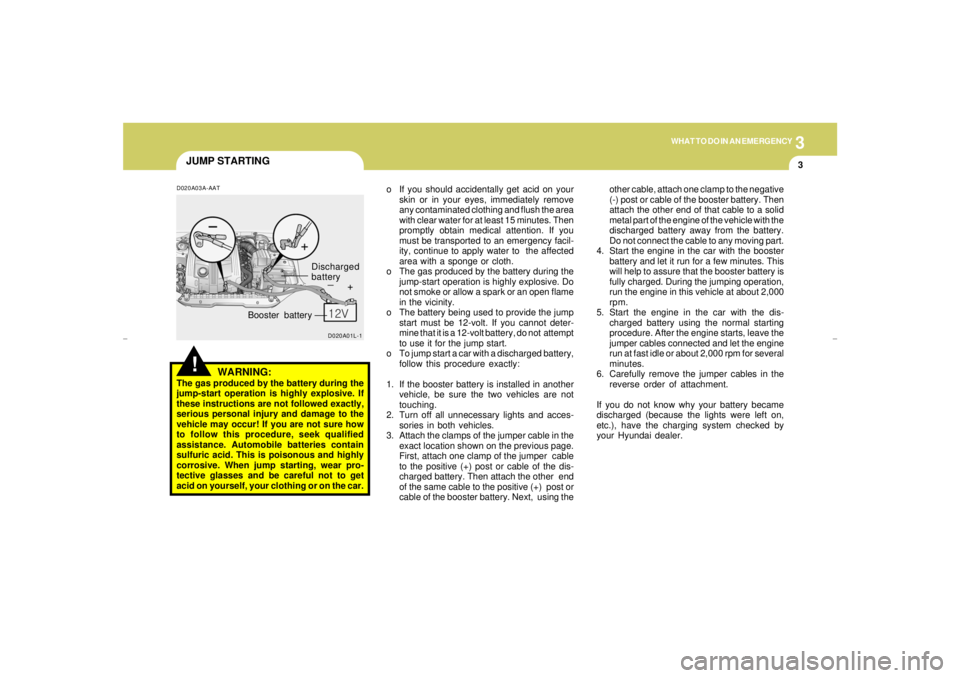
3. Attach the clamps of the jumper cable in the
exact location shown on the previous page.
First, attach one clamp of the jumper cable
to the positive (+) post or cable of the dis-
charged battery. Then attach the other end
of the same cable to the positive (+) post or
cable of the booster battery. Next, using theother cable, attach one clamp to the negative
(-) post or cable of the booster battery. Then
attach the other end of that cable to a solid
metal part of the engine of the vehicle with the
discharged battery away from the battery.
Do not connect the cable to any moving part.
4. Start the engine in the car with the booster
battery and let it run for a few minutes. This
will help to assure that the booster battery is
fully charged. During the jumping operation,
run the engine in this vehicle at about 2,000
rpm.
5. Start the engine in the car with the dis-
charged battery using the normal starting
procedure. After the engine starts, leave the
jumper cables connected and let the engine
run at fast idle or about 2,000 rpm for several
minutes.
6. Carefully remove the jumper cables in the
reverse order of attachment.
If you do not know why your battery became
discharged (because the lights were left on,
etc.), have the charging system checked by
your Hyundai dealer.
xgflhma-3.p656/16/04, 3:00 PM 3
Page 181 of 247

Engine Compartment .................................................... 6-2
General Checks ............................................................ 6-3
Checking the Engine Oil ............................................... 6-4
Changing the Oil and Filter ............................................ 6-5
Checking and Changing the Engine Coolant ................ 6-6
Spark Plugs .................................................................. 6-8
Changing the Air Cleaner Filter ..................................... 6-9
Checking the Transaxle Fluid .....................................6-11
Checking the Brakes ..................................................6-12
Air Conditioning Care..................................................6-14
Changing the Conoitioner Air Filter
(For Evaporator and Blower Unit) .............................6-15
Checking Drive Belts ..................................................6-17
Checking and Replacing Fuses..................................6-17
Power Steering Fluid Level .........................................6-20
Headlight Aiming Adjustment......................................6-21
Replacement of Light Bulbs ........................................6-22
Bulb Wattage ...............................................................6-31
Junction Box Description............................................6-32
Do-It-Yourself Maintenance
6
6
xgflhma-6.p656/16/04, 2:58 PM 1
Page 183 of 247

6
DO-IT-YOURSELF MAINTENANCE
3
GENERAL CHECKS
G020C01L-AATVehicle InteriorThe following should be checked each time
when the vehicle is driven:
o Lights operation
o Windshield wiper operation
o Horn operation
o Defroster, heating system operation (and air
conditioning, if installed)
o Steering operation and condition
o Mirror condition and operation
o Turn signal operation
o Accelerator pedal operation
o Brake operation, including parking brake
o Automatic transaxle operation, including
"Park" mechanism operation
o Seat control condition and operation
o Seat belt condition and operation
o Sunvisor operation
If you notice anything that does not operate
correctly or appears to be functioning incor-
rectly, inspect it carefully and seek assistance
from your Hyundai dealer if service is needed.
G020B01A-AATVehicle ExteriorThe following should be checked monthly:
o Overall appearance and condition
o Wheel condition and wheel nut torque
o Exhaust system condition
o Light condition and operation
o Windshield glass condition
o Wiper blade condition
o Paint condition and body corrosion
o Fluid leaks
o Door and hood lock condition
o Tire pressure and condition (including spare
tire)
G020A01L-AATEngine CompartmentThe following should be checked regularly:
o Engine oil level and condition
o Transaxle fluid level and condition
o Brake fluid level
o Coolant level
o Windshield washer fluid level
o Accessory drive belt condition
o Engine coolant hose condition
o Fluid leaks (on or below components)
o Power steering fluid level
o Battery condition
o Air filter condition
xgflhma-6.p656/16/04, 2:58 PM 3
Page 196 of 247

6
DO-IT-YOURSELF MAINTENANCE
16
CHECKING THE FREEPLAY
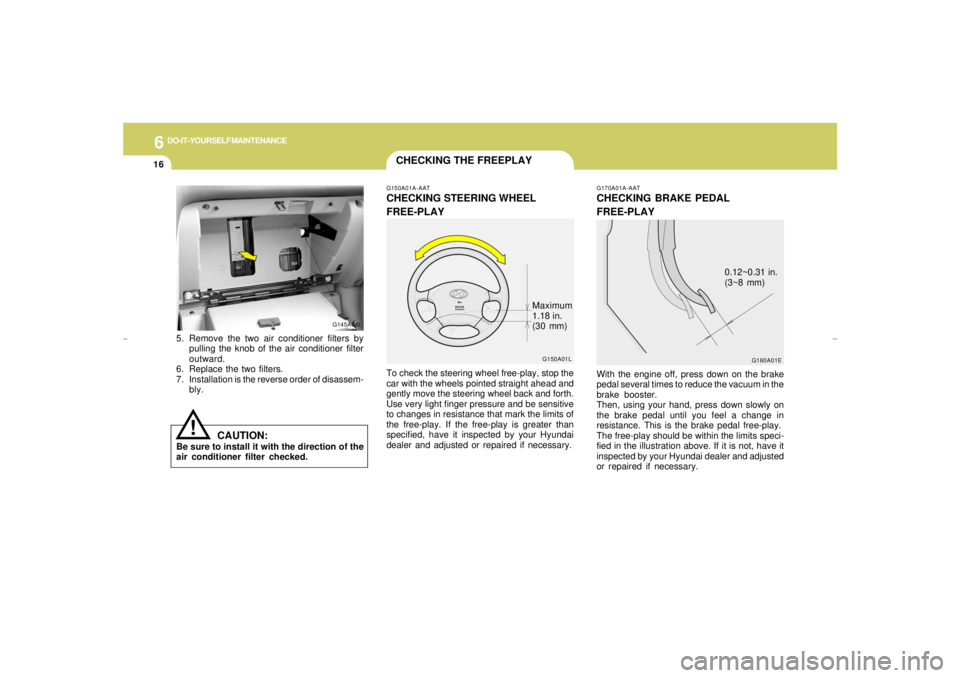
G170A01A-AATCHECKING BRAKE PEDAL
FREE-PLAYWith the engine off, press down on the brake
pedal several times to reduce the vacuum in the
brake booster.
Then, using your hand, press down slowly on
the brake pedal until you feel a change in
resistance. This is the brake pedal free-play.
The free-play should be within the limits speci-
fied in the illustration above. If it is not, have it
inspected by your Hyundai dealer and adjusted
or repaired if necessary.
G160A01E
0.12~0.31 in.
(3~8 mm)
G150A01A-AATCHECKING STEERING WHEEL
FREE-PLAYTo check the steering wheel free-play, stop the
car with the wheels pointed straight ahead and
gently move the steering wheel back and forth.
Use very light finger pressure and be sensitive
to changes in resistance that mark the limits of
the free-play. If the free-play is greater than
specified, have it inspected by your Hyundai
dealer and adjusted or repaired if necessary.
G150A01LMaximum
1.18 in.
(30 mm)
G145A04L
!
5. Remove the two air conditioner filters by
pulling the knob of the air conditioner filter
outward.
6. Replace the two filters.
7. Installation is the reverse order of disassem-
bly.
CAUTION:
Be sure to install it with the direction of the
air conditioner filter checked.
xgflhma-6.p656/16/04, 2:58 PM 16
Page 201 of 247

6
DO-IT-YOURSELF MAINTENANCE
21
HEADLIGHT AIMING ADJUSTMENT
!
!
G290A03L-AATHID Type (If Installed)Before performing aiming adjustment, make
sure of the following.
G290A02L-A
Vertical
aiming1. Keep all tires inflated to the correct pressure.
2. Place the vehicle on level ground and press
the front bumper & rear bumper down sev-
eral times. Place vehicle at a distance of 118
in. (3m) from the test wall.
3. See that the vehicle is unloaded (except for
full levels of coolant, engine oil and fuel, and
spare tire, jack, and tools). Have the driver
or equivalent weight placed in driver's seat.
4. Clean the head light lenses and turn on the
headlights (Low beam).
5. Open the hood.
6. Draw the vertical line (through the center of
each headlight) and the horizontal line
(through the center of each headlight) on the
aiming screen.
And then, draw a parallel line at 0.8in.(21mm.)
under the horizontal line.
7. Adjust each cut-off line of the low beam to the
parallel line with a phillips screwdriver -
VERTICAL AIMING
WARNING:
If you need headlight aiming adjustment,
have your vehicle inspected by your Hyundai
Dealer.
Don't attempt to replace or inspect the HID
headlight bulb to prevent danger of an
electric shock.General Type
WARNING:
Horizontal aiming should be adjusted by an
authorized Hyundai Dealer.
G290B02L-AATAdjustment After Headlight Assembly
ReplacementIf the vehicle has had front body repair and the
headlight assembly has been replaced, the
headlight aiming should be checked using an
aiming screen as shown in the illustration. Turn
on the headlight switch. (Low Beam Position)
1. Adjust headlights so that main axis of light is
parallel to center line of the body and is
aligned with point "P" shown in the illustration.
2. Dotted lines in the illustration show center of
headlights.
G290B01L-A
LW
H
HCut-off line
Ground
line
"P" Horizontal lineVertical line
0.83 in. (21 mm)
xgflhma-6.p656/16/04, 2:59 PM 21
Page 243 of 247

10
INDEX
3
D
Defrosting / Defogging......................................................................1-83
Door
Door locks ...................................................................................... 1-4
Door courtesy light .......................................................................1-74
Locking and unlocking front doors with a key............................... 1-5
Drink Holder......................................................................................1-54
Drive Belts............................................................................... 6-14, 6-17
Driving
Smooth cornering .........................................................................2-12
Winter driving...............................................................................2-13
E
Emission Control System.......................................................... 7-1 ~ 7-4
Engine
Before starting the engine .............................................................. 2-3
Compartment................................................................................. 6-2
Coolant.................................................................................. 6-6 ~ 6-7
Coolant temperature gauge .........................................................1-44
If the engine overheats................................................................. 3-4
Number.......................................................................................... 8-3
Oil .................................................................................................. 6-4
Starting........................................................................................... 2-4
Engine Exhaust Can Be Dangerous................................................... 2-2F
Fan Speed Control ............................................................................1-79
Fog Light
Front.............................................................................................1-45
Front Seats
Adjustable front seats..................................................................1-10
Adjustable headrests ...................................................................1-11
Adjusting seat forward and rearward ..................................1-10, 1-13
Adjusting seatback angle.................................................... 1-11, 1-14
Lumbar support control ................................................................1-12
Seat cushion height adjustment.......................................... 1-12, 1-13
Seat warmer ................................................................................1-16
Fuel
Capacity......................................................................................... 9-2
Gauge..........................................................................................1-43
Recommendations......................................................................... 1-2
Fuel Filler Lid
Remote release .................................................................1-68 ~ 1-69
Manual.........................................................................................1-69
Fuses ..................................................................................... 6-17 ~ 6-18
G
General Checks.................................................................................. 6-3
Glove Box.........................................................................................1-60
xgflhma-10.p656/16/04, 3:01 PM 3