2005 HYUNDAI TUCSON oil dipstick
[x] Cancel search: oil dipstickPage 205 of 273
5
VEHICLE MAINTENANCE REQUIREMENTS8
F070D01A-AATo Manual Transaxle OilInspect the manual transaxle oil according to
the maintenance schedule.NOTE:If the oil level is low, check for possible leaks
before adding oil. Do not overfill.F070F01A-AATo Brake Hoses and LinesVisually check for proper installation, chafing,
cracks, deterioration and any leakage. Replace
any deteriorated or damaged parts immedi-
ately.F070E04A-AATo Automatic Transaxle Fluid and FilterThe fluid level should be in the "HOT" range of
the dipstick, after the engine and transaxle are
at normal operating temperature. Check the
automatic transaxle fluid level with the engine
running and the transaxle in neutral, with the
parking brake properly applied. Use HYUNDAI
GENUINE ATF SP III, DIAMOND ATF SP III, SK
ATF SP III or other brands approved by Hyundai
Motor Co., when adding or changing fluid. Using
the wrong ATF may result in damage to the
ATM.
F070C01A-AATo CoolantThe coolant should be changed at the intervals
specified in the maintenance schedule.F060E01A-AATo Timing BeltInspect all parts related to the timing belt for
damage and deformation. Replace any dam-
aged parts immediately.F060J01A-AATo Spark PlugsMake sure to install new spark plugs of the
correct heat range.F060H01A-AATo Air Cleaner FilterA Genuine Hyundai air cleaner filter is recom-
mended when the filter is replaced.
F060G01A-AATo Vapor Hose and Fuel Filler CapThe vapor hose and fuel filler cap should be
inspected at those intervals specified in the
maintenance schedule. Make sure that a new
vapor hose or fuel filler cap is correctly re-
placed.F065F01O-AATo Crankcase Ventilation HoseInspect the surface of hose for evidence of heat
and/or mechanical damage. Hard and brittle
rubber, cracking, tears, cuts, abrasions, and
excessive swelling indicate deterioration. Par-
ticular attention should be paid to examine that
hose surface nearest to high heat sources,
such as the exhaust manifold.
Inspect the hose routing to assure that the hose
does not come in contact with any heat source,
sharp edges or moving component which might
cause heat damage or mechanical wear. In-
spect all hose connections, such as clamps and
couplings, to make sure they are secure, and
that no leaks are present. Hose should be
replaced immediately if there is any evidence of
deterioration or damage.
Page 208 of 273
6
DO-IT-YOURSELF MAINTENANCE
2
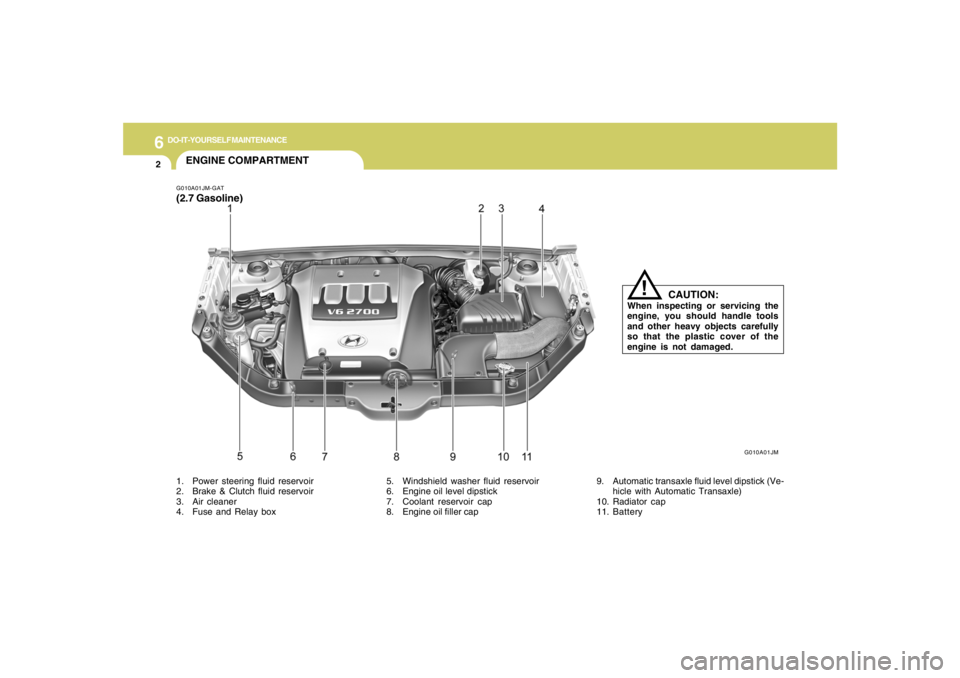
ENGINE COMPARTMENTG010A01JM-GAT(2.7 Gasoline)1. Power steering fluid reservoir
2. Brake & Clutch fluid reservoir
3. Air cleaner
4. Fuse and Relay box5. Windshield washer fluid reservoir
6. Engine oil level dipstick
7. Coolant reservoir cap
8. Engine oil filler cap9. Automatic transaxle fluid level dipstick (Ve-
hicle with Automatic Transaxle)
10. Radiator cap
11. Battery
G010A01JM
CAUTION:
When inspecting or servicing the
engine, you should handle tools
and other heavy objects carefully
so that the plastic cover of the
engine is not damaged.
!
Page 209 of 273
6
DO-IT-YOURSELF MAINTENANCE
3
G010B01JM-AAT(2.0 Gasoline)
G010B01JM
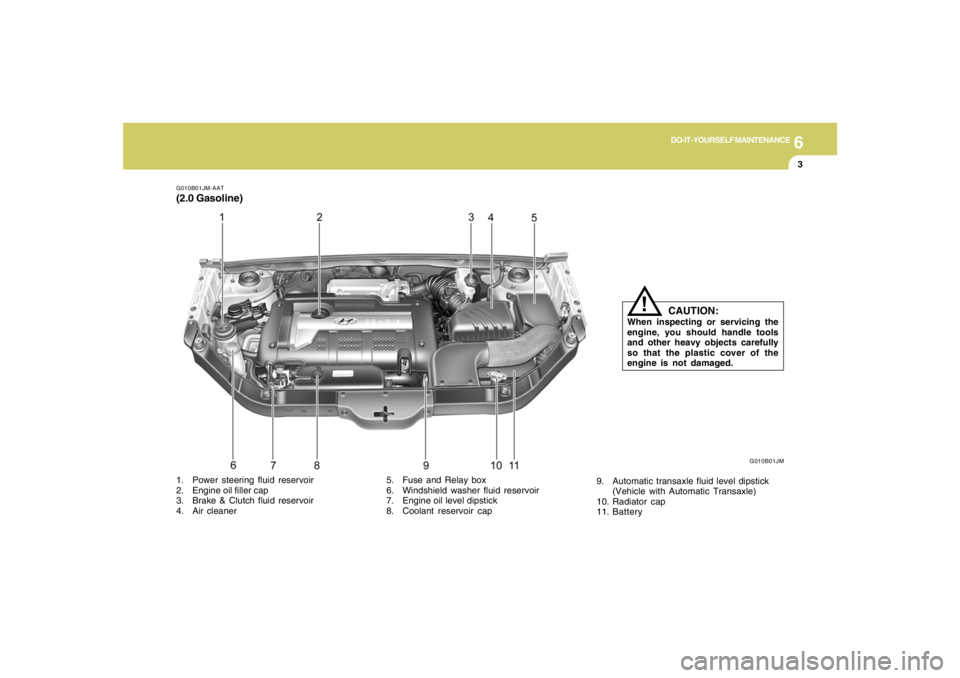
1. Power steering fluid reservoir
2. Engine oil filler cap
3. Brake & Clutch fluid reservoir
4. Air cleaner5. Fuse and Relay box
6. Windshield washer fluid reservoir
7. Engine oil level dipstick
8. Coolant reservoir cap9. Automatic transaxle fluid level dipstick
(Vehicle with Automatic Transaxle)
10. Radiator cap
11. Battery
CAUTION:
When inspecting or servicing the
engine, you should handle tools
and other heavy objects carefully
so that the plastic cover of the
engine is not damaged.
!
Page 211 of 273
6
DO-IT-YOURSELF MAINTENANCE
5
CHECKING THE ENGINE OILG030A01A-AATEngine oil is essential to the performance and
service of the engine. It is suggested that you
check the oil level at least once a week in normal
use and more often if you are on a trip or driving
in severe conditions.
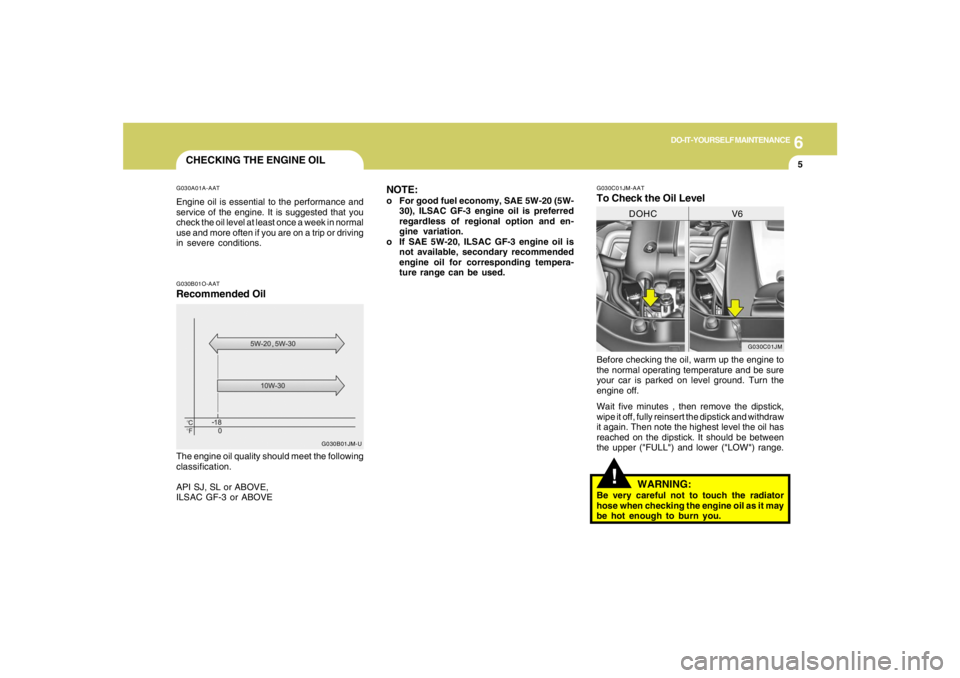
G030C01JM-AATTo Check the Oil LevelBefore checking the oil, warm up the engine to
the normal operating temperature and be sure
your car is parked on level ground. Turn the
engine off.
Wait five minutes , then remove the dipstick,
wipe it off, fully reinsert the dipstick and withdraw
it again. Then note the highest level the oil has
reached on the dipstick. It should be between
the upper ("FULL") and lower ("LOW") range.
G030C01JM
DOHC V6
!
WARNING:
Be very careful not to touch the radiator
hose when checking the engine oil as it may
be hot enough to burn you.
G030B01O-AATRecommended OilThe engine oil quality should meet the following
classification.
API SJ, SL or ABOVE,
ILSAC GF-3 or ABOVE
G030B01JM-U
NOTE:o For good fuel economy, SAE 5W-20 (5W-
30), ILSAC GF-3 engine oil is preferred
regardless of regional option and en-
gine variation.
o If SAE 5W-20, ILSAC GF-3 engine oil is
not available, secondary recommended
engine oil for corresponding tempera-
ture range can be used.
Page 213 of 273
6
DO-IT-YOURSELF MAINTENANCE
7
6. Install a new oil filter in accordance with the
instructions on the carton or on the filter itself.
Do not over-tighten. (Tightening torque :
1.2 ~ 1.6 kgf.m) Be sure that the mounting
surface on the engine is clean and that the
old gasket is removed completely. Lubricate
the new gasket on the filter with clean engine
oil before installation.
7. Remove the engine oil level dipstick.
8. Refill the crankcase with the recommended
engine oil. Refer to the specification in chap-
ter 9 for engine oil capacity.
!
PROPOSITION 65 WARNING:
Used engine oil may cause irritation or
cancer of the skin if left in contact with the
skin for prolonged periods of time. Used
engine oil contains chemicals that have
caused cancer in laboratory animals. Al-
ways protect your skin by washing your
hands thoroughly with soap and warm
water as soon as possible after handling
used oil.
!
WARNING:
Be very careful when draining the engine oil
as it may be hot enough to burn you! 2. Open the hood and remove the engine oil
filler cap.
3. Slide underneath the car and loosen the
drain plug by turning it counterclockwise with
a wrench of the proper size. Be sure that a
drain pan is in position to catch the oil as it
drains out, then remove the drain plug.
4. When the oil has stopped draining, replace
the drain plug using a new washer and
retighten by turning it clockwise.
Oil pan drain plug tightening torque:
3.5 ~ 4.5 kgf.m (2.7L)
4.0 ~ 4.5 kgf.m (2.0L)
5. Remove the oil filter by turning it counter-
clockwise with a oil filter wrench of the proper
size. A certain amount of oil will come out
when you remove the filter. So be sure to
have your drain pan in place underneath it.
CAUTION:
Slowly pour the recommended oil using by
a funnel. Do not overfill! Engine damage
may occur if overfilled.
!
9. Start the engine and check to be sure no oil
is leaking from the drain plug or oil filter.
10.Shut off the engine and recheck the oil level.NOTE:Always dispose of used engine oil in an
environmentally acceptable manner. It is
suggested that it be placed in a sealed
container and taken to a service station for
reclamation. Do not pour the oil on the
ground or put it in with the household
trash.
Page 273 of 273

Seoul KoreaPrinting: OCT. 22, 2004
Publication No.: A2EO-EU40C
Printed in Korea
SERVICE STATION INFORMATION
FUEL:UNLEADED gasoline only
Pump Octane Rating of 87 (Research Octane Number 91) or higher.FUEL TANK CAPACITYUS.gal (Imp.gal., liter) 2.7L: 17 (14.3, 65), 2.0L: 15 (12.8, 58)TIRE PRESSURE:See the label on the driver's side of the center pillar outer panel.OTHER TIRE INFORMATION:See pages 8-2 through 8-13.HOOD RELEASE:Pull handle under left side of dash.ENGINE OIL:API grade SJ, SL or ABOVE / ILSAC grade GF-3 or ABOVE and fuel
efficient oil. Use SAE 5W-20, 5W-30 or 10W-30 if normal temperatures
are above 0°F (-18°C). For other viscosity recommendations, see page 6-
5 or 9-4.
MANUAL TRANSAXLE:HYUNDAI GENUINE PARTS MTF 75W/85 (API GL-4) Oil level
should be up to filler-bolt hole in housing beside differential.AUTOMATIC TRANSAXLE:Apply the parking brake, with the engine running, shift the selector lever
through all ranges and return to “N” (Neutral) position. Then check the
level of fluid on the dipstick. Use only HYUNDAI GENUINE ATF SP III,
DIAMOND ATF SP-III, SK ATF SP III or other brands approved by
Hyundai Motor Co.,QUICK INDEXo Car will not start ....................................................................... 3-2
o Flat tire ..................................................................................... 3-6
o Warning light/chime comes on ................................... 1-44 ~ 1-47
o Engine overheats ...................................................................... 3-4
o Towing of your vehicle ........................................................... 3-12
o Starting the engine ................................................................... 2-5
o Driving tips for first 1,200 miles (2,000 km) .......................... 1-3
o Scheduled maintenance ............................................................ 5-4
o Reporting safety defects ......................................................... 8-14