2005 Hyundai Terracan airbag
[x] Cancel search: airbagPage 304 of 539

CAUTION:
When installing a container of liquid air freshener inside the vehicle, do not place it near the instrument cluster nor on the instrument panel pad surface. If there is any leakage from theair freshener onto these areas (Instrument cluster, instrument panel pad or air ventilator), it may damage these parts. If the liquid from air freshener does leak onto these areas, wash them with water immediately.!
1. Passenger's Airbag
2. Glove Box
3. Heating/Air Conditioning Control Panel
4. Headlight Leveling Switch
5. Cruise Control Main Switch(Not all models)
6. Hazard Warning Switch
7. Panel Brightness Control Knob (Rheostat Switch)
8. Windscreen Wiper/Washer Switch
9. Rear Fog Light Switch
10. Horn and Driver's Airbag
11. Instrument Cluster
12. Multi-Function Light Switch/Front Fog Light Switch
13. Rear Ashtray
14. Rear Drink Holder
15. Rear Power Outlet
16. Front Drink Holder
17. Parking Brake
18. Transfer Shift Knob
19. Front Power Outlet
20. Seat Warmer Switch (Not all models)
21. Shift Lever
22. Coin Holder
23. Front Ashtray/Cigar Lighter
24. Steering Wheel Tilt Lever
25. Cruise Control Switch (Not all models)
26. Remote Fuel-Filler Lid Release Lever
27. Multi Box
28. Bonnet Release Lever
Page 305 of 539
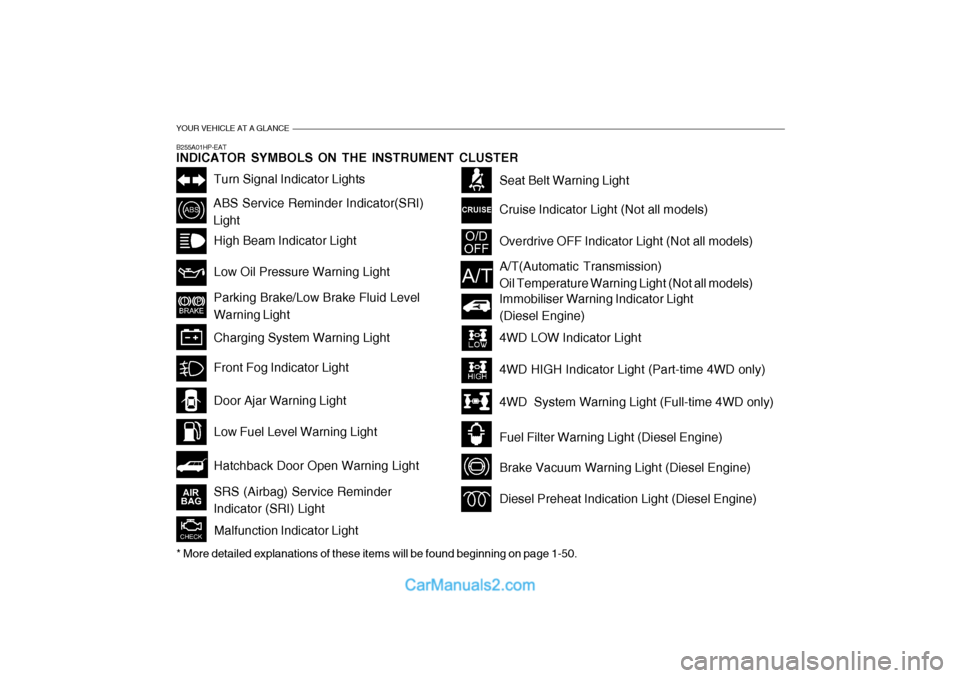
YOUR VEHICLE AT A GLANCE
B255A01HP-EAT INDICATOR SYMBOLS ON THE INSTRUMENT CLUSTER
Turn Signal Indicator Lights
ABS Service Reminder Indicator(SRI) LightHigh Beam Indicator Light Low Oil Pressure Warning Light Parking Brake/Low Brake Fluid Level Warning Light Charging System Warning Light
Hatchback Door Open Warning Light
Door Ajar Warning Light Low Fuel Level Warning Light
Front Fog Indicator Light
Overdrive OFF Indicator Light (Not all models)
Immobiliser Warning Indicator Light (Diesel Engine)
Seat Belt Warning Light Cruise Indicator Light (Not all models)
Malfunction Indicator Light
A/T(Automatic Transmission) Oil Temperature Warning Light (Not all models)
4WD LOW Indicator Light 4WD HIGH Indicator Light (Part-time 4WD only)
4WD System Warning Light (Full-time 4WD only)
Fuel Filter Warning Light (Diesel Engine)
Brake Vacuum Warning Light (Diesel Engine)
Diesel Preheat Indication Light (Diesel Engine)
* More detailed explanations of these items will be found beginning on page 1-50.SRS (Airbag) Service Reminder Indicator (SRI) Light
Page 306 of 539
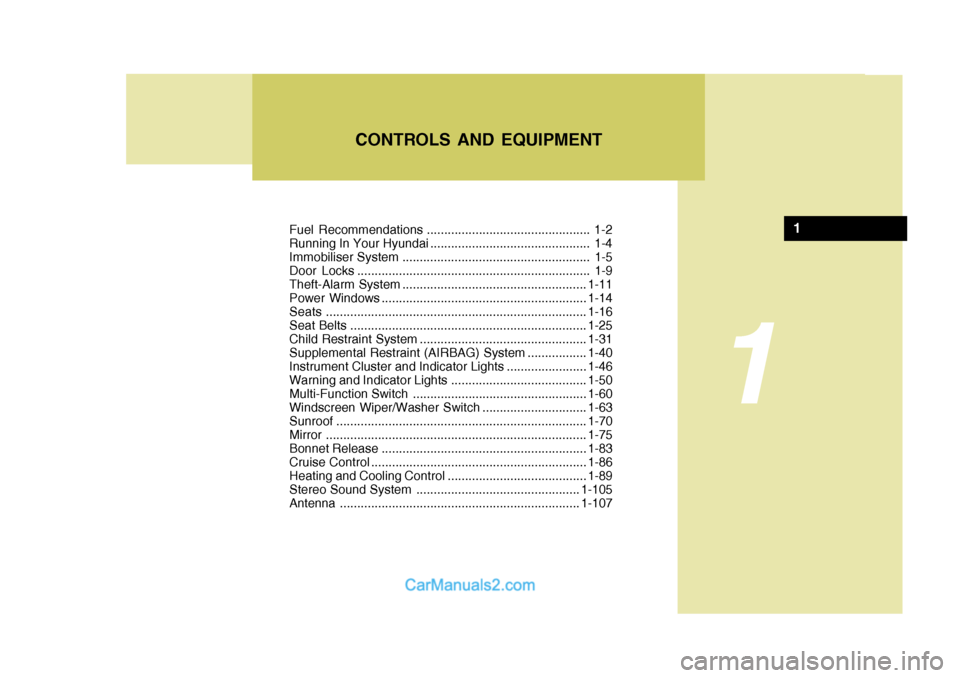
Fuel Recommendations ............................................... 1-2
Running In Your Hyundai .............................................. 1-4
Immobiliser System ...................................................... 1-5
Door Locks ................................................................... 1-9Theft-Alarm System ..................................................... 1-11
Power Windows ........................................................... 1-14
Seats ........................................................................... 1-16
Seat Belts .................................................................... 1-25
Child Restraint System ................................................ 1-31
Supplemental Restraint (AIRBAG) System .................1-40
Instrument Cluster and Indicator Lights .......................1-46
Warning and Indicator Lights....................................... 1-50
Multi-Function Switch .................................................. 1-60
Windscreen Wiper/Washer Switch ..............................1-63
Sunroof ........................................................................ 1-70
Mirror ........................................................................... 1-75
Bonnet Release ........................................................... 1-83
Cruise Co ntrol.............................................................. 1-86
Heating and Cooling Control .......... ..............................1-89
Stereo Sound System ............................................... 1-105
Antenna ..................................................................... 1-107
CONTROLS AND EQUIPMENT
1
1
Page 322 of 539
1
CONTROLS AND EQUIPMENT
17
!
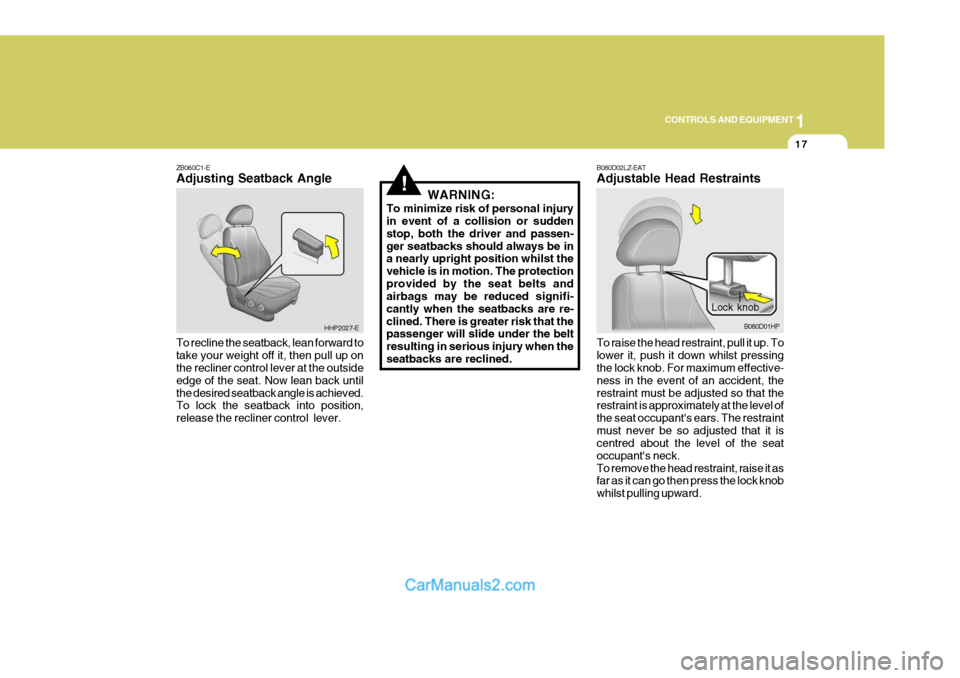
ZB060C1-E Adjusting Seatback Angle To recline the seatback, lean forward to take your weight off it, then pull up on the recliner control lever at the outside edge of the seat. Now lean back untilthe desired seatback angle is achieved. To lock the seatback into position, release the recliner control lever. WARNING:
To minimize risk of personal injury in event of a collision or sudden stop, both the driver and passen-ger seatbacks should always be in a nearly upright position whilst the vehicle is in motion. The protectionprovided by the seat belts and airbags may be reduced signifi- cantly when the seatbacks are re-clined. There is greater risk that the passenger will slide under the belt resulting in serious injury when the seatbacks are reclined.
HHP2027-E
Lock knob
B080D01HP
B080D02LZ-EAT Adjustable Head Restraints To raise the head restraint, pull it up. To lower it, push it down whilst pressing the lock knob. For maximum effective- ness in the event of an accident, therestraint must be adjusted so that the restraint is approximately at the level of the seat occupant's ears. The restraintmust never be so adjusted that it is centred about the level of the seat occupant's neck.To remove the head restraint, raise it as far as it can go then press the lock knob whilst pulling upward.
Page 324 of 539
1
CONTROLS AND EQUIPMENT
19
!
!
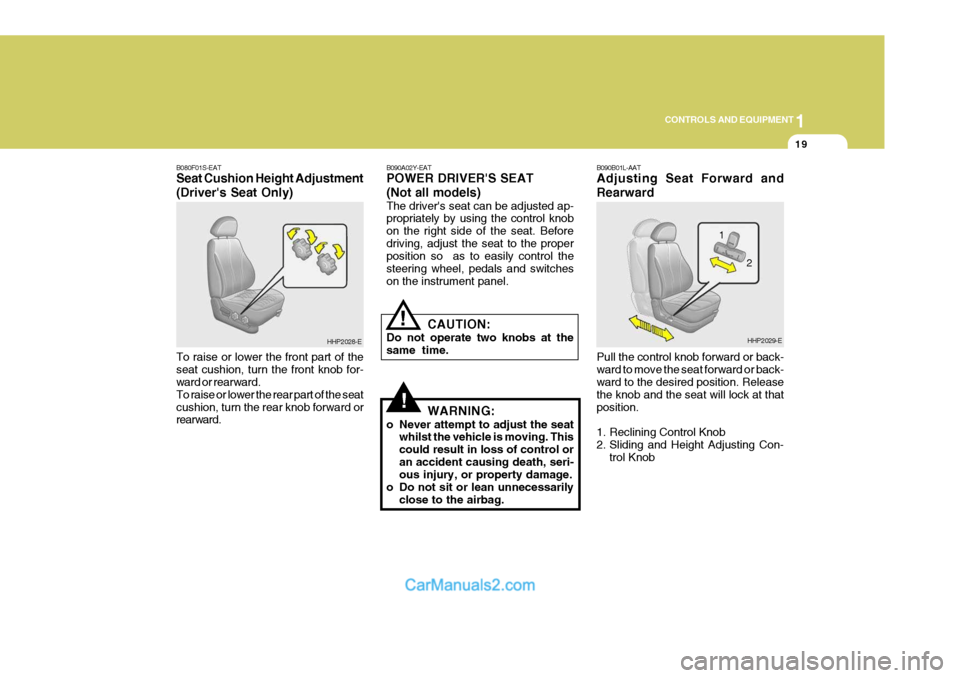
B080F01S-EAT Seat Cushion Height Adjustment (Driver's Seat Only) To raise or lower the front part of the seat cushion, turn the front knob for- ward or rearward. To raise or lower the rear part of the seatcushion, turn the rear knob forward or rearward. B090A02Y-EAT POWER DRIVER'S SEAT (Not all models) The driver's seat can be adjusted ap- propriately by using the control knob on the right side of the seat. Beforedriving, adjust the seat to the proper position so as to easily control the steering wheel, pedals and switcheson the instrument panel.
CAUTION:
Do not operate two knobs at thesame time.
WARNING:
o Never attempt to adjust the seat whilst the vehicle is moving. Thiscould result in loss of control oran accident causing death, seri- ous injury, or property damage.
o Do not sit or lean unnecessarily close to the airbag.
HHP2028-E B090B01L-AAT Adjusting Seat Forward and Rearward Pull the control knob forward or back- ward to move the seat forward or back- ward to the desired position. Release the knob and the seat will lock at thatposition.
1. Reclining Control Knob
2. Sliding and Height Adjusting Con-
trol KnobHHP2029-E
2
1
Page 325 of 539
1CONTROLS AND EQUIPMENT
20
!
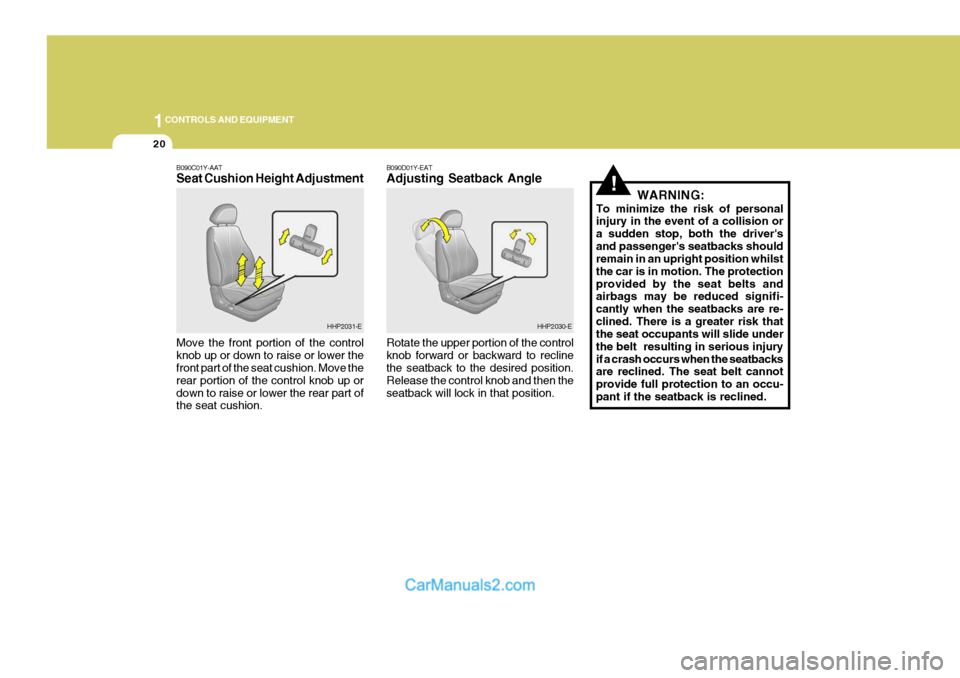
B090C01Y-AAT Seat Cushion Height Adjustment Move the front portion of the control knob up or down to raise or lower the front part of the seat cushion. Move the rear portion of the control knob up ordown to raise or lower the rear part of the seat cushion. B090D01Y-EAT Adjusting Seatback Angle Rotate the upper portion of the control knob forward or backward to recline the seatback to the desired position. Release the control knob and then theseatback will lock in that position.
WARNING:
To minimize the risk of personal injury in the event of a collision or a sudden stop, both the driver'sand passenger's seatbacks should remain in an upright position whilst the car is in motion. The protectionprovided by the seat belts and airbags may be reduced signifi- cantly when the seatbacks are re-clined. There is a greater risk that the seat occupants will slide under the belt resulting in serious injuryif a crash occurs when the seatbacks are reclined. The seat belt cannot provide full protection to an occu-pant if the seatback is reclined.
HHP2031-EHHP2030-E
Page 337 of 539
1CONTROLS AND EQUIPMENT
32
!WARNING:
o A child restraint system must be placed in the rear seat. Never install a child or infant seat on the front passenger's seat. Should an accident occur andcause the passenger side airbag to deploy, it could severely in- jure or kill an infant or child seatedin an infant or child seat. Thus, only use a child restraint in the rear seat of your vehicle.
o Since a safety belt or child re-
straint system can become veryhot if it is left in a closed vehicle, be sure to check the seat cover and buckles before placing achild there.
o When the child restraint system
is not in use, fasten it with asafety belt so that it will not be thrown forward in the case of a sudden stop or an accident. o Children who are too large to be in
a child restraint should sit in the rear seat and be restrained with the available lap/shoulder belts.Never allow children to ride in the front passanger seat.
o Always make sure that the shoul- der belt portion of the outboardlap/shoulder belt is positioned midway over the shoulder, neveracross the neck. Moving the child closer to the centre of the vehicle may help provide a good shoul-der belt fit. The lap belt portion of the lap/shoulder belt or the cen- tre seat lap belt must always bepositioned as low as possible on the child's hips and as snug as possible.
o If the seat belt will not properly fit the child, we recommend the useof an approved booster seat inthe rear seat in order to raise the child's seating height so that the seat belt will properly fit the child.
o Never allow a child to stand up or kneel on the seat. o Never use an infant carrier or child
safety seat that "hooks" over aseatback; it may not provide ad-equate security in an accident.
o Never allow a child to be held in a
person's arms whilst they are in amoving vehicle, as this could re- sult in serious injury to the child in the event of an accident or asudden stop. Holding a child in a moving vehicle does not provide the child with any means of pro-tection during an accident, even if the person holding the child is wearing a seat belt.
o If the child restraint seat is not
anchored properly, the risk of achild being seriously injured or killed in a collision greatly in- creases.
Page 339 of 539
1CONTROLS AND EQUIPMENT
34
!WARNING:
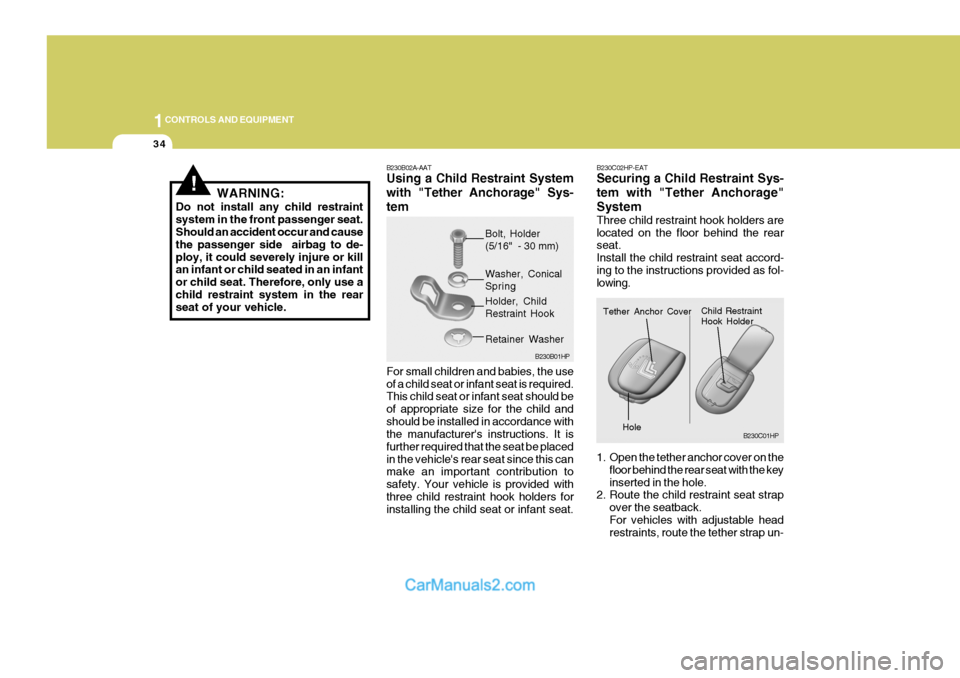
Do not install any child restraint system in the front passenger seat. Should an accident occur and cause the passenger side airbag to de-ploy, it could severely injure or kill an infant or child seated in an infant or child seat. Therefore, only use achild restraint system in the rear seat of your vehicle. B230B02A-AAT Using a Child Restraint System with "Tether Anchorage" Sys-tem For small children and babies, the use of a child seat or infant seat is required. This child seat or infant seat should be of appropriate size for the child andshould be installed in accordance with the manufacturer's instructions. It is further required that the seat be placedin the vehicle's rear seat since this can make an important contribution to safety. Your vehicle is provided withthree child restraint hook holders for installing the child seat or infant seat.B230C02HP-EAT Securing a Child Restraint Sys- tem with "Tether Anchorage"System Three child restraint hook holders are located on the floor behind the rear seat. Install the child restraint seat accord-ing to the instructions provided as fol- lowing.
1. Open the tether anchor cover on the
floor behind the rear seat with the key inserted in the hole.
2. Route the child restraint seat strap
over the seatback.For vehicles with adjustable head restraints, route the tether strap un-
B230B01HP
Bolt, Holder (5/16" - 30 mm)
Washer, ConicalSpring Holder, Child Restraint Hook
Retainer Washer
B230C01HP
Tether Anchor Cover
Child Restraint Hook HolderHole