Page 376 of 539
1
CONTROLS AND EQUIPMENT
71
!
!
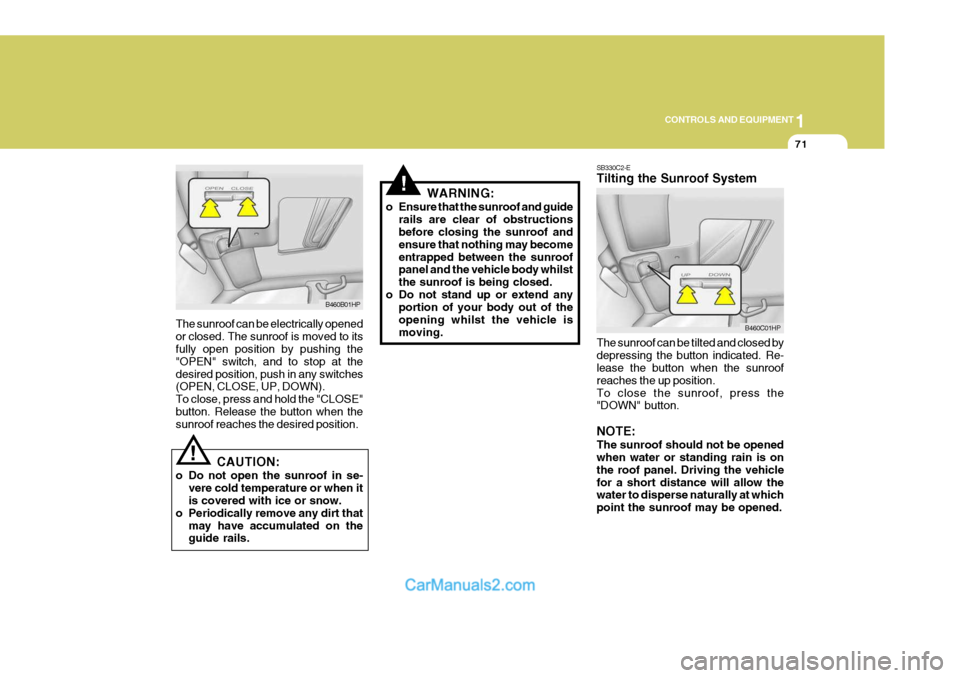
The sunroof can be electrically opened or closed. The sunroof is moved to its fully open position by pushing the "OPEN" switch, and to stop at thedesired position, push in any switches (OPEN, CLOSE, UP, DOWN). To close, press and hold the "CLOSE"button. Release the button when the sunroof reaches the desired position.
CAUTION:
o Do not open the sunroof in se- vere cold temperature or when itis covered with ice or snow.
o Periodically remove any dirt that may have accumulated on theguide rails. WARNING:
o Ensure that the sunroof and guide rails are clear of obstructionsbefore closing the sunroof and ensure that nothing may becomeentrapped between the sunroof panel and the vehicle body whilst the sunroof is being closed.
o Do not stand up or extend any portion of your body out of theopening whilst the vehicle ismoving.
B460B01HP SB330C2-E Tilting the Sunroof System The sunroof can be tilted and closed by depressing the button indicated. Re- lease the button when the sunroof reaches the up position.To close the sunroof, press the "DOWN" button. NOTE: The sunroof should not be opened when water or standing rain is on the roof panel. Driving the vehiclefor a short distance will allow the water to disperse naturally at which point the sunroof may be opened.
B460C01HP
Page 377 of 539
1CONTROLS AND EQUIPMENT
72
Push in the map light switch to turn the light on or off. This light produces a spot beam for convenient use as a map light at night or as a personal lightfor the driver and the passenger.INTERIOR LIGHT
B480B01Y-AAT Map Light
B480B01HP
!
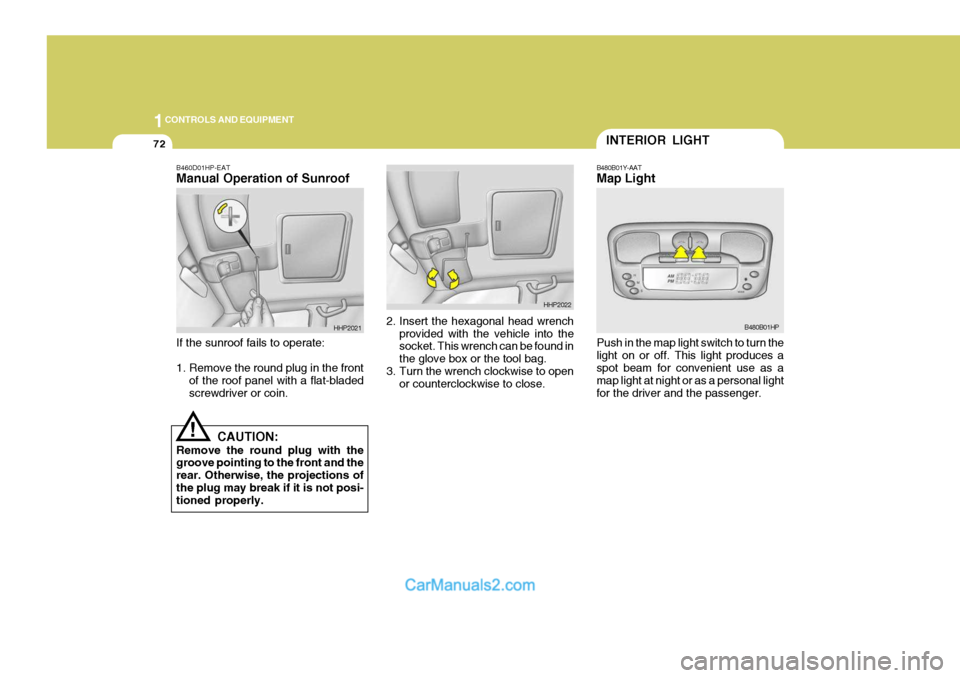
B460D01HP-EAT Manual Operation of Sunroof If the sunroof fails to operate:
1. Remove the round plug in the front
of the roof panel with a flat-bladed screwdriver or coin. 2. Insert the hexagonal head wrench
provided with the vehicle into the socket. This wrench can be found in the glove box or the tool bag.
3. Turn the wrench clockwise to open
or counterclockwise to close.
CAUTION:
Remove the round plug with the groove pointing to the front and the rear. Otherwise, the projections ofthe plug may break if it is not posi- tioned properly.
HHP2021
HHP2022
Page 386 of 539
1
CONTROLS AND EQUIPMENT
81
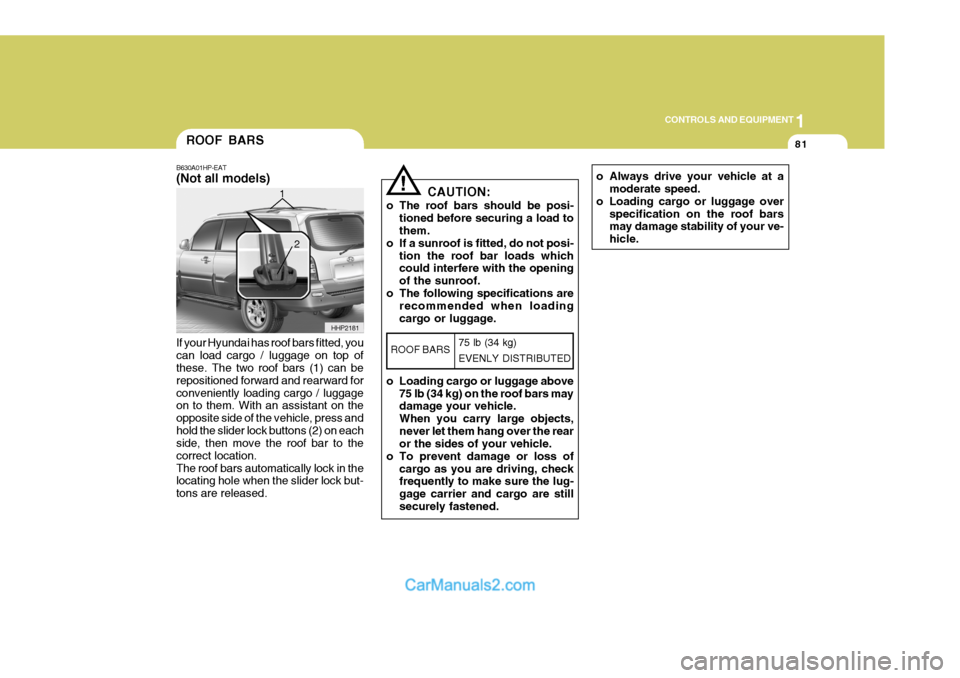
If your Hyundai has roof bars fitted, you can load cargo / luggage on top of these. The two roof bars (1) can be repositioned forward and rearward forconveniently loading cargo / luggage on to them. With an assistant on the opposite side of the vehicle, press andhold the slider lock buttons (2) on each side, then move the roof bar to the correct location.The roof bars automatically lock in the locating hole when the slider lock but- tons are released.ROOF BARS
B630A01HP-EAT (Not all models)
HHP2181
1
2
o Always drive your vehicle at a
moderate speed.
o Loading cargo or luggage over specification on the roof bars may damage stability of your ve- hicle.! CAUTION:
o The roof bars should be posi- tioned before securing a load to them.
o If a sunroof is fitted, do not posi-
tion the roof bar loads whichcould interfere with the opening of the sunroof.
o The following specifications are recommended when loadingcargo or luggage.
o Loading cargo or luggage above 75 lb (34 kg) on the roof bars may damage your vehicle. When you carry large objects,never let them hang over the rear or the sides of your vehicle.
o To prevent damage or loss of cargo as you are driving, checkfrequently to make sure the lug- gage carrier and cargo are stillsecurely fastened.
ROOF BARS 75 lb (34 kg) EVENLY DISTRIBUTED
Page 517 of 539

6 OWNER MAINTENANCE
40
NO.1 2 34 5 67 8 9
10 11 1213 14 1516 17 1819 20 2122 23 2425 26 2728 AMPERAGES
30A 10A 15A 20A10A15A30A20A 10A 10A20A10A- -
10A 10A -
10A10A10A10A 10A 10A
-
10A15A15A 10A CIRCUIT PROTECTED
Defogger Relay
Hazard Relay, Hazard Switch Stop Lamp Switch
TOD, EST Control Module - Sunroof Controller
Blower Relay
Power Door Locks
Rear Fog Lamp RelayAudio, Map Lamp
Cigar Lighter, Power Outlet relay, ACC Socket
Power Outside Mirror Switch- - A/C Switch
Left/Right Outside Mirror & Defogger -
TCM, ECM(COVEC-F), TCCS(TOD, EST), Immobiliser
Back-up Lamp Switch, Inside Rearview Mirror, Transmission Range Switch Hazard Switch
Instrument Cluster, ETACM, Vehicle Speed Sensor, DRL Control ModuleAirbag Airbag Indicator -
Blower & A/C, ETACM, Defogger Relay
Seat Warmer
Sunroof, Rear Wiper & Washer, Cruise Switch, Rear Intermittent Wiper Relay
Start Relay, Theft-Alarm Relay
G200E01HP-EAT Inner Panel NOTE: Not all fuse panel descriptions in this manual may be applicable to your vehicle. It is accurate at the time of printing. When you inspect the fuse box on your vehicle, refer to the fuse box label. G200D01HP
Page 538 of 539
10
INDEX
5
S Seat Belts 3-Point system ....................................................... 1-28
Adjusting your seat belt .......................................... 1-28
Care of seat belts ................................................... 1-26
Centre rear seat 3-point system with emergency
locking retractor .................................................... 1-29
Height adjustable front seat shoulder belt ..............1-27
Pre-tensioner Seat Belt .................. ........................1-38
Precautions ............................................................. 1-25
Seat Warmer ............................................................. 1-21
Sound
Brake Pad Wear Warning Sound ............................ 1-57
Spark Plugs ............................................................... 6-12
Speedometer ............................................................. 1-59
Starting Procedure ....................................................... 2-6
Steering Wheel
Free-play ................................................................. 6-23
Tilt lever ................................................................. 1-85
Stereo Sound System ............................................. 1-105
Sun visor ................................................................... 1-83
Sunroof ...................................................................... 1-70
T Tachometer ................................................................ 1-58
Theft-Alarm system ................................................... 1-11
Tyres
Balancing .................................................................. 8-4
Chains ...................................................................... 8-3 Changing a flat
tyre .................................................. 3-7
In the event of a puncture ........................................ 3-7 Information ................................................................ 8-2
Pressures ................................................................. 8-3
Replacement ............................................................. 8-4
Rotation .................................................................... 8-4
Snow tyres ............................................................... 8-3
Spare tyre ................................................................. 3-6Spare tyre and tools ................................................. 8-6
Towing A trailer (or vehicle) ................................................ 2-26
Emergency ............................................................. 3-16
If your car must be towed ........................................ 3-4 Important trailer weight information ......................... 2-29
Transmission
Automa tic ............................................................... 2-10
Automatic transmission lubricant ............................ 6-17
Manual ...................................................................... 2-8
Manual transmission lubricant ................................ 6-16
Trip Odometer ............................................................ 1-59
U Under Tray ................................................................. 1-21
VVehicle Identification Number (VIN) ............................. 8-2
Vehicle Specifica tions ................................................. 9-1