2005 Hyundai Sonata Drain
[x] Cancel search: DrainPage 174 of 271
34WHAT TO DO IN AN EMERGENCY
IF THE ENGINE OVERHEATS
!!
!
WARNING:
While the engine is running, keep hair,
hands and clothing away from moving parts
such as the fan and drive belts to prevent
injury.
5. If the water pump drive belt is broken or
engine coolant is leaking out, stop the engine
immediately and call the nearest Hyundai
dealer for assistance.
WARNING:
Do not remove the radiator cap when the
engine is hot. This can allow coolant to be
blown out of the opening and cause seri-
ous burns.6. If you cannot find the cause of the overheat-
ing, wait until the engine temperature has
returned to normal. Then, if coolant has been
lost, carefully add coolant to the reservoir
(page 6-9) to bring the fluid level in the
reservoir up to the halfway mark.
7. Proceed with caution, keeping alert for fur-
ther signs of overheating. If overheating
happens again, call a Hyundai dealer for
assistance.
CAUTION:
Serious loss of coolant indicates there is a
leak in the cooling system and this should
be checked as soon as possible by a Hyundai
dealer.
D030A02A-AATIf your temperature gauge indicates overheat-
ing, you experience a loss of power, or hear loud
pinging or knocking, the engine is probably too
hot. If this happens, you should:
1. Pull off the road and stop as soon as it is safe
to do so.
2. Place the gear selector lever in "P" (auto-
matic) or neutral (manual transaxle) and set
the parking brake. If the air conditioning is on,
turn it off.
3. If engine coolant is running out under the car
or steam is coming out from the hood, stop
the engine. Do not open the hood until the
coolant has stopped running or the steaming
has stopped. If there is no visible loss of
engine coolant and no steam, leave the
engine running and check to be sure the
engine cooling fan is operating. If the fan is
not running, turn the engine off.
4. Check to see if the water pump drive belt is
missing. If it is not missing, check to see that
it is tight. If the drive belt seems to be
satisfactory, check for coolant leaking from
the radiator, hoses or under the car. (If the
air conditioning had been in use, it is normal
for cold water to be draining from it when you
stop).
Page 186 of 271
4
CORROSION PREVENTION AND APPEARANCE CARE
3
WASHING AND WAXING
E020E01A-AATDon't Neglect the InteriorMoisture can collect under the floor mats and
carpeting to cause corrosion. Check under the
mats periodically to be sure the carpeting is dry.
Use particular care if you carry fertilizers, clean-
ing materials or chemicals in the car.
These should be carried only in proper contain-
ers and any spills or leaks should be cleaned up,
flushed with clean water and thoroughly dried.
E020C01A-AATKeep Your Garage DryDon't park your car in a damp, poorly ventilated
garage. This creates a favorable environment
for corrosion. This is particularly true if you
wash your car in the garage or drive it into the
garage when it is still wet or covered with snow,
ice or mud. Even a heated garage can contrib-
ute to corrosion unless it is well ventilated so
moisture is dispersed.
E030A01A-AATWashing Your HyundaiNever wash your car when the surface is hot
from being in the sun. Always wash your car in
the shade.
Wash your car frequently. Dirt is abrasive and
can scratch the paint if it is not removed. Air
pollution or acid rain may damage the paint and
trim through chemical action if pollutants are
allowed to remain in contact with the surface. If
you live near the ocean or in an area where road
salts or dust control chemicals are used, you
should pay particular attention to the underside
of the car. Start by rinsing the car to remove dust
and loose dirt. In winter, or if you have driven
through mud or muddy water, be sure to thor-
oughly clean the underside as well. Use a hard
direct stream of water to remove accumulations
of mud or corrosive materials. Use a good
quality car-washing solution and follow the
manufacturer's directions on the package.
These are available at your Hyundai dealer or
auto parts outlet. Don't use strong household
detergents, gasoline, strong solvents or abra-
sive cleaning powders as these may damage
the finish.
Use a clean sponge or cloth, rinse it frequently
and don't damage the finish by rubbing too hard.
For stubborn spots, dampen them frequently
and remove them a little at a time. o When cleaning lower door panels, rocker
panels and frame members, be sure that
drain holes are kept open so that moisture
can escape and not be trapped inside to ac-
celerate corrosion.
E020D02A-AATKeep Paint and Trim in Good ConditionScratches or chips in the finish should be
covered with "touch-up" paint as soon as pos-
sible to reduce the possibility of corrosion. If
bare metal is showing through, the attention of
a qualified body and paint shop is recommended.
Bird droppings : Bird droppings are highly cor-
rosive and may damage painted surfaces in just
a few hours. Always remove bird droppings as
soon as possible.
Page 205 of 271
6
DO-IT-YOURSELF MAINTENANCE
7
!
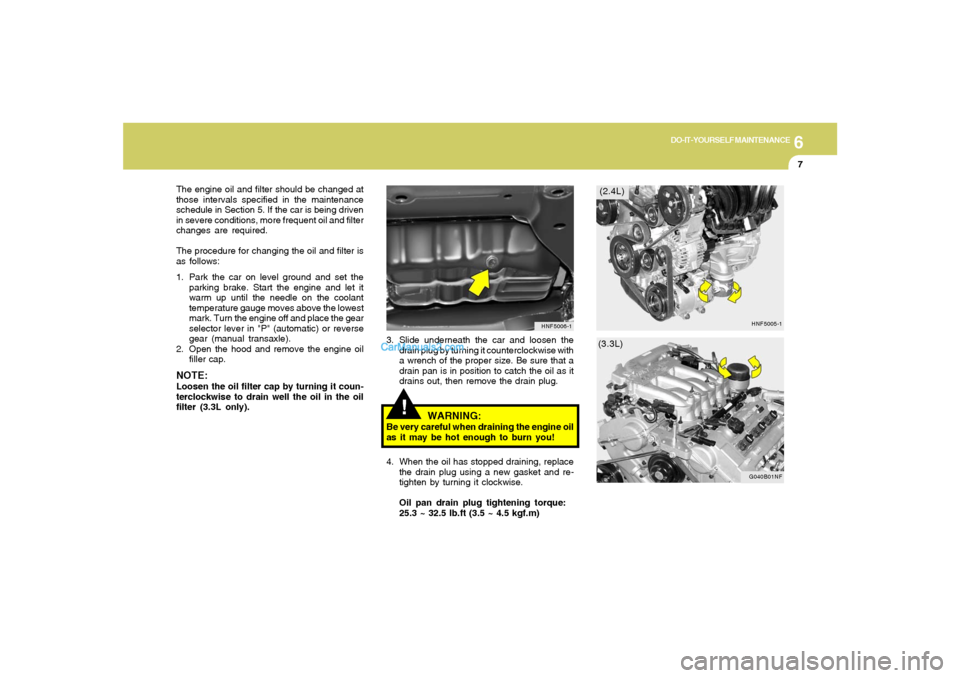
3. Slide underneath the car and loosen the
drain plug by turning it counterclockwise with
a wrench of the proper size. Be sure that a
drain pan is in position to catch the oil as it
drains out, then remove the drain plug.
4. When the oil has stopped draining, replace
the drain plug using a new gasket and re-
tighten by turning it clockwise.
Oil pan drain plug tightening torque:
25.3 ~ 32.5 lb.ft (3.5 ~ 4.5 kgf.m)
HNF5006-1
(2.4L)
(3.3L) The engine oil and filter should be changed at
those intervals specified in the maintenance
schedule in Section 5. If the car is being driven
in severe conditions, more frequent oil and filter
changes are required.
The procedure for changing the oil and filter is
as follows:
1. Park the car on level ground and set the
parking brake. Start the engine and let it
warm up until the needle on the coolant
temperature gauge moves above the lowest
mark. Turn the engine off and place the gear
selector lever in "P" (automatic) or reverse
gear (manual transaxle).
2. Open the hood and remove the engine oil
filler cap.
NOTE:Loosen the oil filter cap by turning it coun-
terclockwise to drain well the oil in the oil
filter (3.3L only).
WARNING:
Be very careful when draining the engine oil
as it may be hot enough to burn you!
HNF5005-1
G040B01NF
Page 206 of 271
6
DO-IT-YOURSELF MAINTENANCE
8
CHECKING AND CHANGING THE
ENGINE COOLANT!
G050A01A-AAT
WARNING:
Do not remove the radiator cap when the
engine is hot. When the engine is hot, the
engine coolant is under pressure and may
erupt through the opening if the cap is
removed. You could be seriously burned if
you do not observe this precaution. Do not
remove the radiator cap until the radiator is
cool to the touch.
!
5. Remove the oil filter by turning it counter-
clockwise with a oil filter wrench of the proper
size. A certain amount of oil will come out
when you remove the filter. So be sure to
have your drain pan in place underneath it.
6. Install a new oil filter in accordance with the
instructions on the carton or on the filter itself.
Do not over-tighten.
Tightening torque:
8.7 ~ 11.6 lb.ft (1.2 ~ 1.6 kgf.m)
Be sure that the mounting surface on the
engine is clean and that the old gasket is
removed completely. Lubricate the new
gasket on the filter with clean engine oil
before installation.
7. Remove the engine oil level dipstick.
8. Refill the crankcase with the recommended
engine oil. Refer to the specification in chap-
ter 9 for engine oil capacity.
CAUTION:
Slowly pour the recommended oil into a
funnel. Do not overfill to avoid damage to
the engine.
NOTE:Always dispose of used engine oil in an
environmentally acceptable manner. It is
suggested that it be placed in a sealed
container and taken to a service station for
reclamation. Do not pour the oil on the
ground or put it into the household trash.
PROPOSITION 65 WARNING:
Used engine oil may cause irritation or
cancer of the skin if left in contact with the
skin for prolonged periods of time. Used
engine oil contains chemicals that have
caused cancer in laboratory animals. Al-
ways protect your skin by washing your
hands thoroughly with soap and warm
water as soon as possible after handling
used oil.
!
9. Start the engine and check to be sure no oil
is leaking from the drain plug or oil filter.
10.Shut off the engine and recheck the oil level.
Page 208 of 271
6
DO-IT-YOURSELF MAINTENANCE
10
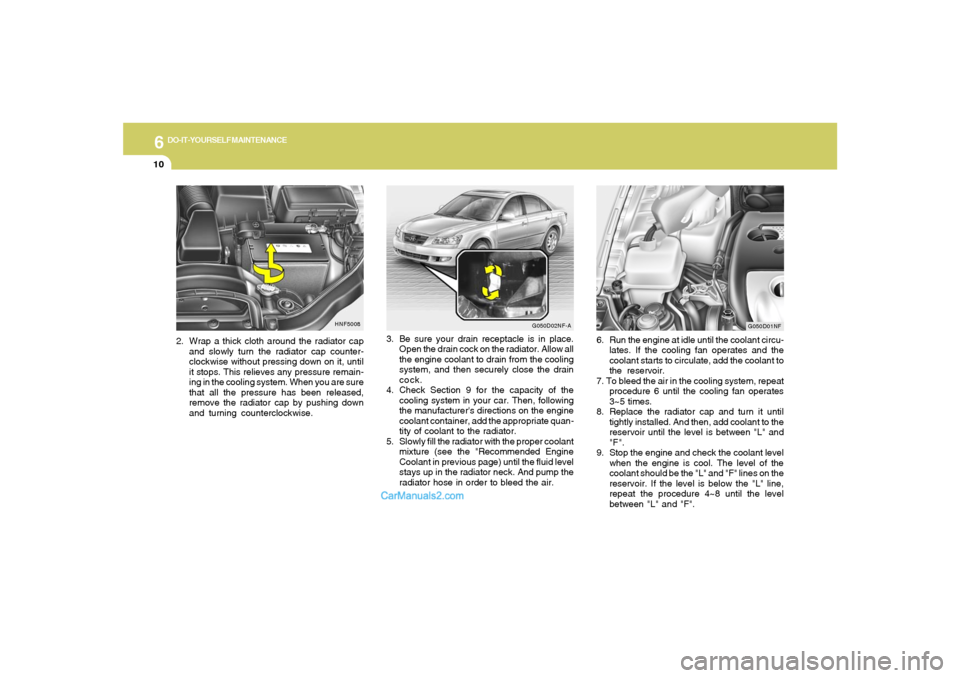
3. Be sure your drain receptacle is in place.
Open the drain cock on the radiator. Allow all
the engine coolant to drain from the cooling
system, and then securely close the drain
cock.
4. Check Section 9 for the capacity of the
cooling system in your car. Then, following
the manufacturer's directions on the engine
coolant container, add the appropriate quan-
tity of coolant to the radiator.
5. Slowly fill the radiator with the proper coolant
mixture (see the "Recommended Engine
Coolant in previous page) until the fluid level
stays up in the radiator neck. And pump the
radiator hose in order to bleed the air.
HNF5008
2. Wrap a thick cloth around the radiator cap
and slowly turn the radiator cap counter-
clockwise without pressing down on it, until
it stops. This relieves any pressure remain-
ing in the cooling system. When you are sure
that all the pressure has been released,
remove the radiator cap by pushing down
and turning counterclockwise.
G050D02NF-A
G050D01NF
6. Run the engine at idle until the coolant circu-
lates. If the cooling fan operates and the
coolant starts to circulate, add the coolant to
the reservoir.
7. To bleed the air in the cooling system, repeat
procedure 6 until the cooling fan operates
3~5 times.
8. Replace the radiator cap and turn it until
tightly installed. And then, add coolant to the
reservoir until the level is between "L" and
"F".
9. Stop the engine and check the coolant level
when the engine is cool. The level of the
coolant should be the "L" and "F" lines on the
reservoir. If the level is below the "L" line,
repeat the procedure 4~8 until the level
between "L" and "F".
Page 209 of 271

6
DO-IT-YOURSELF MAINTENANCE
11
!!
10.Replace the reservoir cap and check to be
sure the drain cock and the radiator cap are
fully closed and not leaking.
CAUTION:
Recheck after a few days and add the cool-
ant if the level is below the "L" level.
WARNING:
The cooling fan is controlled by engine
coolant temperature and may sometimes
operate even when the engine is not run-
ning. Use extreme caution when working
near the blades of the coolant fan so that
you are not injured by a rotating fan blade.
As the engine coolant temperature de-
creases, the fan will automatically shut off.
This is a normal condition.
Type
SK16PR-A11
IFR5G-11
SPARK PLUGSG060A01NF-AAT
G060A01LYour engine was originally equipped with Iri-
dium-tipped spark plugs.
Iridium-tipped spark plugs will last longer than
conventional type spark plugs and can be
identified by blue lines on the ceramic shell.NOTE:Do not clean or regap Iridium-tipped spark
plugs.
G060B01NF-AATReplacing the Spark PlugsThe spark plugs should be changed at the
intervals specified in the vehicle maintenance
schedule in Section 5 or whenever engine
performance indicates they should be changed.
Symptoms that suggest poor spark plug perfor-
mance include engine misfiring under load, loss
of fuel economy, poor acceleration, etc. When
spark plugs are replaced, always use spark
plugs recommended by Hyundai. The use of
other spark plugs can result in loss of perfor-
mance, radio interference or engine damage.NOTE:When replacing the spark plugs, always use
the genuine parts recommended.Recommended Spark Plugs:
0.039 ~ 0.043 in.
(1.0~1.1 mm)
Remark
2.4L
3.3L
Page 215 of 271
6
DO-IT-YOURSELF MAINTENANCE
17
CAUTION:
o Radiator antifreeze (engine coolant)
should not be used in the washer system
because it will damage the car's finish.
o The washer lever should not be pulled
and the washer should not be operated
if the washer reservoir is empty. This can
damage the washer fluid pump.
!
A good quality washer fluid should be used to fill
the washer reservoir. The fluid level should be
checked more frequently during bad weather or
whenever the washer system is in more fre-
quent use.
The capacity of the washer reservoir is 3.2 U.S.
quarts (4.0 liters).
!
WARNING:
It is always better to check the transaxle oil
level when the engine is cool or cold. If the
engine is hot, you should exercise great
caution to avoid burning yourself on hot
engine or exhaust parts.
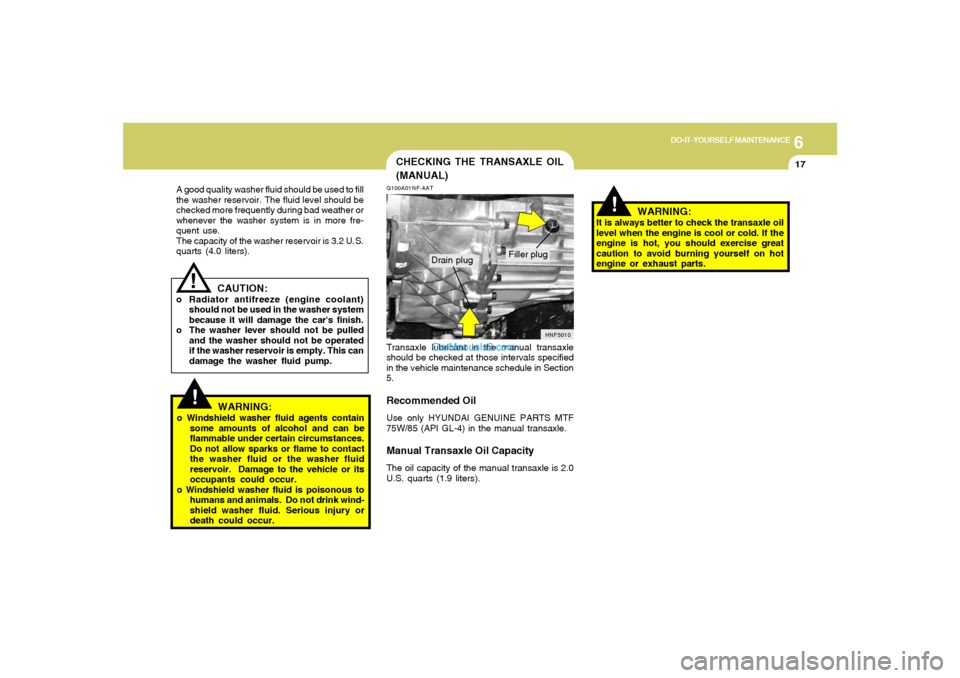
CHECKING THE TRANSAXLE OIL
(MANUAL)G100A01NF-AAT
HNF5010
Filler plug
Drain plug
Transaxle lubricant in the manual transaxle
should be checked at those intervals specified
in the vehicle maintenance schedule in Section
5.Recommended OilUse only HYUNDAI GENUINE PARTS MTF
75W/85 (API GL-4) in the manual transaxle.Manual Transaxle Oil CapacityThe oil capacity of the manual transaxle is 2.0
U.S. quarts (1.9 liters).
!
WARNING:
o Windshield washer fluid agents contain
some amounts of alcohol and can be
flammable under certain circumstances.
Do not allow sparks or flame to contact
the washer fluid or the washer fluid
reservoir. Damage to the vehicle or its
occupants could occur.
o Windshield washer fluid is poisonous to
humans and animals. Do not drink wind-
shield washer fluid. Serious injury or
death could occur.
Page 263 of 271

9
VEHICLE SPECIFICATIONS4
Oil & Grease Standard
API SJ, SL
or ABOVE, SAE 5W-20, SAE 5W-30 (ALL TEMP. RANGE)
ILSAC GF-3 SAE 10W-30 (ABOVE 0°F(-18°C))
or ABOVE
HYUNDAI GENUINE PARTS MTF 75W/85 (API GL-4)
HYUNDAI GENUINE ATF SP III, DIAMOND ATF SP III, SK ATF SP III or other
brands meeting the SP III specification approved by Hyundai Motor Co..
Ethylene glycol base for aluminum radiator
PSF-3 TYPE FLUID
DOT 3 or DOT 4 Equivalent
LUBRICATION CHARTJ080A02NF-AAT
Quantity (Us. qts)(Imp. qts, Liter)
Drain and refill (With oil filter);
2.4L : 4.54 (3.78, 4.3)
3.3L : 6.02 (5.02, 5.7)
2.0 (1.67, 1.9)
2.4L : 8.24 (6.86, 7.8)
3.3L : 11.52 (9.59, 10.9)
2.4L : 6.87 (5.72, 6.5)
2.4L : 6.66 (5.54, 6.3)
3.3L : 8.66 (7.21, 8.2)
0.95 (0.79, 0.9)
As required Item
Engine Oil
Transaxle
Coolant
Power steering
Brake and clutch fluid
Manual Transaxle
Automatic Transaxle
Manual
Automatic