2005 Hyundai Sonata weight
[x] Cancel search: weightPage 164 of 271
2
DRIVING YOUR HYUNDAI
20
C190D01S-AATSafety ChainsShould the hitch connection between your car
and the trailer or vehicle you are towing fail, the
trailer or vehicle could wander dangerously
across other lanes of traffic and ultimately leave
the roadway. To eliminate this potentially dan-
gerous situation, safety chains, attached be-
tween your car and the trailer or towed vehicle,
are required in most states.
CAUTION:
o Never connect a trailer brake system
directly to the vehicle brake system.
o When towing a trailer on steep grades (in
excess of 12%) pay close attention to the
engine coolant temperature gauge to
ensure the engine does not overheat. If
the needle of the coolant temperature
gauge moves across the dial towards
"H" (HOT), pull over and stop as soon as
it is safe to do so, and allow the engine
to idle until it cools down. You may
proceed once the engine has cooled
sufficiently.
!
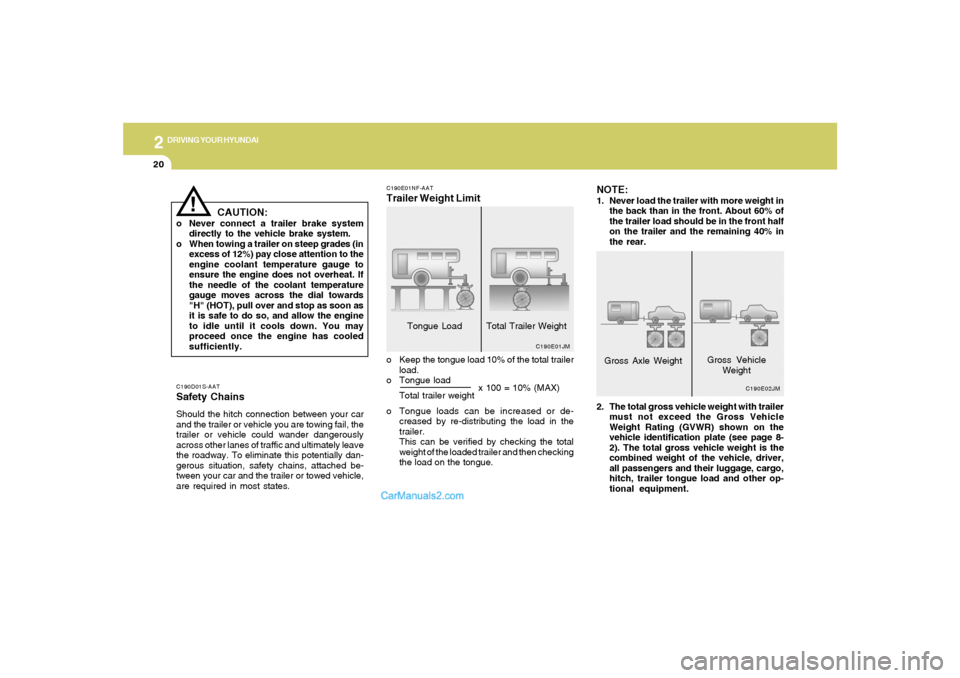
C190E02JM
Gross Axle WeightGross Vehicle
Weight
2. The total gross vehicle weight with trailer
must not exceed the Gross Vehicle
Weight Rating (GVWR) shown on the
vehicle identification plate (see page 8-
2). The total gross vehicle weight is the
combined weight of the vehicle, driver,
all passengers and their luggage, cargo,
hitch, trailer tongue load and other op-
tional equipment.
C190E01NF-AATTrailer Weight Limit
Tongue Load Total Trailer Weight
o Keep the tongue load 10% of the total trailer
load.
o Tongue load
o Tongue loads can be increased or de-
creased by re-distributing the load in the
trailer.
This can be verified by checking the total
weight of the loaded trailer and then checking
the load on the tongue.
C190E01JM
x 100 = 10% (MAX)
Total trailer weight
NOTE:1. Never load the trailer with more weight in
the back than in the front. About 60% of
the trailer load should be in the front half
on the trailer and the remaining 40% in
the rear.
Page 165 of 271
2
DRIVING YOUR HYUNDAI
21
C190F01Y-GATTrailer or Vehicle Towing Tips1. Before towing, check hitch and safety chain
connections as well as proper operation of
the trailer running lights, brake lights, and
turn signals.
2. Always drive your vehicle at a moderate
speed. (Less than 60 mph)
3. Trailer towing requires more fuel than normal
conditions.
4. To maintain engine braking efficiency and
electrical charging performance, do not tow
a trailer with the transaxle in fifth gear (manual
transaxle).
5. Always secure items in the trailer to prevent
load shift while driving.
6. Check the condition and air pressure of all
tires on the trailer and your car. Low tire
pressure can seriously affect the handling.
Also check the spare tire.
7. The vehicle/trailer combination is more af-
fected by crosswind and buffeting.
When being passed by a large vehicle, keep
a constant speed and steer straight ahead.
If there is too much wind buffeting, slow down
to get out of the other vehicle's air turbulence.
!
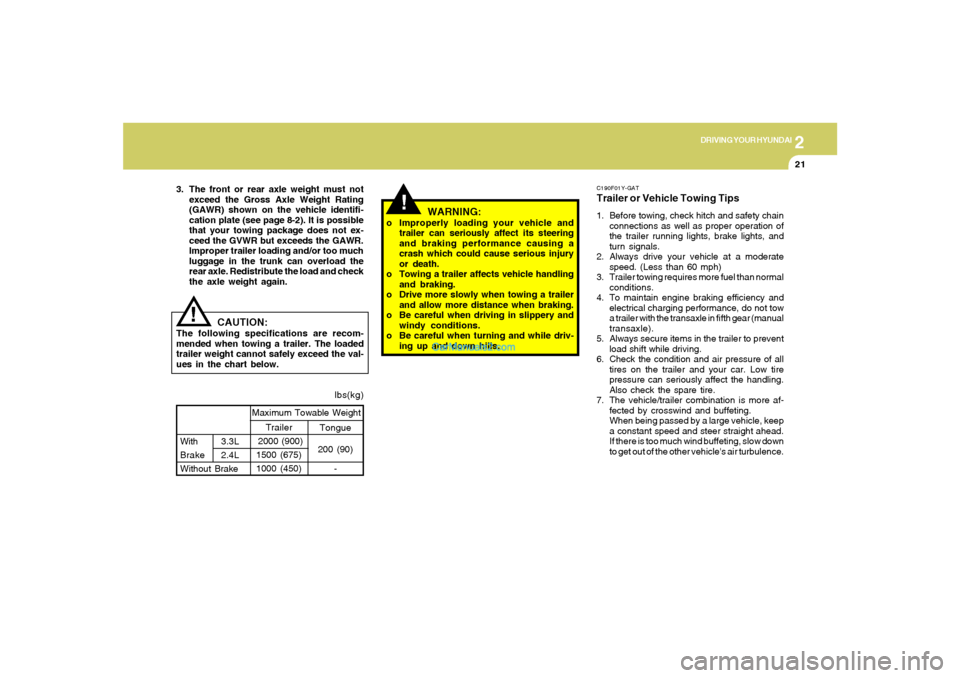
lbs(kg)
!
Tongue
200 (90)
- With3.3L
Brake 2.4L
Without BrakeMaximum Towable Weight
Trailer
2000 (900)
1500 (675)
1000 (450)
CAUTION:
The following specifications are recom-
mended when towing a trailer. The loaded
trailer weight cannot safely exceed the val-
ues in the chart below.
WARNING:
o Improperly loading your vehicle and
trailer can seriously affect its steering
and braking performance causing a
crash which could cause serious injury
or death.
o Towing a trailer affects vehicle handling
and braking.
o Drive more slowly when towing a trailer
and allow more distance when braking.
o Be careful when driving in slippery and
windy conditions.
o Be careful when turning and while driv-
ing up and down hills. 3. The front or rear axle weight must not
exceed the Gross Axle Weight Rating
(GAWR) shown on the vehicle identifi-
cation plate (see page 8-2). It is possible
that your towing package does not ex-
ceed the GVWR but exceeds the GAWR.
Improper trailer loading and/or too much
luggage in the trunk can overload the
rear axle. Redistribute the load and check
the axle weight again.
Page 167 of 271
2
DRIVING YOUR HYUNDAI
23
C190F01JMTotal
1400 lbs
(635 kg)
300 lbs
(136 kg)
1100 lbs
(489 kg)
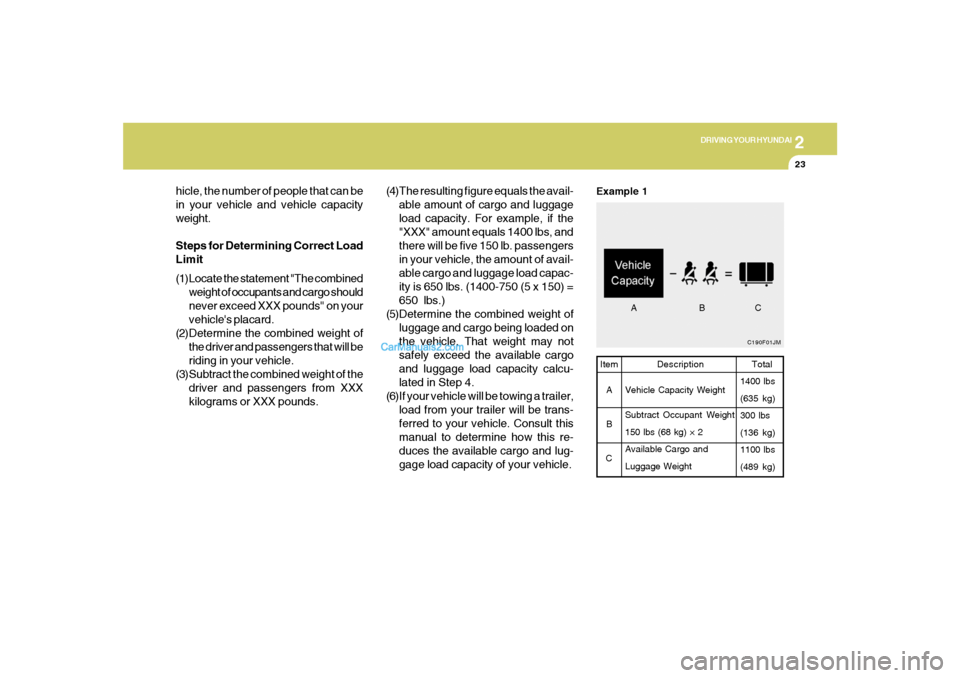
Example 1Item
A
B
CDescription
Vehicle Capacity Weight
Subtract Occupant Weight
150 lbs (68 kg) × 2
Available Cargo and
Luggage Weight
ABC
hicle, the number of people that can be
in your vehicle and vehicle capacity
weight.
Steps for Determining Correct Load
Limit
(1)Locate the statement "The combined
weight of occupants and cargo should
never exceed XXX pounds'' on your
vehicle's placard.
(2)Determine the combined weight of
the driver and passengers that will be
riding in your vehicle.
(3)Subtract the combined weight of the
driver and passengers from XXX
kilograms or XXX pounds.(4)The resulting figure equals the avail-
able amount of cargo and luggage
load capacity. For example, if the
"XXX" amount equals 1400 lbs, and
there will be five 150 lb. passengers
in your vehicle, the amount of avail-
able cargo and luggage load capac-
ity is 650 lbs. (1400-750 (5 x 150) =
650 lbs.)
(5)Determine the combined weight of
luggage and cargo being loaded on
the vehicle. That weight may not
safely exceed the available cargo
and luggage load capacity calcu-
lated in Step 4.
(6)If your vehicle will be towing a trailer,
load from your trailer will be trans-
ferred to your vehicle. Consult this
manual to determine how this re-
duces the available cargo and lug-
gage load capacity of your vehicle.
Page 168 of 271
2
DRIVING YOUR HYUNDAI
24
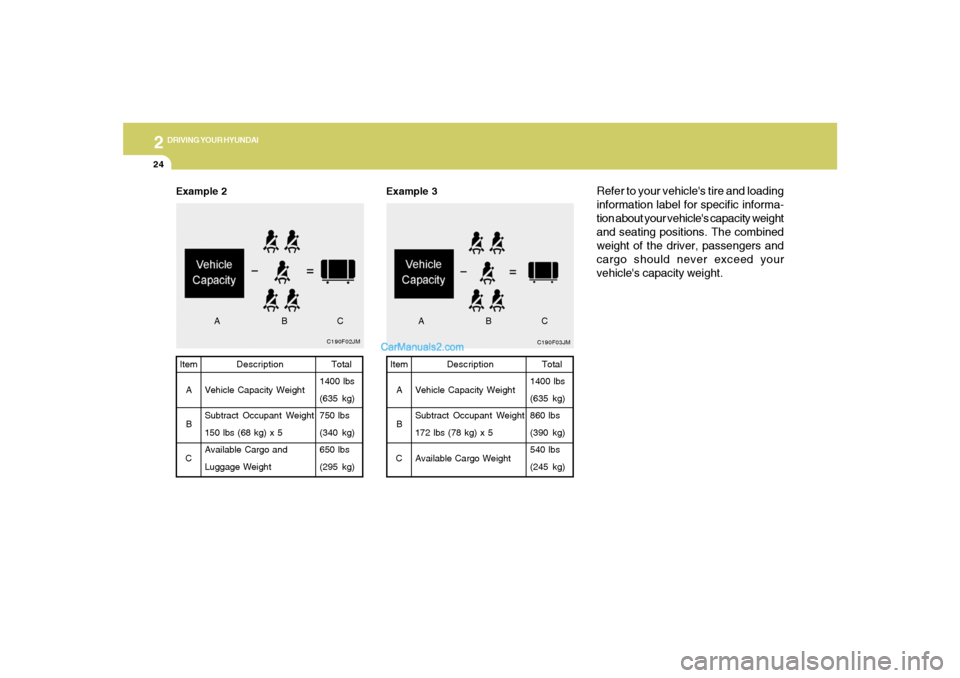
C190F02JM
Example 2
Total
1400 lbs
(635 kg)
750 lbs
(340 kg)
650 lbs
(295 kg) Item
A
B
CDescription
Vehicle Capacity Weight
Subtract Occupant Weight
150 lbs (68 kg) x 5
Available Cargo and
Luggage Weight
ABC
C190F03JMTotal
1400 lbs
(635 kg)
860 lbs
(390 kg)
540 lbs
(245 kg) Item
A
B
CDescription
Vehicle Capacity Weight
Subtract Occupant Weight
172 lbs (78 kg) x 5
Available Cargo Weight
Example 3
ABC
Refer to your vehicle's tire and loading
information label for specific informa-
tion about your vehicle's capacity weight
and seating positions. The combined
weight of the driver, passengers and
cargo should never exceed your
vehicle's capacity weight.
Page 169 of 271
2
DRIVING YOUR HYUNDAI
25
!
WARNING:
o Overloading your vehicle can
cause heat buildup in your
vehicle's tires and possible tire
failure that could lead to a crash.
o Overloading your vehicle can
cause increased stopping dis-
tances that could lead to a crash.
o A crash resulting from poor han-
dling vehicle damage, tire failure,
or increased stopping distances
could result in serious injury or
death.
!
This label also tells you the maximum
weights that can be supported by the
front and rear axles, called Gross Axle
Weight Rating (GAWR). To find out the
actual loads on your front and rear
axles, you need to go to a weigh station
and weigh your vehicle. Your dealer can
help you with this. Be sure to spread out
your load equally on the left and right
sides of the centerline.
WARNING:
o Never exceed the GVWR for your
vehicle or the GAWR for either the
front or rear axle.
o Do not load your vehicle any
heavier than the GVWR or either
the maximum front or rear GAWR.
If you do, parts on your vehicle
can break, and it can change the
way your vehicle handles. This
could cause you to lose control
and crash. Also, overloading can
shorten the life of your vehicle.
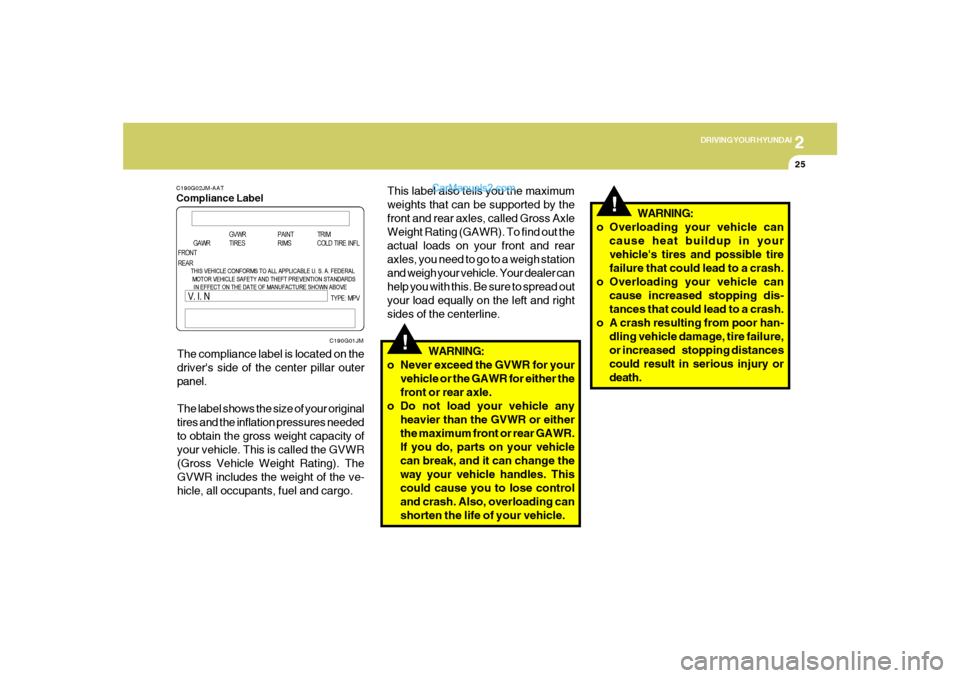
C190G02JM-AATCompliance LabelThe compliance label is located on the
driver's side of the center pillar outer
panel.
The label shows the size of your original
tires and the inflation pressures needed
to obtain the gross weight capacity of
your vehicle. This is called the GVWR
(Gross Vehicle Weight Rating). The
GVWR includes the weight of the ve-
hicle, all occupants, fuel and cargo.
C190G01JM
Page 170 of 271
2
DRIVING YOUR HYUNDAI
26
!
WARNING:
Items you carry inside your vehicle
can strike and injure people in a
sudden stop or turn, or in a crash.
o Put things in the cargo area of
your vehicle. Try to spread the
weight evenly.
o Never stack items, like suitcases,
inside the vehicle above the tops
of the seats.
o Do not leave an unsecured child
restraint in your vehicle.
o When you carry something inside
the vehicle, secure it.
o Do not drive with a seat folded
down unless necessary. NOTE:
o Overloading your vehicle may
cause damage. Repairs would not
be covered by your warranty. Do
not overload your vehicle.
o Using heavier suspension com-
ponents to get added durability
might not change your weight rat-
ings. Ask your dealer to help you
load your vehicle the right way.
The label will help you decide how much
cargo and installed equipment your
vehicle can carry.
If you carry items inside your vehicle –
like suitcases, tools, packages, or any-
thing else – they move as fast as the
vehicle goes. If you have to stop or turn
quickly, or if there is a crash, the items
will keep going and can cause an injury
if they strike the driver or a passenger.
Page 228 of 271

6
DO-IT-YOURSELF MAINTENANCE
30
HEADLIGHT AIMING ADJUSTMENTG290A02O-AATBefore performing aiming adjustment, make
sure of the following.
1. Keep all tires inflated to the correct pressure.
2. Place the vehicle on level ground and press
the front bumper & rear bumper down sev-
eral times.
Place vehicle at a distance of 118 in. (3m)
from the test wall.
3. See that the vehicle is unloaded (except for
full levels of coolant, engine oil and fuel, and
spare tire, jack, and tools). Have the driver
or equivalent weight placed in driver's seat.
4. Clean the headlight lenses and turn on the
headlights (Low beam).
5. Open the hood.
G290A01NF-A
Vertical
aiming
!
6. Draw a vertical line (through the center of
each headlight beam pattern) and a horizon-
tal line (through the center of each headlight
beam pattern) on the aiming screen.
And then, draw a parallel line at 0.8 in. (21
mm) under the horizontal line.
7. Adjust each cut-off line of the low beam to the
parallel line with a phillips screwdriver -
VERTICAL AIMING.
WARNING:
Horizontal aiming should be adjusted by
an authorized Hyundai dealer.
G290B01NF-AATAdjustment After Headlight Assembly
Replacement
G260B01GK
L
W
H
H
Cut-off line
Ground line
"P"
Horizontal line
Vertical line
0.8 in.(21 mm)
If the vehicle has had front body repair and the
headlight assembly has been replaced, the
headlight aiming should be checked using the
aiming screen as shown in the illustration. Turn
on the headlight switch (Low Beam Position).
1. Adjust headlights so that main axis of light is
parallel to the center line of the body and is
aligned with point "P" shown in the illustration.
2. Dotted lines in the illustration show the center
of the headlights.
Page 247 of 271
8
CONSUMER INFORMATION, REPORTING SAFETY DEFECTS & BINDING ARBITRATION OF WARRANTY CLAIMS
3
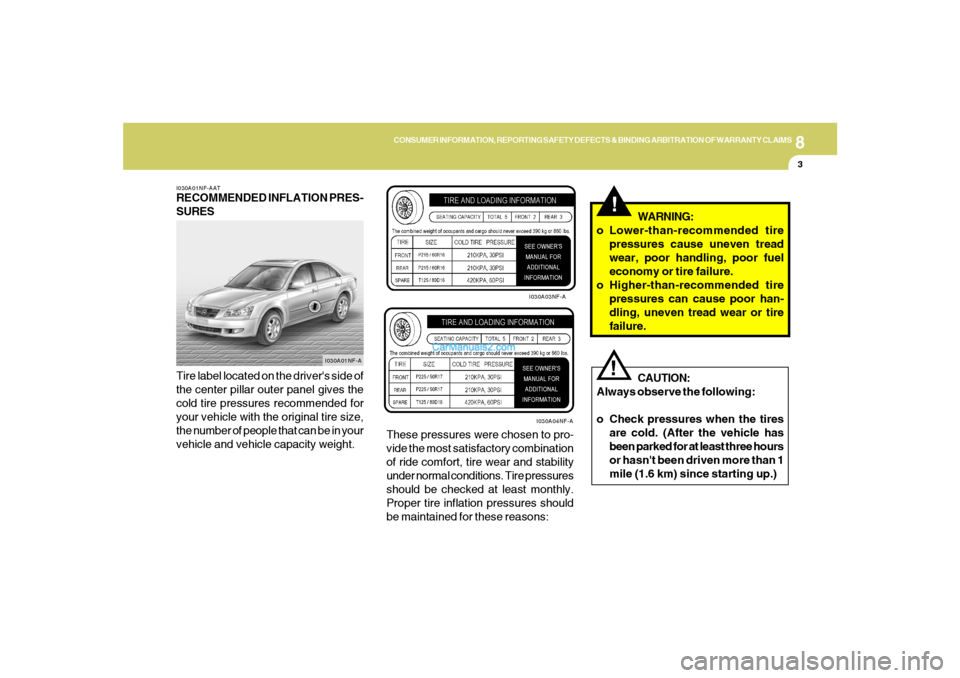
I030A01NF-AATRECOMMENDED INFLATION PRES-
SURES
Tire label located on the driver's side of
the center pillar outer panel gives the
cold tire pressures recommended for
your vehicle with the original tire size,
the number of people that can be in your
vehicle and vehicle capacity weight.These pressures were chosen to pro-
vide the most satisfactory combination
of ride comfort, tire wear and stability
under normal conditions. Tire pressures
should be checked at least monthly.
Proper tire inflation pressures should
be maintained for these reasons:
!
CAUTION:
Always observe the following:
o Check pressures when the tires
are cold. (After the vehicle has
been parked for at least three hours
or hasn't been driven more than 1
mile (1.6 km) since starting up.)
!
WARNING:
o Lower-than-recommended tire
pressures cause uneven tread
wear, poor handling, poor fuel
economy or tire failure.
o Higher-than-recommended tire
pressures can cause poor han-
dling, uneven tread wear or tire
failure.
I030A01NF-AI030A03NF-A
I030A04NF-A