2005 Hyundai Santa Fe spare tire
[x] Cancel search: spare tirePage 176 of 277
2
DRIVING YOUR HYUNDAI
26
C190F02O-AATTrailer or Vehicle Towing Tips1. Before towing, check hitch and safety chain
connections as well as proper operation of
the trailer running lights, brake lights, and
turn signals.
2. Trailer towing requires more fuel than normal
conditions.
3. To maintain engine braking efficiency, do not
tow a trailer with the transaxle engaged in
overdrive gear.
4. Always secure items in the trailer to prevent
load shift while driving.
5. Check the condition and air pressure of all
tires on the trailer and your car. Low tire
pressure can seriously affect the handling.
Also check the spare tire.
6. The vehicle/trailer combination is more af-
fected by crosswind and buffeting.
When being passed by a large vehicle, keep
a constant speed and steer straight ahead.
If there is too much wind buffeting, slow down
to get out of the other vehicle's air turbulence.
7. When parking your car and trailer, especially
on a hill, be sure to follow all the normal
precautions. Turn your front wheel into the
curb, set the parking brake firmly, and put the
transaxle in Park. In addition, place wheel
chocks at each of the trailer's tires.
!
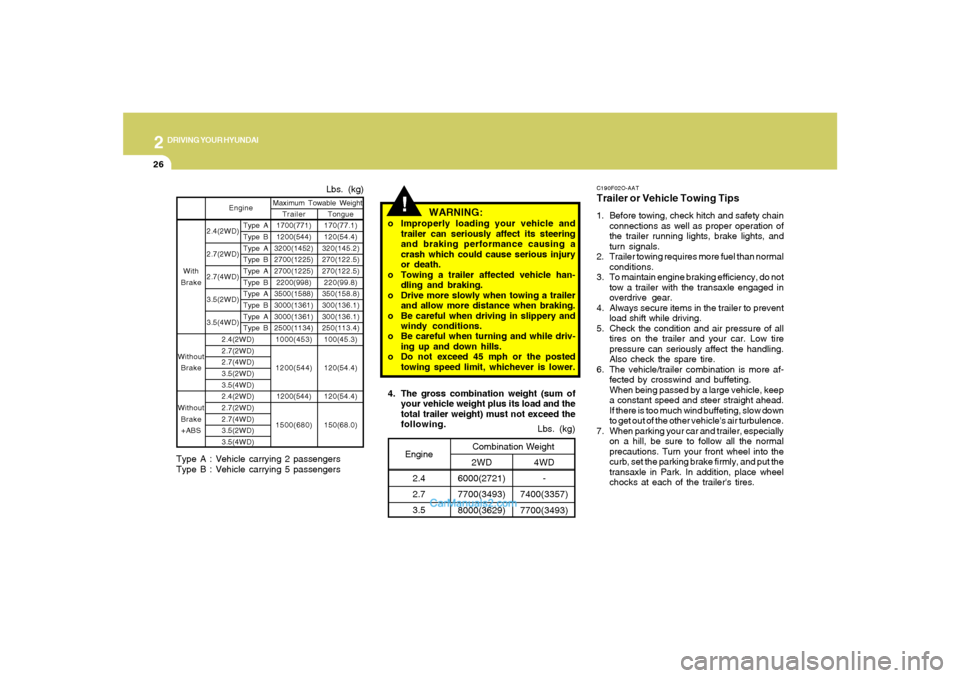
4. The gross combination weight (sum of
your vehicle weight plus its load and the
total trailer weight) must not exceed the
following.
4WD
-
7400(3357)
7700(3493)Lbs. (kg)
2WD
6000(2721)
7700(3493)
8000(3629)Combination Weight
Engine
2.4
2.7
3.5
WARNING:
o Improperly loading your vehicle and
trailer can seriously affect its steering
and braking performance causing a
crash which could cause serious injury
or death.
o Towing a trailer affected vehicle han-
dling and braking.
o Drive more slowly when towing a trailer
and allow more distance when braking.
o Be careful when driving in slippery and
windy conditions.
o Be careful when turning and while driv-
ing up and down hills.
o Do not exceed 45 mph or the posted
towing speed limit, whichever is lower.
2.4(2WD)
2.7(2WD)
2.7(4WD)
3.5(2WD)
3.5(4WD)Tongue
170(77.1)
120(54.4)
320(145.2)
270(122.5)
270(122.5)
220(99.8)
350(158.8)
300(136.1)
300(136.1)
250(113.4)
100(45.3)
120(54.4)
120(54.4)
150(68.0)
Lbs. (kg)
Trailer
1700(771)
1200(544)
3200(1452)
2700(1225)
2700(1225)
2200(998)
3500(1588)
3000(1361)
3000(1361)
2500(1134)
1000(453)
1200(544)
1200(544)
1500(680) Maximum Towable Weight
Type A
Type B
Type A
Type B
Type A
Type B
Type A
Type B
Type A
Type B With
Brake
Without
Brake
Without
Brake
+ABS
Engine2.4(2WD)
2.7(2WD)
2.7(4WD)
3.5(2WD)
3.5(4WD)
2.4(2WD)
2.7(2WD)
2.7(4WD)
3.5(2WD)
3.5(4WD)
Type A : Vehicle carrying 2 passengers
Type B : Vehicle carrying 5 passengers
Page 182 of 277

If the Engine will not Start .............................................. 3-2
Jump Starting ................................................................ 3-3
If the Engine Overheats ................................................ 3-4
Spare Tire ..................................................................... 3-5
If You Have a Flat Tire .................................................. 3-6
Changing a Flat Tire ...................................................... 3-6
If Your Vehicle Must be Towed...................................3-12
Emergency Towing.....................................................3-14
If You Lose Your Keys................................................3-15
3
WHAT TO DO IN AN EMERGENCY
3
Page 186 of 277
3
WHAT TO DO IN AN EMERGENCY
5
SPARE TIRED040A01O-GATThe following instructions for the FULL
SIZE spare tire should be observed:
Check inflation pressure as soon as
practical after installing the spare tire,
and adjust to the specified pressure.
The tire pressure should be periodically
checked and maintained at the speci-
fied pressure while the tire is stored.
Spare Tire Pressure
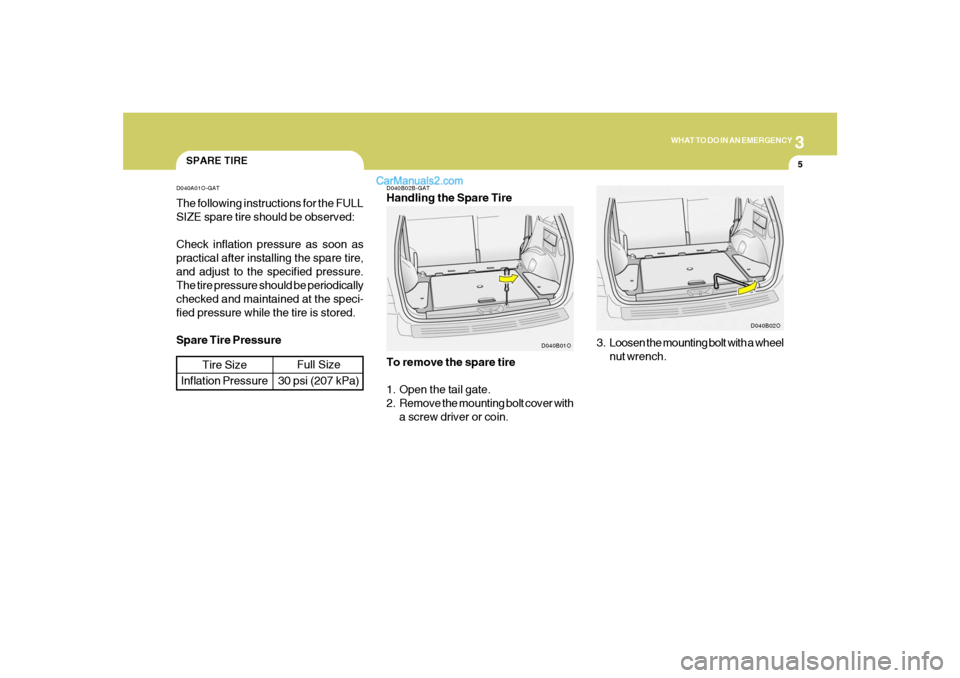
D040B02B-GATHandling the Spare Tire
Tire Size
Inflation Pressure
Full Size
30 psi (207 kPa)To remove the spare tire
1. Open the tail gate.
2. Remove the mounting bolt cover with
a screw driver or coin.
D040B01O
3. Loosen the mounting bolt with a wheel
nut wrench.
D040B02O
Page 187 of 277
36WHAT TO DO IN AN EMERGENCY
CHANGING A FLAT TIRE
IF YOU HAVE A FLAT TIRE
D060A02O-AATThe procedure described on the follow-
ing pages can be used to rotate tires as
well as to change a flat tire. When
preparing to change a flat tire, check to
be sure the gear selector lever is in "P"
and that the parking brake is set, then:
HSM4016
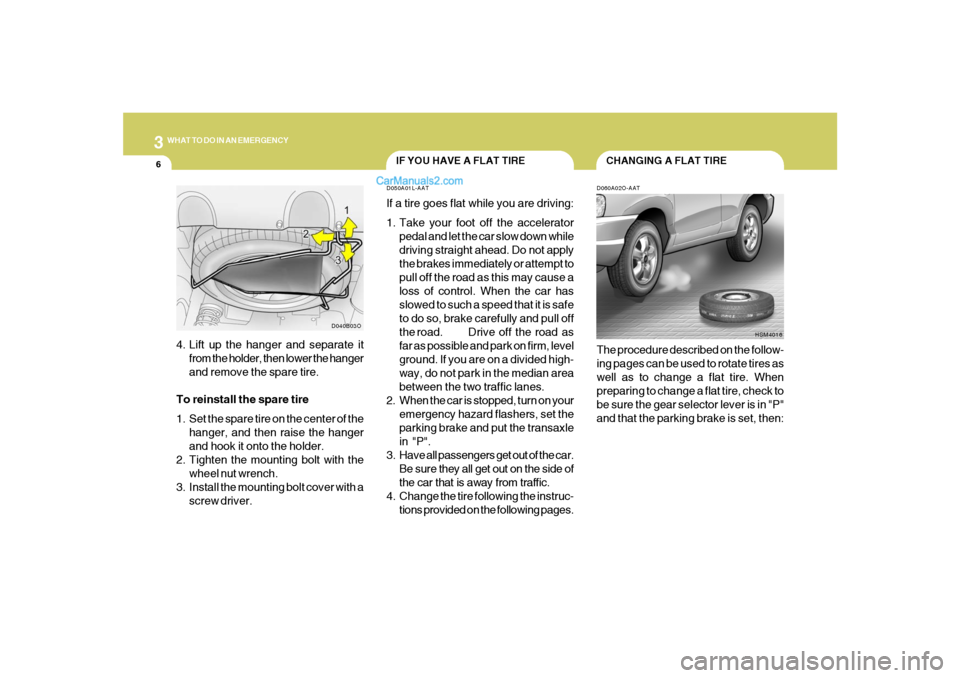
4. Lift up the hanger and separate it
from the holder, then lower the hanger
and remove the spare tire.
To reinstall the spare tire
1. Set the spare tire on the center of the
hanger, and then raise the hanger
and hook it onto the holder.
2. Tighten the mounting bolt with the
wheel nut wrench.
3. Install the mounting bolt cover with a
screw driver.
D050A01L-AATIf a tire goes flat while you are driving:
1. Take your foot off the accelerator
pedal and let the car slow down while
driving straight ahead. Do not apply
the brakes immediately or attempt to
pull off the road as this may cause a
loss of control. When the car has
slowed to such a speed that it is safe
to do so, brake carefully and pull off
the road. Drive off the road as
far as possible and park on firm, level
ground. If you are on a divided high-
way, do not park in the median area
between the two traffic lanes.
2. When the car is stopped, turn on your
emergency hazard flashers, set the
parking brake and put the transaxle
in "P".
3. Have all passengers get out of the car.
Be sure they all get out on the side of
the car that is away from traffic.
4. Change the tire following the instruc-
tions provided on the following pages.
D040B03O
Page 188 of 277
3
WHAT TO DO IN AN EMERGENCY
7
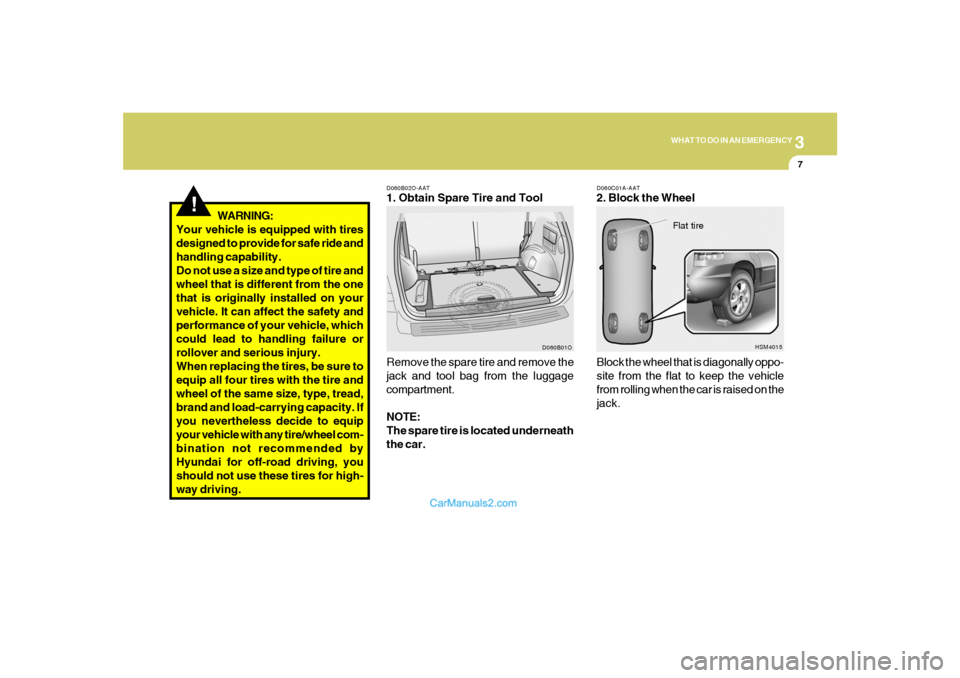
D060C01A-AAT2. Block the Wheel
D060B02O-AAT1. Obtain Spare Tire and Tool
Remove the spare tire and remove the
jack and tool bag from the luggage
compartment.
NOTE:
The spare tire is located underneath
the car.Block the wheel that is diagonally oppo-
site from the flat to keep the vehicle
from rolling when the car is raised on the
jack.
D060B01OHSM4015
Flat tire
!
WARNING:
Your vehicle is equipped with tires
designed to provide for safe ride and
handling capability.
Do not use a size and type of tire and
wheel that is different from the one
that is originally installed on your
vehicle. It can affect the safety and
performance of your vehicle, which
could lead to handling failure or
rollover and serious injury.
When replacing the tires, be sure to
equip all four tires with the tire and
wheel of the same size, type, tread,
brand and load-carrying capacity. If
you nevertheless decide to equip
your vehicle with any tire/wheel com-
bination not recommended by
Hyundai for off-road driving, you
should not use these tires for high-
way driving.
Page 190 of 277

3
WHAT TO DO IN AN EMERGENCY
9
!
Raise the car high enough so that the
fully inflated spare tire can be installed.
To do this, you will need more ground
clearance than is required to remove
the flat tire.
WARNING:
Do not get under the car when it is
supported by the jack! This is very
dangerous as the vehicle could fall
and cause serious injury or death.
No one should stay in the car while
the jack is being used.
!
D060G02Y-AAT6. Changing Wheels
Loosen the wheel nuts and remove
them with your fingers. Slide the wheel
off the studs and lay it flat so it cannot
roll away. To put the wheel on the hub,
pick up the spare tire, line up the holes
with the studs and slide the wheel onto
them. If this is difficult, tip the wheel
slightly and get the top hole in the wheel
lined up with the top stud. Then jiggle
the wheel back and forth until the wheel
can be slid over the other studs.WARNING:
Wheels and wheel covers may have
sharp edges. Handle them carefully
to avoid possible severe injury. Be-
fore putting the wheel into place, be
sure that there is nothing on the hub
or wheel (such as mud, tar, gravel,
etc.) that interferes with the wheel
from fitting solidly against the hub.
D060G01OD060G02O
Page 215 of 277
6
DO-IT-YOURSELF MAINTENANCE
4
GENERAL CHECKS
G020C01L-AATVehicle InteriorThe following should be checked each time
when the vehicle is driven:
o Lights operation
o Windshield wiper operation
o Horn operation
o Defroster, heating system operation (and air
conditioning, if installed)
o Steering operation and condition
o Mirror condition and operation
o Turn signal operation
o Accelerator pedal operation
o Brake operation, including parking brake
o Automatic transaxle operation, including
"Park" mechanism operation
o Seat control condition and operation
o Seat belt condition and operation
o Sunvisor operation
If you notice anything that does not operate
correctly or appears to be functioning correctly,
inspect it carefully and seek assistance from
your Hyundai dealer if service is needed.
G020B01A-AATVehicle ExteriorThe following should be checked monthly:
o Overall appearance and condition
o Wheel condition and wheel nut torque
o Exhaust system condition
o Light condition and operation
o Windshield glass condition
o Wiper blade condition
o Paint condition and body corrosion
o Fluid leaks
o Door and hood lock condition
o Tire pressure and condition
(including spare tire)
G020A01L-AATEngine CompartmentThe following should be checked regularly:
o Engine oil level and condition
o Transaxle fluid level and condition
o Brake fluid level
o Engine coolant level
o Windshield washer fluid level
o Accessory drive belt condition
o Engine coolant hose condition
o Fluid leaks (on or below components)
o Power steering fluid level
o Battery condition
o Air filter condition
Page 235 of 277
6
DO-IT-YOURSELF MAINTENANCE
24
G250A01A-AATFOR MORE INFORMATION ABOUT
YOUR HYUNDAIIf you desire additional information about main-
taining and servicing your Hyundai, you may
purchase a factory Shop Manual at your Hyundai
dealer's parts department. This is the same
manual used by dealership technicians and
while it is highly technical it can be useful in
obtaining a better understanding of your car and
how it works.
G240A01A-AATPOWER STEERING HOSESIt is suggested that you check the power steer-
ing hose connections for fluid leakage at those
intervals specified in the vehicle maintenance
schedule in Section 5.
The power steering hoses should be replaced
if there is severe surface cracking, pulling,
scuffing or worn spots. Deterioration of the hose
could cause premature failure. Recommended Fluid
Use PSF-3 type fluidNOTE:Do not start the engine when the power
steering oil reservoir is empty.
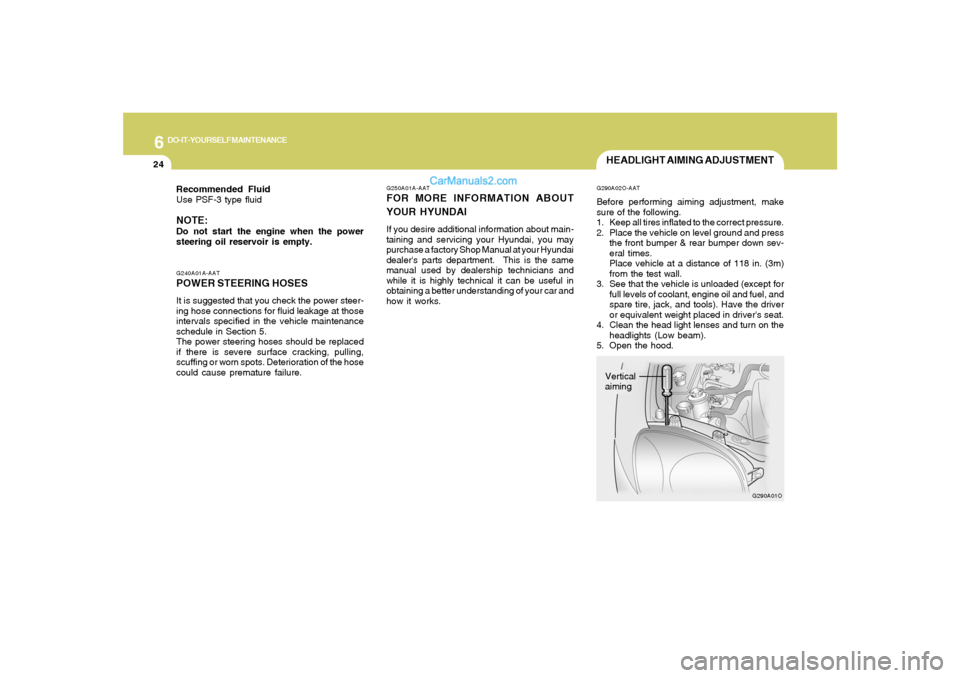
HEADLIGHT AIMING ADJUSTMENTG290A02O-AATBefore performing aiming adjustment, make
sure of the following.
1. Keep all tires inflated to the correct pressure.
2. Place the vehicle on level ground and press
the front bumper & rear bumper down sev-
eral times.
Place vehicle at a distance of 118 in. (3m)
from the test wall.
3. See that the vehicle is unloaded (except for
full levels of coolant, engine oil and fuel, and
spare tire, jack, and tools). Have the driver
or equivalent weight placed in driver's seat.
4. Clean the head light lenses and turn on the
headlights (Low beam).
5. Open the hood.
G290A01O
Vertical
aiming