Page 211 of 277

5
VEHICLE MAINTENANCE REQUIREMENTS
9
F070L01A-AATo Suspension Mounting BoltsCheck the suspension connections for loose-
ness or damage. Retighten to the specified
torque.
F070G02A-AATo Brake FluidCheck brake fluid level in the brake fluid reser-
voir. The level should be between "MIN" and
"MAX" marks on the side of the reservoir. Use
only hydraulic brake fluid conforming to DOT 3
or DOT 4.
F070K01A-AATo Exhaust Pipe and MufflerVisually inspect the exhaust pipes, muffler and
hangers for cracks, deterioration, or damage.
Start the engine and listen carefully for any
exhaust gas leakage. Tighten connections or
replace parts as necessary.
F070J01A-AATo Brake Pads, Calipers and RotorsCheck the pads for excessive wear, discs for
run out and wear, and calipers for fluid leakage.F070H01B-AATo Rear Brake Pads and Linings/
Parking BrakeCheck the rear brake pads and linings for
scoring, burning, leaking fluid, broken parts,
and excessive wear. Inspect the parking brake
system including the parking brake lever and
cables. For detailed service procedures, refer
to the Shop Manual.
F070M01A-AATo Steering Gear Box, Linkage & Boots/
Lower Arm Ball JointWith the vehicle stopped and engine off, check
for excessive free-play in the steering wheel.
Check the linkage for bends or damage. Check
the dust boots and ball joints for deterioration,
cracks, or damage. Replace any damaged
parts.
F070Q01A-AATo Air Conditioning RefrigerantCheck the air conditioning lines and connec-
tions for leakage and damage. Check air con-
ditioning performance according to the relevant
shop manual if necessary.F070P01A-AATo Driveshafts and BootsCheck the drive shafts, boots and clamps for
cracks, deterioration, or damage. Replace any
damaged parts and, if necessary, repack the
grease.F070N01A-AATo Power Steering Pump, Belt and HosesCheck the power steering pump and hoses for
leakage and damage. Replace any damaged or
leaking parts immediately. Inspect the power
steering belt for evidence of cuts, cracks, ex-
cessive wear, oiliness and proper tension.
Replace or adjust it if necessary.
Page 212 of 277

6
Engine Compartment .................................................... 6-2
General Checks ............................................................ 6-4
Checking the Engine Oil ............................................... 6-5
Changing the Oil and Filter ............................................ 6-6
Checking and Changing the Engine Coolant ................ 6-8
Spark Plugs................................................................6-10
Changing the Air Cleaner Filter ...................................6-11
Checking the Transaxle Fluid (Automatic)..................6-13
Checking the Brakes ..................................................6-15
Air Conditioning Care..................................................6-16
Checking Drive Belts ..................................................6-19
Checking and Replacing Fuses..................................6-20
Checking the Battery..................................................6-22
Power Steering Fluid Level .........................................6-23
Replacement of Light Bulbs ........................................6-26
Bulb Wattage ...............................................................6-32
Fuse Panel Description...............................................6-33
DO-IT-YOURSELF MAINTENANCE
6
Page 213 of 277
6
DO-IT-YOURSELF MAINTENANCE
2
G010B01O-AAT(2.7 V6)1. Coolant reservoir cap
2. Brake fluid reservoir
3. Air cleaner
4. Fuse and Relay box5. Windshield washer fluid reservoir
6. Power steering fluid reservoir
7. Engine oil level dipstick
8. Radiator cap 9. Engine oil filler cap
10. Automatic transaxle fluid level dipstick
11. Battery
G010B01O
1234
56 7 8 9 10 11
CAUTION:
When inspecting or servicing the engine,
you should handle tools and other heavy
objects carefully so that the plastic cover of
the engine is not damaged.
!
Page 214 of 277
6
DO-IT-YOURSELF MAINTENANCE
3
G010C01O-AAT(3.5 V6)1. Coolant reservoir cap
2. Engine oil filler cap
3. Brake fluid reservoir
4. Air cleaner5. Fuse and Relay box
6. Windshield washer fluid reservoir
7. Power steering fluid reservoir
8. Radiator cap 9. Engine oil level dipstick
10. Automatic transaxle fluid level dipstick
11. Battery
HSM424
1345
6 7 8 9 10 11
CAUTION:
When inspecting or servicing the engine,
you should handle tools and other heavy
objects carefully so that the plastic cover of
the engine is not damaged.
!
2
Page 215 of 277

6
DO-IT-YOURSELF MAINTENANCE
4
GENERAL CHECKS
G020C01L-AATVehicle InteriorThe following should be checked each time
when the vehicle is driven:
o Lights operation
o Windshield wiper operation
o Horn operation
o Defroster, heating system operation (and air
conditioning, if installed)
o Steering operation and condition
o Mirror condition and operation
o Turn signal operation
o Accelerator pedal operation
o Brake operation, including parking brake
o Automatic transaxle operation, including
"Park" mechanism operation
o Seat control condition and operation
o Seat belt condition and operation
o Sunvisor operation
If you notice anything that does not operate
correctly or appears to be functioning correctly,
inspect it carefully and seek assistance from
your Hyundai dealer if service is needed.
G020B01A-AATVehicle ExteriorThe following should be checked monthly:
o Overall appearance and condition
o Wheel condition and wheel nut torque
o Exhaust system condition
o Light condition and operation
o Windshield glass condition
o Wiper blade condition
o Paint condition and body corrosion
o Fluid leaks
o Door and hood lock condition
o Tire pressure and condition
(including spare tire)
G020A01L-AATEngine CompartmentThe following should be checked regularly:
o Engine oil level and condition
o Transaxle fluid level and condition
o Brake fluid level
o Engine coolant level
o Windshield washer fluid level
o Accessory drive belt condition
o Engine coolant hose condition
o Fluid leaks (on or below components)
o Power steering fluid level
o Battery condition
o Air filter condition
Page 227 of 277

6
DO-IT-YOURSELF MAINTENANCE
16
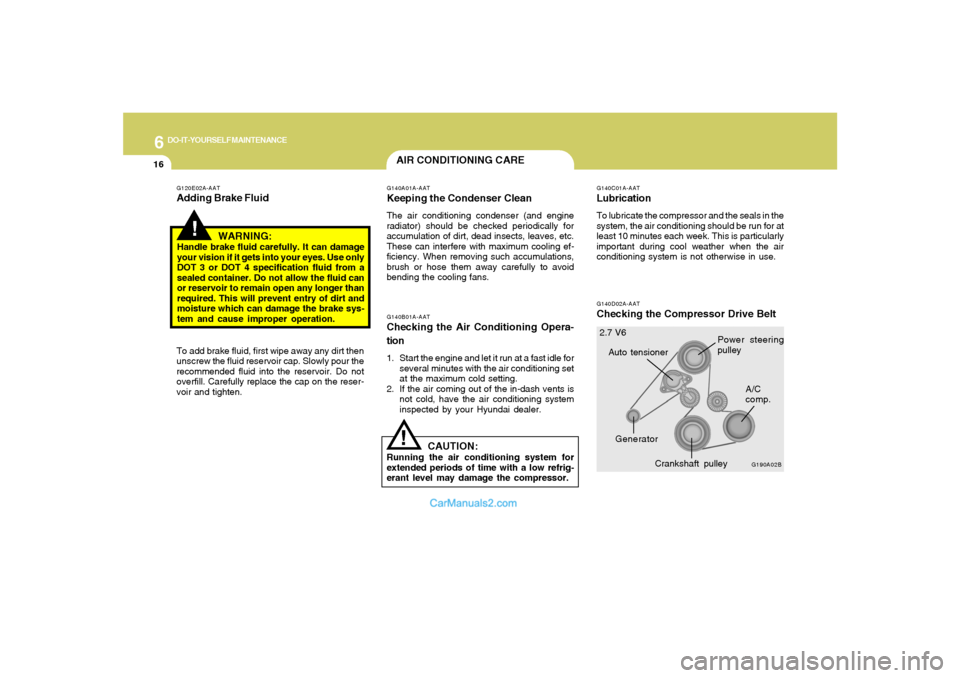
G140D02A-AATChecking the Compressor Drive Belt
G190A02BA/C
comp.
Crankshaft pulley
Power steering
pulley
Auto tensioner
Generator 2.7 V6
G140C01A-AATLubricationTo lubricate the compressor and the seals in the
system, the air conditioning should be run for at
least 10 minutes each week. This is particularly
important during cool weather when the air
conditioning system is not otherwise in use.
!
G120E02A-AATAdding Brake Fluid
WARNING:Handle brake fluid carefully. It can damage
your vision if it gets into your eyes. Use only
DOT 3 or DOT 4 specification fluid from a
sealed container. Do not allow the fluid can
or reservoir to remain open any longer than
required. This will prevent entry of dirt and
moisture which can damage the brake sys-
tem and cause improper operation.
To add brake fluid, first wipe away any dirt then
unscrew the fluid reservoir cap. Slowly pour the
recommended fluid into the reservoir. Do not
overfill. Carefully replace the cap on the reser-
voir and tighten.
AIR CONDITIONING CARE!
G140A01A-AATKeeping the Condenser CleanThe air conditioning condenser (and engine
radiator) should be checked periodically for
accumulation of dirt, dead insects, leaves, etc.
These can interfere with maximum cooling ef-
ficiency. When removing such accumulations,
brush or hose them away carefully to avoid
bending the cooling fans.G140B01A-AATChecking the Air Conditioning Opera-
tion1. Start the engine and let it run at a fast idle for
several minutes with the air conditioning set
at the maximum cold setting.
2. If the air coming out of the in-dash vents is
not cold, have the air conditioning system
inspected by your Hyundai dealer.
CAUTION:
Running the air conditioning system for
extended periods of time with a low refrig-
erant level may damage the compressor.
Page 228 of 277
6
DO-IT-YOURSELF MAINTENANCE
17
When the air conditioning is being used regu-
larly, the compressor drive belt tension should
be checked at least once a month with the
engine turned off.
To check the drive belt tension, press down on
the belt halfway between the engine crankshaft
and compressor pulleys. Pressing with your
finger, you should not be able to deflect this belt
anymore than 1/3 of an inch. If the belt is too
loose, have it adjusted by your Hyundai dealer.
G140D02L
3.5 V6
A/C pulleyGenerator
Power steering pulley
Crankshaft pulley
CHANGING THE AIR
CONDITIONER FILTERB145A03O-GAT(For Evaporator and Blower Unit)
(If Installed)The air conditioner filter is located in front of the
evaporator unit behind the glove box.
It helps to decrease the amount of pollutants
entering the car.
1. Open the glove box and take out the damper
strap through the hole.
HSM412
2. Lower the glove box down completely by
pushing the both sides of the glove box
inward.
HSM345HSM442
Page 229 of 277
6
DO-IT-YOURSELF MAINTENANCE
18
3. Turn over the wall paper on the air condi-
tioner filter cover.
HSM443
5. Replace two conditioner filters by pulling the
knob of the air conditioner filter outward.
6. Installation is the reverse order of disassem-
bly.
!
4. Turn the knob of the air conditioner filter
cover counterclockwise and remove the air
conditioner filter cover.
HSM444
CAUTION:
Be sure to install the air conditioner filter in
the direction of the arrow sign. Otherwise,
it may cause noise or deterioration.
CHECKING THE FREE-PLAYG150A01A-AATSTEERING WHEELTo check the steering wheel free-play, stop the
car with the wheels pointed straight ahead and
gently move the steering wheel back and forth.
Use very light finger pressure and be sensitive
to changes in resistance that mark the limits of
the free-play. If the free-play is greater than
specified, have it inspected by your Hyundai
dealer and adjusted or repaired if necessary.
G150A01O
1.18 in.
(30 mm)