2005 Hyundai Santa Fe warning lights
[x] Cancel search: warning lightsPage 78 of 277
1
FEATURES OF YOUR HYUNDAI
67
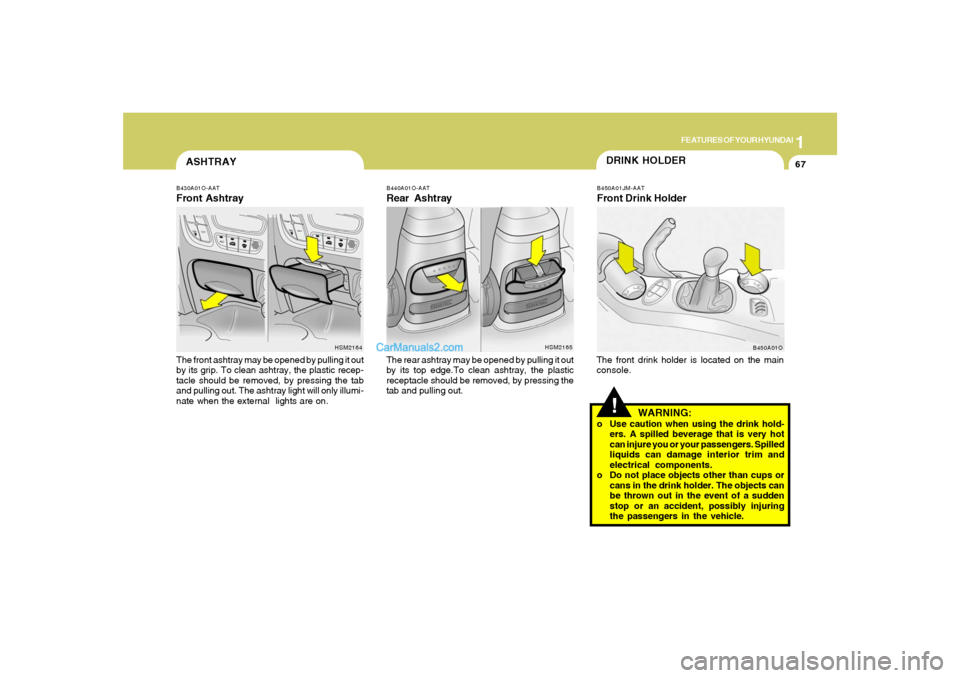
B430A01O-AATFront AshtrayThe front ashtray may be opened by pulling it out
by its grip. To clean ashtray, the plastic recep-
tacle should be removed, by pressing the tab
and pulling out. The ashtray light will only illumi-
nate when the external lights are on.
HSM2164
B440A01O-AATRear AshtrayThe rear ashtray may be opened by pulling it out
by its top edge.To clean ashtray, the plastic
receptacle should be removed, by pressing the
tab and pulling out.
HSM2165
ASHTRAY
DRINK HOLDER!
B450A01JM-AATFront Drink HolderThe front drink holder is located on the main
console.
WARNING:
o Use caution when using the drink hold-
ers. A spilled beverage that is very hot
can injure you or your passengers. Spilled
liquids can damage interior trim and
electrical components.
o Do not place objects other than cups or
cans in the drink holder. The objects can
be thrown out in the event of a sudden
stop or an accident, possibly injuring
the passengers in the vehicle.
B450A01O
Page 153 of 277
2
DRIVING YOUR HYUNDAI
3
RISK OF ROLLOVER
BEFORE STARTING THE ENGINE
!
!
WARNING:
o The 2WD Santa Fe is not designed for
off-road use. The 4WD Santa Fe is de-
signed primarily for use on paved roads.
However, occasional use in off-highway
conditions such as established unpaved
roads and non-challenging off-road
trails is allowed. The 4WD Santa Fe is not
designed for blazing new trails, chal-
lenging off-road conditions, or unpaved
hill climbing. Exceeding the conditions
that were intended for the vehicle's pri-
mary design may result in injury or death.
o Utility vehicle has a significantly higher
collision rate than other type of vehicles.
C020A01HP-AATBefore you start the engine, you should always:
1. Look around the vehicle to be sure there are
no flat tires, puddles of oil, water or other
indications of possible trouble.
2. After entering the car, check to be sure the
parking brake is engaged.
3. Check that all windows, and lights are clean.
4. Check that the interior and exterior mirrors
are clean and in position.
5. Check your seat, seatback and headrest to
be sure they are in their proper positions.
6. Lock all the doors.
7. Fasten your seat belt and be sure that all
other occupants have fastened theirs.
8. Turn off all lights and accessories that are
not needed.
9. When you turn the ignition switch to "ON",
check that all appropriate warning lights are
operating and that you have sufficient fuel.
10.Check the operation of warning lights and all
bulbs when key is in the "ON" position. o Sports utility vehicles have higher
ground clearance and a narrower track
to make them capable of performing in
a wide variety of off-road applications.
Specific design characteristics give them
a higher center of gravity than ordinary
cars. An advantage of the higher ground
clearance is a better view of the road
allowing you to anticipate problem. They
are not designed for cornering at the
same speeds as conventional 2-wheel
drive vehicles any more than low-slung
sports cars are designed to perform sat-
isfactorily under off-road conditions. If
at all possible, avoid sharp turns or abrupt
maneuvers. As with other vehicles of
this type, failure to operate this vehicle
correctly may result in loss of control or
vehicle rollover.
o In a collision, an unbelted person is
significantly more likely to be seriously
injured or killed than a person wearing a
seatbelt.
WARNING:
C015A01O-AAT
Page 156 of 277
2
DRIVING YOUR HYUNDAI
6
The first few shifts on a new vehicle, or if the
battery has been disconnected, may be some-
what abrupt. This is a normal condition, and the
shifting sequence will adjust after shifts are
cycled a few times by the T.C.M (Transaxle
Control Module).
HSM3022-1
CAUTION:
Never shift into "R" or "P" position while the
vehicle is moving.
!
OPERATING THE AUTOMATIC
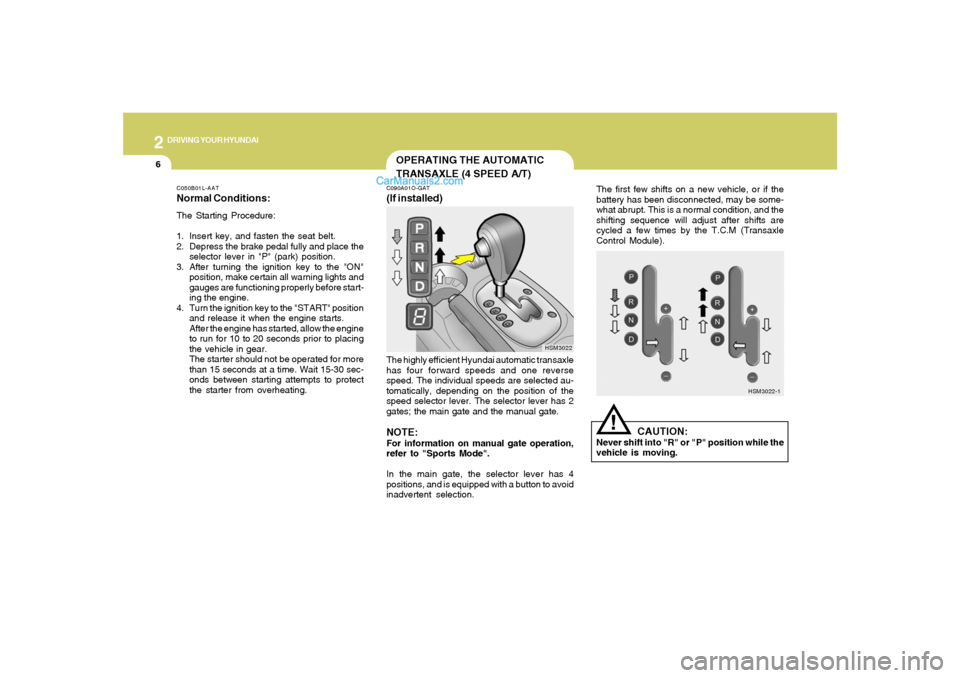
TRANSAXLE (4 SPEED A/T)C090A01O-GAT(If installed)The highly efficient Hyundai automatic transaxle
has four forward speeds and one reverse
speed. The individual speeds are selected au-
tomatically, depending on the position of the
speed selector lever. The selector lever has 2
gates; the main gate and the manual gate.NOTE:For information on manual gate operation,
refer to "Sports Mode".
In the main gate, the selector lever has 4
positions, and is equipped with a button to avoid
inadvertent selection.
HSM3022 C050B01L-AAT
Normal Conditions:The Starting Procedure:
1. Insert key, and fasten the seat belt.
2. Depress the brake pedal fully and place the
selector lever in "P" (park) position.
3. After turning the ignition key to the "ON"
position, make certain all warning lights and
gauges are functioning properly before start-
ing the engine.
4. Turn the ignition key to the "START" position
and release it when the engine starts.
After the engine has started, allow the engine
to run for 10 to 20 seconds prior to placing
the vehicle in gear.
The starter should not be operated for more
than 15 seconds at a time. Wait 15-30 sec-
onds between starting attempts to protect
the starter from overheating.
Page 176 of 277
2
DRIVING YOUR HYUNDAI
26
C190F02O-AATTrailer or Vehicle Towing Tips1. Before towing, check hitch and safety chain
connections as well as proper operation of
the trailer running lights, brake lights, and
turn signals.
2. Trailer towing requires more fuel than normal
conditions.
3. To maintain engine braking efficiency, do not
tow a trailer with the transaxle engaged in
overdrive gear.
4. Always secure items in the trailer to prevent
load shift while driving.
5. Check the condition and air pressure of all
tires on the trailer and your car. Low tire
pressure can seriously affect the handling.
Also check the spare tire.
6. The vehicle/trailer combination is more af-
fected by crosswind and buffeting.
When being passed by a large vehicle, keep
a constant speed and steer straight ahead.
If there is too much wind buffeting, slow down
to get out of the other vehicle's air turbulence.
7. When parking your car and trailer, especially
on a hill, be sure to follow all the normal
precautions. Turn your front wheel into the
curb, set the parking brake firmly, and put the
transaxle in Park. In addition, place wheel
chocks at each of the trailer's tires.
!
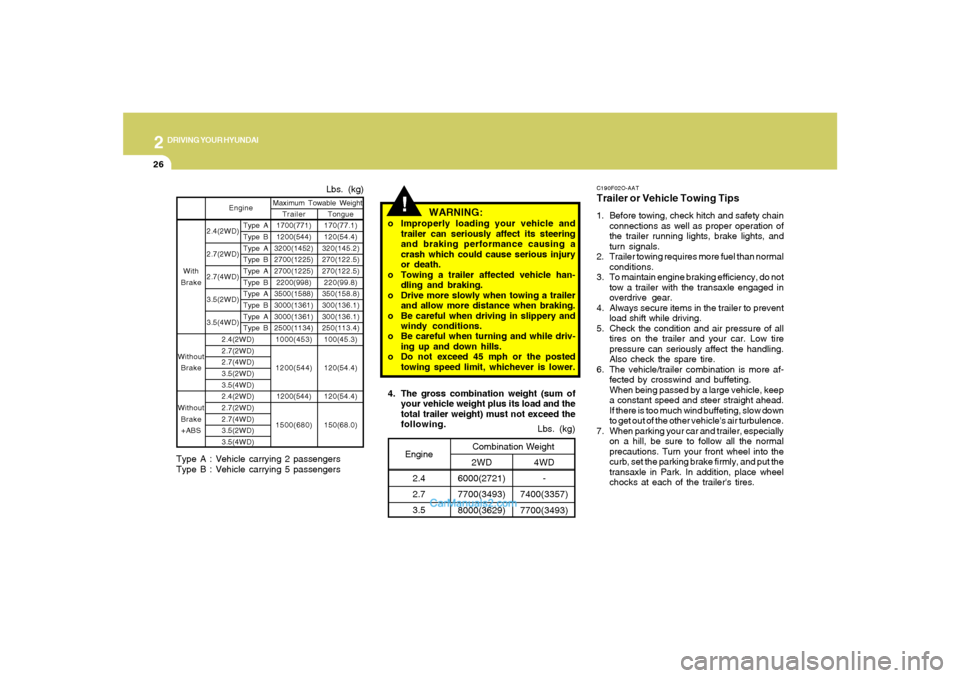
4. The gross combination weight (sum of
your vehicle weight plus its load and the
total trailer weight) must not exceed the
following.
4WD
-
7400(3357)
7700(3493)Lbs. (kg)
2WD
6000(2721)
7700(3493)
8000(3629)Combination Weight
Engine
2.4
2.7
3.5
WARNING:
o Improperly loading your vehicle and
trailer can seriously affect its steering
and braking performance causing a
crash which could cause serious injury
or death.
o Towing a trailer affected vehicle han-
dling and braking.
o Drive more slowly when towing a trailer
and allow more distance when braking.
o Be careful when driving in slippery and
windy conditions.
o Be careful when turning and while driv-
ing up and down hills.
o Do not exceed 45 mph or the posted
towing speed limit, whichever is lower.
2.4(2WD)
2.7(2WD)
2.7(4WD)
3.5(2WD)
3.5(4WD)Tongue
170(77.1)
120(54.4)
320(145.2)
270(122.5)
270(122.5)
220(99.8)
350(158.8)
300(136.1)
300(136.1)
250(113.4)
100(45.3)
120(54.4)
120(54.4)
150(68.0)
Lbs. (kg)
Trailer
1700(771)
1200(544)
3200(1452)
2700(1225)
2700(1225)
2200(998)
3500(1588)
3000(1361)
3000(1361)
2500(1134)
1000(453)
1200(544)
1200(544)
1500(680) Maximum Towable Weight
Type A
Type B
Type A
Type B
Type A
Type B
Type A
Type B
Type A
Type B With
Brake
Without
Brake
Without
Brake
+ABS
Engine2.4(2WD)
2.7(2WD)
2.7(4WD)
3.5(2WD)
3.5(4WD)
2.4(2WD)
2.7(2WD)
2.7(4WD)
3.5(2WD)
3.5(4WD)
Type A : Vehicle carrying 2 passengers
Type B : Vehicle carrying 5 passengers
Page 184 of 277
3
WHAT TO DO IN AN EMERGENCY
3
JUMP STARTING!
o If you should accidentally get acid on your
skin or in your eyes, immediately remove
any contaminated clothing and flush the area
with clear water for at least 15 minutes. Then
promptly obtain medical attention. If you
must be transported to an emergency facil-
ity, continue to apply water to the affected
area with a sponge or cloth.
o The gas produced by the battery during the
jump-start operation is highly explosive. Do
not smoke or allow a spark or an open flame
in the vicinity.
o The battery being used to provide the jump
start must be 12-volt. If you cannot deter-
mine that it is a 12-volt battery, do not attempt
to use it for the jump start.
o To jump start a car with a discharged battery,
follow this procedure exactly:
1. If the booster battery is installed in another
vehicle, be sure the two vehicles are not
touching.
2. Turn off all unnecessary lights and acces-
sories in both vehicles.
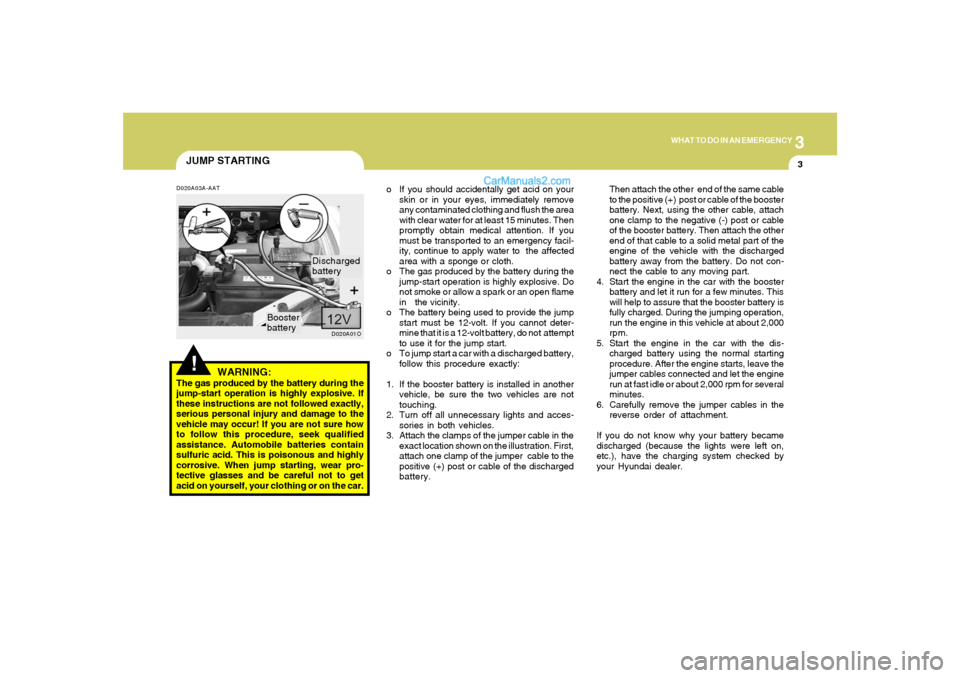
3. Attach the clamps of the jumper cable in the
exact location shown on the illustration. First,
attach one clamp of the jumper cable to the
positive (+) post or cable of the discharged
battery.Then attach the other end of the same cable
to the positive (+) post or cable of the booster
battery. Next, using the other cable, attach
one clamp to the negative (-) post or cable
of the booster battery. Then attach the other
end of that cable to a solid metal part of the
engine of the vehicle with the discharged
battery away from the battery. Do not con-
nect the cable to any moving part.
4. Start the engine in the car with the booster
battery and let it run for a few minutes. This
will help to assure that the booster battery is
fully charged. During the jumping operation,
run the engine in this vehicle at about 2,000
rpm.
5. Start the engine in the car with the dis-
charged battery using the normal starting
procedure. After the engine starts, leave the
jumper cables connected and let the engine
run at fast idle or about 2,000 rpm for several
minutes.
6. Carefully remove the jumper cables in the
reverse order of attachment.
If you do not know why your battery became
discharged (because the lights were left on,
etc.), have the charging system checked by
your Hyundai dealer.
D020A03A-AAT
WARNING:
The gas produced by the battery during the
jump-start operation is highly explosive. If
these instructions are not followed exactly,
serious personal injury and damage to the
vehicle may occur! If you are not sure how
to follow this procedure, seek qualified
assistance. Automobile batteries contain
sulfuric acid. This is poisonous and highly
corrosive. When jump starting, wear pro-
tective glasses and be careful not to get
acid on yourself, your clothing or on the car.
D020A01O
Booster
batteryDischarged
battery
Page 236 of 277
6
DO-IT-YOURSELF MAINTENANCE
25
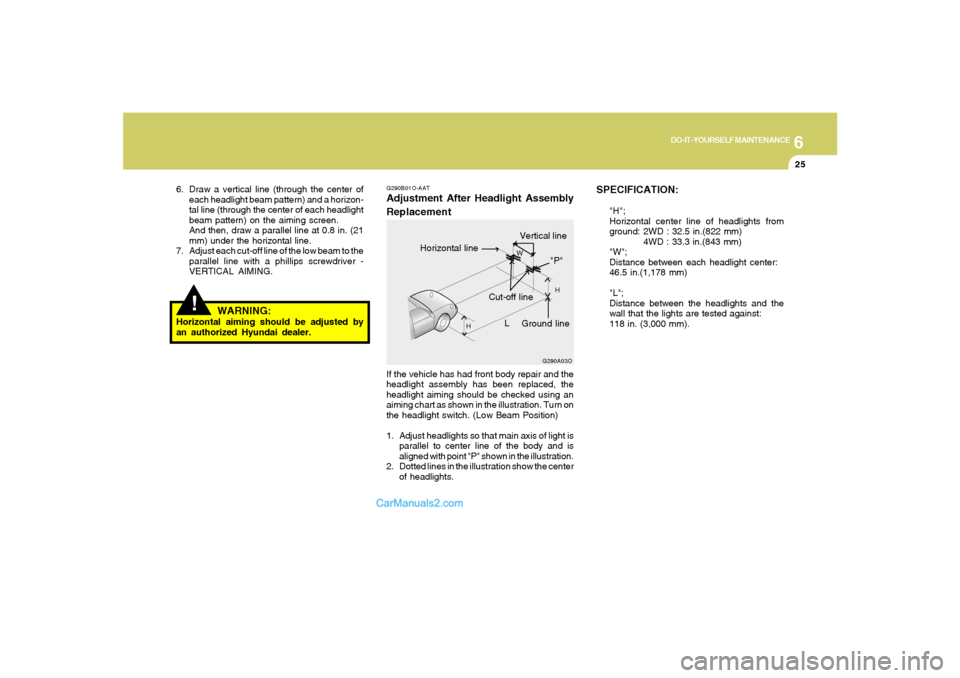
SPECIFICATION:
"H";
Horizontal center line of headlights from
ground: 2WD : 32.5 in.(822 mm)
4WD : 33.3 in.(843 mm)
"W";
Distance between each headlight center:
46.5 in.(1,178 mm)
"L";
Distance between the headlights and the
wall that the lights are tested against:
118 in. (3,000 mm).
Vertical line
G290B01O-AATAdjustment After Headlight Assembly
ReplacementIf the vehicle has had front body repair and the
headlight assembly has been replaced, the
headlight aiming should be checked using an
aiming chart as shown in the illustration. Turn on
the headlight switch. (Low Beam Position)
1. Adjust headlights so that main axis of light is
parallel to center line of the body and is
aligned with point "P" shown in the illustration.
2. Dotted lines in the illustration show the center
of headlights.
G290A03O
L
W
H
H
Cut-off line
Ground line
"P"
Horizontal line
!
6. Draw a vertical line (through the center of
each headlight beam pattern) and a horizon-
tal line (through the center of each headlight
beam pattern) on the aiming screen.
And then, draw a parallel line at 0.8 in. (21
mm) under the horizontal line.
7. Adjust each cut-off line of the low beam to the
parallel line with a phillips screwdriver -
VERTICAL AIMING.
WARNING:
Horizontal aiming should be adjusted by
an authorized Hyundai dealer.
Page 273 of 277
10
INDEX
4
G
General Checks.................................................................................. 6-4
Glove Box..........................................................................................1-72
H
Hazard Warning System ..................................................................1-62
Heating and Cooling Control .............................................................1-92
Heating and Ventilation
Air flow control..............................................................................1-94
Air intake control switch ...............................................................1-93
Bi-level heating.............................................................................1-98
Defrosting / Defogging ..............................................................1-101
Fan speed control (Blower control) .............................................1-93
Temperature control....................................................................1-97
High-Mounted Rear Stop Light .........................................................1-83
Homelink Mirror.................................................................................1-76
Hood Release....................................................................................1-85
Horn.................................................................................................1-88
I
Ignition Switch ...................................................................................... 2-4
Instrument Cluster and Indicator Lights...........................................1-46
Instrument Panel Light Control (Rheostat).......................................1-65
Interior Light.......................................................................................1-71
J
Jump Starting...................................................................................... 3-3K
Keys................................................................................................... 1-3
If you lose your keys ...................................................................3-15
Positions......................................................................................... 2-4
L
Light Bulbs Replacement..................................................................6-26
Limited-Slip Differential......................................................................2-19
Luggage Compartment Light ............................................................1-81
Luggage Net ......................................................................................1-82
M
Maintenance Intervals
Explanation of scheduled maintenance items ............................... 5-7
Maintenance under severe usage conditions............................... 5-6
Scheduled maintenance................................................................ 5-4
Service requirements.................................................................... 5-2
Mirrors
Day-night inside rearview mirror .................................................1-76
Outside rearview mirror ...............................................................1-73
O
Odometer / Trip Odometer ...............................................................1-53
P
Parking Brake....................................................................................1-80
Power Driver's Seat ..........................................................................1-14
Power Outlet......................................................................................1-66
Power Steering Fluid Level ...............................................................6-23
Page 275 of 277
10
INDEX
6
Transaxle
Automatic.............................................................................. 2-6, 2-19
Automatic transaxle fluid checking ..............................................6-13
Trip Computer...................................................................................1-55
V
Vehicle Identification Number............................................................. 8-2
Vehicle Load Limit .............................................................................2-37
Vehicle Specifications
Engine ............................................................................................. 9-3
Lubrication chart............................................................................ 9-4
Measurement................................................................................. 9-2
W
Warning and Indicator Lights ............................................................1-48
Windows
Power...........................................................................................1-11
Windshield Wiper and Washer ..........................................................1-60
Rear window wiper and washer..................................................1-61
Windshield Wiper Blades ..................................................................6-11