2005 Hyundai Santa Fe turn signal
[x] Cancel search: turn signalPage 73 of 277
1FEATURES OF YOUR HYUNDAI62
B360A01O-A
HAZARD WARNING SYSTEM
FRONT FOG LIGHT SWITCH
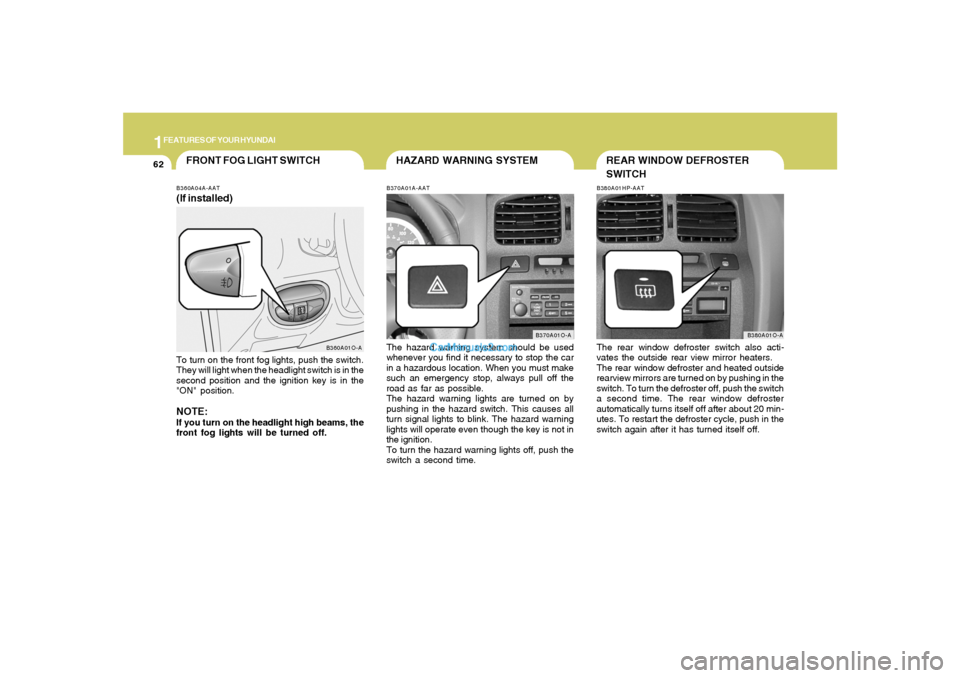
B370A01A-AATThe hazard warning system should be used
whenever you find it necessary to stop the car
in a hazardous location. When you must make
such an emergency stop, always pull off the
road as far as possible.
The hazard warning lights are turned on by
pushing in the hazard switch. This causes all
turn signal lights to blink. The hazard warning
lights will operate even though the key is not in
the ignition.
To turn the hazard warning lights off, push the
switch a second time.
B370A01O-A B360A04A-AAT
(If installed)To turn on the front fog lights, push the switch.
They will light when the headlight switch is in the
second position and the ignition key is in the
"ON" position.NOTE:If you turn on the headlight high beams, the
front fog lights will be turned off.
B380A01HP-AATThe rear window defroster switch also acti-
vates the outside rear view mirror heaters.
The rear window defroster and heated outside
rearview mirrors are turned on by pushing in the
switch. To turn the defroster off, push the switch
a second time. The rear window defroster
automatically turns itself off after about 20 min-
utes. To restart the defroster cycle, push in the
switch again after it has turned itself off.
B380A01O-A
REAR WINDOW DEFROSTER
SWITCH
Page 130 of 277

1
FEATURES OF YOUR HYUNDAI
119
D285B02O-AAT1. POWER ONPress this knob to turn the system on and off.VOLUME ControlTurn the knob clockwise to increase volume.
Turn it counterclockwise to decrease volume.2. BAND Select ButtonPress this button to switch between AM, FM1
and FM2. The display will show your selection.3. RADIO STATION Control KnobTurn this knob to tune to radio stations.4. SEEK/SCAN Button
SEEKPress the up or down arrow to seek to the next
or previous station and stay there. The sound
will mute while seeking.
SCANPress and hold one of the arrows for more than
two seconds. The radio will produce one beep.
The radio will produce one beep. The radio will
scan to each stations, play for a few seconds,
then go on to the next station. Press one of the
arrows or one of the pushbuttons again to stop
scanning. SCAN will be displayed whenever the
tuner is in the scan mode. In FM mode, this
function will scan through the current band such
as FM1 or FM2. The radio will scan stations with
a strong signal only. The sound will mute while
scanning.5. PRESET STATION Select ButtonThe six numbered pushbuttons let you return to
your favorite stations. You can set up to 18
stations (six AM, six FM1 and six FM2) by
performing the following steps:
1. Turn the radio on.
2. Press BAND select button to select AM, FM1
of FM2.
3. Tune in the desired station.
4. Press AUTO EQ to choose the bass and
treble equalization that best suits the type of
station you are listening to.5. Press and hold one of the six numbered
pushbuttons. The radio will produce one
beep. Whenever you press that numbered
pushbutton, the station you set will return
and the bass and treble equalization that you
selected will also be automatically selected
for that pushbutton.
6. Repeat the above steps for each pushbutton.
6. AUDIO Knob
Setting the Tone (BASS/Treble)Push and release the AUDIO knob until BASS
or TREB appears on the display. Turn the knob
clockwise or counterclockwise to increase or
decrease. The display will show the bass or
treble level. If a station is weak or noisy, you may
want to decrease the treble.
To adjust bass and treble to the middle position,
push and hold the AUDIO knob. The radio will
produce one beep and adjust the display level
to the middle position.
To adjust all tone and speaker controls to the
middle position, push and hold the AUDIO knob
when no tone or speaker control is displayed.
The radio will produce one beep and display
CENTERED.
Page 149 of 277

1FEATURES OF YOUR HYUNDAI
138
ANTENNAB870C01A-GATMANUAL ANTENNA (If installed)Your car uses a manual stainless steel antenna
to receive both AM and FM broadcast signals.
Pull up the antenna using your fingers, as shown
in the drawing.
CAUTION:
Before entering an automatic car wash or a
place with a low height clearance such as a
residential or commercial garage, be sure
that the antenna is fully retracted.
!
B870C01O
NOTE:Look at a tape before you insert it. If the tape
is loose, tighten it by turning one of the
hubs with a pencil or your finger. If the label
is peeling off, do not put it in the drive
mechanism.
Do not leave tapes sitting where they are
exposed to hot, warm, or high humidity,
such as on top of the dashboard or in the
player. If a tape is excessively hot or cold, let
it reach a moderate temperature before
putting it in the player.
B860A03L
B885A01O-AATMICRO ANTENNA (If installed)Your car uses the micro antenna to receive both
AM and FM broadcast signals.
This antenna is folding and removable type.
CAUTION:
1. Be sure to fold the micro antenna before
entering a garage with a low height or
installing a car cover.
!
B885A01O
Page 176 of 277
2
DRIVING YOUR HYUNDAI
26
C190F02O-AATTrailer or Vehicle Towing Tips1. Before towing, check hitch and safety chain
connections as well as proper operation of
the trailer running lights, brake lights, and
turn signals.
2. Trailer towing requires more fuel than normal
conditions.
3. To maintain engine braking efficiency, do not
tow a trailer with the transaxle engaged in
overdrive gear.
4. Always secure items in the trailer to prevent
load shift while driving.
5. Check the condition and air pressure of all
tires on the trailer and your car. Low tire
pressure can seriously affect the handling.
Also check the spare tire.
6. The vehicle/trailer combination is more af-
fected by crosswind and buffeting.
When being passed by a large vehicle, keep
a constant speed and steer straight ahead.
If there is too much wind buffeting, slow down
to get out of the other vehicle's air turbulence.
7. When parking your car and trailer, especially
on a hill, be sure to follow all the normal
precautions. Turn your front wheel into the
curb, set the parking brake firmly, and put the
transaxle in Park. In addition, place wheel
chocks at each of the trailer's tires.
!
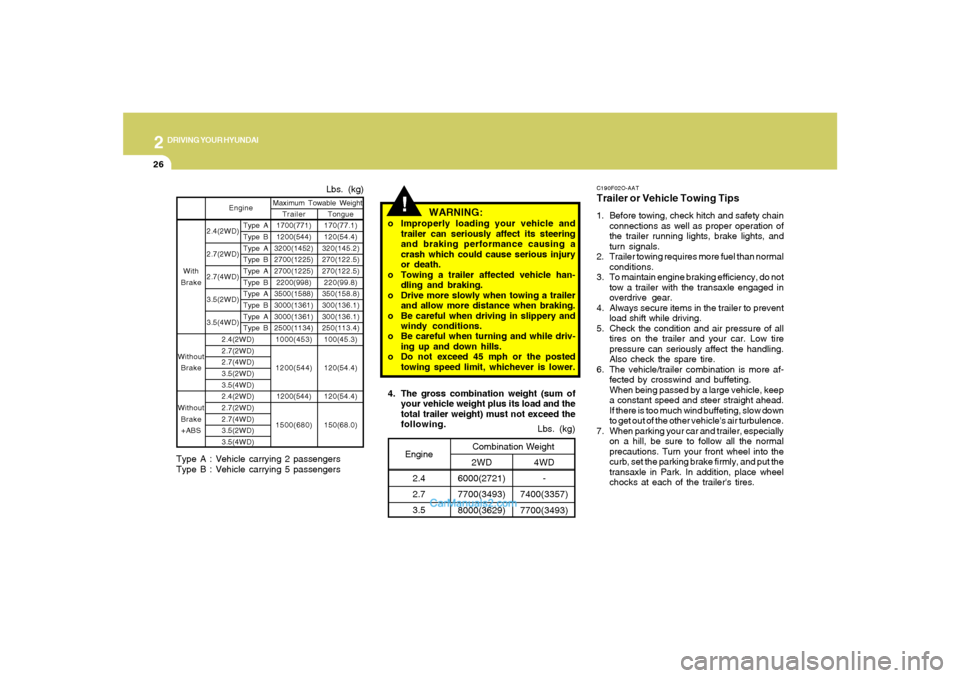
4. The gross combination weight (sum of
your vehicle weight plus its load and the
total trailer weight) must not exceed the
following.
4WD
-
7400(3357)
7700(3493)Lbs. (kg)
2WD
6000(2721)
7700(3493)
8000(3629)Combination Weight
Engine
2.4
2.7
3.5
WARNING:
o Improperly loading your vehicle and
trailer can seriously affect its steering
and braking performance causing a
crash which could cause serious injury
or death.
o Towing a trailer affected vehicle han-
dling and braking.
o Drive more slowly when towing a trailer
and allow more distance when braking.
o Be careful when driving in slippery and
windy conditions.
o Be careful when turning and while driv-
ing up and down hills.
o Do not exceed 45 mph or the posted
towing speed limit, whichever is lower.
2.4(2WD)
2.7(2WD)
2.7(4WD)
3.5(2WD)
3.5(4WD)Tongue
170(77.1)
120(54.4)
320(145.2)
270(122.5)
270(122.5)
220(99.8)
350(158.8)
300(136.1)
300(136.1)
250(113.4)
100(45.3)
120(54.4)
120(54.4)
150(68.0)
Lbs. (kg)
Trailer
1700(771)
1200(544)
3200(1452)
2700(1225)
2700(1225)
2200(998)
3500(1588)
3000(1361)
3000(1361)
2500(1134)
1000(453)
1200(544)
1200(544)
1500(680) Maximum Towable Weight
Type A
Type B
Type A
Type B
Type A
Type B
Type A
Type B
Type A
Type B With
Brake
Without
Brake
Without
Brake
+ABS
Engine2.4(2WD)
2.7(2WD)
2.7(4WD)
3.5(2WD)
3.5(4WD)
2.4(2WD)
2.7(2WD)
2.7(4WD)
3.5(2WD)
3.5(4WD)
Type A : Vehicle carrying 2 passengers
Type B : Vehicle carrying 5 passengers
Page 215 of 277
6
DO-IT-YOURSELF MAINTENANCE
4
GENERAL CHECKS
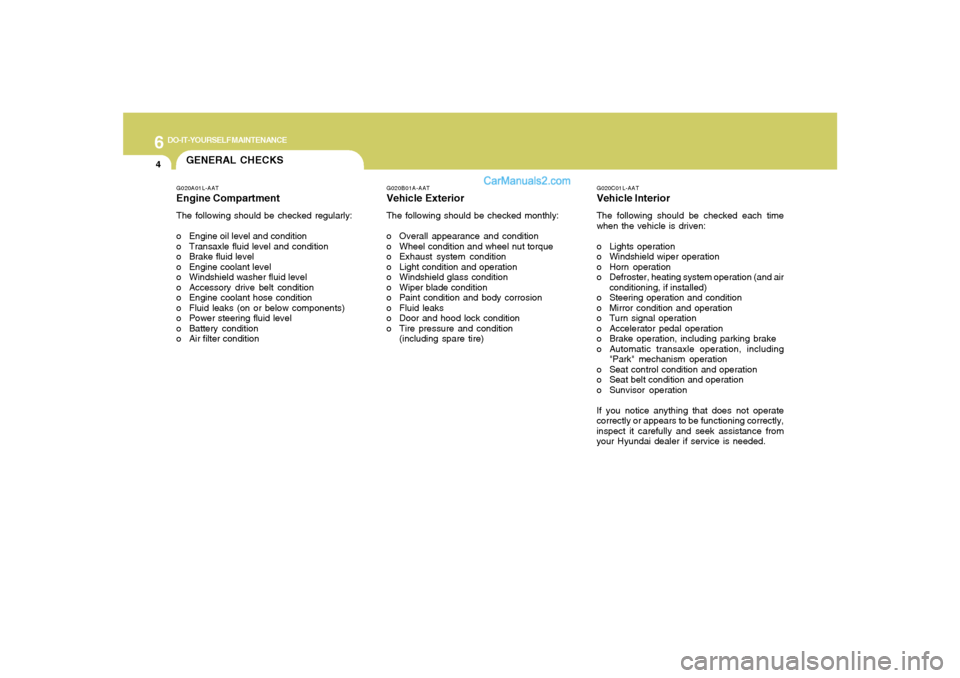
G020C01L-AATVehicle InteriorThe following should be checked each time
when the vehicle is driven:
o Lights operation
o Windshield wiper operation
o Horn operation
o Defroster, heating system operation (and air
conditioning, if installed)
o Steering operation and condition
o Mirror condition and operation
o Turn signal operation
o Accelerator pedal operation
o Brake operation, including parking brake
o Automatic transaxle operation, including
"Park" mechanism operation
o Seat control condition and operation
o Seat belt condition and operation
o Sunvisor operation
If you notice anything that does not operate
correctly or appears to be functioning correctly,
inspect it carefully and seek assistance from
your Hyundai dealer if service is needed.
G020B01A-AATVehicle ExteriorThe following should be checked monthly:
o Overall appearance and condition
o Wheel condition and wheel nut torque
o Exhaust system condition
o Light condition and operation
o Windshield glass condition
o Wiper blade condition
o Paint condition and body corrosion
o Fluid leaks
o Door and hood lock condition
o Tire pressure and condition
(including spare tire)
G020A01L-AATEngine CompartmentThe following should be checked regularly:
o Engine oil level and condition
o Transaxle fluid level and condition
o Brake fluid level
o Engine coolant level
o Windshield washer fluid level
o Accessory drive belt condition
o Engine coolant hose condition
o Fluid leaks (on or below components)
o Power steering fluid level
o Battery condition
o Air filter condition
Page 237 of 277
6
DO-IT-YOURSELF MAINTENANCE
26
REPLACEMENT OF LIGHT BULBS!
G260A02A-AATBefore attempting to replace a light bulb, be sure
the switch is turned to the "OFF" position.
The next paragraph shows how to reach the
light bulbs so they may be changed. Be sure to
replace the burned-out bulb with one of the
same number and wattage rating.
See page 6-32 for the wattage description.
CAUTION:
Keep the lamps out of contact with petro-
leum products, such as oil, gasoline, etc.
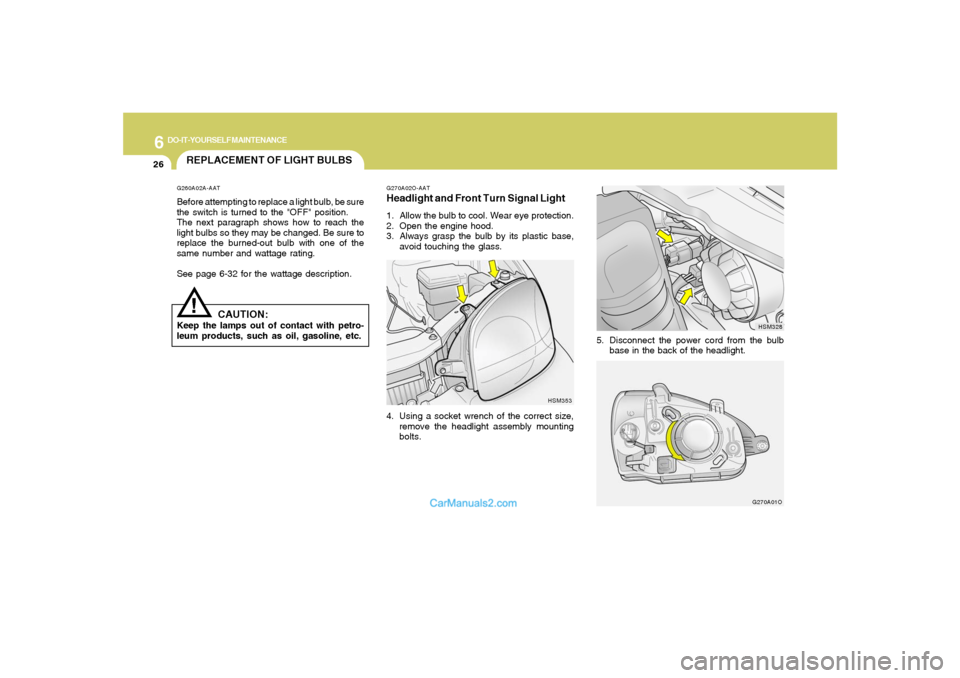
G270A02O-AATHeadlight and Front Turn Signal Light1. Allow the bulb to cool. Wear eye protection.
2. Open the engine hood.
3. Always grasp the bulb by its plastic base,
avoid touching the glass.
4. Using a socket wrench of the correct size,
remove the headlight assembly mounting
bolts.
HSM353
G270A01O
5. Disconnect the power cord from the bulb
base in the back of the headlight.
HSM328
Page 239 of 277
6
DO-IT-YOURSELF MAINTENANCE
28
!
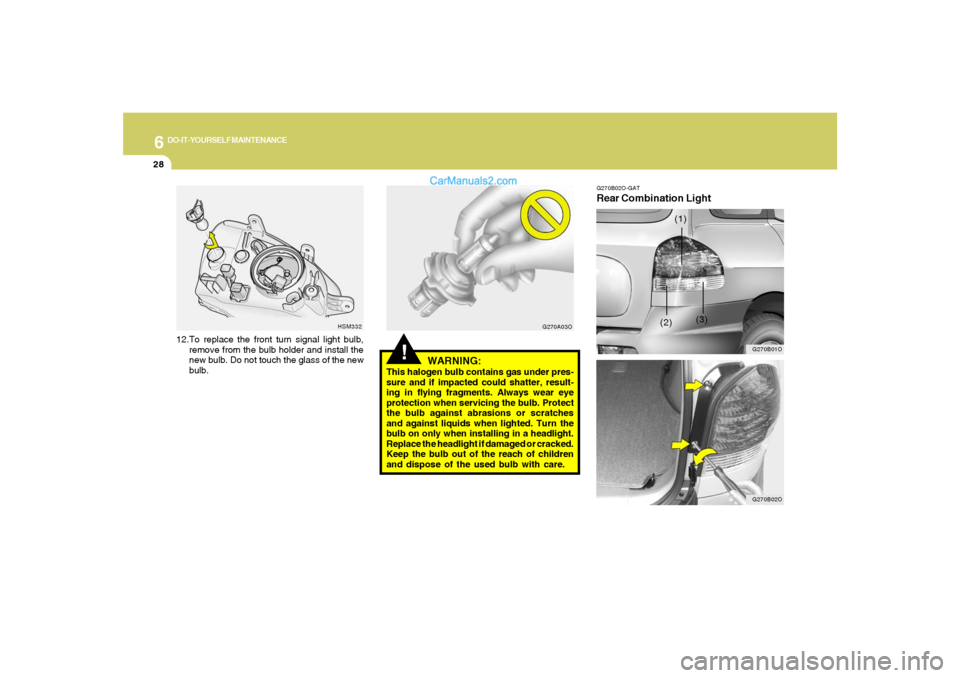
WARNING:
This halogen bulb contains gas under pres-
sure and if impacted could shatter, result-
ing in flying fragments. Always wear eye
protection when servicing the bulb. Protect
the bulb against abrasions or scratches
and against liquids when lighted. Turn the
bulb on only when installing in a headlight.
Replace the headlight if damaged or cracked.
Keep the bulb out of the reach of children
and dispose of the used bulb with care.
G270A03O
12.To replace the front turn signal light bulb,
remove from the bulb holder and install the
new bulb. Do not touch the glass of the new
bulb.
HSM332
G270B02O-GATRear Combination Light
G270B01O
(3) (1)
(2)
G270B02O
Page 240 of 277
6
DO-IT-YOURSELF MAINTENANCE
29
HSM342
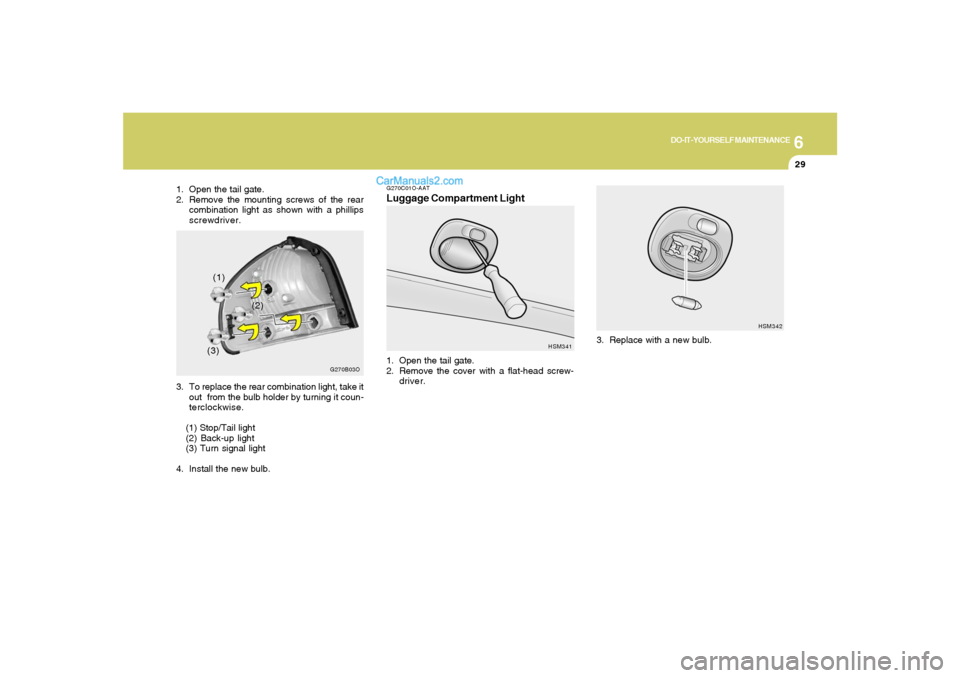
3. Replace with a new bulb.
G270C01O-AATLuggage Compartment Light1. Open the tail gate.
2. Remove the cover with a flat-head screw-
driver.
HSM341
1. Open the tail gate.
2. Remove the mounting screws of the rear
combination light as shown with a phillips
screwdriver.
(1)
(2)
(3)
G270B03O
3. To replace the rear combination light, take it
out from the bulb holder by turning it coun-
terclockwise.
(1) Stop/Tail light
(2) Back-up light
(3) Turn signal light
4. Install the new bulb.