Page 5 of 205

A050A05A-AATHYUNDAI MOTOR COMPANY
Note: Because future owners will also need the information included in this manual, if you sell this
Hyundai, please leave the manual in the vehicle for their use. Thank you. Copyright 2005 Hyundai Motor Company. All rights reserved. No part of this publication may be reproduced, stored in any retrieval system or transmitted in any form or by any means without the prior written permission of Hyundai Motor Company.
A040A01A-AAT
FOREWORD
Thank you for choosing Hyundai. We are pleased to welcome you to the growing number of discriminating people who drive Hyundais. The advanced engineering and high-quality construc- tion of each Hyundai we build is something of which we're very proud. Your Owner's Manual will introduce you to the features and operation of your new Hyundai. It is suggested that you read it carefully because the information it contains can contribute greatly to the satisfaction you receive from your new car. The manufacturer also recommends that all service and maintenance on your car be performed by an authorized Hyundai dealer. Hyundai dealers are prepared to provide high-quality service, maintenance and any other assistance that may be required.
! CAUTION:
Severe engine and transmission damage may result from the use of poor quality fuels and lubricants that do not meet Hyundai specifications. You must always use high quality fuels and lubricants that meet the specifications listed on Page 9-4 in the Vehicle Specifications section of the Owner's Manual.
Page 14 of 205
YOUR VEHICLE AT A GLANCE
B255A01P-GAT INDICATOR SYMBOLS ON THE INSTRUMENT CLUSTER * More detailed explanations of these items will be found beginning on page 2-8.
O/D OFF Indicator Light (Automatic Transmission Only)
Fuel Filter Warning Light (Diesel only)
Diesel Pre-heat Indicator Light (Diesel only)
Immobilizer Warning Light (If installed)
SRS (Airbag) Service Reminder Indicator Light (If installed)
ABS Service Reminder Indicator Light(If installed)
Turn Signal Indicator Lights High Beam Indicator LightLow Oil Pressure Warning Light Parking Brake/Low Brake Fluid Level Warning Light Charging System Warning Light Seat Belt Warning Light (If installed) Door Ajar Warning Light Low Fuel Level Warning Light
POWER/HOLD Indicator Light (If installed) Malfunction Indicator Light (If installed)
4WD HIGH/LOW Indicator Light (If installed)
Page 42 of 205
1BEFORE DRIVING YOUR VEHICLE
28SEATS
HSRFL859
1. FRONT SEAT (See page 1-30)
2. SECOND SEAT (See page 1-32)
3. THIRD SEAT (See page 1-33)
4. FOURTH SEAT (See page 1-35)
5. AUXILIARY SEAT (See page 1-36) 1
2
3
4
5 5
For 12 passengers
Page 43 of 205
1
BEFORE DRIVING YOUR VEHICLE
29
HSRFL859-2
1. FRONT SEAT (See page 1-30)
2. SECOND SEAT (See page 1-32)
3. THIRD SEAT (See page 1-34)
4. AUXILIARY SEAT (See page 1-36)
For 9 passengers (European community)
Page 46 of 205

1BEFORE DRIVING YOUR VEHICLE
32
5
!
B290C03P-GAT Pull the lever and rotate the seat clock- wise.
WARNING:
o Never rotate the seat while the vehicle is in motion.
o When the seat is rotated, be sure
that the seat is securely locked inposition.
B290A01P-GAT SECOND AND THIRD SEATS Adjusting Seat Forward andRearward (Minibus) (If installed) Pull the lever up and hold it while you slide the seat forward or backward to desired position. Release the lever tolock the seat in position.
B290B02P-GAT To rotate (Second Seat Only) (If installed)
1. Position the driver's seat at the end
of forward. And then position the third seat at the end of rearward.
2. Pull the reclining lever and fold the seatback of the front seat.
3. Fold the auxiliary seat. (See page 1-36)
4. Pull the lever (a) and slide the seat
at the end of rearward.
5. Pull the lever (b) and incline the seatback forward.
6. Rotate the seat clockwise.
7. After rotating the seat 90° or 180°, it can be fixed.
8. Adjust the seatback or seat the de-
sired position.
HSRFL084
Type 1
HSRFL085Type 2
B290C01P
3
4 67
(a)
(b)
9. Reverse the above procedure to
return the seat to the original posi-tion.
Page 108 of 205
4
CORROSION PREVENTION AND APPEARANCE CARE
7
4
IN CASE OF EMERGENCY
7CHANGING A FLAT TIRE
D060A01HP-GAT The procedure described on the fol- lowing pages can be used to rotatetires as well as to change a flat tire. When preparing to change a flat tire, check to be sure the gear selectorlever is in "P" (automatic transmission) or reverse gear (manual transmission) and that the parking brake is set, then: HSRFL060D060A01P-GAT 1. Obtain Spare Tire and Tool
E010B01P-3
HSRFL050
Remove the spare tire and take out the jack and tool bag. D060C01A-AAT 2. Block the Wheel Block the wheel that is diagonally op- posite from the flat tire to keep the vehicle from rolling when the car israised on the jack.
HA14009
NOTE: The spare tire is located underneath the car.
Flat tire
Minibus/Van Truck
Page 118 of 205

4
CORROSION PREVENTION AND APPEARANCE CARE
17
4
IN CASE OF EMERGENCY
17
C190B01S-AAT Trailer Hitches Select the proper hitch and ball combi- nation, making sure that its location iscompatible with that of the trailer or vehicle being towed. Use a quality non-equalizing hitch which distributesthe tongue load uniformly throughout the chassis. The hitch should be bolted securely to the car and installed by a qualified technician. DO NOT USE A HITCHDESIGNED FOR TEMPORARY IN- STALLATION AND NEVER USE ONE THAT ATTACHES ONLY TO THEBUMPER. C190C01P-GAT Trailer Brakes If your trailer is equipped with a braking system, make sure it conforms to fed-eral and/or local regulations and that it is properly installed and operating cor- rectly. NOTE: If you tow a trailer or vehicle, your car will require more frequent main-tenance due to the additional load. See "Maintenance Under Severe Usage Conditions" on page 6-11.
CAUTION:
o Never connect a trailer brake sys- tem directly to the vehicle brakesystem.
o When towing a trailer on steep
grades (in excess of 12%) payclose attention to the engine cool- ant temperature gauge to ensure the engine does not overheat. Ifthe needle of the coolant tem- perature gauge moves across the dial towards "H" (HOT), pull over
!
C190A01A-GAT TRAILER OR VEHICLE TOWING If you are considering towing with your car, you should first check with yourProvince Department of Motor Vehicles to determine their legal requirements. Since laws vary from province to prov-ince, the requirements for towing trail- ers, cars, other types of vehicles, or apparatus may differ. Ask your Hyundaidealer for further details before towing.
CAUTION:
Do not do any towing with your carduring its first 2,000 km (1,200 miles)in order to allow the engine to prop- erly break in. Failure to heed this caution may result in serious en-gine or transmission damage.
!
Page 119 of 205

44IN CASE OF EMERGENCY
18
and stop as soon as it is safe to do so, and allow the engine toidle until it cools down. You may proceed once the engine has cooled sufficiently.
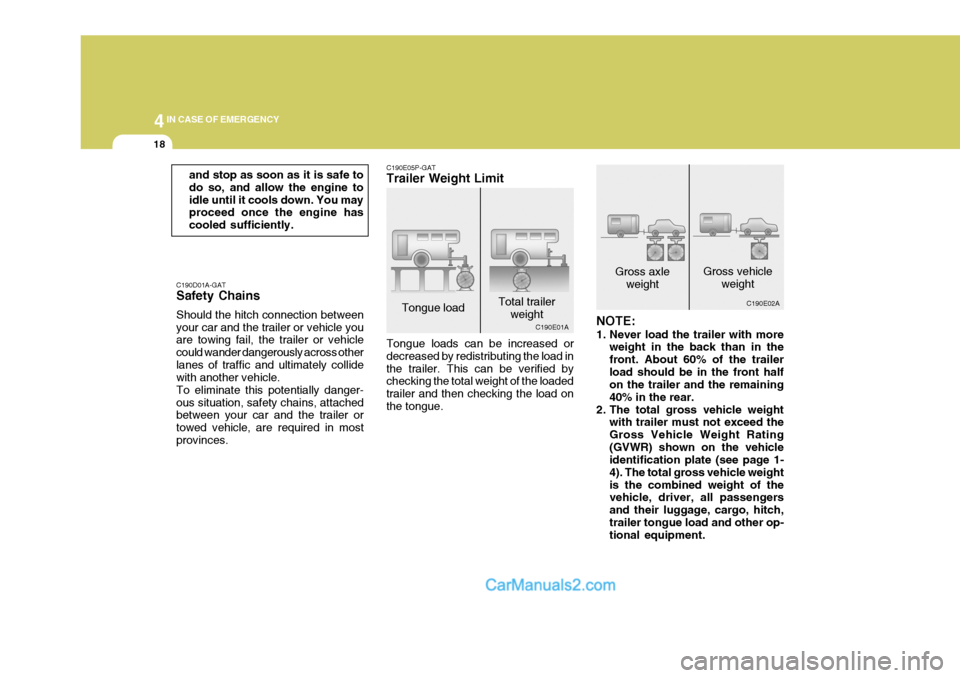
C190D01A-GAT Safety Chains Should the hitch connection between your car and the trailer or vehicle you are towing fail, the trailer or vehicle could wander dangerously across otherlanes of traffic and ultimately collide with another vehicle. To eliminate this potentially danger-ous situation, safety chains, attached between your car and the trailer or towed vehicle, are required in mostprovinces. C190E05P-GAT Trailer Weight Limit Tongue loads can be increased or decreased by redistributing the load inthe trailer. This can be verified by checking the total weight of the loaded trailer and then checking the load onthe tongue.
NOTE:
1. Never load the trailer with more
weight in the back than in the front. About 60% of the trailerload should be in the front half on the trailer and the remaining 40% in the rear.
2. The total gross vehicle weight with trailer must not exceed theGross Vehicle Weight Rating(GVWR) shown on the vehicle identification plate (see page 1- 4). The total gross vehicle weightis the combined weight of the vehicle, driver, all passengers and their luggage, cargo, hitch,trailer tongue load and other op- tional equipment.
Tongue load
Total trailer
weight Gross axle
weight Gross vehicle
weight
C190E01A C190E02A