2005 Hyundai H-1 (Grand Starex) turn signal
[x] Cancel search: turn signalPage 14 of 205

YOUR VEHICLE AT A GLANCE
B255A01P-GAT INDICATOR SYMBOLS ON THE INSTRUMENT CLUSTER * More detailed explanations of these items will be found beginning on page 2-8.
O/D OFF Indicator Light (Automatic Transmission Only)
Fuel Filter Warning Light (Diesel only)
Diesel Pre-heat Indicator Light (Diesel only)
Immobilizer Warning Light (If installed)
SRS (Airbag) Service Reminder Indicator Light (If installed)
ABS Service Reminder Indicator Light(If installed)
Turn Signal Indicator Lights High Beam Indicator LightLow Oil Pressure Warning Light Parking Brake/Low Brake Fluid Level Warning Light Charging System Warning Light Seat Belt Warning Light (If installed) Door Ajar Warning Light Low Fuel Level Warning Light
POWER/HOLD Indicator Light (If installed) Malfunction Indicator Light (If installed)
4WD HIGH/LOW Indicator Light (If installed)
Page 29 of 205

1
BEFORE DRIVING YOUR VEHICLE
15
B160B01P-GAT CARRYING CHILDREN
o If a child is left in the vehicle alone,
always be sure to turn off the igni- tion and remove the key.
o If a child is seated alone in the
second seat, use the child-protec-tion system.
B160A02P-GAT "CHILD-PROTECTION" SLIDE DOOR(Minibus/Van) When the slide door is closed with the "child-protection" lever in the " " position, it cannot be opened by usingthe inner handle. Use the outer handle to open the door. If adults are to sit in the second seat,release the child protection lock. When this is done, the lever will be in the " " position.
HSRFL161
THEFT-ALARM SYSTEM
B070A01P-GAT (Minibus) (If installed) This system is designed to provide protection from unauthorized entry intothe car. This system is operated in three stages: the first is the "Armed" stage, the second is the "Alarm" stage,and the third is the "Disarmed" stage. If triggered, the system provides an audible alarm with blinking of the turnsignal light.
Page 30 of 205

1BEFORE DRIVING YOUR VEHICLE
16
B070C01FC-GAT Alarm Stage The alarm will be activated if any of the following occurs while the car is parkedand the system is armed.
(1) A front or rear door is opened with-
out using the transmitter.
(2) The tail gate is opened without us-
ing the transmitter.
(3) The engine hood is opened. B070B03P
NOTE:
o If any door, tail gate or engine
hood remains open, the system will not be armed.
o If this happens, rearm the system as described above.
CAUTION:
Do not arm the system until all passengers have left the car. If the system is armed while apassenger(s) remains in the car, the alarm may be activated when the remaining passenger(s) leaves the car.
!
B070B01O-AAT Armed Stage Park the car and stop the engine. Arm the system as described below.
(1) Remove the ignition key from the
ignition switch.
(2) Make sure that the engine hood and tail gate are locked.
(3) Lock the doors using the transmit-
ter of the keyless entry system.
After completion of the steps above, the turn signal light will blink once to indicate that the system is armed. B070B02P
Page 31 of 205

1
BEFORE DRIVING YOUR VEHICLE
17
B070D03P-AAT Disarmed Stage The system will be disarmed when the driver's or passenger's door is un-locked by depressing the button on the transmitter after the system was armed. After completion of the step above, the turn signal lights will blink twice to indicate that the system is disarmed. NOTE:
o Once the system has been dis- armed, it can not be rearmed ex- cept by repeating the arming pro- cedures.
o When the system is disarmed
with the interior light switched to"DR", the interior light will illumi- nate for 30 seconds.
The alarming horn will sound and theturn signal light will blink continuouslyfor 27 seconds (E.C only/ Except E.C 3 times). To turn off the system, unlock the door or tail gate with the transmit-ter.
CAUTION:
Avoid trying to start the engine whilethe system is armed.
! CAUTION:
Only the transmitter can disarm the armed stage. If the transmitter doesnot disarm the system, it is neces- sary to take the following steps;
1. Unlock the door with the key, which will cause, the alarm to be activated.
2. Insert the key in the ignition key cylinder and turn the ignition keyto "ON" position.
3. Wait for 30 seconds. After completing the steps above, the system will be disarmed.
!
Page 32 of 205

1BEFORE DRIVING YOUR VEHICLE
18
B070F02A-GAT Keyless Entry System (If installed) Locking doors
1. Close all doors.
2. Push the button on the transmitter.
3. At the same time all doors lock, the
turn signal lights will blink once toindicate that the system is armed.
Unlocking doors 1. Push the button on the transmitter once more after all doors were locked.
2. At the same time all doors unlock,
the turn signal lights will blink twiceto indicate that the system is dis- armed. 3. Remove four screws at the back
side of the built-in circuit. HTB054
HTB055
B070E02P-AAT Replacing the battery When the transmitter's battery be- comes weak, it may take several pushes on the button to lock or unlockthe doors, and the LED will not light. Replace the battery as soon as pos- sible. Battery type : CR1220 (Minibus/Van)
CR2032 (Truck)
Replacement instructions: (Minibus/Van)
1. Remove the screw with a phillips screwdriver.
2. Carefully separate the case with a flat-head screwdriver as shown in the illustration. HTB053
4. Remove the old battery from thecase and note the polarity. Makesure the polarity of the new battery is the same (+side facing up), theninsert it in the transmitter.
Page 117 of 205

44IN CASE OF EMERGENCY
16
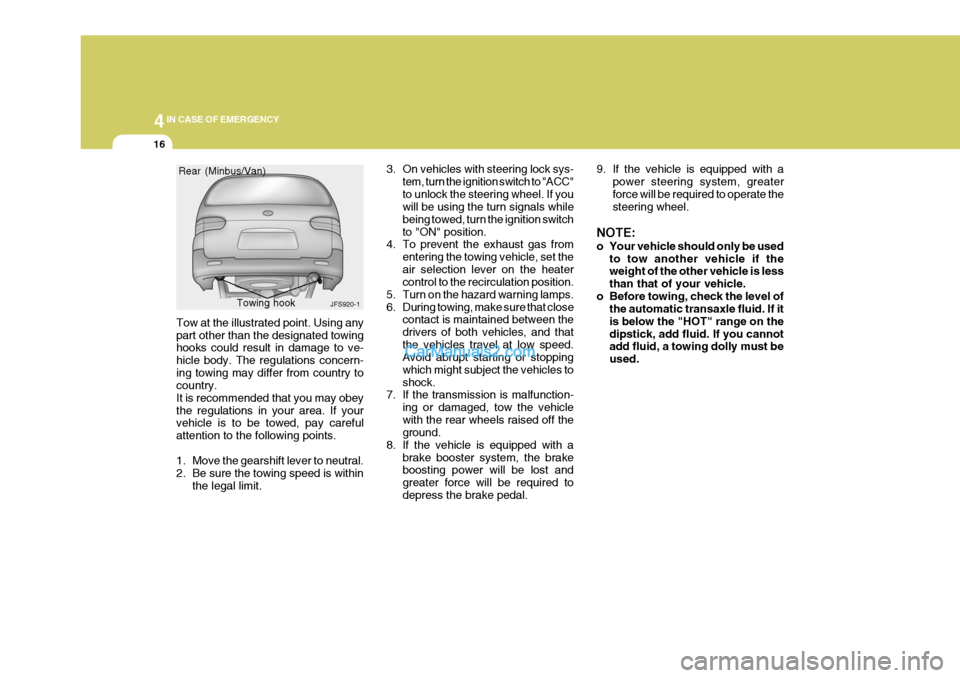
Tow at the illustrated point. Using any part other than the designated towing hooks could result in damage to ve- hicle body. The regulations concern-ing towing may differ from country to country. It is recommended that you may obeythe regulations in your area. If your vehicle is to be towed, pay careful attention to the following points.
1. Move the gearshift lever to neutral.
2. Be sure the towing speed is within
the legal limit. 3. On vehicles with steering lock sys-
tem, turn the ignition switch to "ACC"to unlock the steering wheel. If you will be using the turn signals while being towed, turn the ignition switchto "ON" position.
4. To prevent the exhaust gas from
entering the towing vehicle, set theair selection lever on the heater control to the recirculation position.
5. Turn on the hazard warning lamps.
6. During towing, make sure that close contact is maintained between thedrivers of both vehicles, and thatthe vehicles travel at low speed. Avoid abrupt starting or stopping which might subject the vehicles toshock.
7. If the transmission is malfunction-
ing or damaged, tow the vehiclewith the rear wheels raised off the ground.
8. If the vehicle is equipped with a brake booster system, the brakeboosting power will be lost and greater force will be required todepress the brake pedal.
JFS920-1
Rear (Minbus/Van)
Towing hook
9. If the vehicle is equipped with apower steering system, greater force will be required to operate the steering wheel.
NOTE:
o Your vehicle should only be used to tow another vehicle if the weight of the other vehicle is less than that of your vehicle.
o Before towing, check the level of the automatic transaxle fluid. If itis below the "HOT" range on thedipstick, add fluid. If you cannot add fluid, a towing dolly must be used.
Page 121 of 205

44IN CASE OF EMERGENCY
20
!WARNING:
o Improperly loading your car and trailer can serious affect its steer- ing and braking performance causing a crash in which youmay be seriously injured.
o For automatic transmission ve-
hicles, the trailer should be towedwith the towing vehicle unloaded, with the exception of the driver. Otherwise, the automatic trans-mission oil temperature may rise to a temperature that may result in serious damage of the auto- matic transmission. C190F02A-GAT Trailer or Vehicle Towing Tips
1. Before towing, check hitch and
safety chain connections as well as proper operation of the trailer run- ning lights, brake lights, and turn signals.
2. Always drive your vehicle at a mod- erate speed (Less than 100 km/h).
3. Trailer towing requires more fuel than normal conditions.
4. To maintain engine braking effi-
ciency and electrical charging per-formance, do not use fifth gear (manual transmission) or overdrive (automatic transmission).
5. Always secure items in the trailer to prevent load shift while driving.
6. Check the condition and air pres- sure of all tires on the trailer and your car. Low tire pressure can se- riously affect the handling. Alsocheck the spare tire.
7. The vehicle/trailer combination is
more affected by crosswind andbuffeting. When being passed by a large vehicle, keep a constant speed and steer straight ahead. If there is too much wind buffeting,slow down to get out of the othervehicle’s air turbulence.
8. When parking your car and trailer,
especially on a hill, be sure to followall the normal precautions. Turn your front wheel into the curb, set the parking brake firmly, and put thetransmission in 1st or "R" (manual transmission) or "P" (automatic transmission). In addition, placewheel chocks at each of the trailer’s tires.
9. If the trailer has electric brakes, start your vehicle and trailer mov-ing, and then apply the trailer brake controller by hand to be sure thebrakes are working. This lets you check your electrical connection at the same time.
10.During your trip, check occasion- ally to be sure that the load issecure, and that the lights and anytrailer brakes are still working.
11.Avoid jerky starts, sudden accel-
eration or sudden stops.
12.Avoid sharp turns and rapid lane changes.
Page 132 of 205

4
CORROSION PREVENTION AND APPEARANCE CARE
31
4
IN CASE OF EMERGENCY
31
HSRFL274
7. Push the bulb spring to remove the headlight bulb. HSRFL273
6. Turn the plastic cover counterclock- wise and remove it.
4. Using a spanner of the correct size,
remove the headlight assembly mounting bolts.
HSRFL272
5. Disconnect the power cord from the back of the headlight.
Replacement instructions:
1. Allow the bulb to cool. Wear eye
protection.
2. Open the engine hood.
3. Always grasp the bulb by its plastic base, avoid touching the glass. HSRFL270
G270A01P-GAT HEADLIGHT AND FRONT TURN SIGNAL LIGHT (Minibus/van)
Turn signal light
HSRFL271
Front position light
Headlight