2005 Hyundai Azera light
[x] Cancel search: lightPage 237 of 297

Engine Compartment .................................................... 6-2
General Checks ........................................................... 6-3
Maintenance Precautions ............................................. 6-4
Checking the Engine Oil .............................................. 6-4
Checking and Changing the Engine Coolant ............... 6-7
Spark Plugs .................................................................. 6-9
Changing the Air Cleaner Filter ...................................6-10
Checking the Transaxle Fluid (Automatic) .................6-14
Checking the Brakes .................................................. 6-16
Air Conditioning Care .................................................. 6-18
Changing the Air Conditioner Filter .............................6-18
Checking Drive Belts .................................................. 6-21
Checking and Replacing Fuses ..................................6-21
Checking the Battery .................................................. 6-23
Checking the Eclectric Cooling Fans .........................6-25
Power Steering Fluid Level ......................................... 6-25
Headlight Aiming Adjustment ...................................... 6-26
Replacement of Light Bulbs ........................................6-28
Bulb Wattage ............................................................... 6-36
Fuse Panel D escription ............................................... 6-37
DO-IT-YOURSELF MAINTENANCE
6
6
Page 239 of 297

6
DO-IT-YOURSELF MAINTENANCE
3GENERAL CHECKS
G020A01NF-GAT
Engine Compartment
The following should be checked regu- larly:
o Engine oil level and condition
o Transaxle fluid level and condition
o Brake fluid level
o Engine coolant level
o Windshield washer fluid level
o Accessory drive belt condition
o Engine coolant hose condition
o Fluid leaks (on or below compo- nents)
o Power steering fluid level
o Battery condition
o Air filter condition
o Immediate repairing when engine trembling occurs
o Limit to restart more than 3 times when engine cannot start o Defroster, heating system operation
(and air conditioning, If Installed)
o Steering operation and condition
o Mirror condition and operation
o Turn signal operation
o Accelerator pedal operation
o Brake operation, including parking brake
o Automatic transaxle operation, in- cluding "Park" mechanism opera- tion
o Seat control condition and opera- tion
o Seat belt condition and operation
o Sun visor operation If you notice anything that does not operate correctly or appears to befunctioning incorrectly, inspect it care- fully and seek assistance from your Hyundai dealer if service is needed.
G020B01A-AAT
Vehicle Exterior
The following should be checked
monthly:
o Overall appearance and condition
o Wheel condition and wheel nut
torque
o Exhaust system condition
o Light condition and operation
o Windshield glass condition
o Wiper blade condition
o Paint condition and body corrosion
o Fluid leaks
o Door and hood lock condition
o Tire pressure and condition (including spare tire)
G020C01TG-AAT
Vehicle Interior
The following should be checked each
time when the vehicle is driven:
o Lights operation
o Windshield wiper operation
o Horn operation
Page 248 of 297
6 DO-IT-YOURSELF MAINTENANCE
12
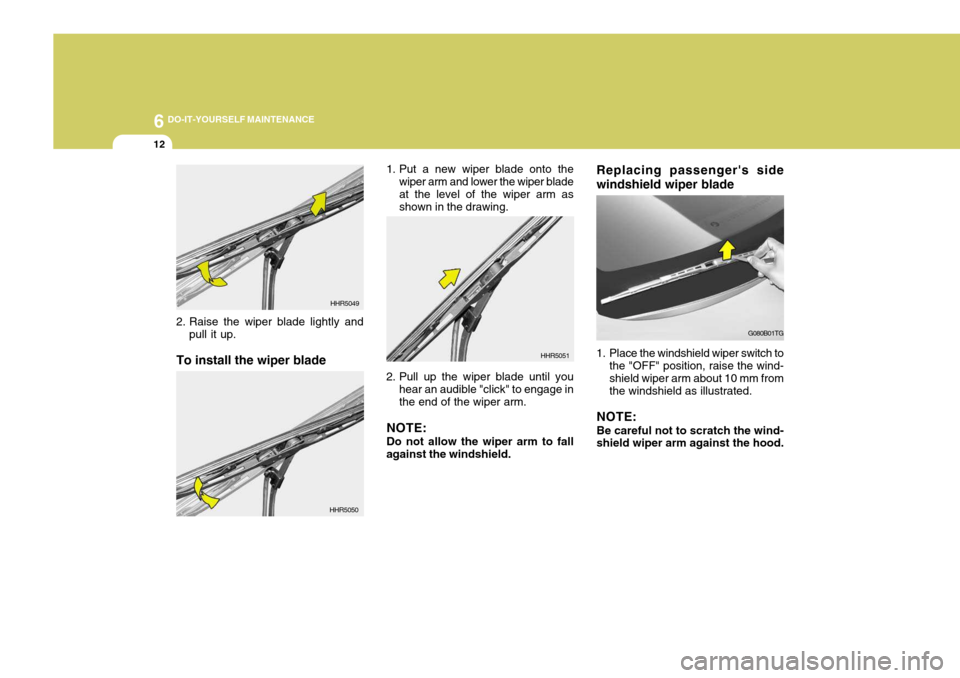
Replacing passenger's side windshield wiper blade
1. Place the windshield wiper switch to
the "OFF" position, raise the wind- shield wiper arm about 10 mm fromthe windshield as illustrated.
NOTE: Be careful not to scratch the wind- shield wiper arm against the hood. G080B01TG
2. Raise the wiper blade lightly and
pull it up.
To install the wiper blade HHR5049
HHR5050 1. Put a new wiper blade onto the
wiper arm and lower the wiper blade at the level of the wiper arm as shown in the drawing.
2. Pull up the wiper blade until you hear an audible "click" to engage in the end of the wiper arm.
NOTE: Do not allow the wiper arm to fall
against the windshield. HHR5051
Page 256 of 297
6 DO-IT-YOURSELF MAINTENANCE
20
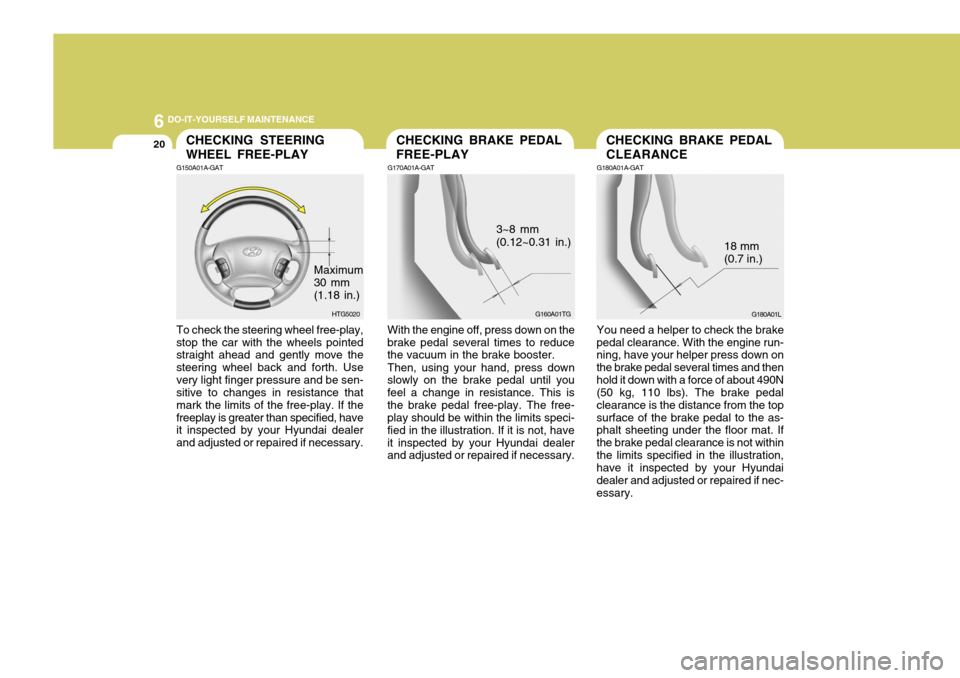
G180A01L
18 mm (0.7 in.)
You need a helper to check the brake
pedal clearance. With the engine run- ning, have your helper press down on the brake pedal several times and thenhold it down with a force of about 490N (50 kg, 110 lbs). The brake pedal clearance is the distance from the topsurface of the brake pedal to the as- phalt sheeting under the floor mat. If the brake pedal clearance is not withinthe limits specified in the illustration, have it inspected by your Hyundai dealer and adjusted or repaired if nec-essary.
With the engine off, press down on the
brake pedal several times to reduce the vacuum in the brake booster.
Then, using your hand, press down
slowly on the brake pedal until you feel a change in resistance. This isthe brake pedal free-play. The free- play should be within the limits speci- fied in the illustration. If it is not, haveit inspected by your Hyundai dealer and adjusted or repaired if necessary. G160A01TG
3~8 mm (0.12~0.31 in.)To check the steering wheel free-play, stop the car with the wheels pointed straight ahead and gently move the steering wheel back and forth. Usevery light finger pressure and be sen- sitive to changes in resistance that mark the limits of the free-play. If thefreeplay is greater than specified, have it inspected by your Hyundai dealer and adjusted or repaired if necessary. HTG5020
Maximum 30 mm (1.18 in.)
CHECKING STEERING WHEEL FREE-PLAY
G150A01A-GATCHECKING BRAKE PEDAL FREE-PLAY
G170A01A-GATCHECKING BRAKE PEDAL CLEARANCE
G180A01A-GAT
Page 258 of 297

6 DO-IT-YOURSELF MAINTENANCE
22
1. Turn off the ignition and all other
switches.
2. Open the fuse box and examine each fuse. Remove each fuse by pulling it toward you (a small "fusepuller" tool is contained in the relay and fuse box of the engine room to simplify this operation).
G200B02NF
3. Be sure to check all other fuses even if you find one that appears tohave burned out.G200B01NF-GAT Replacing Accessory Fuse
G200B01TG
The fuse box for the lights and other electrical accessories will be found in the left side of the crash pad. Insidethe box you will find a list showing the circuits protected by each fuse. If any of your car's lights or other electrical accessories stop working, a blown fuse could be the reason. If the fuse has burned out, you will see thatthe metal strip inside the fuse has burned through. If you suspect a blown fuse, follow this procedure:
CAUTION:
When replacing a fusible link, never
use anything but a new fusible link with the same or lower amper- age rating. Never use a piece ofwire or a higher-rated fusible link. This could result in serious dam- age and create a fire hazard.
!
Page 259 of 297
6
DO-IT-YOURSELF MAINTENANCE
23
CAUTION:
A burned-out fuse indicates that there is a problem in the electricalcircuit. If you replace a fuse and it blows as soon as the accessory is turned on, the problem is seriousand should be referred to a Hyundai dealer for diagnosis and repair. Never replace a fuse withanything except a fuse with the same or a lower amperage rating. A higher capacity fuse could cause damage and create a fire hazard. NOTE: See page 6-37 for the fuse panel descriptions.
!
CHECKING THE BATTERY
G210A01A-AAT
WARNING:
Batteries can be dangerous! When working with batteries, carefully observe the following precautionsto avoid serious injuries. The fluid in the battery contains a
strong solution of sulfuric acid, which is poisonous and highly corrosive. Be careful not to spill it on yourself or thecar. If you do spill battery fluid on yourself, immediately do the follow- ing: HTG5019
!
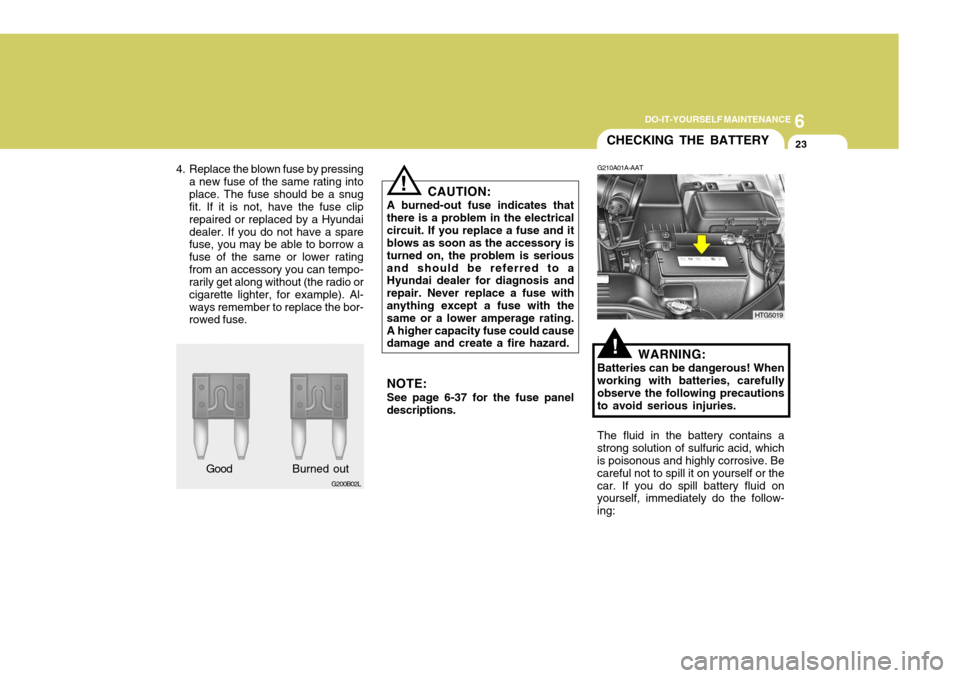
4. Replace the blown fuse by pressing
a new fuse of the same rating into place. The fuse should be a snug fit. If it is not, have the fuse clip repaired or replaced by a Hyundaidealer. If you do not have a spare fuse, you may be able to borrow a fuse of the same or lower ratingfrom an accessory you can tempo- rarily get along without (the radio or cigarette lighter, for example). Al-ways remember to replace the bor- rowed fuse.
G200B02L
Good B
urned out
Page 260 of 297
6 DO-IT-YOURSELF MAINTENANCE
24
Keep batteries out of the reach of children becausebatteries contain highly corrosive SULFURIC ACID. Do not allow battery acidto contact your skin, eyes, clothing or paint finish. If any electrolyte gets into your eyes, flush your eyes with clean water for at least15 minutes and get imme- diate medical attention. If possible, continue to ap-ply water with a sponge or cloth until medical atten- tion is received. If electrolyte gets on your skin, thoroughly wash the contacted area.If you feel a pain or a burn-ing sensation, get medi-cal attention immediately.Wear eye protection whencharging or working neara battery.Always provide ventilationwhen working in an en- closed space.
!
G210B01Y-GAT
Checking the Battery
Keep the battery clean. Any evidence of corrosion around the battery postsor terminals should be removed using a solution of household baking soda and warm water. After the batteryterminals are dry, cover them with a light coating of grease.
WARNING:Always read the followinginstructions carefully when handling a battery. Keep lighted cigarettes and all other flames or sparks away from the bat-tery.Hydrogen, which is ahighly combustible gas, is always present in battery cells and may explode ifignited.o If battery fluid is on your skin, flush the affected areas with water for at least 15 minutes and then seek medical assistance.
o If battery fluid is in your eyes, rinse out your eyes with water and getmedical assistance as soon as possible. While you are being drivento get medical assistance, continue to rinse your eyes by using a sponge or soft cloth saturated withwater.
o If you swallow battery fluid, drink a large quantity of water or milk fol- lowed by milk of magnesia, eat a raw egg or drink vegetable oil. Getmedical assistance as soon as possible.
While batteries are being charged(either by a battery charger or by the vehicle's alternator), they produceexplosive gases. Always observe these warnings to prevent injuries from occurring:
o Charge batteries only in a well ven- tilated area.
o Do not permit flames, sparks or smoking in the area.
o Keep children away from the area.
Page 262 of 297
6 DO-IT-YOURSELF MAINTENANCE
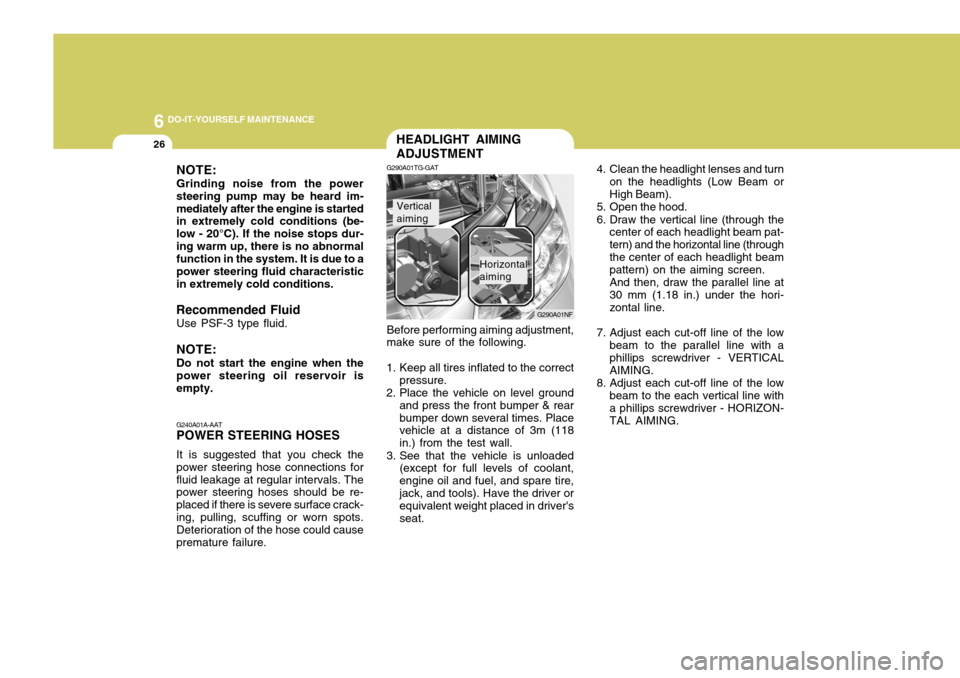
26HEADLIGHT AIMING ADJUSTMENT
G290A01TG-GAT
G290A01NF
Before performing aiming adjustment, make sure of the following.
1. Keep all tires inflated to the correct pressure.
2. Place the vehicle on level ground and press the front bumper & rear bumper down several times. Place vehicle at a distance of 3m (118 in.) from the test wall.
3. See that the vehicle is unloaded (except for full levels of coolant,engine oil and fuel, and spare tire,jack, and tools). Have the driver or equivalent weight placed in driver's seat.
Vertical aiming
Horizontal aiming 4. Clean the headlight lenses and turn
on the headlights (Low Beam or High Beam).
5. Open the hood.
6. Draw the vertical line (through the center of each headlight beam pat- tern) and the horizontal line (throughthe center of each headlight beam pattern) on the aiming screen. And then, draw the parallel line at 30 mm (1.18 in.) under the hori- zontal line.
7. Adjust each cut-off line of the low beam to the parallel line with a phillips screwdriver - VERTICAL AIMING.
8. Adjust each cut-off line of the low beam to the each vertical line with a phillips screwdriver - HORIZON-TAL AIMING.
NOTE: Grinding noise from the power steering pump may be heard im-mediately after the engine is started in extremely cold conditions (be- low - 20°C). If the noise stops dur-ing warm up, there is no abnormal function in the system. It is due to a power steering fluid characteristicin extremely cold conditions.
Recommended Fluid Use PSF-3 type fluid. NOTE: Do not start the engine when the power steering oil reservoir is empty. G240A01A-AAT POWER STEERING HOSES It is suggested that you check the power steering hose connections forfluid leakage at regular intervals. The power steering hoses should be re- placed if there is severe surface crack-ing, pulling, scuffing or worn spots. Deterioration of the hose could cause premature failure.