Page 237 of 414

�Û�Ý
Press the or button to
select another category.
Pressing and holding the DISP
button for more than 5 seconds will
change the search mode between
Channel Search and Category
Search. Each time you press and
release the DISP button, the display
above the rear control panel changes
in the f ollowing sequence: Channel
Number, Category Name, Music
Name, Artist Name, Channel Name,
and back to Channel Number.
If CDs are loaded in the CD changer,
select them by pressing the CD
button. If a CD is loaded in the DVD
player, press the DVD/AUX button.
To rewind the tape, push the
button. You will see REW in
the display. To fast forward the tape,
push the button. You will see
FF displayed.
Pressthe buttontofindthe
beginning of the current song or
passage. Press the button to
f ind the beginning of the next song
or passage.
Press the button to change the
tape direction.
Pressthe buttontoskiptothe
beginning of the next track. Press
the button to return to the
beginning of the current track.
To move rapidly within a track, press
andholdthe or button.
The system will continue to move
through the track. Press the
button to move f orward, or the
button to move backward.
Release the button when the system
reaches the point you want.
If CDs are loaded in the CD changer
and the overhead screen is not open,
pressing the or button changes
the discs. To Play a CD f rom the Rear
Control Panel To Play the Optional Tape Player
f rom the Rear Control Panel
Rear Entertainment System
236
Page 257 of 414
�Û
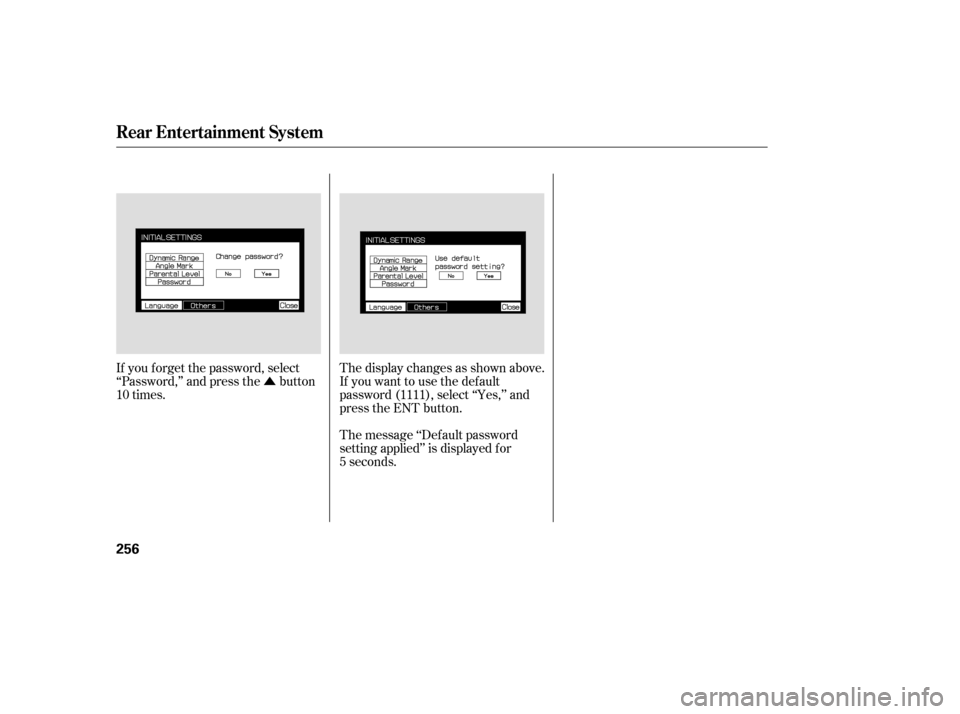
If you f orget the password, select
‘‘Password,’’ and press the button
10 times. The display changes as shown above.
If you want to use the def ault
password (1111), select ‘‘Yes,’’ and
press the ENT button.
The message ‘‘Def ault password
setting applied’’ is displayed f or
5 seconds.
Rear Entertainment System
256
Page 279 of 414
.
During this period:Avoid full-throttle starts and r")
Help assure your vehicle’s f uture
reliability and perf ormance by paying
extra attention to how you drive
during the f irst 600 miles (1,000 km).
During this period:Avoid full-throttle starts and rapid
acceleration.
Avoidhardbrakingforthefirst
200 miles (300 km).
Do not change the oil until the
scheduled maintenance time.
You should also f ollow these
recommendations with an
overhauled or exchanged engine, or
when the brakes are replaced. Do not tow a trailer. Your vehicle is designed to operate
on unleaded gasoline with a pump
octane number of 86 or higher. Use
of a lower octane gasoline can cause
a persistent, heavy metallic rapping
noise that can lead to engine damage.
We recommend quality gasolines
containing detergent additives that
help prevent f uel system and engine
deposits.
In addition, in order to maintain good
perf ormance, f uel economy, and
emissions control, we strongly
recommend, in areas where it is
available, the use of gasoline that
does NOT contain manganese-based
f uel additives such as MMT.
If you notice any undesirable
operating symptoms, try another
service station or switch to another
brand of gasoline. Some gasoline today is blended with
oxygenates such as ethanol or
MTBE. Your vehicle is designed to
operate on oxygenated gasoline
containing up to 10 percent ethanol
by volume and up to 15 percent
MTBE by volume. Do not use
gasoline containing methanol.
For f urther important f uel-related
inf ormation, please ref er to your
.
Use of gasoline with these additives
may adversely af f ect perf ormance,
and cause the malfunction indicator
lamp on your instrument panel to
come on. If this happens, contact your dealer f or service.
Break-in Period, Gasoline T ype
Break-in Period
Gasoline Type
Quick Start Guide
278
Page 301 of 414

�Î
You should never pump the brake pedal.
Let the ABS work f or you by always
keeping f irm, steady pressure on the
brake pedal. This is sometimes
ref erred to as ‘‘stomp and steer.’’
You will f eel a pulsation in the brake
pedal when the ABS activates, and
you may hear some noise. This is
normal: it is the ABS rapidly
pumpingthebrakes.Ondry
pavement, you will need to press on
thebrakepedalveryhardbeforethe
ABS activates. However, you may
feel the ABS activate immediately if
you are trying to stop on snow or ice.If the ABS indicator comes on, the
anti-lock f unction of the braking
system has shut down. The brakes
still work like a conventional system,
but without anti-lock. You should
have your dealer inspect your vehicle
as soon as possible.
on loose or
uneven surf aces, such as gravel or
snow, than a vehicle without anti-
lock. Always steer moderately
when you are braking hard. Severe
or sharp steering wheel movement
can still cause your vehicle to veer
into oncoming traffic or off the road. such as trying to take a
corner too f ast or making a sudden
lane change. it only helps with steering
control during braking.
The anti-lock brake system (ABS)
helps prevent the brakes f rom
locking up, and helps you retain
steering control by pumping the
brakes rapidly, much f aster than a
person can do it.
Anti-lock Brakes (ABS)
ABS Indicator
A vehicle with A BS may require a
longer distance to stop A BS cannot prevent a loss of
stability. A BS will not prevent a skid that
results f rom changing direction
abruptly, A BS does not reduce the time or
distance it takes to stop the
vehicle;Import ant Saf et y Reminders
300
ABS INDICATOR
Page 304 of 414
Your vehicle is equipped with a tire
pressure monitoring system (TPMS)
that turns on every time you start the
engine and monitors the pressure in
your tires while driving.
You will see the above display on the
multi-inf ormation display when you
turn the ignition switch to ON (II)
andpresstheINFObuttononthe
steering wheel six times.To see the inf lation pressures of all
f our tires, press the SEL/RESET
buttononthesteeringwheel.The
display changes as shown above.
Each tire has its own pressure
sensor. If the air pressure of a tire
becomes signif icantly low, the
sensor in that tire immediately sends
a signal that causes the low tire
pressure indicator in the instrument
panel to come on. If this happens,
you will see which tire is losing the
pressure in the multi-information
display along with a ‘‘CHECK TIRE
PRESSURE’’ message.
CONT INUED
On U.S. Touring model only
Tire Pressure Monitoring System (TPMS)
Driving
303
Page 309 of 414

The best way to conf irm that vehicle
and trailer weights are within limits
is to have them checked at a public
scale.
Using a suitable scale or a special
tongue load gauge, check the tongue
load the f irst time you set up a
towing combination (a f ully-loaded
vehicle and trailer), then recheck the
tongue load whenever the conditions
change.If the total trailer weight is more
than 1,850 lbs (840 kg), you must
also use a weight distributing hitch.
This device transf ers weight f rom
the vehicle’s rear wheels to the f ront
wheels, and to the trailer’s wheels.
Caref ully f ollow the hitch maker’s
instructions f or proper installation
and adjustment.
Always use saf ety chains when you
tow a trailer. Make sure the chains
are secured to the trailer and hitch,
and that they cross under the tongue
and can catch the trailer if it
becomes unhitched. Leave enough
slack to allow the trailer to turn
corners easily, but do not let the
chains drag on the ground.
Towing generally requires a variety
of supplemental equipment,
depending on the size of your trailer,
how much load you are towing, and
where you tow. To ensure the best
quality, we recommend that you
purchase Honda equipment
whenever possible.
Discuss your needs with your trailer
sales or rental agency, and f ollow the
guidelines in this section. Also make
sure that all equipment is properly
installed and meets f ederal, state,
province, and local regulations.
Any hitch used on your vehicle must
be properly bolted to the underbody,
using the six threaded holes
provided. A hitch and the required
f luid coolers designed especially f or
your Odyssey can be obtained f rom
your Honda dealer.
Towing a Trailer
Checking L oads
T owing Equipment and
A ccessoriesWeight Distributing Hitch
Saf et y Chains
Hitches
308
Page 317 of 414
When the remaining engine oil lif e is
less than 5 percent, you will see a
‘‘CHANGE OIL’’ message in the
odometer/trip meter display, along
with the same maintenance item
code(s), every time you turn the
ignition switch to ON (II).When the remaining engine oil lif e is
0 percent, you will see the above
display. In this display, the remaining
oil lif e indicator will be blinking. This
display comes on and stays on every
time you turn the ignition switch to
ON (II). When you see this message,
have the indicated maintenance
perf ormed by your dealer as soon as
possible.You can change the display to the
odometer, the trip meter, or the
outside temperature by pushing the
SELECT/RESET knob on the
instrument panel.
Maintenance Minder
316
Page 319 of 414
These messages will come on every
time you turn the ignition switch to
ON (II).
Immediately have the service
perf ormed, and make sure to reset
the display as described on page .
You can change the display to the
odometer, the trip meter, or the
outside temperature by pushing the
SEL/RESET button on the steering
wheel.
When the remaining engine oil lif e is
less than 0 percent and you have not
done the required maintenance, you
will see the above display for several
seconds. In this display, ‘‘0’’ will be
blinking.
The display then changes to
‘‘SERVICE PAST DUE.’’
When the remaining engine oil lif e is
less than 5 percent, you will see the
above display. The display then
changes to ‘‘SERVICE DUE NOW.’’
Have the indicated maintenance
done as soon as possible. 320
Maintenance Minder
318

that turns on every time you start the
engine and monitors the pressure in
your tires while driving.
You will see the above displ")
, every time y")
.
Immediately have the service
perf ormed, and make sure to reset
the display as described on page .
You can change the di")