Page 71 of 414
This indicator reminds you that the
maintenance main items and sub
items will be displayed in the
odometer/trip meter display. See
page f or more inf ormation on
the maintenance minder.This indicator comes on when there
is a system message in the multi-
inf ormation display. Press the INFO
button on the steering wheel to see
the message (see page ).
Most of the time, this indicator
comes on along with other indicators
in the instrument panel such as the
seat belt reminder indicator, SRS
indicator, VSA system indicator, etc.
While the engine is operating in its
most economical range, this
indicator comes on and stays on. It
goes of f when your vehicle uses
extra f uel.
This indicator goes of f when your
dealer resets it after completing the
required maintenance service. 79
315On LX and EX models On Touring model
On EX with leather and Touring models
Instrument Panel Indicators
System Message
Indicator
Fuel Economy
Indicator Maintenance MINDER
Indicator
70
Page 90 of 414

You can also use the trip meter
SELECT/RESET knob in the
instrument panel to select and enter
your selections while the multi-
inf ormation display is in the
customizing mode. Turn the knob to
select a setting and press it to enter
your selection. UsetheINFObuttononthesteering
wheel to see the settings, and the
SEL/RESET button to enter your
selections.
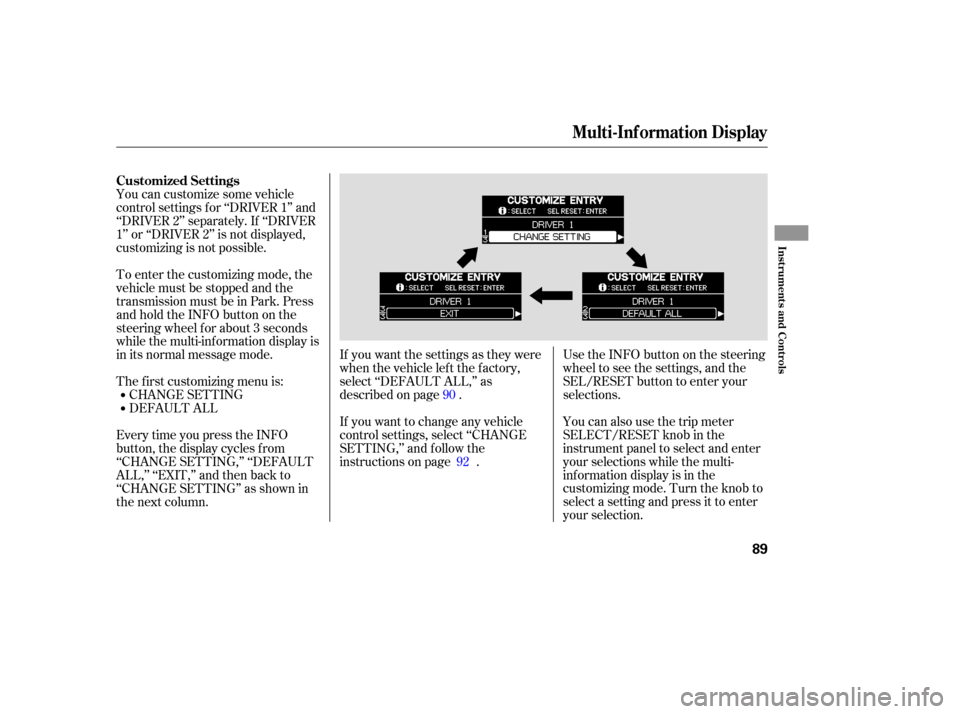
If you want the settings as they were
when the vehicle lef t the f actory,
select ‘‘DEFAULT ALL,’’ as
described on page .
If you want to change any vehicle
control settings, select ‘‘CHANGE
SETTING,’’ and f ollow the
instructions on page .
EverytimeyoupresstheINFO
button, the display cycles from
‘‘CHANGE SETTING,’’ ‘‘DEFAULT
ALL,’’ ‘‘EXIT,’’ and then back to
‘‘CHANGE SETTING’’ as shown in
the next column. You can customize some vehicle
control settings f or ‘‘DRIVER 1’’ and
‘‘DRIVER 2’’ separately. If ‘‘DRIVER
1’’ or ‘‘DRIVER 2’’ is not displayed,
customizing is not possible.
DEFAULT ALL CHANGE SETTING
The f irst customizing menu is: To enter the customizing mode, the
vehicle must be stopped and the
transmission must be in Park. Press
andholdtheINFObuttononthe
steering wheel f or about 3 seconds
while the multi-information display is
in its normal message mode.
90
92
Customized Settings
Multi-Inf ormation Display
Inst rument s and Cont rols
89
Page 92 of 414
When DEFAULT ALL is completed
successf ully, you will see the above
display f or several seconds, and the
display will return to ‘‘CUSTOMIZE
ENTRY.’’If DEFAULT ALL is not completed
successf ully, you will see the above
display f or several seconds, then the
display goes back to the normal
message mode. Repeat the
procedure to select DEFAULT ALL.To exit ‘‘DEFAULT ALL,’’ press the
INFO button until you see ‘‘EXIT,’’
then press the SEL/RESET button.
Multi-Inf ormation Display
Inst rument s and Cont rols
91
Page 124 of 414

�µ�µ
When the light switch is in the
‘‘ ’’ or ‘‘ ’’ position, the
lights on indicator comes on as a
reminder. This indicator stays on if
you leave the light switch on and
turn the ignition switch to the
ACCESSORY (I) or LOCK (0)
position.
To switch f rom low
beams to high beams, push the lef t
lever f orward until you hear a click.
The blue high beam indicator will
come on (see page ). Pull it back
to return to low beams. To flash the
high beams, pull the lever back
lightly, then release it. The high
beams will stay on as long as you
hold the lever back.
Turn the f og lights on and of f by
turning the switch next to the
headlight switch. To turn on the automatic lighting,
turn the light switch to AUTO at any
time. The lights will come on
automatically when the outside light
level becomes low (at dusk, f or
example). The lights on indicator
comesonasareminder.Thelights
and indicator turn off automatically
when the system senses high
ambient light.The automatic lighting
f eature turns on the headlights, all
other exterior lights, and the
instrument panel lights when it
senses low ambient light. You can use the f og lights only when
the headlights are on low beam. The lights turn of f automatically
when you turn the ignition switch to
LOCK (0). To turn them on again,
either turn the ignition switch to ON
(II), or turn the light switch to .
Even with the automatic lighting
f eature turned on, we recommend
thatyouturnonthelightsmanually
when driving at night or in a dense
f og, or when you enter dark areas
such as long tunnels or parking
structures.
Do not leave the light switch in
AUTO if you will not be driving the
vehicle f or an extended period (a
weekormore).Youshouldalsoturn
of f the lights if you plan to leave the
engine idling or the engine of f f or a
long time.
69
CONT INUED
On Touring model
Touring model only
High Beams
Fog Lights AUTO
Headlights
Inst rument s and Cont rols
123
Page 125 of 414

�Î
�Î
�ÎIf you unlock the door, but do not
open it within 15 seconds, the lights
go of f . With the driver’s door open,
you will hear a lights-on reminder
chime. The lights turn on again when you
unlock or open the driver’s door.
On the Touring model, this time is
changeable. See page f or how to
select and set the time.
This turns of f the headlights,
parking lights, taillights, side marker
lights, license plate lights, and
instrument panel lights within 15
seconds of removing the key f rom
the ignition switch and closing the
driver’s door.
This feature activates if you leave
the headlight switch in the ‘‘ ’’
or ‘‘ ’’ position, remove the key,
then open and close the driver’s door.
If you remove the key f rom the
ignition switch with the headlight
switch on, but do not open the door
and get out, the lights turn off after
10 minutes.
The automatic lighting f eature is
controlledbyasensorlocatedontop
of the dashboard. Do not cover this
sensor or spill liquids on it. 107
On EX and Touring models only
Automatic Lighting Of f Feature
Headlights
124
Page 126 of 414
The level of brightness is shown on
the multi-information display on the
Touring model or in the odometer/
trip meter display on LX and EX
models while you adjust it. It goes
out 5 seconds af ter you f inish
adjusting.
The knob on the instrument panel
controls the brightness of the instru-
ment panel lights. Turn the knob to
adjust the brightness.
With the headlight switch off, the
high beam headlights and the high
beam indicator come on with
reduced brightness when you turn
the ignition switch to ON (II) and
release the parking brake. They
remain on until you turn the ignition
switch of f , even if you set the
parking brake.
The headlights revert to normal
operation when you turn them on
with the switch.
Instrument Panel Brightness
Daytime Running L ights
(Canadian Models)
Headlights, Instrument Panel Brightness
Inst rument s and Cont rols
125
BRIGHTNESS LEVEL
SELECT/RESET KNOB Touring model shown
Page 132 of 414

�µ�µ�µ
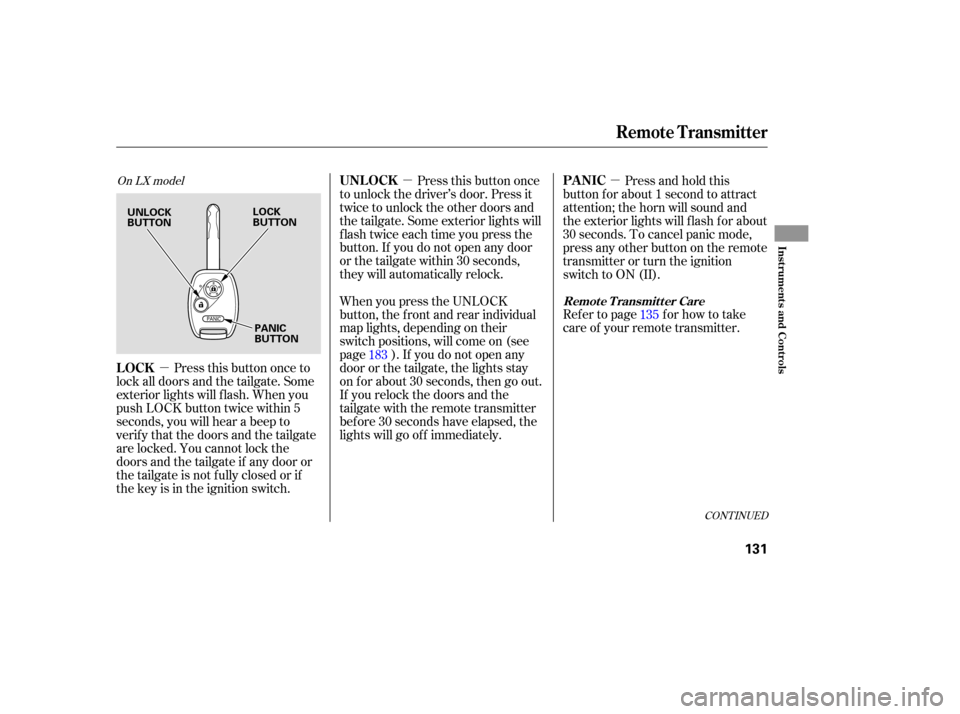
Press this button once to
lock all doors and the tailgate. Some
exterior lights will f lash. When you
push LOCK button twice within 5
seconds, you will hear a beep to
verify that the doors and the tailgate
are locked. You cannot lock the
doors and the tailgate if any door or
the tailgate is not f ully closed or if
the key is in the ignition switch. Press this button once
to unlock the driver’s door. Press it
twice to unlock the other doors and
the tailgate. Some exterior lights will
f lash twice each time you press the
button. If you do not open any door
orthetailgatewithin30seconds,
they will automatically relock. Press and hold this
button for about 1 second to attract
attention; the horn will sound and
the exterior lights will f lash f or about
30 seconds. To cancel panic mode,
press any other button on the remote
transmitter or turn the ignition
switch to ON (II).
Refertopage forhowtotake
care of your remote transmitter.
When you press the UNLOCK
button, the f ront and rear individual
map lights, depending on their
switch positions, will come on (see
page ). If you do not open any
door or the tailgate, the lights stay
on f or about 30 seconds, then go out.
If you relock the doors and the
tailgate with the remote transmitter
bef ore 30 seconds have elapsed, the
lights will go of f immediately. 135
183
CONT INUED
On LX model
LOCK UNL OCK
PA NIC
Remote Transmitter Care
Remote Transmitter
Inst rument s and Cont rols
131
UNLOCK
BUTTONLOCK
BUTTON
PANIC
BUTTON
Page 134 of 414

�µ�µ
�µ
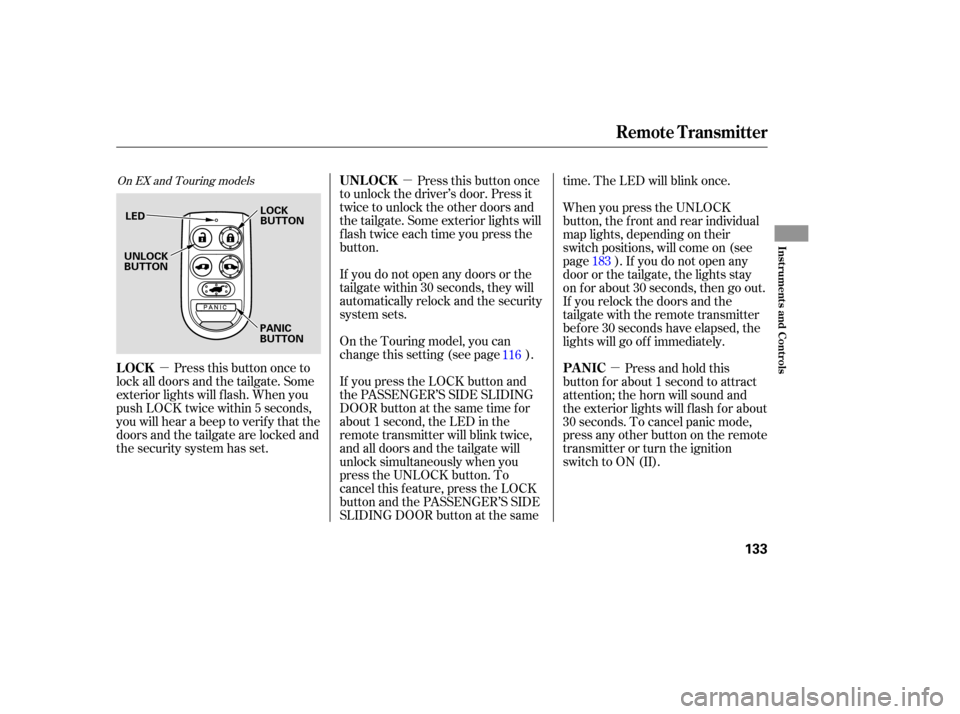
Press this button once to
lock all doors and the tailgate. Some
exterior lights will f lash. When you
push LOCK twice within 5 seconds,
you will hear a beep to verify that the
doors and the tailgate are locked and
the security system has set. Press this button once
to unlock the driver’s door. Press it
twice to unlock the other doors and
the tailgate. Some exterior lights will
f lash twice each time you press the
button.
If you do not open any doors or the
tailgate within 30 seconds, they will
automatically relock and the security
system sets.
If you press the LOCK button and
the PASSENGER’S SIDE SLIDING
DOOR button at the same time f or
about 1 second, the LED in the
remote transmitter will blink twice,
and all doors and the tailgate will
unlock simultaneously when you
press the UNLOCK button. To
cancel this f eature, press the LOCK
button and the PASSENGER’S SIDE
SLIDING DOOR button at the same time. The LED will blink once.
On the Touring model, you can
change this setting (see page ). When you press the UNLOCK
button, the f ront and rear individual
map lights, depending on their
switch positions, will come on (see
page ). If you do not open any
door or the tailgate, the lights stay
on f or about 30 seconds, then go out.
If you relock the doors and the
tailgate with the remote transmitter
bef ore 30 seconds have elapsed, the
lights will go of f immediately.
Press and hold this
button for about 1 second to attract
attention; the horn will sound and
the exterior lights will f lash f or about
30 seconds. To cancel panic mode,
press any other button on the remote
transmitter or turn the ignition
switch to ON (II).
116
183
On EX and Touring models
LOCK UNL OCK
PA NIC
Remote Transmitter
Inst rument s and Cont rols
133
LEDLOCK
BUTTON
PANIC
BUTTON
UNLOCK
BUTTON