Page 84 of 414
Check Tire PressureWarning: Approaching Object
This message, and the indicator to
the lef t of the message, is a part of
the parking sensor system. If you are
approaching too close to an object,
you will see ‘‘WARNING
APPROACHING OBJECT’’ in the
display and hear a beeper. See page
f or more inf ormation. The f ollowing messages indicate
various problems in your vehicle’s
systems.
If one or more of your vehicle tires
are low on pressure, you will see a
‘‘CHECK TIRE PRESSURE’’
message in the display. See page f or more inf ormation on the tire
pressure monitoring system (TPMS). 303
271
CONT INUED
On U.S. Touring model only
Multi-Inf ormation Display
Inst rument s and Cont rols
83
Page 89 of 414
Check DRL System
If there is a problem with the
Daytime Running Light (DRL)
System, you will see ‘‘CHECK DRL
SYSTEM’’ in the multi-inf ormation
display. If you see this message,
have your vehicle checked by a
dealer.For more inf ormation, see page .
Your vehicle is equipped with the
Michelin PAX system. The PAX
system uses the multi-inf ormation
display to show you one of three
messages while you are driving with
a f lat tire. 356
Canadian model only
U.S. Touring model only
PA X Warning Messages
Multi-Inf ormation Display
88
Page 121 of 414
�Î
�Î
To use the horn, press the pad around the ‘‘H’’ logo.
:
Controls Near the Steering Wheel
120
POWER SLIDING
DOOR SWITCHES
REAR WINDOW
DEFOGGER
STEERING WHEEL
ADJUSTMENT CRUISE
CONTROL
CLOCK
LIGHT CONTROL
SWITCH
AUDIO SYSTEM/
REAR
ENTERTAINMENT
SYSTEM
STEERING WHEEL
AUDIO CONTROLS PASSENGER
AIRBAG OFF
INDICATOR
POWER TAILGATE
SWITCH HEADLIGHTS/
TURN SIGNALS
HAZARD WARNING
BUTTON
WINDSHIELD
WIPERS/WASHERS
VSA OFF
SWITCH
HORN
(P.142)
(P.139)
(P.271) (P.302)
(P.228) (P.127) (P.121)
(P.122)
(P.264)
(P.126) (P.227)
(P.33)
(P.126)
(P.199, 230)
(P. 183 )
PARKING SENSOR
SYSTEM SWITCH
DRIVER’S PEDAL
ADJUSTMENT SWITCH
(P.169)
(P.166)
(P.75)MULTI-INFORMATION
DISPLAY SWITCHES
VSA OFF SWITCH
/
(P.302)
MOONROOF
Page 127 of 414
.
This causes all f our outside turn
signals and both indicators in the
instrument panel to f")
Push the red button between the
center air vents to turn on the hazard
warning lights (f our-way f lashers).
This causes all f our outside turn
signals and both indicators in the
instrument panel to f lash. Use the
hazard warning lights if you need to
park in a dangerous area near heavy
traf f ic, or if your vehicle is disabled.The def ogger wires on the inside of
the rear window can be accidentally
damaged. When cleaning the glass,
always wipe side-to-side. Make sure the rear window is clear
and you have good visibility bef ore
starting to drive.
The rear window def ogger will clear
fog, frost, and thin ice from the
window. Push the def ogger button to
turn it on and off. The indicator in
the button comes on to show the
def ogger is on. It shuts of f when you
turn of f the ignition. You have to
turn the def ogger on again when you
restart the vehicle.
Hazard Warning Button
Rear Window Def ogger
Hazard Warning Button, Rear Window Def ogger
126
LX model EX and Touring models
Page 150 of 414
�µ
The f ront passenger’s seat, and the
seats in the second and third rows
adjust manually.
Make all seat adjustments bef ore
you start driving. The EX and Touring models have a
power adjustable driver’s seat. The
LX model has manual driver’s seat
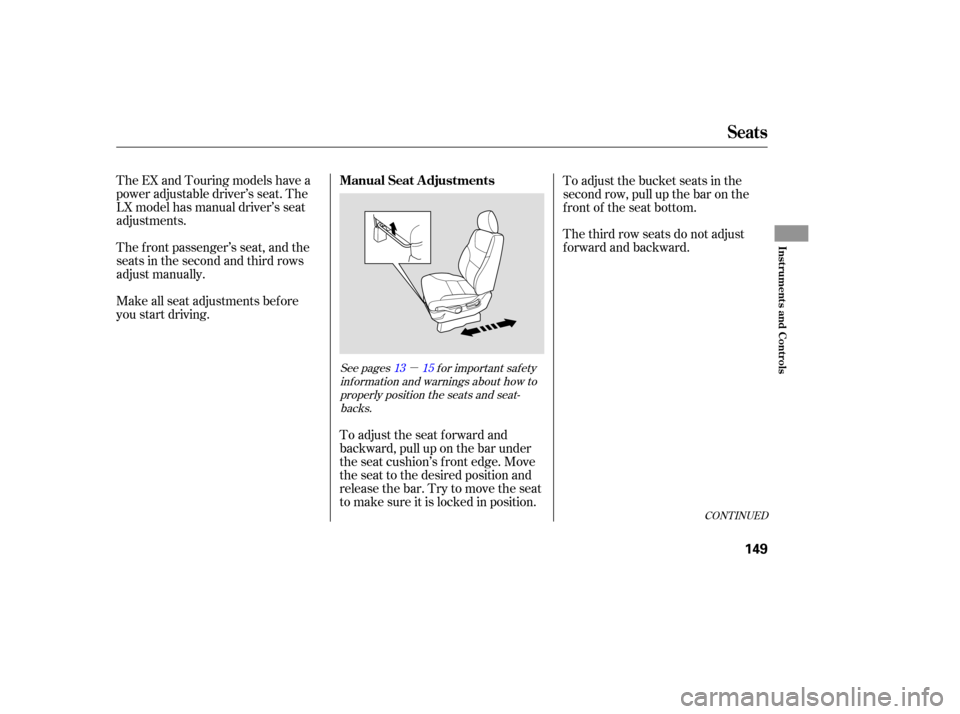
adjustments.To adjust the seat forward and
backward, pull up on the bar under
the seat cushion’s f ront edge. Move
the seat to the desired position and
releasethebar.Trytomovetheseat
to make sure it is locked in position.To adjust the bucket seats in the
second row, pull up the bar on the
front of the seat bottom.
The third row seats do not adjust
f orward and backward.
See pages f or important saf ety
inf ormation and warnings about how toproperly position the seats and seat-backs. 13 15
CONT INUED
Manual Seat Adjustments
Seats
Inst rument s and Cont rols
149
Page 152 of 414
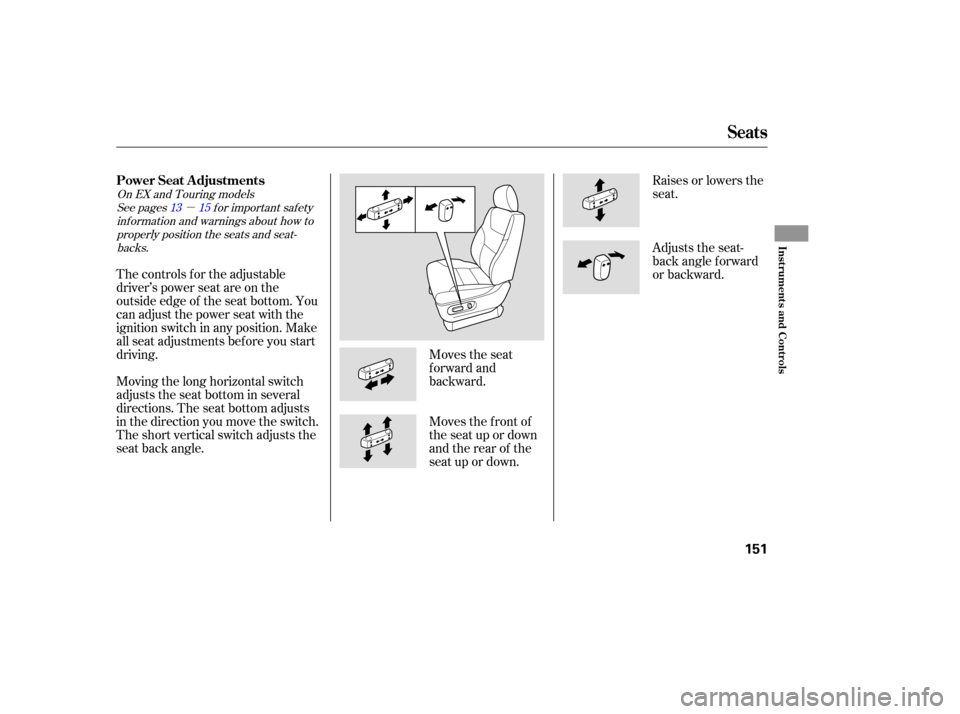
�µ
Moves the seat
forward and
backward.Raises or lowers the
seat.
The controls f or the adjustable
driver’s power seat are on the
outside edge of the seat bottom. You
can adjust the power seat with the
ignition switch in any position. Make
all seat adjustments bef ore you start
driving.
Moving the long horizontal switch
adjusts the seat bottom in several
directions. The seat bottom adjusts
in the direction you move the switch.
The short vertical switch adjusts the
seat back angle. Moves the f ront of
the seat up or down
and the rear of the
seat up or down.Adjusts the seat-
back angle f orward
or backward.
See pages f or important saf ety
inf ormation and warnings about how toproperly position the seats and seat-backs.
On EX and Touring models
13 15
Power Seat A djustments
Seats
Inst rument s and Cont rols
151
Page 153 of 414

See page f or important saf etyinf ormation and a warning about how toproperly position the head restraints.
On EX and Touring models 15
On EX with Leather and Touring models
Your vehicle is equipped with head
restraints in all seating positions to
help protect you and your
passengers f rom whiplash and other
injuries.
An armrest is located on each of the
frontseatsandoneachsideof the
second row seats. Pivot it down to
use it. When you remove the bucket
seats in the second row, pivot the
armrests up out of the way.
To change the lumbar support, move
the lever on the right side of the
seat-back forward or backward.
Keep moving the lever f orward or
backward until you f ind a suitable
position. They are most ef f ective when you
adjust them so the back of the
occupant’s head rests against the
center of the restraint.
Theangleof thearmrestoneach
f ront seat is adjustable. Pivot the
armrest down, and pull it up to the
desired angle. Head Restraints
Armrests
Driver’s L umbar Support
Seats
152
Page 318 of 414
�µ
CONT INUED
When the remaining engine oil lif e is
15 percent or less, the display shows
a ‘‘SERVICE DUE SOON’’ message
along with the maintenance item
code(s) f or other scheduled
maintenance items needing service.
To see the current engine oil lif e,
turn the ignition switch to ON (II),
then push and release the
SEL/RESET button on the steering
wheel three times.
If you still do not perf orm the
indicated maintenance, you will see a
negative mileage, f or example
‘‘ 543,’’ blinking in the display. This
negative mileage means that you
should have perf ormed the indicated
maintenance 543 miles ago.
Immediately have the indicated
maintenancedonebyyourdealer.
When you turn the ignition switch to
ON (II), the master warning
indicator will also come on.
On Touring model
Maintenance Minder
Maint enance
317
MASTER WARNING INDICATOR


System, you will see ‘‘CHECK DRL
SYSTEM’’ in the multi-inf ormation
display. If you see this message,
have your vehi")