Page 158 of 223
Pull the bulb straight out of its
socket. Push the new bulb straight
into the socket until it bottoms.Open the trunk.
Determine which of the two bulbs
is burned out: taillight or back-up
light.
Remove the socket by turning it
one-quarter turn counterclockwise.Insert the socket back into the
light assembly. Turn it clockwise
to lock it in place.
Pull the bulb straight out of its
socket.
Push the new bulb straight into
the socket until it bottoms.
Testthelightstomakesurethe
new bulb is working.
Reinstall the socket into the light
assembly by turning it clockwise
until it locks.
Testthelightstomakesurethe
new bulb is working.
Reinstall the trunk lining. Make
sure it is installed under the edge
of the trunk seal.
Put the f asteners into the holes on
the side of the trunk lining.
Reinstall the screws. 4. 5. 6.
1. 2. 3.
4.5.6. 7. 8.
Lights
Replacing Rear Bulbs
(in T runk L id)
Maint enance
167
BULBS
SOCKETS
�����—�����—�����y�
������
������y���
�(�����������y���
�����y
Page 159 of 223
Open the trunk and remove the
socket f rom the light assembly by
turning it one-quarter turn counter-
clockwise.
Pull the bulb straight out of its
socket. Push the new bulb straight
into the socket until it bottoms.Reinstall the socket. Turn it
clockwise until it locks. Make sure
the new bulb is working.
2.
1. 3.
Lights
Replacing a High-mount Brake
Light Bulb
168
BULB
SOCKET
�����—�����—�����y�
������
������y���
�(�����������y���
���
�y
Page 173 of 223

If you have a f lat tire while driving,
stop in a saf e place to change it.
Drive slowly along the shoulder until
you get to an exit or an area to stop
that is far away from the traffic lanes.Open the trunk. Raise the trunk
f loor mat and the trunk f loor by
lif ting up on the back edge.
Take the tool kit out of the trunk.
Unscrew the wing bolt and take
the spare tire out of its well.
Turn on the hazard warning lights,
and turn the ignition switch to
LOCK (0). Have all the
passengers get out of the vehicle
while you change the tire.
Park the vehicle on f irm, level and
non-slippery ground. Put the
transmission in Park (automatic)
or Reverse (manual). Apply the
parking brake.
5.
4.
3.
2.
1.
Changing a Flat T ire
T aking Care of t he Unexpect ed
183
SPARE TIRE TRUNK FLOOR
JACK
TOOL KIT
The vehicle can easily roll off
the jack, seriously injuring
anyone underneath.
Follow the directions for
changing a tire exactly, and
never get under the vehicle
when it is supported only by thejack.
�����—�����—�����y�
�������������y���
�(�����������y���
�����y
Page 178 of 223
:You hear nothing, or almost
nothing. The engine’s starter
motor does n")
Diagnosing why the engine won’t
start f alls into two areas, depending
on what you hear when you turn the
key to START (III):You hear nothing, or almost
nothing. The engine’s starter
motor does not operate at all, or
operates very slowly.
You can hear the starter motor
operating normally, or the starter
motor sounds like it is spinning
f aster than normal, but the engine
does not start up and run. When you turn the ignition switch to
START (III), you do not hear the
normal noise of the engine trying to
start. You may hear a clicking sound
or series of clicks, or nothing at all.
Check the transmission interlock.
If you have a manual transmission,
the clutch pedal must be pushed
all the way to the f loor or the
starter will not operate. With an
automatic transmission, it must be
in Park or Neutral. Turn the ignition switch to START
(III). If the headlights do not dim,
check the condition of the f uses. If
the f uses are OK, there is
probably something wrong with
the electrical circuit f or the
ignition switch or starter motor.
You will need a qualif ied
technician to determine the
problem (see
on page ).
Check these things:
If the headlights dim noticeably or
go out when you try to start the
engine, either the battery is dis-
charged or the connections are
corroded. Check the condition of
the battery and terminal connec-
tions (see page ). You can
then try jump starting the vehicle
f rom a booster battery (see page).
Turn the ignition switch to ON (II).
Turn on the headlights, and check
their brightness. If the headlights
areverydimordonotcomeonat
all, the battery is discharged. See
on page .190 178
190 202
If theEngineWon’tStart
Nothing Happens or the Starter
Motor Operates Very Slowly
Emergency T owing
Jump Starting
188
�����—�����—�����y�
�������������y���
�(�����������y���
���
�y
Page 180 of 223

�´�´
Although this seems like a simple
procedure, you should take several
precautions.
You cannot start your vehicle with an
automatic transmission by pushing
or pulling it. Open the hood, and check the
physical condition of the battery.
In very cold weather, check the
condition of the electrolyte. If it
seems slushy or f rozen, do not try
jump starting until it thaws.
The numbers in the illustration show
you the order to connect the jumper
cables.
Connect one jumper cable to the
positive ( ) terminal on your
battery. Connect the other end to
the positive ( ) terminal on the
booster battery.
Turn of f all the electrical acces-
sories: heater, A/C, stereo system,
lights, etc. Put the transmission in
Neutral or Park, and set the
parking brake.
1. 2. 3.
Jump Starting
To Jump Start Your Vehicle:
190
BOOSTER BATTERY
A battery can explode if you do
not follow the correct procedure,
seriously injuring anyonenearby.
Keep all sparks, open flames,
and smoking materials away
from the battery.
If a battery sits in extreme cold, the
electrolyte inside can f reeze.
Attempting to jump start with a f rozen
battery can cause it to rupture.
�����—�����—�����y�
�������������y���
�(�����������y���
�����y
Page 188 of 223

If something electrical in your
vehicle stops working, check f or a
blown f use f irst. Determine f rom the
chart on pages and , or the
diagram on the f use box lid, which
f uses control that device. Check
those fuses first, but check all the
f uses bef ore deciding that a blown
f use is the cause. Replace any blown
f uses, and check if the device works.Turn the ignition switch to LOCK
(0). Make sure the headlights and
all other accessories are off.
Remove the cover f rom the f use
box.
Check each of the large f uses in
the under-hood f use box by
looking through the top at the wire
inside. Remove the screws with a
phillips-head screwdriver.Check the smaller f uses in the
under-hood f use box and all the
fuses in the interior fuse box by
pulling out each one with the f use
puller provided in the under-hood
fuse box.
Look f or a burned wire inside the
f use. If it is burned, replace it with
one of the spare f uses of the same
rating or lower.
1. 2. 3.
4. 5.
200 201
Fuses
Checking and Replacing Fuses
198
UNDER-HOOD
TAB FUSE
BLOWN FUSE PULLER
�����—�����—�����y�
�������������y���
�(�����������y�������
�y
Page 191 of 223
�µ�µ �µ �µ �µ
�Î
�Î
�Î
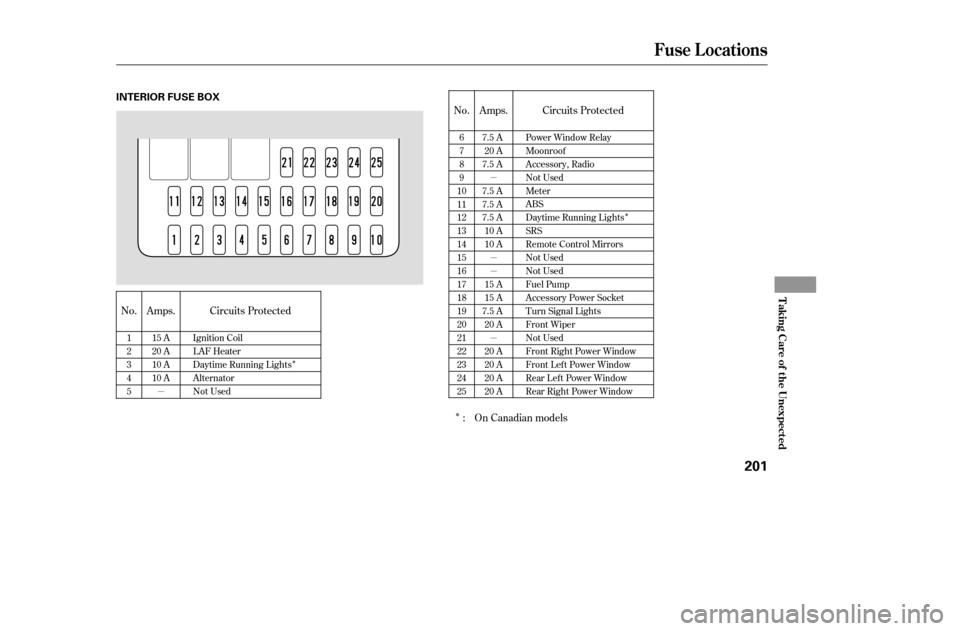
No. Amps. Circuits Protected No. Amps. Circuits Protected
On Canadian models
:
1 2345 15 A
20 A
10 A
10 A
Ignition Coil
LAF Heater
Daytime Running Lights
Alternator
Not Used 6789
10111213141516171819202122232425 7.5 A
20 A
7.5 A
7.5 A
7.5 A
7.5 A 10 A
10 A
15 A
15 A
7.5 A 20 A
20 A
20 A
20 A
20 A Power Window Relay
Moonroof
Accessory, Radio
Not Used
Meter
ABS
Daytime Running Lights
SRS
Remote Control Mirrors
Not Used
Not Used
Fuel Pump
Accessory Power Socket
Turn Signal Lights
Front Wiper
Not Used
Front Right Power Window
Front Left Power Window
Rear Lef t Power Window
Rear Right Power Window
Fuse Locations
T aking Care of t he Unexpect ed
201
INTERIOR FUSE BOX
�����—�����—�����y�
�������������y���
�(�����������y���������y
Page 198 of 223

�µ�µ�µ
�Î �Î �µ
�µ �µ�µ �µ �µ �µ �µ�µ�µ�µ�µ�µ�µ�µ
�Î�Î�Î�Î �Î
�Î �Î �Î�Î�Î
�Î�Î
�Î
Specif ications
T echnical Inf ormation
209
Air Conditioning
Fuses
Alignment
Battery
Lights
Tires
HFC-134a (R-134a)
17.6 19.4 oz (500 550 g) SP-10
12 V 60 W (HB3)
2°14’0°45’
0°
0.00 in (0.0 mm)
P185/65R15 86H P185/70R14 87S
0.08 in (2.0 mm)
Refrigerant type
Charge quantity
Lubricant oil type
Interior
Under-hood
Toe-in
CamberCaster
Capacity 12 V 36 AH/5 HR
Headlights
Front turn signal/side marker
lights
Rear turn signal lights
Stop/Taillights/Rear side
marker lights
Back-up lights
Taillights
High-mount brake light
License plate lights
Ceiling light
Front ceiling light
Spotlights
Trunk light 12 V
12 V
12 V
12 V
12 V
12 V
12 V
12 V
12 V
12 V
12 V
12 V
5W
8W
5W
8W
3CP
21 W
3CP
21 W
21/5 W
21 W
27/8 W
60 psi (420 kPa , 4.2 kgf/cm
)
30 psi (210 kPa , 2.1 kgf/cm)
T125/70D15 95M
T115/70D14 88M
Size
Pressure
12 V 51 W (HB4)
5W P195/60R15 87H
See page 201 or the fuse label
attached to the inside of the fuse
box door under the steering
column.
See page 200 or the fuse box
cover.
1: 2: U.S.: DX, LX without ABS
U.S.: LX with ABS, EX
U.S.: EX
Canada: SiLX HighLow
Front/Rear
Spare
Front/Rear
Spare
FrontRear
FrontRear
Front
U.S.: LX, EX, Canada: Si
Canada: DX
1: 2:3:4: 5: DX, Canadian SE
Canadian LX-G
Canada: LX-G, Si
1 2
123
45
1
�����—�����—�����y�
�����������
�y���
�(�����������y�����
���y