Page 151 of 228
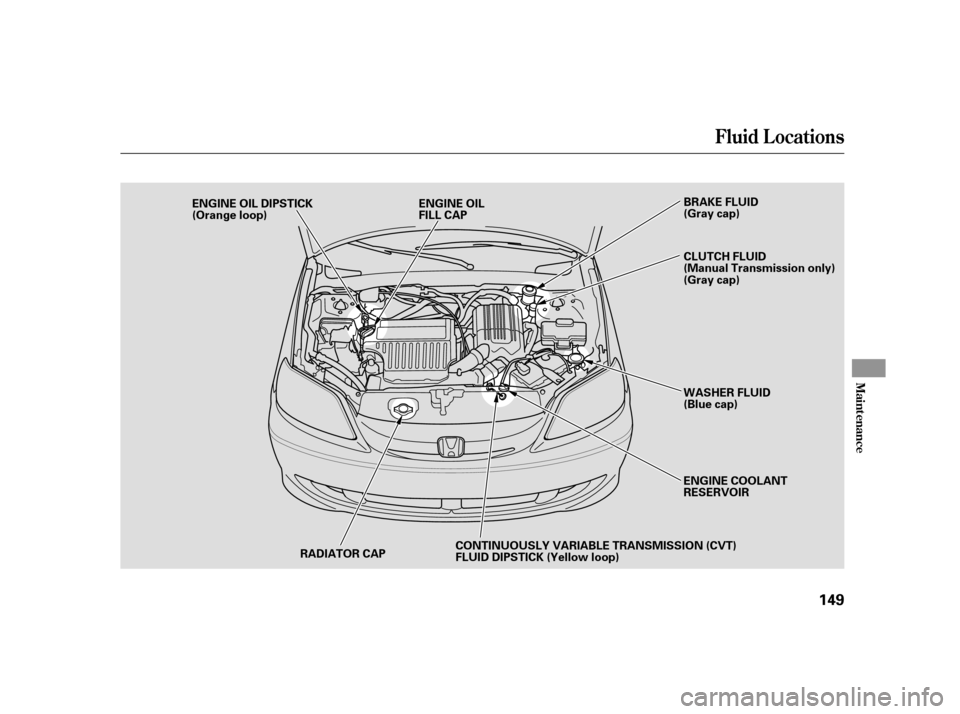
Fluid Locations
Maint enance
149
RADIATOR CAP
ENGINE OIL DIPSTICK
(Orange loop)
ENGINE OIL
FILL CAP
CONTINUOUSLY VARIABLE TRANSMISSION (CVT)
FLUID DIPSTICK (Yellow loop) BRAKE FLUID
(Gray cap)
WASHER FLUID
(Blue cap)
ENGINE COOLANT
RESERVOIR CLUTCH FLUID
(Manual Transmission only)
(Gray cap)
Page 160 of 228

Check the brake f luid level in the
reservoirs monthly.
Always use Honda Heavy Duty
Brake Fluid DOT 3. If it is not
available, you should use only DOT 3
or DOT 4 f luid, f rom a sealed
container, as a temporary
replacement.The f luid level should be between
theMINandMAXmarksontheside
of the reservoir. If the level is at or
below the MIN mark, your brake
system needs attention. Have the
brake system inspected f or leaks or
worn brake pads.The f luid level should be between
theMINandMAXmarksontheside
of the reservoir. If it is not, add
brake f luid to bring it up to that level.
Use the same fluid specified for the
brake system.
Replace the brake f luid according to
the time recommendation in the
maintenance schedule.
Using any non-Honda brake f luid can
cause corrosion and decrease the lif e
of the system. Have the brake
system f lushed and ref illed with
Honda Heavy Duty Brake Fluid
DOT 3 as soon as possible.
Brake f luid marked DOT 5 is not
compatible with your vehicle’s
braking system and can cause
extensive damage.
A low f luid level can indicate a leak
in the clutch system. Have this
system inspected as soon as possible.
Manual Transmission only
Brake System
Clutch System
Brake and Clutch Fluid
158
MAX
MIN MAX
MIN
Page 165 of 228
Pull the bulb straight out of its
socket. Push the new bulb straight
into the socket until it bottoms.
Insert the socket back into the
light assembly. Turn it clockwise
to lock it in place.
Turn on the lights to make sure
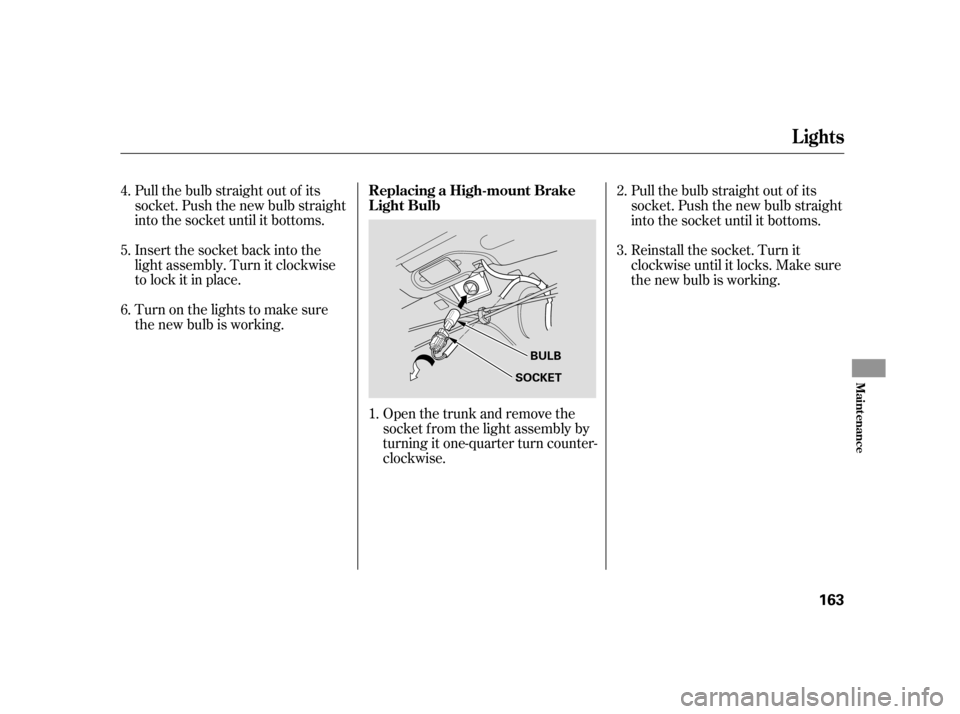
the new bulb is working.Open the trunk and remove the
socket f rom the light assembly by
turning it one-quarter turn counter-
clockwise.Reinstall the socket. Turn it
clockwise until it locks. Make sure
the new bulb is working. Pull the bulb straight out of its
socket. Push the new bulb straight
into the socket until it bottoms.
4.
5.
6.
1.2.
3.
Lights
Replacing a High-mount Brake
Light Bulb
Maint enance
163
BULB
SOCKET
Page 174 of 228

�´When installing cables, f ollow the
manuf acturer’s instructions, and
mount them as tight as you can.
Make sure they are not contacting
the brake lines or suspension. Drive
slowly with them installed. If you
hear them coming into contact with
the body or chassis, stop and
investigate. Remove them as soon as
you begin driving on cleared roads.
If you mount snow tires on your
vehicle, make sure they are radial
tires of the same size and load range
as original tires. Mount snow tires on
all f our wheels. The traction
provided by snow tires on dry roads
maybelowerthanyouroriginaltires.
Check with the tire dealer f or
maximum speed recommendations.
Because your vehicle has limited tire
clearance, mount only SAE Class ‘‘S’’
cable-type traction devices, with
rubber chain tensioners on the f ront
tires. Use traction devices only when
required by driving conditions or
local laws. Make sure they are the
correct size f or your tires. Make link-
type ‘‘chains’’ should not be used.
Wheels:
Tires:
See page f or inf ormation about
DOT Tire Quality Grading, and page
f or tire size and labeling
inf ormation.
Tires marked ‘‘M S’’ or ‘‘All
Season’’ on the sidewall have an all-
weather tread design suitable for
most winter driving conditions.
For the best perf ormance in snowy
or icy conditions, you should install
snow tires or tire chains. They may
be required by local laws under
certain conditions. 204
206
Tires
Snow T ires
T ire ChainsWheel and T ire Specif ications
Winter Driving
172
14x51/2JJ
P185/70R14 87S Traction devices that are the wrong
size or improperly installed can
damage your vehicle’s brake lines,
suspension, body, and wheels. Stop
driving if they are hitting any part of
the vehicle.
Page 176 of 228

Fill the f uel tank.
Change the engine oil and f ilter.Block the rear wheels.
If the vehicle is to be stored f or a
longer period, it should be
supported on jackstands so the
tires are of f the ground.
Wash and dry the exterior
completely.
Cleantheinterior.Makesurethe
carpeting, floor mats, etc., are
completely dry.
If you need to park your vehicle f or
an extended period (more than one
month), there are several things you
should do to prepare it f or storage.
Proper preparation helps prevent
deterioration and makes it easier to
get your vehicle back on the road. If
possible, store your vehicle indoors. Leave one window open slightly (if
the vehicle is being stored
indoors).Cover the vehicle with a
‘‘breathable’’ cover, one made
f rom a porous material such as
cotton. Non-porous materials, such
as plastic sheeting, trap moisture,
which can damage the paint.
To minimize sticking, apply a
silicone spray lubricant to all door
and trunk seals. Also, apply a
vehiclebodywaxtothepainted
surfaces that mate with the door
and trunk seals. Support the f ront wiper blade
arms with a f olded towel or rag so
they do not touch the windshield.
Leave the parking brake off. Put
the transmission in Reverse
(manual) or Park (CVT). Disconnect the 12 volt battery.
Reconnect the 12 volt battery and
drive your vehicle every month f or
about 30 minutes. This will keep
the IMA battery charged and in
good condition.
If you store your vehicle f or 1 year or
longer, have your dealer perf orm the
inspections called f or in the 2 years/
30,000 miles (48,000 km)
maintenance schedule (Normal
Conditions) as soon as you take it
out of storage (see page ). The
replacements called f or in the
maintenance schedule are not
needed unless the vehicle has
actually reached that time or mileage. 145
Vehicle Storage
174
Page 177 of 228
This section covers the more
common problems that motorists
experience with their vehicles. It
gives you inf ormation about how to
safely evaluate the problem and what
to do to correct it. If the problem has
stranded you on the side of the road,
you may be able to get going again.
If not, you will also f ind instructions
on getting your vehicle towed.......................
Compact Spare Tire .176
....................
Changing a Flat Tire .177
.............
If the Engine Won’t Start . 182
................................
Jump Starting .184
..............
If the Engine Overheats . 186
.........
Low Oil Pressure Indicator . 188
..........
Charging System Indicator . 189
.......
Malf unction Indicator Lamp . 190
...............
Brake System Indicator . 191
..............................................
Fuses .192
..............................
Fuse Locations .195
......................
Emergency Towing .197
Taking Care of the Unexpected
T aking Care of t he Unexpect ed
175
Page 179 of 228

Open the trunk. Raise the trunk
f loor mat and the trunk f loor by
lif ting up on the back edge.
Take the tool kit out of the trunk.
Unscrew the wing bolt and take
the spare tire out of its well.
Turn on the hazard warning lights,
and turn the ignition switch to
LOCK (0). Have all the
passengers get out of the vehicle
while you change the tire.
If you have a f lat tire while driving,
stop in a saf e place to change it.
Drive slowly along the shoulder until
you get to an exit or an area that is
far away from the traffic lanes.
Park the vehicle on f irm, level and
non-slippery ground. Put the
transmission in Park (CVT) or
Reverse(manual).Applythe
parking brake.5. 4. 3.
2. 1.
CONT INUED
Changing a Flat T ire
T aking Care of t he Unexpect ed
177
SPARE TIRE TRUNK FLOOR
JACK
TOOL KIT
The vehicle can easily roll off
the jack, seriously injuring
anyone underneath.
Follow the directions for
changing a tire exactly, and
never get under the vehicle
when it is supported only by the
jack.
Page 181 of 228
Use the extension and the wheel
nut wrench as shown to raise the
vehicle until the f lat tire is of f the
ground.Bef ore mounting the spare tire,
wipeanydirtoff themounting
surface of the wheel and hub with
a clean cloth. Wipe the hub
carefully;itmaybehotfrom
driving.
Remove the wheel nuts, then
removetheflattire.Handlethe
wheel nuts caref ully; they may be
hot f rom driving. Place the flat tire
on the ground with the outside
surface facing up.
9.
11.
10.
CONT INUED
Changing a Flat T ire
T aking Care of t he Unexpect ed
179
BRAKE HUB
WHEEL NUT WRENCH EXTENSION