Page 55 of 205

�µ
�µ
�µ �µ
�µ
�µ �µ
�µ �µ
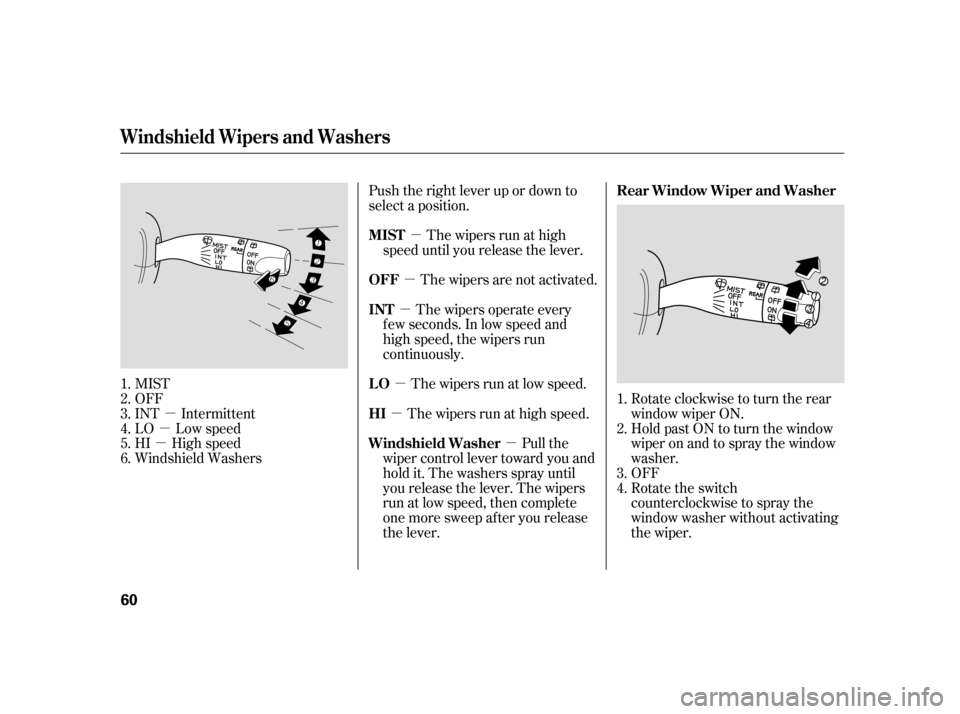
MIST
OFF
INT Intermittent
LO Low speed
HI High speed
Windshield Washers Push the right lever up or down to
select a position.
The wipers are not activated.The wipers run at high
speed until you release the lever.
The wipers run at low speed.The wipers operate every
f ew seconds. In low speed and
high speed, the wipers run
continuously.
The wipers run at high speed. Pull the
wiper control lever toward you and
hold it. The washers spray until
you release the lever. The wipers
run at low speed, then complete
one more sweep af ter you release
the lever. Rotate clockwise to turn the rear
window wiper ON.
Hold past ON to turn the window
wiper on and to spray the window
washer.
OFF
Rotate the switch
counterclockwise to spray the
window washer without activating
the wiper.
1.2.3.4.5.6.
1. 2. 3. 4.
Windshield Wipers and Washers
OFF
MIST LO
INT HI
Windshield Washer Rear Window Wiper and Washer
60
�����—�����—�
���y�
�������������y���
�(���)�������y���������y
Page 106 of 205
Wait a f ew minutes af ter turning the
engine of f bef ore you check the oil.Remove the dipstick (orange loop).
Wipe the dipstick with a clean
cloth or paper towel.
Insert it all the way back in its tube. Remove the dipstick again and
check the level. It should be
between the upper and lower
marks.
If it is near or below the lower mark,
see on page .
To close the hood, lif t it up slightly to
remove the support rod f rom the
hole. Put the support rod back into
its holding clip. Lower the hood to
about a f oot (30 cm) above the
f ender, then let it drop. Make sure it
is securely latched.
3.
1. 2. 4.
138
Service Station Procedures
A dding Oil
Oil Check
Bef ore Driving
113
UPPER MARK
LOWER MARK
GRIP
SUPPORT ROD
CLIP DIPSTICK
�����—�����—�
���y�
����
������
�y���
�(���)�������y���
�
���y
Page 118 of 205

If the vehicle is f acing uphill, turn
the f ront wheels away f rom the
curb, and put the transmission in
f irst gear.
If the vehicle is f acing downhill,
turn the front wheels toward the
curb, and put the transmission in
reverse gear.
Make sure the parking brake is
f ully released bef ore driving away.
Driving with the parking brake
partially set can overheat or
damage the rear brakes.Your vehicle is not designed to tow a
trailer, attempting to do so can void
your warranties.
Never park over dry leaves, tall
grass, or other f lammable
materials. The hot three way
catalytic converter could cause
these materials to catch on fire.
Lock the doors.
Place any packages, valuables, etc.
in the cargo area, or take them
with you.
Turn of f the lights.
Make sure the moonroof and the
windows are closed.
Always use the parking brake when
you park your vehicle. Make sure
the parking brake is set f irmly or
your vehicle may roll if it is parked
on an incline.
Towing a Trailer
Parking T ips
Parking
Parking, Towing a Trailer
126
�����—�����—�
���y�
����
��������y���
�(���)�������y���
�����y
Page 138 of 205
Remove the socket from the
headlight assembly by turning it
one-quarter turn counterclockwise.Front bumper: Push the f ront
edge of the side marker lens
toward the rear of the vehicle. The
f ront edge will pop out of the
bumper.
Rear bumper: Push the rear edge
of thesidemarkerlenstowardthe
f ront of the vehicle. The rear edge
will pop out of the bumper.
Pull the bulb straight out of its
socket. Push the new bulb straight
into the socket until it bottoms. Insert the socket back into the
headlight assembly. Turn it
clockwise to lock it in place.
Testthelightstomakesurethe
new bulb is working.
Put the inner f ender cover in place.
Install the holding clip. Lock it in
placebypushingonthecenter.
4. 5. 6.7. 8.
1.
Lights
Replacing a Side Marker Bulb
Maint enance
147
SOCKET
BULB
SOCKET
BULB
�����—�����—�
���y�
�������������y���
�(���)�������y���
�����y
Page 141 of 205
Open the hatch.Put your fingers between the
interior trim and the hatch glass
on either side of the high-mount
brake light. Caref ully pull down on
the trim to unsnap the clips f rom
the hatch. Work your way toward
each end of the trim. Remove the
trim.Remove the bulb holder f rom the
light assembly by pushing the tabs
on both sides and pulling the bulb
holder down.
Pull the bulb straight out of its
holder. Push the new bulb in until
it bottoms in its holder.
1.
3.
2.
4.
Lights
Replacing the High-mount Brake
Light Bulb 150 BULB HOLDER
�����—�����—�
���y�
������
��
���y���
�(���)�������y���
�����y
Page 142 of 205
Push the bulb holder into the light
assembly until it locks in place.
Testthelightstomakesurethe
new bulb is working.
Line up the clips on the interior
trim with the corresponding holes
in the hatch.Push on the trim to
snap it back in place.Pushthefrontof thesideturn
signal assembly toward the rear of
the vehicle until it pops out of the
body.
Turn the socket one-quarter turn
counterclockwise to remove it
from the lens.Pull the bulb straight out of its
socket. Push the new bulb straight
into the socket until it bottoms.
Put the socket back into its hole in
the lens and turn it clockwise until
it locks.
Testthelightstomakesurethe
new bulb is working.
Put the side turn signal assembly
back into the body, rear first. Push
on the f ront edge until it snaps into
place.
1.
2. 3. 5. 6.
4.
6.7.
5.
Lights
Replacing a Side T urn Signal Bulb
Maint enance
151
BULB
SOCKET
�����—�����—�
���y�
������
������y���
�(���)�������y���
�����y
Page 145 of 205
To replace a f ront wiper blade:Raise the wiper arm of f the
windshield. Raise the driver’s side
first, then the passenger’s side. Disconnect the blade assembly
fromthewiperarmbypushingin
the lock tab. Hold the lock tab in
while you push the blade assembly
toward the base of the arm.
Check the condition of the wiper
blades at least every 6 months.
Replace them if you f ind signs of
cracking in the rubber, areas that are
getting hard, or if they leave streaks
and unwiped areas when used.
2.
1.
Wiper Blades
154 WIPER ARMS
LOCK TAB
�����—�����—�
���y�
������
������y���
�(���)�������y���
�����y
Page 153 of 205

�µ
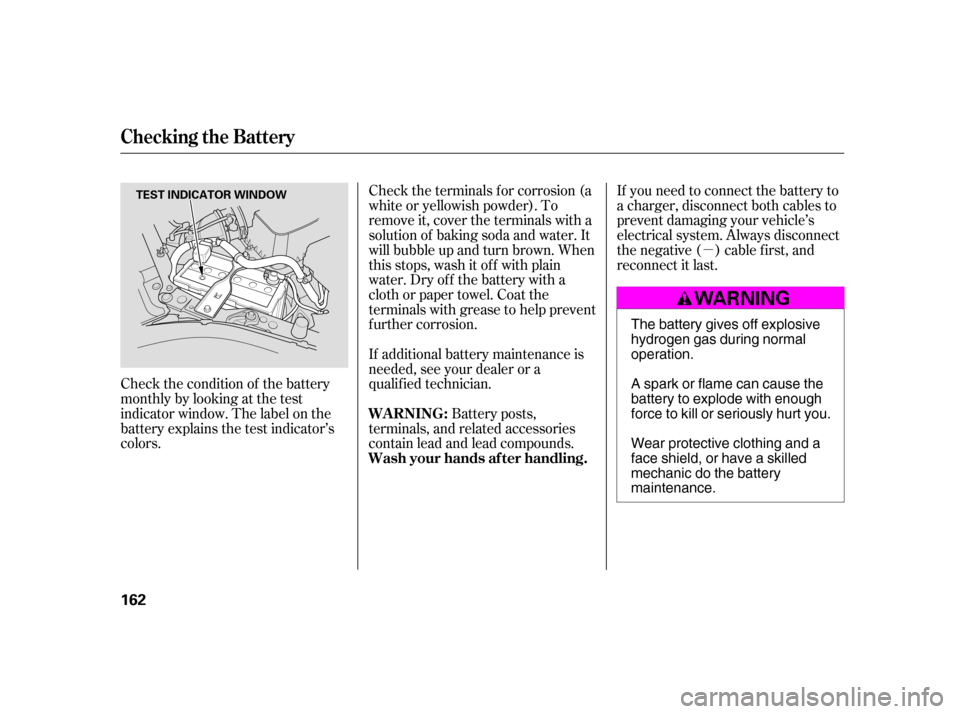
Check the condition of the battery
monthlybylookingatthetest
indicator window. The label on the
battery explains the test indicator’s
colors. If additional battery maintenance is
needed, see your dealer or a
qualif ied technician.
Battery posts,
terminals, and related accessories
contain lead and lead compounds.
Check the terminals f or corrosion (a
white or yellowish powder). To
remove it, cover the terminals with a
solution of baking soda and water. It
will bubble up and turn brown. When
this stops, wash it of f with plain
water. Dry off the battery with a
cloth or paper towel. Coat the
terminals with grease to help prevent
f urther corrosion.
If you need to connect the battery to
a charger, disconnect both cables to
prevent damaging your vehicle’s
electrical system. Always disconnect
the negative ( ) cable first, and
reconnect it last.
WARNING:
Wash your hands af ter handling.
Checking the Battery
162 TEST INDICATOR WINDOW
The battery gives off explosive
hydrogen gas during normaloperation.
A spark or flame can cause the
battery to explode with enough
force to kill or seriously hurt you.
Wear protective clothing and a
face shield, or have a skilled
mechanic do the batterymaintenance.
�����—�����—�
���y�
�������������y���
�(���)�������y���
�����y