Page 2 of 205
�Î
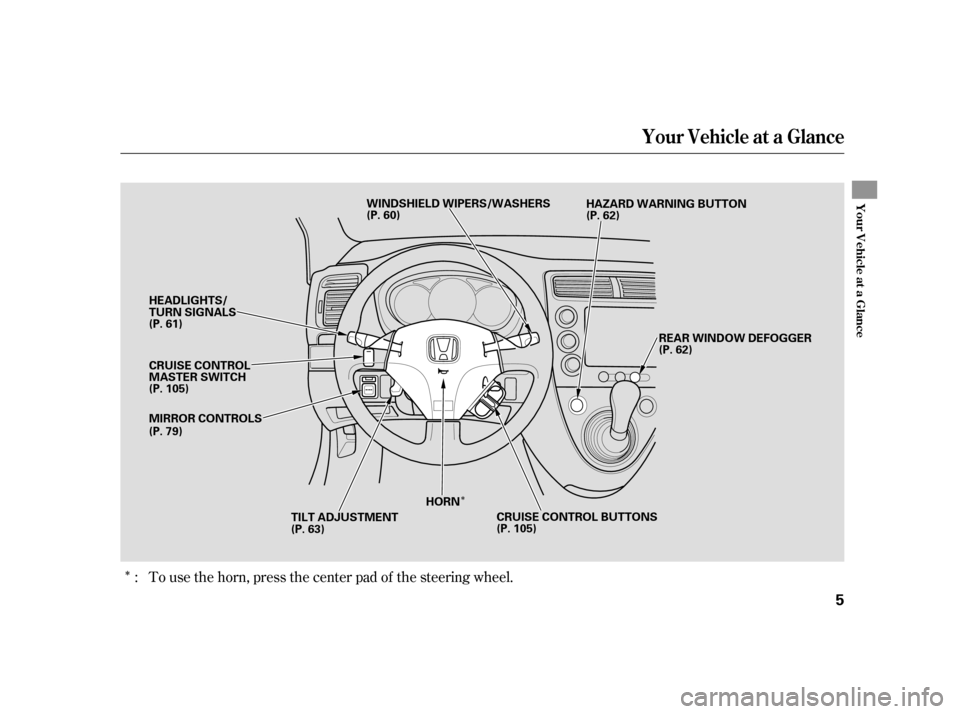
�ΠTo use the horn, press the center pad of the steering wheel.
:
Your Vehicle at a Glance
Your Vehicle at a Glance
5
WINDSHIELD WIPERS/WASHERS
REAR WINDOW DEFOGGER
HORN
TILT ADJUSTMENT
HEADLIGHTS/
TURN SIGNALS
CRUISE CONTROL
MASTER SWITCH
MIRROR CONTROLS
CRUISE CONTROL BUTTONS
(P. 61)
(P. 105)
(P. 79) (P. 60)
(P. 62)
(P. 62)
(P. 63) (P. 105)HAZARD WARNING BUTTON
�����—�����—�
���y�
���������
���y���
�(���)�������y���������y
Page 48 of 205
. It is a
reminder to check the parking
brake. Driving with the parking
brake not f ully released can
damage the brakes and tires.
This indicator has")
Itcomesonwhenyouturnthe
ignition switch to ON (II). It is a
reminder to check the parking
brake. Driving with the parking
brake not f ully released can
damage the brakes and tires.
This indicator has two f unctions:
This indicator comes on when you
turn the ignition switch to ON (II)
with the headlight switch off and the
parking brake set. It should go of f if
youturnontheheadlightsorrelease
the parking brake. If it comes on at
any other time, it means there is a
problem with the DRL. There may
also be a problem with the high
beam headlights.
The lef t or right turn signal indicator
blinks when you signal a lane change
or turn. If the indicator does not
blink or blinks rapidly, it usually
means one of the turn signal bulbs is
burned out (see page ). Replace
the bulb as soon as possible, since
other drivers cannot see that you are
signaling.
This indicator comes on with the
high beam headlights. For more
inf ormation, see page .
If it stays on lit af ter you have f ully
released the parking brake while
the engine is running, or if it
comes on while driving, there
could be a problem with the brake
system. For more inf ormation, see
page .
On Canadian models, this indicator
comes on with reduced brightness
when the Daytime Running Lights
(DRL) are on (see page ).
This indicator comes on if the hatch
is not closed tightly.
When you press the Hazard Warning
button, both turn signal indicators
blink. All turn signals on the outside
of the vehicle should f lash.
1. 2.
179 146
61
61
Canadian model only
Parking Brake
and Brake
System
Indicator
‘‘Daytime Running
Lights’’ Indicator
High Beam Indicator
Turn Signal and
Hazard Warning
Indicators
Hatch-open Indicator
Instrument Panel Indicators
Inst rument s and Cont rols
53
U.S. Canada
�����—�����—�
���y�
�����������
�y���
�(���)�������y���������y
Page 54 of 205
�Î
�Î To use the horn, press the pad around the ‘‘H’’ logo.
Controls Near the Steering Wheel
Inst rument s and Cont rols
59
REAR WINDOW DEFOGGER
MIRROR CONTROLS TILT ADJUSTMENTHORN
HEADLIGHTS/TURN SIGNALS
WINDSHIELD WIPERS/WASHERS
(P. 61) (P. 60)
(P. 62)
(P. 105)
(P. 79) (P. 63)
(P. 62)
CRUISE CONTROL
MASTER SWITCH
(P. 105)
HAZARD WARNING BUTTONCRUISE CONTROL
BUTTONS
�����—�����—�
���y�
���������
���y���
�(���)�������y���������y
Page 56 of 205

�µ�µ
�µ
Turn Signal
Of f
Parking and interior lights
Headlight on
High beams
Flashhighbeams Push down on the
lef t lever to signal a lef t turn and up
to signal a right turn. To signal a lane
change, push lightly on the lever and
hold it. The lever will return to the
center when you release it or
complete a turn. Push the lever back
untilyouhearaclicktoturnonthe
high beams. The blue high beam
indicator will come on (see page ).
Pull the lever back again to low
beams.
The headlights revert to normal
operation when you turn them on
with the switch.
To f lash the high beams, pull the
lever back lightly, then release it.
The high beams will stay on as long
as you hold the lever back.
With the headlight switch off, the
high beam headlights come on with
reduced brightness when you turn
the ignition switch to ON (II) and
release the parking brake. They
remain on until you turn the ignition
switch of f , even if you set the
parking brake.
Turning the switch to
the ‘‘ ’’ position turns on the
parking lights, taillights, instrument
panel lights, side-marker lights, and
rear license plate lights. Turning the
switch to the ‘‘ ’’ position turns
on the headlights. If you leave the
lights on with the key removed f rom
the ignition switch, you will hear a
reminder tone when you open the
driver’s door.
1.2.3.4.5.6. 53
Canadian model only
T urn Signal and Headlights T urn Signal High Beams
Daytime Running L ights
Headlights
Turn Signal and Headlights
Inst rument s and Cont rols
61
�����—�����—�
���y�
�������������y���
�(���)�������y���������y
Page 57 of 205
. This causes all four
outside turn signals and both
indicators in the instrument panel to
f lash. Use the hazard warning lights")
Pushtheredbuttontoturnonthe
hazard warning lights (f our-way
flashers). This causes all four
outside turn signals and both
indicators in the instrument panel to
f lash. Use the hazard warning lights
if you need to park in a dangerous
area near heavy traffic, or if your
vehicle is disabled.
The knob on the instrument panel
controls the brightness of the instru-
ment panel lights. Turn the knob to
adjust the brightness.
The rear window def ogger will clear
fog,frost,andthinicefromthe
window. Push the def ogger button to
turn it on and of f . The indicator
above the button comes on to show
the def ogger is on. If you do not turn
it of f , the def ogger will shut itself of f
af ter about 15 minutes. It also shuts
of f when you turn of f the ignition
switch. You have to turn the
def ogger on again when you restart
the vehicle.
Instrument Panel Brightness, Hazard Warning Button, Rear Window Def ogger
Rear Window Def ogger
Instrument Panel Brightness Hazard Warning Button
62
�����—�����—�
���y�
�������������y���
�(���)�������y���������y
Page 64 of 205

�µ
�µ
�µ Avoid dropping or throwing the
transmitter.
Protect the transmitter from
extreme temperature.
Do not immerse the transmitter in
any liquid.
If you lose a transmitter, the
replacement needs to be
reprogrammed by your dealer.
Press this button once
to unlock the driver’s door. Push it
twice to unlock the other doors and
hatch. Some exterior and interior
lights f lash twice each time you
press this button. If you do not open
anydoorswithin30seconds,they
will automatically relock.
Pressthisbuttonfor
about 1 second to attract attention;
thehornwillsoundandtheexterior
lights will f lash f or about 30 seconds.
To cancel panic mode, press any
other button on the remote
transmitter, or turn the ignition
switch to ON (II).
Press this button once to
lock both doors and hatch. Some
exterior lights will f lash. When you
push LOCK twice within 5 seconds,
you will hear a beep to verify that the
doors are locked. You cannot lock it
if any door is not f ully closed or the
key is in the ignition switch.Remote Transmitter CareUNL OCK
PA NIC
LOCK
Remote Transmitter
Inst rument s and Cont rols
69
UNLOCK
BUTTON
LED LOCK
BUTTON
PANIC
BUTTON
�����—�����—�
���y�
�������������y���
�(���)�������y���������y
Page 74 of 205
Keeptheinsideandoutsidemirrors
clean and adjusted f or best visibility.
Be sure to adjust the mirrors bef ore
you start driving.
The inside mirror has day and night
positions. The night position reduces
glare f rom headlights behind you.
Flip the tab on the bottom edge of
the mirror to select the day or night
position.Move the selector switch to L
(driver’s side) or R (passenger’s
side).Push the appropriate edge of the
adjustment switch to move the
mirrorright,left,up,ordown.
When you f inish, move the
selector switch to the center (off)
position. This turns the
adjustment switch of f to keep your
settings.
3.
1. 2.
Mirrors
MirrorsAdjusting the Power Mirrors
Inst rument s and Cont rols
79
TAB
ADJUSTMENT
SWITCHSELECTOR
SWITCH
�����—�����—�
���y�
���������
���y���
�(���)�������y���������y
Page 76 of 205
The ceiling light has a three-position
switch: ON, Door Activated, and
OFF.
In the Door Activated (center)
position, the light comes on when
you:Open any door.
Remove the key from the ignition.
If you do not open a door, the light
f ades out in about 10 seconds.
Unlock the doors with the key or
remote transmitter. The cargo area light comes on when
you open the hatch.
The f ront ceiling light also contains
two spotlights. Push the button next
to the light to turn it on and off.
Interior Lights
Ceiling L ight
Cargo A rea L ight
Inst rument s and Cont rols
81
FRONT DOOR ACTIVATED
ON
OFF
�����—�����—�
���y�
�������������y���
�(���)�������y���������y


position, the light comes on when
you:Open any door.
Remove the key from the ignition.
If yo")