Page 2 of 226
Your Vehicle at a Glance
4
HEADLIGHTS/TURN SIGNALS
MIRROR CONTROLS CRUISE CONTROL BUTTONSREAR WINDOW
DEFOGGER
WINDSHIELD WIPERS/WASHERS
AUDIO SYSTEM
STEERING WHEEL ADJUSTMENT HAZARD WARNING BUTTON
MOONROOF SWITCH
(P. 79)
CRUISE CONTROL
MASTER BUTTON
(P. 117)
(P. 80) (P. 62)
(P. 61) (P. 64)
(P. 92)CLOCK
(P. 115)
(P. 64)
ACCESSORY POWER SOCKET
(P. 85)
(P. 117)
(P. 65)
�����—�����—�����y�
�������������y���
�(���%�������y���������y
Page 46 of 226
Control L ocations
50
MIRROR
CONTROLSHEATING/COOLING CONTROLS
HOOD RELEASE
HANDLE CRUISE CONTROL
BUTTONS
FUEL FILL DOOR RELEASE
A/T model is shown. POWER WINDOW
SWITCHES
AUDIO SYSTEM
MOONROOF SWITCH
(P. 79)
POWER DOOR LOCK
MASTER SWITCH
(P. 69)
CRUISE CONTROL
MASTER BUTTON
(P. 117)
(P. 78)
(P. 124)(P. 117) ACCESSORY POWER
SOCKET
(P. 85)CLOCK
(P. 115)
(P. 92)
HAZARD WARNING BUTTON
(P. 88)
(P. 80)
(P. 64)
(P. 123)
TRUNK RELEASE
(P. 70)
�����—�����—�����y�
�������������y���
�(���%�������y���������y
Page 56 of 226
�Î
�Î
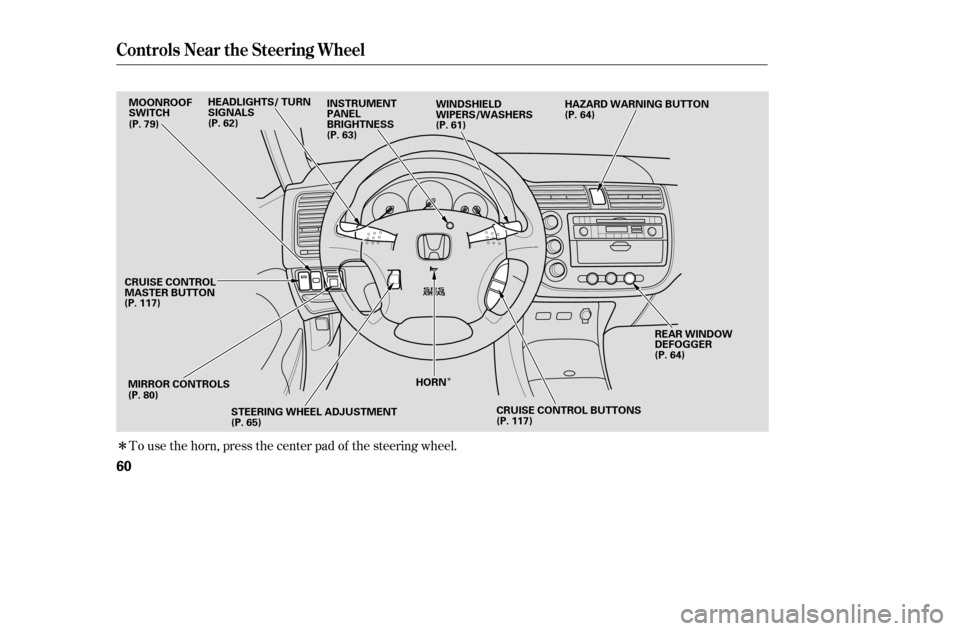
To use the horn, press the center pad of the steering wheel.
Controls Near the Steering Wheel
60
MIRROR CONTROLSREAR WINDOW
DEFOGGER
WINDSHIELD
WIPERS/WASHERS
MOONROOF
SWITCH
(P. 117) (P. 80) STEERING WHEEL ADJUSTMENT
(P. 65) (P. 64)
(P. 64)
(P. 61)
(P. 79)
HORNHAZARD WARNING BUTTON
INSTRUMENT
PANEL
BRIGHTNESS
(P. 63)
HEADLIGHTS/ TURN
SIGNALS
(P. 62)
CRUISE CONTROL BUTTONS
(P. 117)
CRUISE CONTROL
MASTER BUTTON
�����—�����—�����y�
������
����
�y���
�(���%�������y���������y
Page 76 of 226
Push the appropriate edge of the
adjustment switch to move the
mirrorright,left,up,ordown.
The inside mirror has day and night
positions. The night position reduces
glare f rom headlights behind you.
Flip the tab on the bottom edge of
the mirror to select the day or night
position.
Keeptheinsideandoutsidemirrors
clean and adjusted f or best visibility.
Be sure to adjust the mirrors bef ore
you start driving. When you f inish, move the
selector switch to the center (off)
position. This turns the
adjustment switch of f to keep your
settings.
Turn the ignition switch to ON (II).
Move the selector switch to L
(driver’s side) or R (passenger’s
side).
1. 2. 3. 4.
If equipped
Adjusting the Power Mirrors
Mirrors
80
SELECTOR SWITCH
ADJUSTMENT SWITCH
TAB
�����—�����—�����y�
�������������y���
�(���%�������y���������y
Page 77 of 226
The outside mirrors are heated to
remove fog and frost. With the
ignition switch in the ON (II)
position, turn on the heaters by
pressing the button. The indicator in
the button comes on as a reminder.
Press the button again to turn the
heaters off.To apply the parking brake, pull the
lever up f ully. To release it, pull up
slightly, push the button, and lower
the lever. The parking brake
indicator on the instrument panel
should go out when the parking
brake is f ully released (see page ).
55
On Canadian Si models
Power Mirror Heaters Parking Brake
Mirrors, Parking Brake
Inst rument s and Cont rols
81
PARKING BRAKE
LEVER
U.S. : Value Package, LX, EX, Special
Edition
Canada: DX Special Edition, REVERB,
LX, Si PARKING BRAKE LEVER
U.S. : DX, HX
Canada: DX
Driving the vehicle with the parking
brake applied can damage the rear
brakes and axles.
�����—�����—�����y�
�������������y���
�(���%�������y���������y
Page 78 of 226
�Î
�Î �Î
�Î
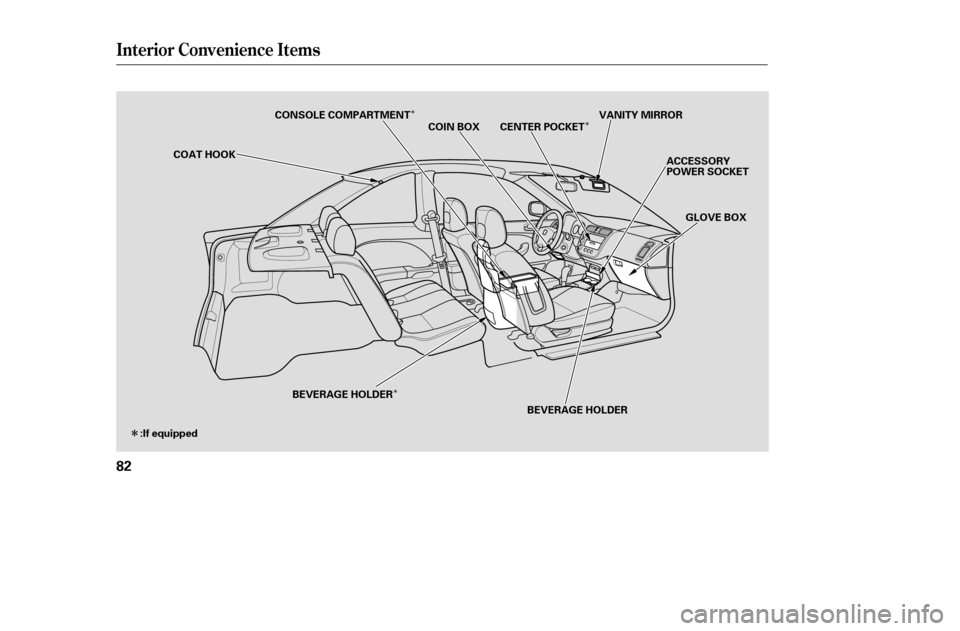
Interior Convenience Items
82
VANITY MIRROR
GLOVE BOX
COIN BOX
ACCESSORY
POWER SOCKET
COAT HOOK
BEVERAGE HOLDER
CONSOLE COMPARTMENT
BEVERAGE HOLDER
:If equipped CENTER POCKET
�����—�����—�����y�
�������������y���
�(���%�������y���������y
Page 81 of 226
To use an accessory power socket,
pull up the cover.
To open the lid, pull it down. Close it
with a firm push.
Touseavanitymirroronthebackof
the sun visor, pull up the cover.
They will not power an automotive
type cigarette lighter element.
To use an accessory, the ignition
switch must be in the ACCESSORY
(I) or ON (II) position.
This socket is intended to supply
power f or 12 volt DC accessories
that are rated 120 watts or less (10
amps).If equipped
Center Pocket A ccessory Power Socket
Vanity Mirror
Interior Convenience Items
Inst rument s and Cont rols
85
�����—�����—�����y�
�������������y���
�(���%�������y���������y
Page 127 of 226
Fasten your seat belt. Check that
your passengers have f astened
their seat belts (see page ).
Make sure the doors are securely
closed and locked.
Check the steering wheel
adjustment (see page ).
Check the adjustment of the
inside and outside mirrors (see
page ).
Check that any items you may be
carrying are stored properly or
f astened down securely.
Check the seat adjustment (see
page ).
Make sure all windows, mirrors,
and outside lights are clean and
unobstructed. Remove f rost, snow,
or ice.
Youshoulddothefollowingchecks
and adjustments bef ore you drive
your vehicle.
Check that the hood is f ully closed.
Check that the trunk is f ully
closed.
Visually check the tires. If a tire
looks low, use a gauge to check its
pressure. When you start the engine, check
the gauges and indicators in the
instrument panel (see page ).
1. 2. 14
3. 4. 5. 6. 7. 8. 9.
11.
10.
80
73
65 51
Preparing to Drive
134
�����—�����—�����y�
�������������y���
�(���%�������y���
�����y


position, turn on the heaters by
pressing the button. The indicator in
the button comes on as a reminde")

.
Make sure the doors are securely
closed and locked.
Check the steering wheel
adjustment (see page ).
Che")