Page 2 of 226
Your Vehicle at a Glance
4
HEADLIGHTS/TURN SIGNALS
MIRROR CONTROLS CRUISE CONTROL BUTTONSREAR WINDOW
DEFOGGER
WINDSHIELD WIPERS/WASHERS
AUDIO SYSTEM
STEERING WHEEL ADJUSTMENT HAZARD WARNING BUTTON
MOONROOF SWITCH
(P. 79)
CRUISE CONTROL
MASTER BUTTON
(P. 117)
(P. 80) (P. 62)
(P. 61) (P. 64)
(P. 92)CLOCK
(P. 115)
(P. 64)
ACCESSORY POWER SOCKET
(P. 85)
(P. 117)
(P. 65)
�����—�����—�����y�
�������������y���
�(���%�������y���������y
Page 33 of 226
Place the child seat on the vehicle
seat, then attach the seat to the
lower anchors according to the
child seat maker’s instructions.
Your vehicle is equipped with
LATCH (Lower Anchors and
Tethers for Children) at the outer
rear seats.
The lower anchors are located
between the seat-back and seat
bottom, and are to be used only with
a child seat designed f or use with
LATCH.
The location of each lower anchor is
indicated by a small button above the
anchor point.
Make sure there are no objects
near the anchors that could
prevent a secure connection
between the child seat and the
anchors.
Move the seat belt buckle or
tongue away f rom the lower
anchors.
To install a LATCH-compatible child
seat:
Some LATCH-compatible seats
have a rigid-type connector as
shown above.
1. 2. 3.
Installing a Child Seat
Installing a Child Seat with
LATCH
36
LOWER ANCHORS
Rigid type
BUTTONS
�����—�����—�����y�
�������������y���
�(���%�������y���������y
Page 46 of 226
Control L ocations
50
MIRROR
CONTROLSHEATING/COOLING CONTROLS
HOOD RELEASE
HANDLE CRUISE CONTROL
BUTTONS
FUEL FILL DOOR RELEASE
A/T model is shown. POWER WINDOW
SWITCHES
AUDIO SYSTEM
MOONROOF SWITCH
(P. 79)
POWER DOOR LOCK
MASTER SWITCH
(P. 69)
CRUISE CONTROL
MASTER BUTTON
(P. 117)
(P. 78)
(P. 124)(P. 117) ACCESSORY POWER
SOCKET
(P. 85)CLOCK
(P. 115)
(P. 92)
HAZARD WARNING BUTTON
(P. 88)
(P. 80)
(P. 64)
(P. 123)
TRUNK RELEASE
(P. 70)
�����—�����—�����y�
�������������y���
�(���%�������y���������y
Page 56 of 226
�Î
�Î
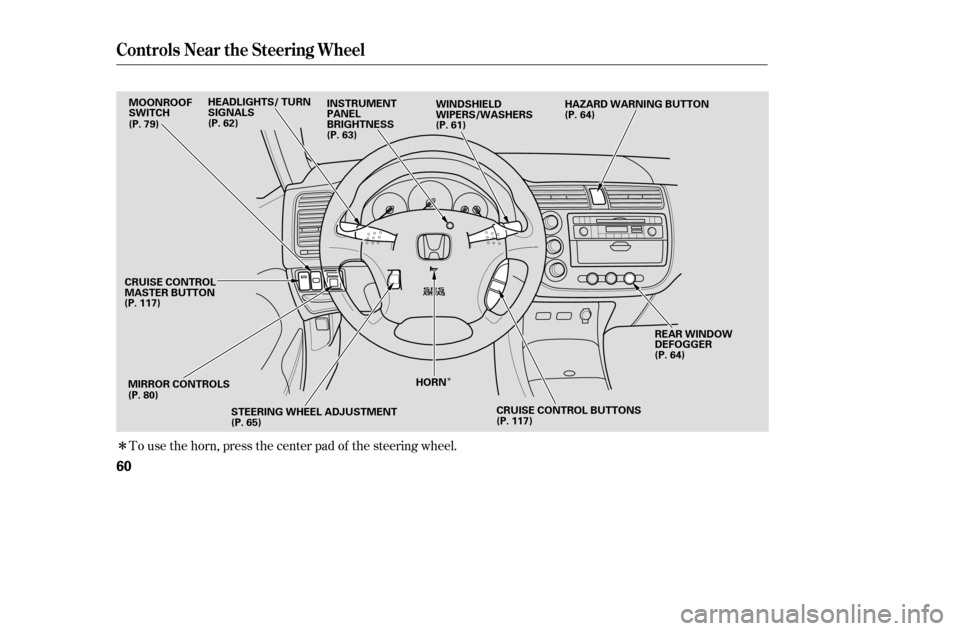
To use the horn, press the center pad of the steering wheel.
Controls Near the Steering Wheel
60
MIRROR CONTROLSREAR WINDOW
DEFOGGER
WINDSHIELD
WIPERS/WASHERS
MOONROOF
SWITCH
(P. 117) (P. 80) STEERING WHEEL ADJUSTMENT
(P. 65) (P. 64)
(P. 64)
(P. 61)
(P. 79)
HORNHAZARD WARNING BUTTON
INSTRUMENT
PANEL
BRIGHTNESS
(P. 63)
HEADLIGHTS/ TURN
SIGNALS
(P. 62)
CRUISE CONTROL BUTTONS
(P. 117)
CRUISE CONTROL
MASTER BUTTON
�����—�����—�����y�
������
����
�y���
�(���%�������y���������y
Page 87 of 226
Playing the Radio
92
AM/FM BUTTONTUNE KNOB
SCAN INDICATOR
SEEK BAR PRESET BUTTONS TUNE KNOB
SCAN INDICATOR
STEREO INDICATOR
AM/FM BUTTON STEREO INDICATOR
SEEK BAR
FM/AM
BUTTON
SEEK BAR
AUTO SELECT
BUTTON
SOUND
BUTTON
SCAN
BUTTONPRESET BUTTONS
PRESET BUTTONS
SCAN
BUTTON
AUTO SELECT BUTTON
PRESET BUTTONS
POWER/
VOLUMEKNOB
DX model
POWER/
VOLUMEKNOB AUTO SELECT
BUTTONPOWER/
VOLUMEKNOB
PRESET CALL BAR
SCAN BUTTON
Audio System with In-dash CD Changer
STEREO INDICATOR
U.S. :Special Edition models
Canada:REVERB, Si-GA models
U.S.: Value Package, HX, LX, EX models
Canada: DX Special Edition, LX, Si-G models
�����—�����—�����y�
�������������y���
�(���%�������y���������y
Page 88 of 226
 or ON (II) position.
Turn the system on by pushing the
Power Volume knob or the AM/FM
button (FM/AM button on models
with in-dash CD change")
�µ�µ
�µ
The ignition switch must be in the
ACCESSORY (I) or ON (II) position.
Turn the system on by pushing the
Power Volume knob or the AM/FM
button (FM/AM button on models
with in-dash CD changer). Adjust the
volume by turning the Power
Volume knob.
As you adjust a volume, you will hear
a beep whenever the adjustment
level reaches the maximum and
minimum of its range.
The band and f requency that the
radio was last tuned to is displayed.
To change bands, press the AM/FM
or FM/AM button. On the FM band,
ST will be displayed if the station is
broadcasting in stereo. Stereo
reproduction on AM is not available. On the AM band, AM noise
reduction turns on automatically.
You can use any of f ive methods to
f ind a radio station on the selected
band: the
preset buttons, and .
Use the TUNE knob or
the SEEK bar to tune the radio to a
desired f requency.
Turn the knob to the right to tune a
higher f requency, and turn it to the
lef t to tune a lower f requency.
Press the side of the SEEK bar
to tune a higher f requency, and
press the side to tune a lower
f requency. The SEEK f unction
searches up and down f rom the
current f requency to f ind a station
with a strong signal. To activate it,
press the or side of the
SEEK bar, then release it.
On models with in-dash CD changer,
press the or side of the
SEEK bar until you hear a beep, then
release it.
The SCAN function
samples all stations with strong
signals on the selected band. To
activate it, press the SCAN button,
then release it. You will see SCAN in
the display. The system will scan f or
a station with a strong signal. When
it f inds one, it will stop and play that
station for about 5 seconds.On models with in-dash CD changer On models with in-dash CD changer
Except f or models with in-dash CDchanger
On models with in-dash CD changer Except f or models with in-dash CD
changer
CONT INUED
Playing the Radio
To Play the Radio
To Select a StationTUNE,SEEK,SCAN, AUTO SELECT
TUNE SEEK
SCAN
Features
93
�����—�����—�����y�
�������������y���
�(���%�������y���������y
Page 89 of 226

�µ
�µ
Press the A. SEL button. ‘‘A.SEL’’
f lashes in the display, and the system
goes into scan mode f or several
seconds. It stores the f requencies of
six AM, and twelve FM stations in
the preset buttons.
You will see a ‘‘0’’ displayed af ter
pressing a preset button if Auto
Select cannot f ind a strong station
f or every preset button.
If you do not like the stations Auto
Select has stored, you can store
other f requencies on the preset
buttons as previously described.
press the
A. SEL button. This restores the
presets you originally set.
If you are
traveling far from home and can no
longer receive your preset stations,
you can use the auto select feature to
find stations in the local area.
To select a dif f erent preset
f requency, you can also use the
Preset CALL bar. Press the ‘‘ ’’
side of the bar to select the
f requency stored in the next preset
button, and press the ‘‘ ’’ side to
select the f requency in the previous
preset button.
The preset f requencies will be lost
if your vehicle’s battery goes dead,
is disconnected, or the radio f use
is removed.
If you do nothing, the system will
then scan f or the next strong station
andplayitfor5seconds.Whenit
plays a station that you want to listen
to, press the SCAN button again.
Each preset button can
store one f requency on AM, and two
f requencies on FM.
Repeat steps 1 through 3 to store a
total of six stations on AM and
twelve stations on FM.
Pick a preset button, and hold it
until you hear a beep.
UsetheTUNE,SEEK,orSCAN
function to tune the radio to a
desired station.
Select the desired band, AM or
FM. FM1 and FM2 let you store
two f requencies with each preset
button.
1. 2. 3. 4.
To turn of f Auto Select,
On models with in-dash CD changer
Playing the Radio
AUTO SELECT
Preset
94
�����—�����—�����y�
���������
���y���
�(���%�������y���������y
Page 109 of 226

Your vehicle’s audio system will
disable itself if it is disconnected
f rom electrical power f or any reason.
To make it work again, the user
must enter a specif ic f ive-digit code
in the Preset buttons. Because there
are hundreds of number
combinations possible f rom the f ive-
digits, making the system work
without knowing the exact code is
nearly impossible.
Youshouldhavereceivedacardthat
lists your audio system’s code and
serial numbers. It is best to store this
card in a saf e place at home. In
addition, you should write the audio
system’s serial number in this
Owner’s Manual.
If you lose the card, you must obtain
the code number f rom a dealer. Todo this, you will need the system’s
serial number.
If your vehicle’s battery is
disconnected or goes dead, or the
radio f use is removed, the audio
system will disable itself . If this
happens, you will see ‘‘ ’’
(except for models with
in-dash CD changer)/‘‘CODE’’
(on models with in-dash CD
changer) in the f requency display
the next time you turn on the system.
Use the preset buttons to enter the
f ive-digit code. The code is on the
radio code card included in your
Owner’s Manual kit. When it is
entered correctly, the radio will start
playing.
If you make a mistake entering the
code, do not start over; complete the
f ive-digit sequence, then enter the
correct code. You have ten tries to
enter the correct code. If you are
unsuccessful in ten attempts, youmust then leave the system on for 1
hour bef ore trying again.
You will have to store your favorite
stations in the preset buttons after
the system begins working. Your
original settings were lost when the
power was disconnected.
Standard f or Value Package, HX, LX, EX
and Special Edition models in the U.S.,and DX Special Edition, REVERB, LXandSimodelsinCanada
Radio T hef t Prot ect ion
114
�����—�����—�����y�
�������������y���
�(���%�������y���
�
���y