Page 130 of 226

If you exceed the maximum speed
f or the gear you are in, you may f eel
the engine cut in and out. This is
caused by a limiter in the engine’s
computer controls. The engine will
run normally when you reduce the
engine speed by upshif ting or
slowing down.
Bef ore downshif ting, make sure the
vehicle speed is low enough that you
will not activate the engine speed
limiter in the lower gear.
Drive in the highest gear that lets
the engine run and accelerate
smoothly. This will give you good
f uel economy and ef f ective
emissions control. The f ollowing
shif t points are recommended:
Shif t up
1st to 2nd
2nd to 3rd 3rd to 4th
4th to 5th Normal acceleration
15 mph (24 km/h)
27 mph (43 km/h)
39 mph (63 km/h)
53 mph (85 km/h) Bef ore downshif ting, make sure the
engine will not go into the
tachometer’s red zone.
If you exceed the maximum speed
f or the gear you are in, the engine
speed will enter into the tachometer’s
red zone. If this occurs, you may f eel
the engine cut in and out. This is
caused by a limiter in the engine’s
computer controls. The engine will
run normally when you reduce the
RPM below the red zone.
U.S. DX and Value Package models
All models except U.S. DX and Value PackageEngine Speed L imiter
Recommended Shif t Points
Manual T ransmission
Driving
137
�����—�����—�����y�
�������������y���
�(���%�������y���
�����y
Page 133 of 226
�µ�µ
�µ
�µ If you exceed the maximum speed
f or the gear you are in, the engine
speed will enter into the tachometer’s
red zone. If this occurs, you may f eel
the engine cut in and out. This is
caused by a limiter in the engine’s
computer controls. The engine will
run normally when you reduce the
RPM below the red zone.
If you exceed the maximum speed
f or the gear you are in, you may f eel
the engine cut in and out. This is
caused by a limiter in the engine’s
computer controls. The engine will
run normally when you reduce the
engine speed by upshif ting or
slowing down.
To help reduce wheel spin.
For starting out on a slippery
surf ace or in deep snow.
To increase engine braking when
going down steep hills.
For more power when climbing.
Use Second gear: This position is similar
to D, except only the first three
gears are selected. Use D to provide
engine braking when going down a
steep hill. D can also keep the
transmission f rom cycling between
third and f ourth gears in stop-and-go
driving.
To shif t to Second,
pressthereleasebuttononthefront
of the shif t lever. This position locks
thetransmissioninsecondgear.It
does not downshif t to f irst gear
when you come to a stop.
Use Neutral if you
need to restart a stalled engine, or if
it is necessary to stop brief ly with
the engine idling. Shif t to the Park
position if you need to leave your
vehicle for any reason. Press on the
brake pedal when you are moving
the shift lever from Neutral to
another gear.
Use this position f or
your normal driving. The
transmission automatically selects a
suitable gear f or your vehicle speed
and acceleration. You may notice the
transmission shif ting up at higher
speeds when the engine is cold. This
helps the engine warm up f aster.
3
3
All models except U.S. DX and Value Package
U.S. DX and Value Package models
Automatic Transmission
Engine Speed L imiter
Drive (D )
Second (2)
Neutral (N)
Drive (D)3
140
�����—�����—�����y�
�������������y���
�(���%�������y���
�����y
Page 135 of 226
The continuously variable
transmission’s unique design
provides a smooth, constant f low of
power. It is electronically controlled
f or more precise operation and
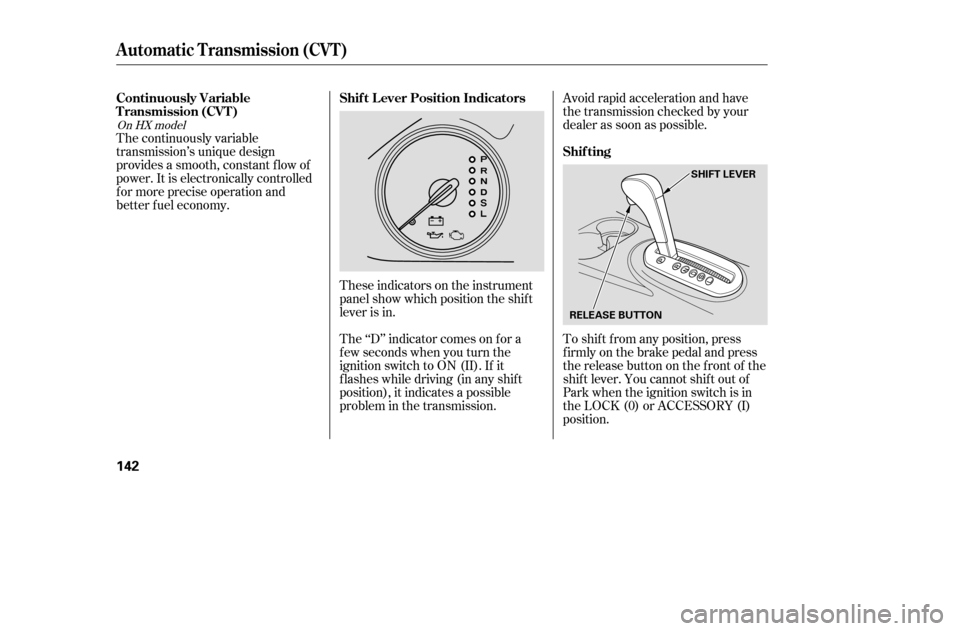
better f uel economy.These indicators on the instrument
panel show which position the shif t
lever is in.Avoid rapid acceleration and have
thetransmissioncheckedbyyour
dealer as soon as possible.
To shif t f rom any position, press
f irmly on the brake pedal and press
the release button on the front of the
shiftlever.Youcannotshiftoutof
Park when the ignition switch is in
the LOCK (0) or ACCESSORY (I)
position.
The ‘‘D’’ indicator comes on f or a
f ew seconds when you turn the
ignition switch to ON (II). If it
f lashes while driving (in any shif t
position), it indicates a possible
problem in the transmission.
On HX model
Automatic Transmission (CVT)
Continuously Variable
T ransmission (CVT )
Shif t L ever Position Indicators
Shif ting
142
RELEASE BUTTONSHIFT LEVER
�����—�����—�����y�
���������
���y���
�(���%�������y���
�����y
Page 158 of 226

If the level is below the lower
mark, add f luid into the f iller hole
to bring it to the upper mark (On
CVT model, the HOT side’s upper
mark).
Remove the dipstick and check the
f luid level. There is a HOT side and a
COLD side on the dipstick. It should
be between the upper and lower
marks on the HOT side. To thoroughly f lush the transmission,
the technician should drain and ref ill
it with Honda ATF-Z1, then drive the
vehicle f or a short distance. Do this
three times. Then drain and ref ill the
transmission a final time.
Insert the dipstick all the way back
into the transmission securely as
shown in the illustration.
If you are not sure how to add f luid,
contact your dealer.
The transmission should be drained
and ref illed with new f luid according
to the time and distance recommen-
dations in the maintenance schedule.
Pour the f luid slowly and caref ully
so you do not spill any. Clean up
any spills immediately; it could
damage components in the engine
compartment.
Always use Honda ATF-Z1
(Automatic Transmission Fluid). If
it’s not available, you may use a
DEXRON
III automatic
transmission f luid as a temporary
replacement. However, continued
use can af f ect the shif t quality.
Have the transmission f lushed and
ref illed with Honda ATF-Z1 as
soon as it is convenient.
5.
6.
On CVT model
Automatic Transmission Fluid
166
UPPER MARK
DIPSTICK (CVT)
LOWER MARK
�����—�����—�����y�
�������������y���
�(���%�������y���
�����y
Page 171 of 226

While tubeless tires have some
ability to self -seal if they are
punctured, you should look closely
for punctures if a tire starts losing
pressure.
Youshoulduseyourowntire
pressure gauge whenever you check
your tire pressures. This will make it
easier f or you to tell if a pressure
loss is due to a tire problem and not
due to a variation between gauges.
If you check air pressures when the
tires are hot [driven f or several miles
(kilometers)], you will see readings 4
to6psi(30to40kPa,0.3to0.4
kgf /cm ) higher than the cold
readings.Thisisnormal.Donotlet
air out to match the recommended
cold air pressure. The tire will be
underinf lated.
The following charts show the
recommended cold tire pressures f or
most normal driving conditions and
speeds.
Honda strongly recommends that
you not drive f aster than posted
speed limits and conditions allow. If
you decide it is safe to drive at high
speeds (over 100 mph or 160 km/h),
be sure to adjust the cold tire
pressuresasshownbelow.If youdo
not, excessive heat can build up and
cause sudden tire f ailure.
Thecompactsparetirepressureis:
Tire Size
Cold Tire Pressure
f or High-Speed
Driving
Tire Size Cold Tire Pressure for Normal Driving
Tire Size Cold Tire Pressure
for Normal Driving
Tire Size Cold Tire Pressure
for Normal Driving
CONT INUED
U.S.: DX, Value Package, HX, Canada: DX
Canada: LX
U.S.: DX, Value Package, HX, Canada: DX
U.S. DX, Value Package, HX and
Canadian DX models only
U.S.: LX, EX, Special Edition, Canada: Si, REVERB
Tires
Recommended Tire Pressures
Normal Driving
High-Speed Driving
Maint enance
179
60 psi (420 kPa , 4.2 kgf/cm)
P185/70R14 87S 35 psi (240 kPa , 2.4kgf/cm
)
P195/60R15 87H 30 psi (210 kPa , 2.1 kgf/cm
)
P185/65R15 86H 30 psi (210 kPa , 2.1
kgf/cm
)
P185/70R14 87S 30 psi (210 kPa , 2.1
kgf/cm
)
�����—�����—�����y�
������
������y���
�(���%�������y���
�����y
Page 172 of 226

Every time you check inf lation, you
should also examine the tires f or
damage, f oreign objects, and wear.
Youshouldlookfor:Bumps or bulges in the tread or
side of the tire. Replace the tire if
youfindeitherof theseconditions.
Cuts, splits, or cracks in the side
of the tire. Replace the tire if you
can see f abric or cord.
Excessive tread wear.
Tire pressure f or high-speed driving
is the same as f or normal driving.
When you return to normal speed
driving, be sure to readjust the tire
pressure f or normal driving. You
should wait until the tires are cold
bef ore adjusting the tire pressure.
For convenience, the recommended
tire sizes and cold air pressures are
on a label on the driver’s doorjamb.
For additional inf ormation about
your tires, see page .
Your tires have wear indicators
molded into the tread. When the
tread wears down, you will see a
band 1/2 inch (12.7 mm) wide across
the tread. This shows there is less
than 1/16 inch (1.6 mm) of tread lef t
on the tire.
A tire this worn gives very little
traction on wet roads. You should
replace the tire if you can see three
or more tread wear indicators.
216
U.S. LX, EX, Special Edition and
Canadian REVERB, LX, Si modelsTire Inspection
Tires
180
INDICATOR LOCATION MARKS
TREAD WEAR INDICATOR
�����—�����—�����y�
������
����
�y���
�(���%�������y���
�����y