Page 62 of 226

Protect the keys f rom direct
sunlight, high temperature, and
high humidity.
Donotdropthekeysorsetheavy
objects on them.
Keep the keys away f rom liquids.
If they get wet, dry them
immediately with a sof t cloth.
The master key fits all the locks on
your vehicle. The valet key works
only in the ignition and the door
locks. You can keep the trunk, trunk
release handle and rear seat trunk
access locked when you leave your
vehicle and the valet key at a parking
f acility. The keys do not contain batteries.
Do not try to take them apart.
Youshouldhavereceivedakey
number tag with your keys. You will
need this key number if you ever
have to get a lost key replaced. Use
only Honda-approved key blanks.
These keys contain electronic
circuits that are activated by the
immobilizer system. They will not
work to start the engine if the
circuits are damaged.
Keys and Locks
66
MASTER
KEYS (Black)
VALET
KEY (Gray)
KEY
NUMBERTAG
�����—�����—�����y�
�������������y���
�(���%�������y���������y
Page 66 of 226

As a saf ety f eature, your vehicle has
a release lever on the trunk latch so
the trunk can be opened f rom the
inside. To open the trunk, push the
release lever to the lef t.
Parents should decide if their
children should be shown how to use
this f eature. For more inf ormation
about child saf ety, see page .
You can also use the master key to
open the trunk lock. The valet key
does not work in this lock.
To open the trunk, pull the trunk
releasehandletotheleftof the
driver’s seat. To protect items in the
trunk when you need to give the key
to someone else, lock the trunk
releasehandlewiththemasterkey
and give the other person the valetkey.
To close the trunk, press down on
the trunk lid. Keep the trunk lid closed at all times
while driving to avoid damaging the
lid, and to prevent exhaust gas f rom
getting into the interior. See
on page .
30
45 Emergency T runk Opener
Carbon
Monoxide Hazard
Trunk
70
MASTER KEY
TRUNK RELEASE HANDLE
MASTER KEY
Pull
�����—�����—�����y�
���������
���y���
�(���%�������y���������y
Page 72 of 226
The left and right halves can be
f olded separately f rom inside the
vehicle or inside the trunk. To f old
down the seat-back f rom inside the
vehicle, insert the master key in the
lock on the rear shelf . To f old down
the driver’s side, turn the key
clockwise, pull down the top of the
seat-back, then release the key. To
f old down the passenger’s side, turn
the key counterclockwise and
perf orm the same procedure.When storing cargo, you can move
therearcentershoulderbeltoutof
the way by removing the belt f rom
the guide.
The lid of the console compartment
canbeusedasanarmrest.
Make sure the passenger’s hands or
fingersareawayfromthearmrest
bef ore pushing it down.If equipped
Folding Rear Seat
Armrest
Seats
76
GUIDE
CENTER SHOULDER BELT
�����—�����—�����y�
���������
���y���
�(���%�������y���������y
Page 73 of 226
To release the seat-back from inside
the trunk, pull the release under the
trunk panel. Push the seat-back
down, then let go of the release.
To lock the seat-back upright, push it
f irmly against the trunk panel. Make
sure it is latched in place by pulling
on the top of the seat.Make sure all rear shoulder belts are
positioned in f ront of the rear seat-
back whenever it is in the upright
position.
Do not put any heavy items on the
seat-back when it is folded.
Make sure all items in the trunk, or
items extending through the opening
into the back seat, are secured.
Looseitemscanflyforwardand
cause injury if you have to brake
hard. See on page
.
Never drive with the seat-back
f olded down and the trunk lid open.
See on
page . 130
45Carrying Cargo
Carbon Monoxide Hazard
Seats
Inst rument s and Cont rols
77
RELEASE Pull Pull
�����—�����—�����y�
�������������y���
�(���%�������y���������y
Page 124 of 226
�Î�Î
�Î
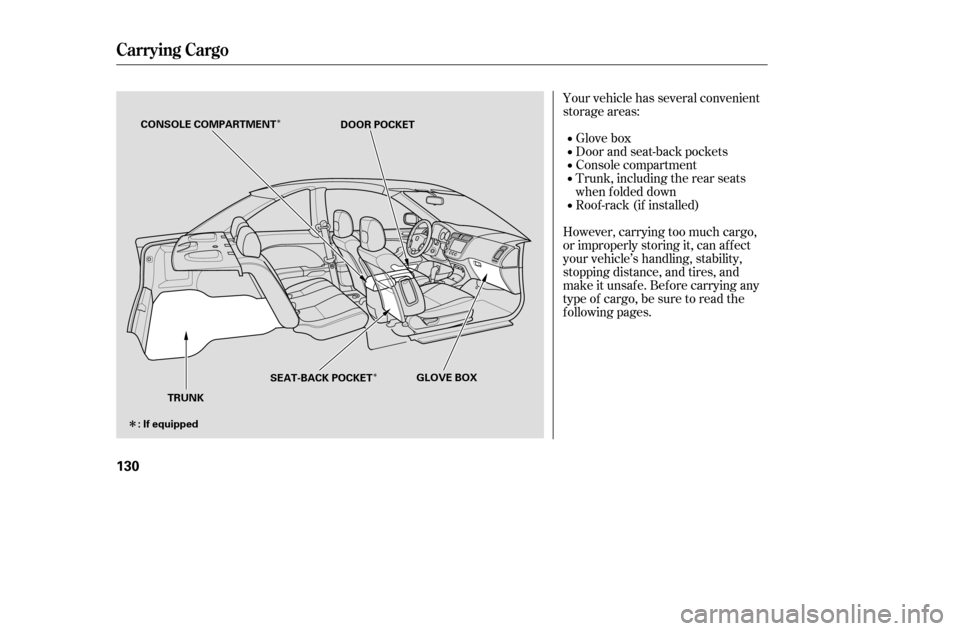
Your vehicle has several convenient
storage areas:
However, carrying too much cargo,
or improperly storing it, can af f ect
your vehicle’s handling, stability,
stopping distance, and tires, and
make it unsaf e. Bef ore carrying any
type of cargo, be sure to read the
f ollowing pages.Roof -rack (if installed)
Trunk, including the rear seats
when f olded down
Console compartment
Door and seat-back pockets
Glove box
Carrying Cargo
130
TRUNK GLOVE BOX
CONSOLE COMPARTMENT
DOOR POCKET
SEAT-BACK POCKET
: If equipped
�����—�����—�����y�
�����������
�y���
�(���%�������y���
�����y
Page 126 of 226

If you carry large items that
prevent you f rom closing the trunk
lid, exhaust gas can enter the
passenger area. To avoid the
possibility of, f ollow the instructions
on page .
If youfolddownthebackseat,tie
down items that could be thrown
about the vehicle during a crash or
sudden stop.
Distribute cargo evenly on the
f loor of the cargo area, placing the
heaviest items on the bottom and
as f ar f orward as possible.
Store or secure all items that could
be thrown around and hurt
someone during a crash.
Do not put any items on top of the
rear shelf . They can block your
view and be thrown around the
vehicle during a crash.
Be sure items placed on the f loor
behind the f ront seats cannot roll
under the seats and interf ere with
the driver’s ability to operate the
pedals or the seat.
Keep the glove box closed while
driving. If it is open, a passenger
could injure their knees during a
crash or sudden stop. If you use an accessory roof rack,
the roof rack weight limit may be
lower. Ref er to the inf ormation that
came with your roof rack.
The cargo net can be used to help
hold down items stored in the trunk.
If you carry any items on a roof
rack,besurethetotalweightof
the rack and the items does not
exceed the maximum allowable
weight. Please contact your dealer
for further information. 45
If equipped
Carrying Cargo
carbon monoxide
poisoning
Carrying Cargo in the Trunk or on
a Roof Rack
Carrying Items in the Passenger
Compartment
Cargo Net
132
�����—�����—�����y�
�������������y���
�(���%�������y���
�����y
Page 127 of 226
Fasten your seat belt. Check that
your passengers have f astened
their seat belts (see page ).
Make sure the doors are securely
closed and locked.
Check the steering wheel
adjustment (see page ).
Check the adjustment of the
inside and outside mirrors (see
page ).
Check that any items you may be
carrying are stored properly or
f astened down securely.
Check the seat adjustment (see
page ).
Make sure all windows, mirrors,
and outside lights are clean and
unobstructed. Remove f rost, snow,
or ice.
Youshoulddothefollowingchecks
and adjustments bef ore you drive
your vehicle.
Check that the hood is f ully closed.
Check that the trunk is f ully
closed.
Visually check the tires. If a tire
looks low, use a gauge to check its
pressure. When you start the engine, check
the gauges and indicators in the
instrument panel (see page ).
1. 2. 14
3. 4. 5. 6. 7. 8. 9.
11.
10.
80
73
65 51
Preparing to Drive
134
�����—�����—�����y�
�������������y���
�(���%�������y���
�����y
Page 138 of 226

If your vehicle has an automatic
transmission, set the parking brake
bef ore you put the transmission in
Park. This keeps the vehicle f rom
moving and putting pressure on the
parking mechanism in the
transmission.If the vehicle is f acing uphill, turn
the f ront wheels away f rom the
curb. If you have a manual
transmission, put it in f irst gear.
If the vehicle is f acing downhill,
turn the front wheels toward the
curb. If you have a manual
transmission, put it in reverse gear.
Make sure the parking brake is
f ully released bef ore driving away.
Driving with the parking brake
partially set can overheat or
damage the rear brakes.
Always use the parking brake when
you park your vehicle. Make sure
the parking brake is set f irmly or
your vehicle may roll if it is parked
on an incline.
Make sure the moonroof (if
equipped) and the windows are
closed.
Never park over dry leaves, tall
grass, or other f lammable
materials. The hot three way
catalytic converter could cause
these materials to catch on fire.
Lock the doors.
Place any packages, valuables, etc.,
in the trunk or take them with you.
Turn of f the lights.
Parking T ips
Parking
Driving
145
�����—�����—�����y�
�������������y���
�(���%�������y���
�����y


.
Make sure the doors are securely
closed and locked.
Check the steering wheel
adjustment (see page ).
Che")