Page 253 of 302

Turn the ignition switch to START
(III). If the headlights do not dim,
check the condition of the f uses. If
thefusesareOK,thereis
probably something wrong with
the electrical circuit f or the
ignition switch or starter motor.
You will need a qualif ied
technician to determine the
problem (see
on page ).In this case, the starter motor’s
speed sounds normal, or even f aster
than normal, when you turn the
ignition switch to START (III), but
the engine does not run.
Are you using the proper starting
procedure? Ref er to on page .
Are you using a properly coded
key? An improperly coded key will
cause the immobilizer system
indicator in the instrument panel
to blink rapidly (see page ). Do you have f uel? Check the f uel
gauge; the low f uel indicator may
not be working.
There may be an electrical
problem, such as no power to the
f uel pump. Check all the f uses
(see page ).
If youfindnothingwrong,youwill
need a qualif ied technician to f ind
the problem. See on page .
If the headlights dim noticeably or
go out when you try to start the
engine, either the battery is dis-
charged or the connections are
corroded. Check the condition of
the battery connections (see page
). You can then try jump
starting the vehicle from a booster
battery (see page ). 265
263 175
77 263
242 253
If theEngineWon’tStart
Emergency T owing T he Starter Operates Normally
Starting the
Engine
Emergency
Towing
252
Page 261 of 302

If the indicator remains on or the
f uel cap was not loose or missing,
have the vehicle checked by the
dealer as soon as possible.If your vehicle’s battery has been
disconnected or gone dead, these
codes are erased. It takes at least
three days of driving under various
conditions to set the codes again.
If you have recently ref ueled your
vehicle, the cause of this indicator
coming on could be a loose or
missing f uel f ill cap. Check the cap
or replace it. Tightening the cap will
not make the indicator turn of f
immediately; it takes at least three
days of normal driving.
Your vehicle has certain ‘‘readiness
codes’’ that are part of the on-board
diagnostics f or the emissions
systems. In some states, part of the
emissions testing is to make sure
these codes are set. If they are not
set, the test cannot be completed.To check if they are set, turn the
ignition to ON (II), without starting
the engine. The Malf unction
Indicator Lamp will come on f or 20
seconds. If it then goes of f , the
readiness codes are set. If it blinks 5
times, the readiness codes are not
set. If possible, do not take your
vehicle f or a state emissions test
until the readiness codes are set.
Refer to State Emissions Testing for
more information (see page ).
285
Readiness Codes
Malf unction Indicator L amp
260
If you keep driving with the
Malf unction Indicator Lamp on, you
can damage your vehicle’s emissions
controls and engine. Those repairs may
not be covered by your vehicle’s
warranties. This indicator may also
come on with the ‘‘D’’ indicator.
Page 265 of 302
With the f ront wheels on the ground,
it is best to tow the vehicle no farther
than 50 miles (80 km), and keep the
speedbelow35mph(55km/h).If you decide to tow your vehicle
with all f our wheels on the ground,
make sure you use a properly-
designed and attached tow bar.
Prepare the vehicle for towing as
described above, and leave the
ignition switch in Accessory (I) so
the steering wheel does not lock.
Make sure the radio and any items
plugged into the accessory power
socket are turned of f so they do not
rundownthebattery.
If your vehicle is equipped with a
f ront spoiler, remove it bef ore
towing so it is not damaged.
Emergency T owing
264
The steering system can be damaged if
the steering wheel is locked. Leave the
ignition switch in ACCESSORY (I), and
make sure the steering wheel turns
f reely bef ore you begin towing.
Trying to lif t or tow your vehicle by the
bumpers will cause serious damage.
The bumpers are not designed to
support the vehicle’s weight.
Page 266 of 302
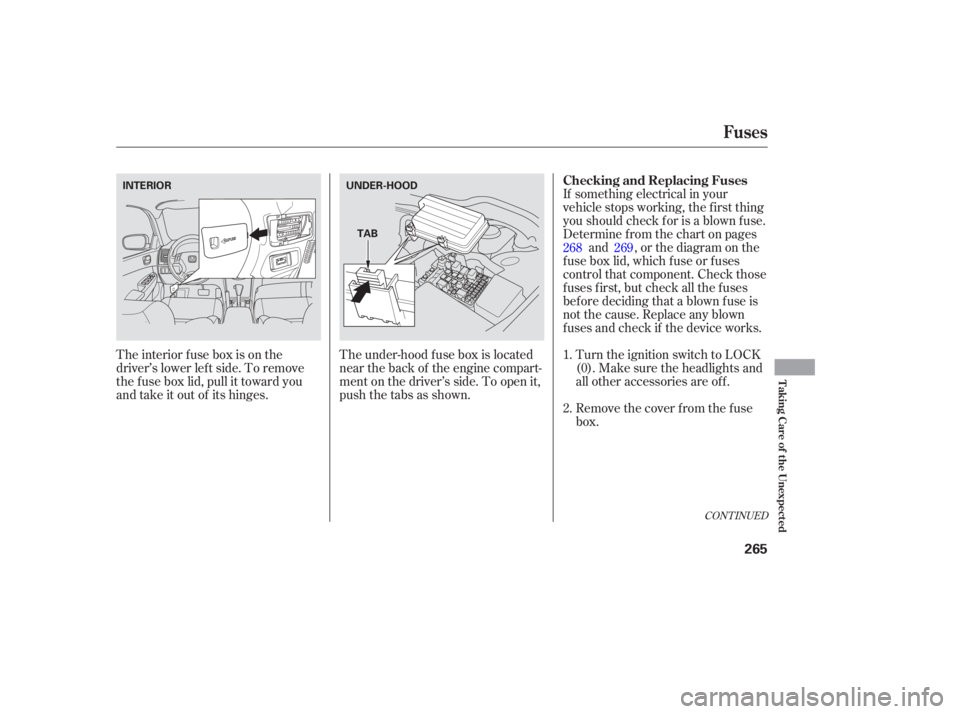
The interior f use box is on the
driver’s lower lef t side. To remove
the f use box lid, pull it toward you
and take it out of its hinges.The under-hood f use box is located
near the back of the engine compart-
ment on the driver’s side. To open it,
pushthetabsasshown.If something electrical in your
vehicle stops working, the first thing
youshouldcheckforisablownfuse.
Determine f rom the chart on pages
and , or the diagram on the
f use box lid, which f use or f uses
control that component. Check those
f uses f irst, but check all the f uses
bef ore deciding that a blown f use is
not the cause. Replace any blown
f uses and check if the device works.
Turn the ignition switch to LOCK
(0). Make sure the headlights and
all other accessories are of f .
Remove the cover f rom the f use
box.
1.
2. 268 269
CONT INUED
Fuses
Checking and Replacing Fuses
T aking Care of t he Unexpect ed
265
INTERIOR
UNDER-HOOD
TAB
Page 269 of 302
�µ�µ
�Î
�Î
�Î
�´
�Î
No. Amps. Circuits Protected
No. Amps. Circuits ProtectedNo. Amps. Circuits Protected
: 6-cylinder models
1
2
3
4
5 10 A
(30A) 10 A
15 A
10 A Left Headlight Low
(Rear Defroster Coil)
Lef t Headlight Hi
Small Light
Right Headlight Hi 6
7
8
9
10 10 A
7.5 A 15 A
20 A Right Headlight Low
Back Up
FI ECU
Condenser f an
Not Used 11
11
12
13
14
15
16
17
17
18
18
19
20
21
22
23
20 A
30 A
7.5 A 20 A
40 A
40 A
15 A
30 A
30 A
20 A
40 A
40 A
(40 A) 40 A
100 A
50 A
50 A Cooling Fan
Cooling Fan
MG. Clutch
Horn, Stop
Rear Defroster
Back Up, ACC
Hazard
ABS Motor
TCS Motor
ABS F/S
TCS
Ignition Coil, DRL (Canada)
Power Seats, Seat Heaters
Heater Motor
Battery
Not Used
BIG1Main
Power Window Main
Fuses
268
UNDER-HOOD FUSE/RELAY BOX
Page 270 of 302
�µ�µ
�µ
�Î
�Î
�Î
�ÎNo.No.
Amps. Amps.Amps.
Circuits Protected Circuits Protected
No. Circuits Protected
1 : 6-cylinder models
2 : On Canadian models
7
8
9
10
11
12 13
14
15
16
17
18
19
20
21
22
23
24
25
26
27
28
29
30
31
32
33
(15 A)
15 A
(10 A) 15 A
10 A
7.5 A 10 A
20 A
15 A
7.5 A 30 A (20 A)
(20 A)
(20 A)
(20 A)
(20 A)
15 A
15 A
7.5 A
7.5 A 10 A
7.5 A 20 A
20 A
20 A
20 A
(20 A)
7.5 A
7.5 A
7.5 A
Back-Up Lights
Door Lock
Front Accessory Sockets
IG OPDS
IG Wiper
Not Used Driver’s Power Seat Slide
Heated Seat
Driver’s Power Seat Recline
IG ACG
IG Fuel Pump
IG Washer
IG Meter
IG SRS
IGP (PGM-FI ECU)
Lef t Rear Power Window
Right Rear Power Window
Right Front Power Window
Driver’s Power Window
Moonroof
Not Used
IG HAC
Not Used
ACC
HAC OP
1
2
3
4
5
6 DrivebyWire
Ignition Coil
Day Light
Laf Heater
Radio
Interior Light
Passenger’s Power Seat Recline
Passenger’s Power Seat Slide
1
2
Fuses
T aking Care of t he Unexpect ed
269
INTERIOR FUSE BOX
Page 272 of 302

Thediagramsinthissectiongive
you the dimensions and capacities of
your vehicle, and the locations of the
identif ication numbers. It also
includes inf ormation you should
know about your vehicle’s tires and
emissions control systems.................
Identif ication Numbers . 272
................................
Specif ications .274
DOT Tire Quality Grading .....................
(U.S.Vehicles) .277
Unif orm Tire Quality ..................................
Grading .277
.................................
Treadwear .277
......................................
Traction .277
.............................
Temperature .278
.................................
Tire Labeling .279
.........................
Oxygenated Fuels .280
......
Driving in Foreign Countries . 281
.......................
Emissions Controls .282
.....................
The Clean Air Act .282
Crankcase Emissions Control ....................................
System .282
Evaporative Emissions Control ....................................
System .282
Onboard Ref ueling Vapor ................................
Recovery .282
...
Exhaust Emissions Controls . 283
....................
PGM-FI System .283
Ignition Timing Control ................................
System .283
Exhaust Gas Recirculation ...................
(EGR) System . 283Three Way Catalytic
...........................
Converter .283
....................
Replacement Parts . 283
..
Three Way Catalytic Converter . 284
..............
State Emissions Testing . 285
T echnical Inf ormat ion
T echnical Inf ormation
271
Page 284 of 302

The exhaust emissions controls
include f our systems: PGM-FI,
ignition timing control, exhaust gas
recirculation and three way catalytic
converter. These f our systems work
together to control the engine’s
combustion and minimize the
amount of HC, CO, and NOx that
comes out the tailpipe. The exhaust
emissions control systems are
separate f rom the crankcase and
evaporative emissions control
systems.
The PGM-FI System uses sequential
multiport f uel injection.
It has three subsystems: air intake,
engine control, and f uel control. The
powertrain control module (PCM) in
automatic transmission vehicles or
the engine control module (ECM) in
manual transmission vehicles use
various sensors to determine how
much air is going into the engine. Itthen controls how much f uel to inject
under all operating conditions. The emissions control systems are
designed and certif ied to work to-
gether in reducing emissions to
levels that comply with the Clean Air
Act. To make sure the emissions
remain low, you should use only new
Honda replacement parts or their
equivalent f or repairs. Using lower
qualitypartsmayincreasethe
emissions f rom your vehicle.
The emissions control systems are
covered by warranties separate from
the rest of your vehicle. Read your
warranty manual f or more informa-
tion.
The exhaust gas recirculation (EGR)
system takes some of the exhaust
gas and routes it back into the intake
manif old. Adding exhaust gas to the
air/f uel mixture reduces the amount
of NOx produced when the f uel is
burned. This system constantly adjusts the
ignition timing, reducing the amount
of HC, CO, and NOx produced.
The three way catalytic converter is
in the exhaust system. Through
chemical reactions, it converts HC,
CO, and NOx in the engine’s exhaust
to carbon dioxide (CO ), nitrogen
(N ), and water vapor.
2
2
Emissions Cont rols
Exhaust Emissions Controls Replacement Parts
PGM-FI Syst em
Three Way Catalytic Converter
Exhaust Gas Recirculat ion (EGR)
Syst em
Ignit ion T iming Cont rol Syst em
T echnical Inf ormation
283