Page 221 of 289
Remove the electrical connector
f rom the bulb by squeezing the
connector to unlock the tab, then
slide the connector of f the bulb.
Remove the bulb by turning it
approximately one-quarter turn
counterclockwise.
Install the new bulb and turn it
one-quarter turn clockwise to lock
it in place.Push the electrical connector back
onto the bulb. Make sure it is on
all the way.
Turn on the headlights to test the
new bulb.
(Passenger’s side)
Reinstall the air intake cover.
Reinstall the two fasteners and
secure them by pushing on the
heads until they lock.
3.
2. 4. 5. 6. 7.
CONT INUED
Lights
Maint enance
229
6-cylinder models
AIR INTAKE
COVER
FASTENERS
4-cylinder models 6-cylinder models
TAB BULB
TABBULB
�����—�����—�����y�
�
��
��������y���
�(���%�������y���������y
Page 222 of 289
Remove the electrical connector
fromthebulbbysqueezingthe
connector to unlock the tab, then
slide the connector of f the bulb.
Remove the bulb by turning it
approximately one-quarter turn
counterclockwise.
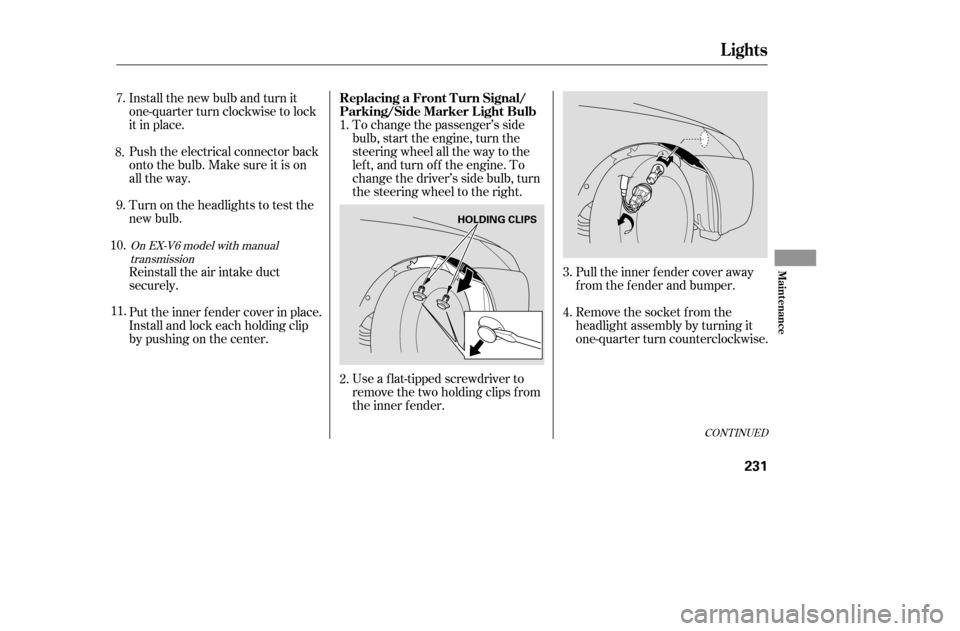
To change the passenger’s side
bulb, start the engine, turn the
steering wheel all the way to the
lef t, and turn of f the engine. To
change the driver’s side bulb, turn
the steering wheel to the right.
Use a f lat-tipped screwdriver to
remove the two holding clips f rom
the inner f ender. Pull the inner f ender cover away
f rom the f ender and bumper.
To change the low beam headlight
bulb on the driver’s side, remove
the air intake duct. You can reach
the air intake duct f rom the back
side of the inner f ender.
6.
5.
4.
1. 2. 3.
On EX-V6 model with manual
transmission
Lights
L ow Beam Headlight
230
AIR INTAKE DUCT
EX-V6 with M/T
HOLDING CLIPS
�����—�����—�����y�
�
��
��������y���
�(���%�������y���������y
Page 223 of 289

Pull the inner f ender cover away
f rom the f ender and bumper.
Remove the socket from the
headlight assembly by turning it
one-quarter turn counterclockwise.
To change the passenger’s side
bulb, start the engine, turn the
steering wheel all the way to the
lef t, and turn of f the engine. To
change the driver’s side bulb, turn
the steering wheel to the right.
Install the new bulb and turn it
one-quarter turn clockwise to lock
it in place.
Push the electrical connector back
onto the bulb. Make sure it is on
all the way.
Turn on the headlights to test the
new bulb.
Reinstall the air intake duct
securely.
Put the inner f ender cover in place.
Install and lock each holding clip
bypushingonthecenter.
Use a f lat-tipped screwdriver to
remove the two holding clips f rom
the inner f ender.
1.
3.
2. 4.
9.
7.
8.
10. 11.
CONT INUED
On EX-V6 model with manual transmission
Lights
Replacing a Front T urn Signal/
Parking/Side Marker Light Bulb
Maint enance
231
HOLDING CLIPS
�����—�����—�����y�
�
��
����
���y���
�(���%�������y���������y
Page 224 of 289

Remove the burned out bulb f rom
thesocketbypushingitinand
turning the bulb counterclockwise
until it unlocks.
Install the new bulb in the socket.
Turn it clockwise to lock it in place.
Insert the socket back into the
headlight assembly. Turn it
clockwise to lock it in place.
Turn on the lights to make sure
the new bulb is working.
Put the inner f ender cover in place.
Install and lock each holding clip
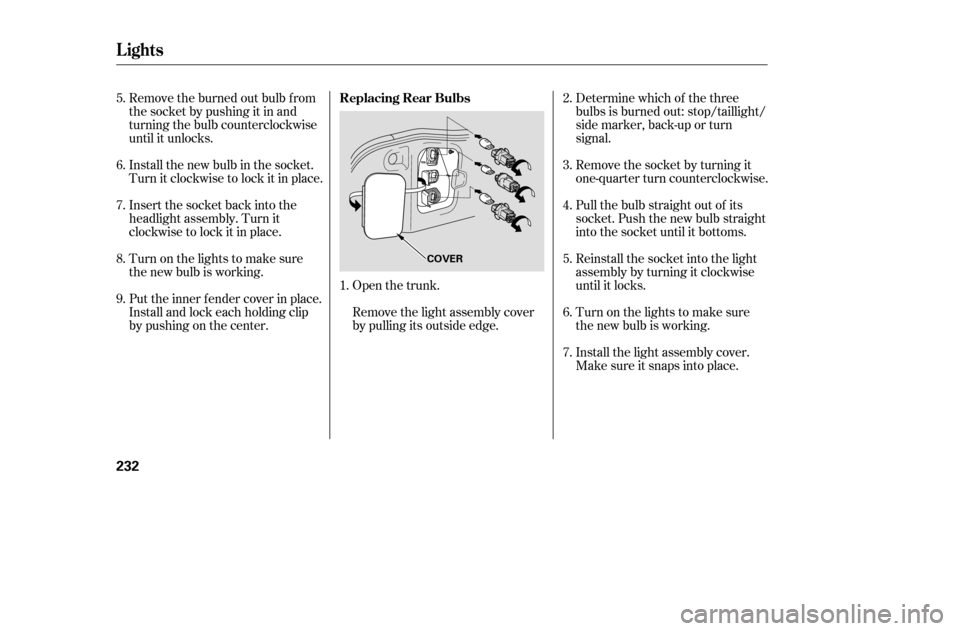
bypushingonthecenter.Open the trunk.
Remove the light assembly cover
by pulling its outside edge.Determine which of the three
bulbs is burned out: stop/taillight/
side marker, back-up or turn
signal.
Remove the socket by turning it
one-quarter turn counterclockwise.
Pull the bulb straight out of its
socket. Push the new bulb straight
into the socket until it bottoms.
Reinstall the socket into the light
assembly by turning it clockwise
until it locks.
Turn on the lights to make sure
the new bulb is working.
Install the light assembly cover.
Make sure it snaps into place.
1. 3.
2. 4. 5.6. 7.
5. 6. 7. 8. 9.
Lights
Replacing Rear Bulbs
232
COVER
�����—�����—�����y�
�
��
��������y���
�(���%�������y���������y
Page 225 of 289
Open the trunk and remove the
socket f rom the light assembly by
turning it one-quarter turn counter-
clockwise.
Remove the burned-out bulb by
pulling it straight out of the socket.
Install the new bulb into the
socket.Reinstall the socket. Turn it
clockwise until it locks.
Turn on the lights to make sure
the new bulb is working.
1. 2. 3. 4.
Lights
Replacing a High-mount Brake
Light Bulb
Maint enance
233
BULB
SOCKET
�����—�����—�����y�
�
��
��������y���
�(���%�������y���������y
Page 241 of 289
The jack is behind a cover in the
right f ender. Remove the cover by
turning the handle counterclock-
wise, then pulling on the cover.Turn the jack’s end bracket
counterclockwise to loosen it, then
remove the jack.
Loosen each wheel nut 1/2 turn
with the wheel nut wrench.
6.
7.8.
Changing a Flat T ire
250
JACK WHEEL NUT
WHEEL NUT WRENCH
�����—�����—�����y�
�
��
��������y���
�(���%�������y���������y
Page 242 of 289
CONT INUED
Place the jack under the jacking
point nearest the tire you need to
change. Turn the end bracket
clockwise until the top of the jack
contacts the jacking point. Make
sure the jacking point tab is
restinginthejacknotch.Remove the wheel nuts, then
remove the f lat tire. Handle the
wheel nuts caref ully; they may be
hot f rom driving. Place the f lat tire
on the ground with the outside
surface facing up.Do not attempt to forcibly pry the
wheel cover of f with a screwdriver or
other tool. The wheel cover cannot
be removed without f irst removing
the wheel nuts.
Use the extension and the wheel
nut wrench as shown to raise the
vehicle until the f lat tire is of f the
ground.
9.
10.
11.On LX and LX-V6 models
Changing a Flat T ire
T aking Care of t he Unexpect ed
251
JACKING POINT WHEEL COVER
WHEEL NUTS
WHEEL NUT WRENCH EXTENSION
�����—�����—�����y�
�
��
��������y���
�(���%�������y���������y
Page 250 of 289

Start the engine, and set the
temperature control dial to
maximum heat (climate control to
AUTO at ‘‘ ’’). Add coolant
to the radiator up to the base of
the f iller neck. If you do not have
the proper coolant mixture
available, you can add plain water.
Remember to have the cooling
system drained and ref illed with
the proper mixture as soon as you
can.
Put the radiator cap back on
tightly. Run the engine, and watch
the temperature gauge. If it goes
back to the red mark, the engine
needs repair (seeon page ).
If the temperature stays normal,
check the coolant level in the
radiator reserve tank. If it has
gone down, add coolant to the
MAX mark. Put the cap back on
tightly.
Using gloves or a large heavy
cloth, turn the radiator cap
counterclockwise, without pushing
down, to the f irst stop. Af ter the
pressure releases, push down on
the cap, and turn it until it comes
off.
If there was no coolant in the
reserve tank, you may need to add
coolant to the radiator. Let the
engine cool down until the pointer
reaches the middle of the
temperature gauge or lower
bef ore checking the radiator.
If you don’t f ind an obvious leak,
check the coolant level in the
radiator reserve tank (see page ).
If you do not see steam or spray,
leave the engine running, and
watch the temperature gauge. If
the high heat is due to overloading,
the engine should start to cool
down almost immediately. If it
does, wait until the temperature
gauge comes down to the midpoint,
then continue driving.
If the temperature gauge stays at
the red mark, turn of f the engine.
Look f or any obvious coolant leaks,
such as a split radiator hose.
Everything is still extremely hot,
so use caution. If you f ind a leak, it
must be repaired bef ore you
continue driving (see
on page ).
6. 7. 8.
9.
10. 11.
3. 4. 5.
269
165 269
If theEngineOverheats
Emergency
Towing
Emergency
Towing
T aking Care of t he Unexpect ed
259
Removing the radiator cap
while the engine is hot can
cause the coolant to spray out,
seriously scalding you.
Always let the engine and
radiator cool down before
removing the radiator cap.
�����—�����—�����y�
�
��
��������y���
�(���%�������y���������y