Page 2 of 289
�Î
�Î
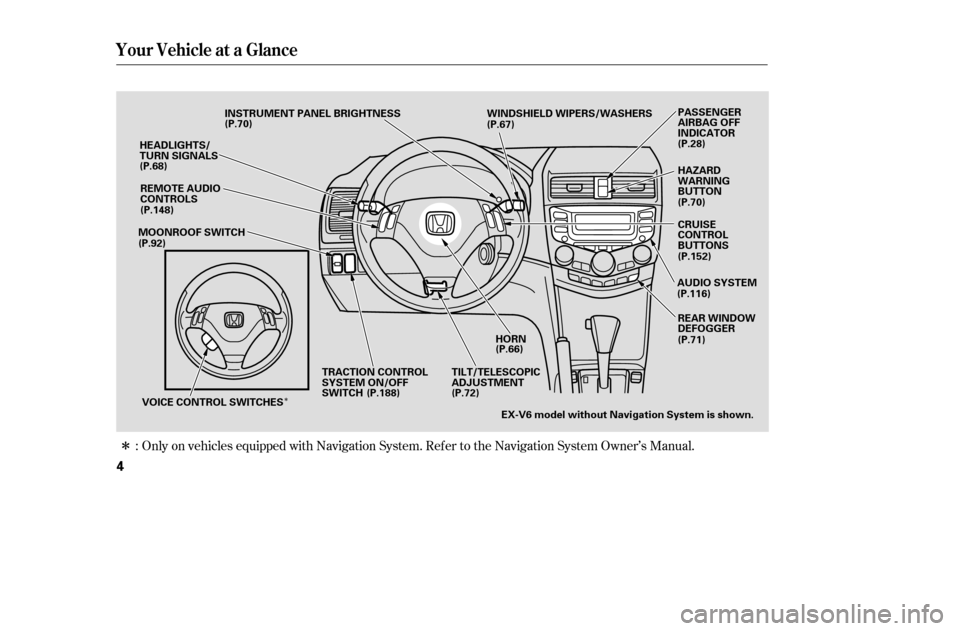
Only on vehicles equipped with Navigation System. Ref er to the Navigation System Owner’s Manual.
:
Your Vehicle at a Glance
4
HORN
HEADLIGHTS/
TURN SIGNALS
TILT/TELESCOPIC
ADJUSTMENTEX-V6 model without Navigation System is shown. REAR WINDOW
DEFOGGER
INSTRUMENT PANEL BRIGHTNESS WINDSHIELD WIPERS/WASHERS
MOONROOF SWITCH
VOICE CONTROL SWITCHES TRACTION CONTROL
SYSTEM ON/OFF
SWITCH HAZARD
WARNING
BUTTON
AUDIO SYSTEM PASSENGER
AIRBAG OFF
INDICATOR
(P.70)
(P.68)
(P.148)
(P.92) (P.67)
(P.28)
(P.70) CRUISE
CONTROL
BUTTONS
(P.152)
(P.116)
(P.66)
(P.72)
(P.188)
REMOTE AUDIO
CONTROLS
(P.71)
�����—�����—�����y�
�������������y���
�(���%�������y���������y
Page 62 of 289
�Î
�Î
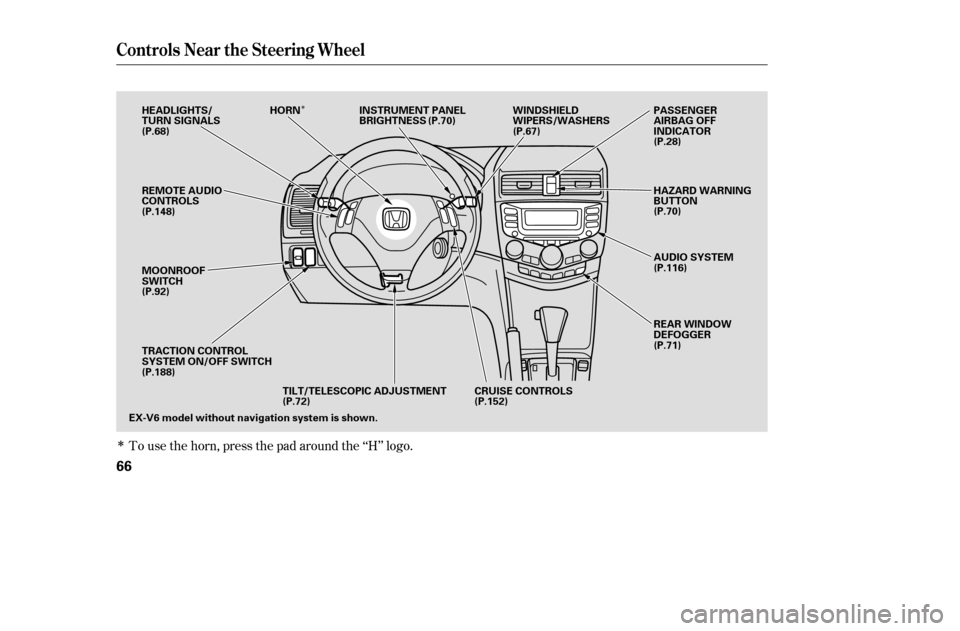
To use the horn, press the pad around the ‘‘H’’ logo.
Controls Near the Steering Wheel
66
EX-V6 model without navigation system is shown.CRUISE CONTROLS
TILT/TELESCOPIC ADJUSTMENT
REMOTE AUDIO
CONTROLS
MOONROOF
SWITCH
TRACTION CONTROL
SYSTEM ON/OFF SWITCH
HEADLIGHTS/
TURN SIGNALS
HORN INSTRUMENT PANEL
BRIGHTNESS WINDSHIELD
WIPERS/WASHERS
REAR WINDOW
DEFOGGER
AUDIO SYSTEM
HAZARD WARNING
BUTTON
PASSENGER
AIRBAG OFF
INDICATOR
(P.68) (P.70)
(P.67)
(P.28)
(P.70)
(P.116)
(P.71)
(P.152)
(P.72)
(P.188)
(P.92)
(P.148)
�����—�����—�����y�
�������������y���
�(���%�������y���������y
Page 63 of 289

�µ
�µ
�µ �µ
�µ
�µ �µ
�µ
�µ
MIST
OFF
INT Intermittent
LO Low speed
HI High speed
Windshield Washers
Push the right lever up or down to
select a position. The wipers are not activated.
Vary the delay by turning the INT
TIME ring.
If youturnittotheshortestdelay,
the wipers will change to low
speed operation when the vehicle
speed exceeds 12 mph (20 km/h).
While the vehicle is stopped and in
gear, the wipers sweep the
windshield whenever you remove
your f oot f rom the brake pedal. The wipers run at low speed.
The wipers run at high speed. Pull the
wiper control lever toward you and
hold it. The washers spray until you
release the lever. The wipers run at
low speed, then complete one more
sweep after you release the lever.
The wipers run at high
speed until you release the lever.
The length of the wiper
interval is varied automatically
according to the vehicle’s speed.
1.2.3.4.5.6
Windshield Wipers and Washers
Windshield Wipers OFF LO HIWindshield Washers
MIST INT
Inst rument s and Cont rols
67
�����—�����—�����y�
�������������y���
�(���%�������y���������y
Page 212 of 289

Check the f luid level in the
windshield washer reservoir at least
monthly during normal use.
Check the reservoir’s f luid level by
removing the cap and looking at the
level gauge attached to the cap.Fill the reservoir with a good-quality
windshield washer f luid. This
increases the cleaning capability and
prevents f reezing in cold weather.
When you ref ill the reservoir, clean
the edges of the windshield wiper
blades with windshield washer f luid
on a clean cloth. This will help to
condition them.
The low washer
level indicator comes on when the
level is low (see page ). 61
On Canadian models:
Windshield Washers
220
LEVEL GAUGE
4-cylinder models 6-cylinder models LEVEL GAUGE
Do not use engine antif reeze or a
vinegar/water solution in the
windshield washer reservoir. Antif reeze
can damage your vehicle’s paint, while
a vinegar/water solution can damage
the windshield washer pump. Use only
commercially-available windshield
washer f luid.
�����—�����—�����y�
�
��
����
�
�y���
�(���%�������y���������y
Page 228 of 289
To replace a wiper blade:Raise the wiper arm of f the
windshield. Raise the driver’s side
first, then the passenger’s side. Disconnect the blade assembly
fromthewiperarmbypushingin
the lock tab. Hold the lock tab in
while you push the blade assembly
toward the base of the arm.
Check the condition of the wiper
blades at least every six months.
Replace them if you f ind signs of
cracking in the rubber, areas that are
getting hard, or if they leave streaks
and unwiped areas when used.
2.
1.
Wiper Blades
236
WIPER ARMS
LOCK TAB
Do not open the hood when the wiper
arms are raised, or you will damage the
hood and the wiper arms.
�����—�����—�����y�
�
��
������
�y���
�(���%�������y���������y
Page 229 of 289
Remove the blade f rom its holder
by grasping the tabbed end of the
blade. Pull f irmly until the tabs
come out of the holder.Examine the new wiper blades. If
they have no plastic or metal
reinf orcement along the back
edge, remove the metal
reinf orcement strips f rom the old
wiper blade, and install them in
the slots along the edge of the new
blade.Slide the new wiper blade into the
holder until the tabs lock.
Slide the wiper blade assembly
onto the wiper arm. Make sure it
locks in place.
Lower the wiper arm down against
the windshield. Lower the
passenger’s side f irst, then the
driver’s side.
3. 4. 5. 6.
7.
Wiper Blades
Maint enance
237
BLADE BLADE
REINFORCEMENT
�����—�����—�����y�
�
��
����
�
�y���
�(���%�������y���������y
Page 238 of 289
 or Park (automatic).
Block the rear wheels.
If the vehicle is to be stored f or a
longer period, it should be
supported on jack")
Leave the parking brake off. Put
the transmission in Reverse
(manual) or Park (automatic).
Block the rear wheels.
If the vehicle is to be stored f or a
longer period, it should be
supported on jackstands so the
tires are of f the ground.
Leave one window open slightly (if
the vehicle is being stored
indoors).
Disconnect the battery.
Support the f ront wiper blade
arms with a f olded towel or rag so
they do not touch the windshield.To minimize sticking, apply a
silicone spray lubricant to all door
and trunk seals. Also, apply a
vehiclebodywaxtothepainted
surfaces that mate with the door
and trunk seals.
Cover the vehicle with a
‘‘breathable’’ cover, one made
f rom a porous material such as
cotton. Non-porous materials, such
as plastic sheeting, trap moisture,
which can damage the paint.
If possible, periodically run the
engine until it reaches f ull
operating temperature (the
cooling f an cycles twice).
Pref erably, do this once a month.
If you store your vehicle f or 1 year or
longer, have your dealer perf orm the
maintenance inspections as soon as
youtakeitoutof storage(seepages
and ). The 6-cylinder model
needs the inspections called f or in
the 2 years/30,000 miles (48,000 km)
maintenance schedule (normal
conditions) and the 4-cylinder model
needs the inspections called f or in
the 2 years/40,000 miles (64,000 km)
maintenance schedule (normal
nonditions). The replacements called
f or in the maintenance schedule are
not needed unless the vehicle has
actually reached that time or mileage. 201 206
Vehicle Storage
Maint enance246
�����—�����—�����y�
�
��
��������y���
�(���%�������y���������y
Page 259 of 289
�Î
�µ �µ�µ �µ�µ
�µ �µ �µ
�Î
No. Amps. Circuits Protected Amps. Circuits Protected
No.No. Amps. Circuits Protected
: On Canadian models
1234567 (15 A)
15 A
(10 A) 15 A
10 A
7.5 A 10 A DBW
Ignition Coil
Daytime Running Light
Laf Heater
Radio
Interior Light
Back-Up Lights 20 A
15 A
7.5 A
30 A Door Lock
Front Accessory Sockets
IG OPDS (Occupant
Position Detection System)
IG Wiper
Not Used
Not Used
89
10 11 1213 141516 17 18192021222324252627282930313233(20 A)
(20 A)
(20 A)
15 A
15 A
7.5 A
7.5 A 10 A
7.5 A
20 A
20 A
(20 A)
7.5 A
7.5 A Driver’s Power Seat Sliding
Heated Seats
Driver’s Power Seat
Reclining
Not Used
IG ACG
IG Fuel Pump
IG Washer
IG Meter
IG SRS
IGP (PGM-FI ECU)
Not Used
Not Used
Passenger’s Power Window
Driver’s Power Window
Moonroof
Not Used
IG HAC
Not Used
ACC
Not Used
Fuse Locations
268
INTERIOR FUSE BOX
�����—�����—�����y�
�
�����������y���
�(���%�������y�������
�y