Page 72 of 286
�µ
�µ
�µ �µ
�µ �µ
�µ
�µ �µ
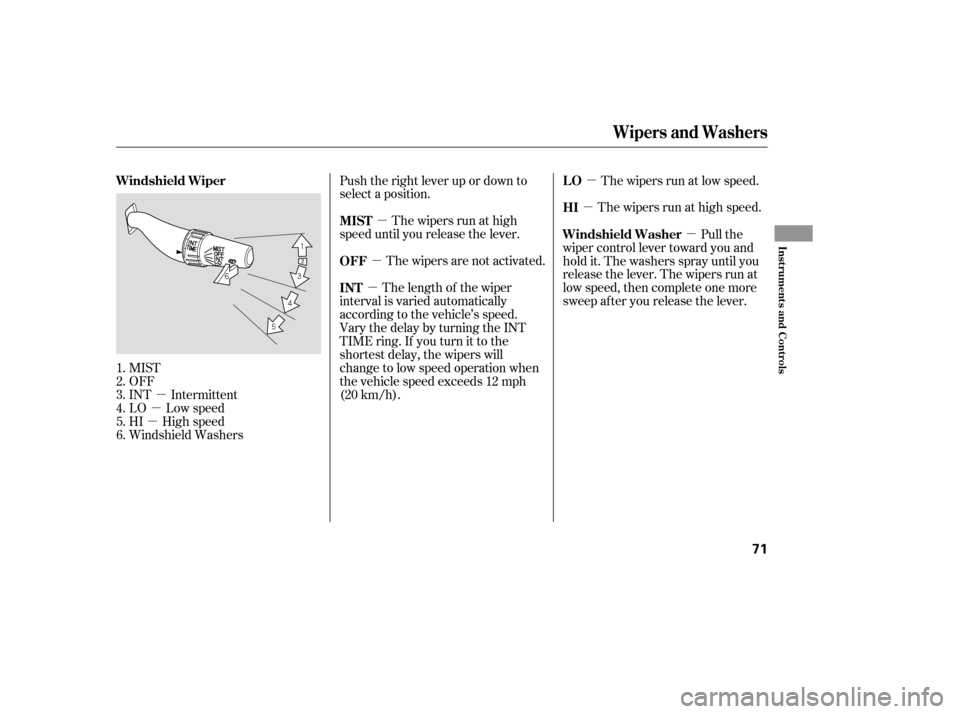
MIST
OFF
INT Intermittent
LO Low speed
HI High speed
Windshield Washers Push the right lever up or down to
select a position.
The wipers run at high
speed until you release the lever.
The wipers are not activated. The wipers run at low speed.
The wipers run at high speed.
The length of the wiper
interval is varied automatically
according to the vehicle’s speed.
Vary the delay by turning the INT
TIME ring. If you turn it to the
shortest delay, the wipers will
change to low speed operation when
the vehicle speed exceeds 12 mph
(20 km/h). Pull the
wiper control lever toward you and
hold it. The washers spray until you
release the lever. The wipers run at
low speed, then complete one more
sweep after you release the lever.
1.
2.
3.
4.
5.
6. Windshield Wiper MIST
OFFLO
HI
INT Windshield Washer
Wipers and Washers
Inst rument s and Cont rols
71
�����—�
���—�����y�����������
���y���
�(���'�������y���������y
Page 95 of 286
To use the sun visor, pull it down.
You can also use the sun visor at the
side window. Remove the support
rod f rom the clip and swing the sun
visor toward the side window.Touseavanitymirroronthebackof
the sun visor, pull up the cover.The light comes on when you pull up
the cover.
Sun Visor
Vanity Mirror
Sun Visor, Vanit y Mirror
94
�����—�
���—���
�y�������������
�y���
�(���'�������y���������y
Page 153 of 286
.
During this period:Avoid full-throttle starts and r")
Help assure your vehicle’s f uture
reliability and perf ormance by paying
extra attention to how you drive
during the f irst 600 miles (1,000 km).
During this period:Avoid full-throttle starts and rapid
acceleration.
Do not change the oil until the
scheduled maintenance time.
Avoidhardbrakingforthefirst
200 miles (300 km).
Do not tow a trailer.
You should also f ollow these
recommendations with an
overhauled or exchanged engine, or
when the brakes are replaced. Your vehicle is designed to operate
on unleaded gasoline with a pump
octane number of 86 or higher. Use
of a lower octane gasoline can cause
a persistent, heavy metallic rapping
noise that can lead to engine damage.
We recommend quality gasoline
containing detergent additives that
help prevent f uel system and engine
deposits.
In addition, in order to maintain good
perf ormance, f uel economy, and
emissions control, we strongly
recommend, in areas where it is
available, the use of gasoline that
does NOT contain manganese-based
f uel additives such as MMT.
Use of gasoline with these additives
may adversely af f ect perf ormance,
and cause the malfunction indicator
lamp on your instrument panel to
come on. If this happens, contactyour authorized dealer f or service.
Some gasoline today is blended with
oxygenates such as ethanol or
MTBE. Your vehicle is designed to
operate on oxygenated gasoline
containing up to 10 percent ethanol
by volume and up to 15 percent
MTBE by volume. Do not use
gasoline containing methanol.
If you notice any undesirable
operating symptoms, try another
service station or switch to another
brand of gasoline.
For f urther important f uel-related
inf ormation, please ref er to your
.
Break-in Period, Fuel Recommendation
Break-in Period Fuel Recommendation
Quick Start Guide
152
�����—���
�—�����y�
������
��
���y���
�(���'�������y���
�����y
Page 156 of 286
Remove the dipstick again, and
check the level. It should be
between the upper and lower
marks.
If it is near or below the lower mark,
see on page .
Insert it all the way back in its hole. Wipe the dipstick with a clean
cloth or paper towel. Remove the dipstick (orange
handle).
Wait a f ew minutes af ter turning the
engine of f bef ore you check the oil.
Lif t the hood up most of the way.
The hydraulic supports will lif t it up
therestof thewayandholditup.
To close the hood, lower the hood to
about a f oot (30 cm) above the
f ender, then f irmly press down on
the f ront edge of the hood. Make
sure it is securely latched. 1.
2.
3.4.
201
A dding Oil
Oil Check
Service Station Procedure
Bef ore Driving
155
DIPSTICK
(orange handle)
UPPER MARK
LOWER MARK
�����—�
���—���
�y�������������
�y���
�(���'�������y���
�����y
Page 162 of 286
. This f igure
includes the total weight of all
occupants, cargo, and accessories,
and the tongue load if you are towing
a trailer.
Steps f")
�µ�·
The maximum load f or your vehicle
is 850 lbs (395 kg). This f igure
includes the total weight of all
occupants, cargo, and accessories,
and the tongue load if you are towing
a trailer.
Steps f or determining correct load
limit:
Locate the statement, ‘‘the
combined weight of occupants and
cargo should never exceed 850
lbs’’ on your vehicle’s placard. [The placard is on the driver’s
doorjamb.]
Determine the combined weight
of the driver and passengers that
will be riding in your vehicle.
Subtract the combined weight of
the driver and passengers f rom
850 pounds or 395 kilograms.
The resulting f igure equals the
available amount of cargo and
luggage load capacity.
For example, if the maximum load
is 850 lbs and there will be f ive 150
lb. passengers in your vehicle, the
amount of available cargo and
luggage load capacity is 100 lbs.
(850 750 (5 150) = 100 lbs.)
Determine the combined weight
of luggage and cargo being loaded
on the vehicle. That weight may
not saf ely exceed the available
cargo and luggage load capacity instep 4.
If your vehicle will be towing a
trailer, load f rom your trailer will
be transf erred to your vehicle.
Consult this manual to determine
how this reduces the available
cargo and luggage load capacity of
yourvehicle(seepage ).
1. 2.
5.6.
3.
4. 182
Load Limits
Carrying Cargo
Bef ore Driving
161
Overloading or improper
loading can affect handling and
stability and cause a crash in
which you can be hurt or killed.
Follow all load limits and other
loading guidelines in this
manual.
�����—�
���—���
�y���������������y���
�(���'�������y���
�����y
Page 166 of 286

This section gives you tips on
starting the engine under various
conditions, and how to operate the
manual and automatic transmissions.
It also includes important
information on parking your vehicle,
the braking system, the traction
control system, and f acts you need if
you are planning to tow a trailer.........................
Preparing to Drive .166
.......................
Starting the Engine .167
..............
Automatic Transmission .168
Shif t Lever Position ...............................
Indicators .168
.......................................
Shif ting .168
..............
Engine Speed Limiter .170
....................
Shif t Lock Release .171
...........................................
Parking .175
.............................
Braking System .176
...............
Brake System Design .176
.............
Brake Wear Indicators .176
...........
Anti-lock Brakes (ABS) .177
Activating the Anti-lock ................................
Brakes .177
........................
ABS Indicator .177
..............
Traction Control System .179
.........................
TCS Of f Switch .180
.........
TCSActivationIndicator .180
............................
TCS Indicator .180
...........................
Towing a Trailer .182
Driving
Driving
165
�����—�
���—���
�y���������������y���
�(���'�������y���
�����y
Page 170 of 286

�µ�µ�µ�µ�µ
This position mechani-
cally locks the transmission. Use
Park whenever you are turning of f or
starting the engine. To shif t out of
Park, you must press on the brake
pedal and have your f oot of f the
accelerator pedal. Press the release
button on the side of the shift lever
to move it.
If you have done all of the above and
still cannot move the lever out of
Park, see on
page .
You must also press the release
button to shift into Park. To avoid
transmission damage, come to a
complete stop bef ore shif ting into
Park. The shif t lever must be in Park
bef ore you can remove the key f rom
the ignition switch. Press the brake
pedal and press the release button to
shif t f rom Park to Reverse. To shif t
from Reverse to Neutral, come to a
completestopandthenshift. This position is similar
to D, except only the first three
gears are selected instead of all f ive.
Use D when towing a trailer in hilly
terrain, or to provide engine braking
when going down a steep hill. D can
also keep the transmission f rom
cycling between third and f ourth
gears in stop-and-go driving.
Use this position f or
your normal driving. The
transmission automatically selects a
suitable gear for the vehicle speed
and acceleration. You may notice the
transmission shif ting up at higher
speeds when the engine is cold. This
helps the engine warm up f aster. Use Neutral if you
need to restart a stalled engine, or if
it is necessary to stop brief ly with
the engine idling. Shif t to the Park
position if you need to leave your
vehicle and apply the parking brake.
Press on the brake pedal when you
are moving the shif t lever f rom
Neutral to another gear.
171
3
3
CONT INUED
Automatic Transmission
Park (P)
Shif t L ock Release Reverse (R) Drive (D )
Drive (D) Neutral (N)3
Driving
169
�����—�
���—���
�y���������������y���
�(���'�������y���
�����y
Page 176 of 286

Always use the parking brake when
you park your vehicle. Make sure
the parking brake is set f irmly or
your vehicle may roll if it is parked
on an incline.
Set the parking brake bef ore you put
the transmission in Park. This keeps
the vehicle from moving and putting
pressure on the parking mechanism
in the transmission.Make sure the windows are closed.
Turn of f the lights.
Place any packages, valuables, etc.,
in the trunk or take them with you.
Lockthedoorswiththekeyorthe
remote transmitter.
Check the indicator on the
instrument panel to verif y that the
security system is set.
Never park over dry leaves, tall
grass, or other f lammable
materials. They may catch f ire
because of the extreme heat of the
three-way catalytic converter.If the vehicle is f acing uphill, turn
the f ront wheels away f rom the
curb.
If the vehicle is f acing downhill,
turn the front wheels toward the
curb.
Make sure the parking brake is
f ully released bef ore driving away.
Driving with the parking brake
partially set can overheat or
damage the rear brakes.
Parking T ips
Parking
Driving
175
�����—�
���—���
�y��������
������y���
�(���'�������y���
�����y