Page 73 of 289
�µ�µ�µ
�µ
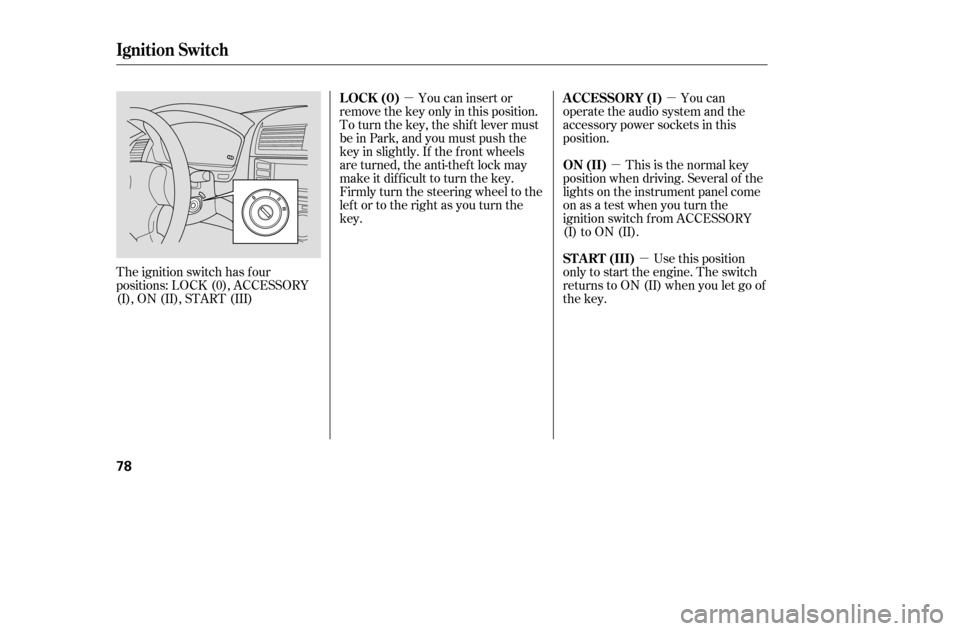
You can insert or
remove the key only in this position.
To turn the key, the shift lever must
be in Park, and you must push the
key in slightly. If the f ront wheels
are turned, the anti-thef t lock may
make it difficult to turn the key.
Firmly turn the steering wheel to the
left or to the right as you turn thekey.
The ignition switch has f our
positions: LOCK (0), ACCESSORY
(I), ON (II), START (III) You can
operate the audio system and the
accessory power sockets in this
position.
This is the normal key
position when driving. Several of the
lights on the instrument panel come
on as a test when you turn the
ignition switch f rom ACCESSORY
(I) to ON (II).
Use this position
only to start the engine. The switch
returns to ON (II) when you let go of
the key.
L OCK (0) A CCESSORY (I)
ON (II)
ST A RT (III)
Ignition Switch
78
�����—�����—�����y�
�������������y���
�(�����������y�������
�y
Page 176 of 289

Your vehicle is equipped with disc
brakes. The brakes on the rear
wheels may be disc or drum,
depending on the model. A power
assist helps reduce the ef f ort needed
on the brake pedal. The ABS helps
you retain steering control when
braking very hard.Check the brakes after driving
through deep water. Apply the
brakes moderately to see if they f eel
normal. If not, apply them gently and
f requently until they do. Be extra
cautious in your driving.
Constant application of the brakes
when going down a long hill builds
up heat and reduces their ef f ective-
ness. Use the engine to assist the
brakes by taking your f oot of f the
accelerator and downshif ting to a
lower gear.
Put your f oot on the brake pedal only
when you intend to brake. Resting
your f oot on the pedal keeps the
brakes applied lightly, builds up heat,
increases wear and reduces their
ef f ectiveness. It also keeps your
brake lights on all the time,
conf using drivers behind you.
If the brake pads need replacing, you
will hear a distinctive, metallic
screeching sound when you apply
the brake pedal. If you do not have
the brake pads replaced, they will
screech all the time. It is normal f or
the brakes to occasionally squeal or
squeak when you apply them.
The f ront disc brakes have audible
brake wear indicators. They are also
in the rear disc brakes of the EX,
EX-V6, and LX-V6 models.
The hydraulic system that operates
the brakes has two separate circuits.
Each circuit works diagonally across
the vehicle (the lef t-f ront brake is
connected with the right-rear brake,
etc.). If one circuit should develop a
problem, you will still have braking
at two wheels.
Braking System
Brake Wear Indicators
Braking System Design
184
�����—�����—�����y�
����
��������y���
�(�����������y���
�����y
Page 201 of 289
Fluid Locations
4-cylinder Models
210
BRAKE FLUID
(Gray cap)
ENGINE OIL DIPSTICK
(Orange handle)
WASHER FLUID
(Blue cap)
POWER STEERING
FLUID (Red cap)
RADIATOR CAPCLUTCH FLUID
(5-speed Manual
Transmission only)
(Light gray cap)
ENGINE OIL
FILL CAP
AUTOMATIC
TRANSMISSION
FLUID DIPSTICK
(Yellow loop)
COOLANT
RESERVOIR
�����—�����—�����y�
����
����
���y���
�(�����������y�����
���y
Page 202 of 289
Fluid Locations
6-cylinder Models
Maint enance
211
ENGINE OIL FILL CAPBRAKE FLUID
(Gray cap)
AUTOMATIC
TRANSMISSION
FLUID DIPSTICK
(Yellow loop)
COOLANT
RESERVOIR
RADIATOR CAP
POWER STEERING
FLUID (Red cap)
WASHER FLUID
(Blue cap) ENGINE OIL DIPSTICK
(Orange loop)
�����—�����—�����y�
����
������
�y���
�(�����������y�����
���y
Page 215 of 289
The f luid level should be between
theMINandMAXmarksontheside
of the reservoir. If it is not, add
brake f luid to bring it up to that level.
Use the same fluid specified for the
brake system.
Low f luid level can indicate a leak in
the clutch system. Have this system
inspected as soon as possible.Check the level on the side of the
reservoir when the engine is cold.
The f luid should be between the
UPPER LEVEL and LOWER LEVEL.
If not, add power steering f luid to the
UPPER LEVEL.
Pour the f luid slowly and caref ully
so you do not spill. Clean up any
spill immediately; it could damage
components in the engine
compartment.
Brake and Clutch Fluid, Power Steering Fluid
Clutch Fluid Power Steering Fluid
224
MAX
MIN UPPER LEVEL
4-cylinder models LOWER LEVEL LOWER LEVELUPPER LEVEL
6-cylinder models
�����—�����—�����y�
����
��������y���
�(�����������y���������y
Page 216 of 289
�µ�µ
Always use Honda Power Steering
Fluid. You may use another power
steering f luid as an emergency
replacement, but have the power
steering system f lushed and ref illed
with Honda PSF as soon as possible.
A low power steering f luid level can
indicate a leak in the system. Check
the f luid level f requently, and have
the system inspected as soon as
possible.
The timing belt should be replaced
at the intervals shown in the
maintenance schedule. Replace the
belt at 60,000 miles (100,000 km) if
you regularly drive your vehicle in
one or more of these conditions:
In very high temperatures
(over 110°F, 43°C).
In very low temperatures
(under 20°F, 29°C).
Frequently tow a trailer.
6-cylinder models only
Power Steering Fluid, T iming Belt
T iming Belt
Maint enance
225
T urning the steering wheel to f ull lef t
or right lock and holding it there can
damage the power steering pump.
�����—�����—�����y�
����
��������y���
�(�����������y���������y
Page 254 of 289
, and keep the
speedbelow35mph(55km/h).If you decide to tow your vehicle
with all f our wheels on t")
With the f ront wheels on the ground,
it is best to tow the vehicle no farther
than 50 miles (80 km), and keep the
speedbelow35mph(55km/h).If you decide to tow your vehicle
with all f our wheels on the ground,
make sure you use a properly-
designed and attached tow bar.
Prepare the vehicle for towing as
described above, and leave the
ignition switch in Accessory (I) so
the steering wheel does not lock.
Make sure the radio and any items
plugged into the accessory power
socket are turned of f so they do not
rundownthebattery.
If your vehicle is equipped with a
f ront spoiler, remove it bef ore
towing so it is not damaged.
Emergency T owing
264
The steering system can be damaged if
the steering wheel is locked. Leave the
ignition switch in ACCESSORY (I), and
make sure the steering wheel turns
f reely bef ore you begin towing.
Trying to lif t or tow your vehicle by the
bumpers will cause serious damage.
The bumpers are not designed to
support the vehicle’s weight.
�����—�����—�����y�
�������������y���
�(�����������y���������y
Page 281 of 289
 . 78
.............
Accessory Power Socket . 103
...........")
CONT INUED
....................................
Accessories . 168
ACCESSORY (Ignition Key
.......................................
Position) . 78
.............
Accessory Power Socket . 103
....................
Additives, Engine Oil . 212
...................................
Airbag (SRS) . 11
..........
Airbag System Components . 23
............................
Air Conditioning . 109
.........................................
Usage . 111
.......................
Air Pressure, Tires . 237
.......................
Alcohol in Gasoline . 280
Anti-lock Brakes (ABS)
...............................
Indicator . 59, 186
...................................
Operation . 185
.
Anti-thef t Steering Column Lock . 78
........
Audio System . 118, 126, 136, 141
.............
Automatic Speed Control . 151
..............
Automatic Transmission . 178
..........................
Capacity, Fluid . 274
.......................................
Shif ting . 178
.
Shif t Lever Position Indicator . 178
................
Shif t Lever Positions . 178
....................
Shif t Lock Release . 181 Battery
Charging System ...........................
Indicator . 58, 259
............................
Jump Starting . 253
..............................
Maintenance . 242
............................
Specif ications . 275
..............................
Bef ore Driving . 159
........................................
Belts, Seat . 10
Brakes
...........
Anti-lock System (ABS) . 185
.............
Break-in, New Linings . 160
....................
Bulb Replacement . 231
...........................................
Fluid . 223
.........................................
Parking . 99
.........................
System Indicator . 59
........................
Wear Indicators . 184
.............................
Braking System . 184
........................
Break-in, New Car . 160
..
Brightness Control, Instruments . 72
........................
Brights, Headlights . 70
Bulb Replacement
..............................
Brake Lights . 231
................
Front Parking Lights . 229
.................................
Headlights . 226 .........
High-mount Brake Light . 232
............................
Specif ications . 275
...............................
Trunk Light . 231
....................
Turn Signal Lights . 229
..............................
Bulbs, Halogen . 226
............................
Capacities Chart . 274
.............
Carbon Monoxide Hazard . 52
.............................
Carrying Cargo . 170
..............
CAUTION, Explanation of . ii
...................................
CD Changer . 128
..............................
CD Player . 126, 127
........................
CD Pocket, Center . 103
........................
Certif ication Label . 272
............................................
Chains . 241
....................
Changing a Flat Tire . 247
Changing Oil
........................................
How to . 214
.............
When to . 202, 203, 204, 205
...
Charging System Indicator . 58, 259
............
Checklist, Bef ore Driving . 174
..................
Childproof Door Locks . 81
Index
AB
C
INDEX
I
�����—�����—�����y�
�����������
�y���
�(�����������y���������y

ENGINE OIL DIPSTICK
(Orange handle)
WASHER FLUID
(Blue cap)
POWER STEERING
FLUID (Red cap)
RADIATOR CAPCLUTCH FLUID
(5-speed Manua")

AUTOMATIC
TRANSMISSION
FLUID DIPSTICK
(Yellow loop)
COOLANT
RESERVOIR
RADIATOR CAP
POWER STEERING
FL")

