2005 GMC YUKON XL DENALI clock
[x] Cancel search: clockPage 5 of 62

A.PPower/Volume Knob. See “Hard Keys” under
Using the Navigation System on page 2-2.
B. NAV (Navigation) Key. See “Hard Keys” under
Using the Navigation System on page 2-2.
C. NAV RPT (Navigation Repeat) Key. See “Hard
Keys” underUsing the Navigation System on
page 2-2.
D. BAND Key. See “Playing the Radio” under
Navigation Audio System on page 3-2.
E.
wSEEKxKey. See “Finding a Station” under
Navigation Audio System on page 3-2.
F.
BCD Key. See “Playing a CD” underNavigation
Audio System on page 3-2.
G.
eAudio Key. SeeNavigation Audio System on
page 3-2.
H. CONFIG (Con�gure) Key. See “Hard Keys” under
Using the Navigation System on page 2-2.
I. Tuning Knob. See “Finding a Station” under
Navigation Audio System on page 3-2.J.
VZoom In Screen Button. See “Touch Sensitive
Screen Buttons” underUsing the Navigation System
on page 2-2.
K. Dest (Destination) Screen Button. See “Touch
Sensitive Screen Buttons” underUsing the
Navigation System on page 2-2.
L. Nav
y(Navigation) Options Screen Button.
See “Touch Sensitive Screen Buttons” under
Using the Navigation System on page 2-2.
M. Nav (Navigation Menu) Screen Button. See “Touch
Sensitive Screen Buttons” underUsing the
Navigation System on page 2-2.
N.
UZoom Out Screen Button. See “Touch Sensitive
Screen Buttons” underUsing the Navigation
System on page 2-2.
O. Clock. See “Clock” underConfigure Menu on
page 2-31.
P. Directional Indicator. SeeSymbols on page 2-6.
Q. DVD/CD Loading Slot
R.
XDVD/CD Eject Key
1-3
Page 6 of 62

Getting Started
Before you begin to operate the navigation system, read
this manual thoroughly to become familiar with it and
to understand how the system works.
The navigation system allows you to do the following:
Plan a route with provided turn-by-turn route
and map guidance with voice prompts.
Select a destination using various methods
and choices.
The information in the system may not always be
complete. Road conditions such as prohibited turns,
detours, and construction zones, change frequently.
It is important to consider whether you can follow
the directions given by the system for the current
conditions.
When getting started, you may set the navigation system
to your preference using various options. You will also
need to know how to perform various functions to begin
route guidance. Reference the following topics for
further information:
Setting Radio Station Presets
To set preset radio stations, do the following:
1. Press the power/volume knob to turn the audio and
navigation system on.
2. Press the BAND hard key to access the band menu
and select the desired band. You may choose
between AM, FM1, FM2, and XM1, and XM2
(if equipped).
3. Use the tuning knob or the SEEK hard key arrows
to select a station.
4. Touch and hold one of the six screen buttons at the
bottom of the screen until you hear a beep or see
the station displayed on the selected preset button.
Setting the Time
To set the time, do the following:
1. Press the power/volume knob to turn the audio and
navigation system on.
2. Press the CONFIG hard key.
3. Touch the Clock screen button.
4. Touch the appropriate Time Zone screen button.
5. Touch the Daylight Savings screen button.
The time is now set. Touch the Manual Adjust screen
button if you need to further adjust the time. The radio will
use the GPS satellite to set the time. The vehicle needs
to be in an open area to receive the signal.
1-4
Page 14 of 62

Touch-Sensitive Screen Buttons
Touch-sensitive buttons are located on the navigation
screen. When you have successfully selected a
button on the screen, a beep will sound. This feature
can also be turned off. SeeConfigure Menu on
page 2-31for more information. Screen buttons will be
highlighted when available and dim when they are
unavailable. There are also some toggle touch-sensitive
screen buttons that will be light blue when active and
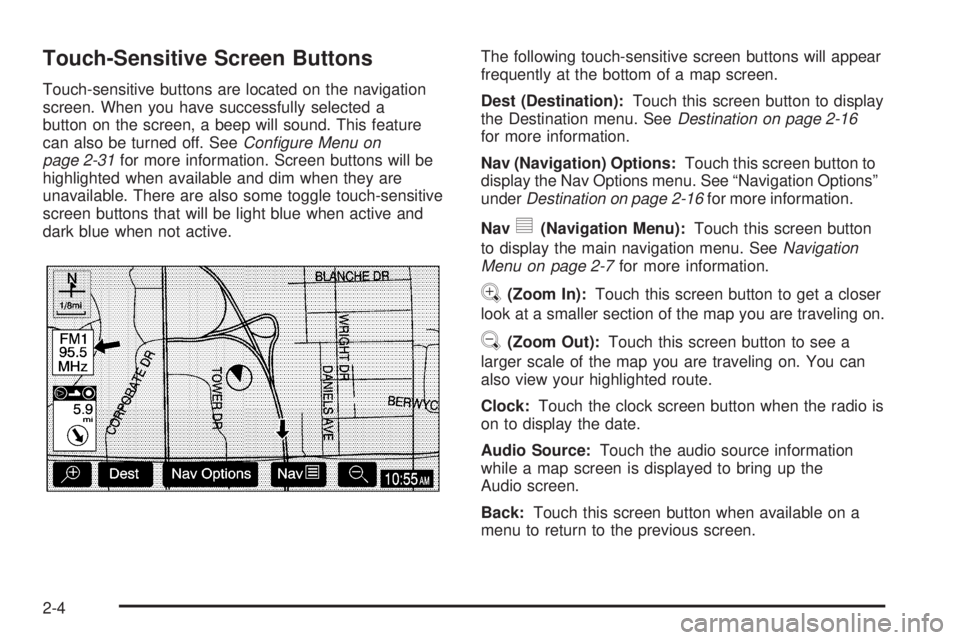
dark blue when not active.The following touch-sensitive screen buttons will appear
frequently at the bottom of a map screen.
Dest (Destination):Touch this screen button to display
the Destination menu. SeeDestination on page 2-16
for more information.
Nav (Navigation) Options:Touch this screen button to
display the Nav Options menu. See “Navigation Options”
underDestination on page 2-16for more information.
Nav
y(Navigation Menu):Touch this screen button
to display the main navigation menu. SeeNavigation
Menu on page 2-7for more information.
V(Zoom In):Touch this screen button to get a closer
look at a smaller section of the map you are traveling on.
U(Zoom Out):Touch this screen button to see a
larger scale of the map you are traveling on. You can
also view your highlighted route.
Clock:Touch the clock screen button when the radio is
on to display the date.
Audio Source:Touch the audio source information
while a map screen is displayed to bring up the
Audio screen.
Back:Touch this screen button when available on a
menu to return to the previous screen.
2-4
Page 42 of 62

Language
Your vehicle has been set for the English language,
but you may also select French for all instructional text
and voice prompts. However, names on the map
when using the navigation functions will not change.
If you wish to change the language, the map DVD must
be inserted. Then, do the following:
1. Touch the Language screen button. A caution
will display.
2. Touch the desired language to select it.
3. Touch the NEXT screen button to change the
display back to the map screen.
If the language is changed from English, the menu
screens will not match word-for-word as they appear in
this manual.
If you accidentally select a language you do not
understand, press the CONFIG hard key, then select
the desired language.
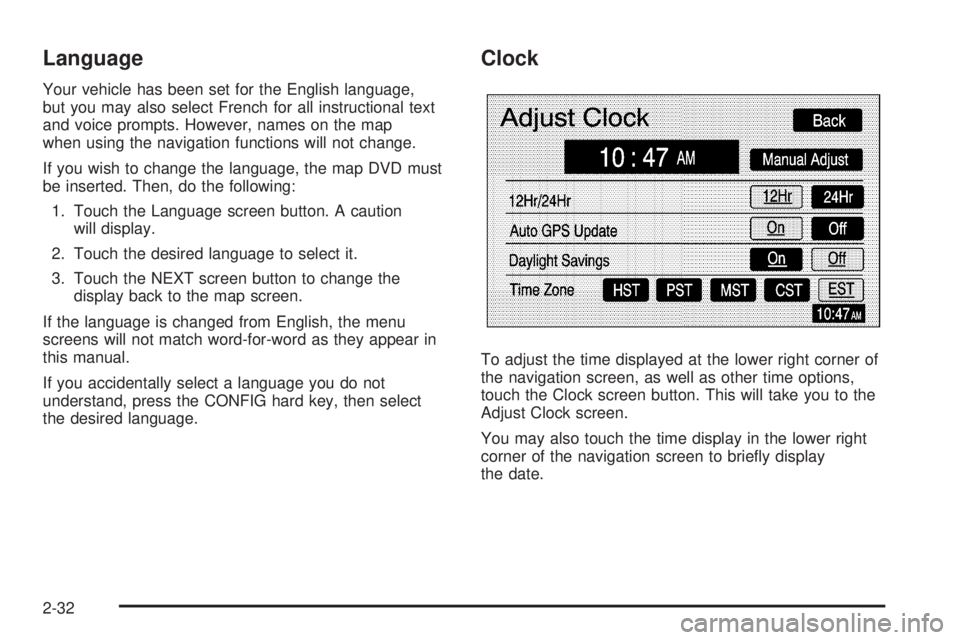
Clock
To adjust the time displayed at the lower right corner of
the navigation screen, as well as other time options,
touch the Clock screen button. This will take you to the
Adjust Clock screen.
You may also touch the time display in the lower right
corner of the navigation screen to brie�y display
the date.
2-32
Page 43 of 62

To change the hours and minutes on the clock,
do the following:
1. Touch the Manual Adjust screen button.
2. Touch the up or down arrow screen buttons to
increase or decrease the hours and minutes.
3. Touch the Back screen button to return to the
previous screen.
12Hr/24Hr:This feature allows you to choose whether
the time is displayed in standard or military time.
Touch the 12Hr screen button for standard time or the
24Hr screen button for military time.
Auto GPS Update:With this feature on, the navigation
system time will be set to match the current GPS
time. The time will be updated with the GPS time when
the ignition is turned on. You may also touch the Off
screen button to turn this feature off.Daylight Savings:With this feature on, the navigation
system will automatically adjust the time for Daylight
Savings. You may also touch the Off screen button to
turn this feature off.
Time Zone:This feature allows you to choose from
�ve different time zones: HST (Hawaii), PST (Paci�c),
MST (Mountain), CST (Central), and EST (Eastern).
Touch the desired time zone screen button to select it.
Display Off
To turn the navigation screen off, touch the Disp Off
screen button on the Con�gure menu. To turn the
screen back on, press any hard key to the left of the
navigation screen.
2-33