2005 GMC SIERRA DENALI ECU
[x] Cancel search: ECUPage 335 of 428
A Tire and Loading Information label is attached to the
vehicle’s center pillar (B-pillar), below the driver’s door
lock post (striker). This label lists your vehicle’s original
equipment tires and their recommended cold tire in�ation
pressures. The recommended cold tire in�ation pressure,
shown on the label, is the minimum amount of air
pressure needed to support your vehicle’s maximum load
carrying capacity.
For additional information regarding how much weight
your vehicle can carry, and an example of the tire
and loading information label, seeLoading Your Vehicle
on page 4-42.
When to Check
Check your tires once a month or more. Do not forget to
check the spare tire. For additional information
regarding the spare tire, seeSpare Tire on page 5-91.
How to Check
Use a good quality pocket-type gage to check tire
pressure. You cannot tell if your tires are properly in�ated
simply by looking at them. Radial tires may look properly
in�ated even when they’re underin�ated. Check the tire’s
in�ation pressure when the tires are cold. Cold means
your vehicle has been sitting for at least three hours or
driven no more than 1 mile (1.6 km).Remove the valve cap from the tire valve stem. Press
the tire gage �rmly onto the valve to get a pressure
measurement. If the cold tire in�ation pressure matches
the recommended pressure on the Tire and Loading
Information label, no further adjustment is necessary. If
the in�ation pressure is low, add air until you reach
the recommended amount.
If you over�ll the tire, release air by pushing on the
metal stem in the center of the tire valve. Recheck the
tire pressure with the tire gage.
Be sure to put the valve caps back on the valve stems.
They help prevent leaks by keeping out dirt and moisture.
Tire Inspection and Rotation
Tires should be rotated every 5,000 to 8,000 miles
(8 000 to 13 000 km).
Any time you notice unusual wear, rotate your tires as
soon as possible and check wheel alignment. Also
check for damaged tires or wheels. SeeWhen It Is Time
for New Tires on page 5-65andWheel Replacement
on page 5-69for more information.
Make sure the spare tire is stored securely. Push, pull,
and then try to rotate or turn the tire. If it moves,
use the ratchet/wheel wrench to tighten the cable. See
Changing a Flat Tire on page 5-72.
5-63
Page 357 of 428
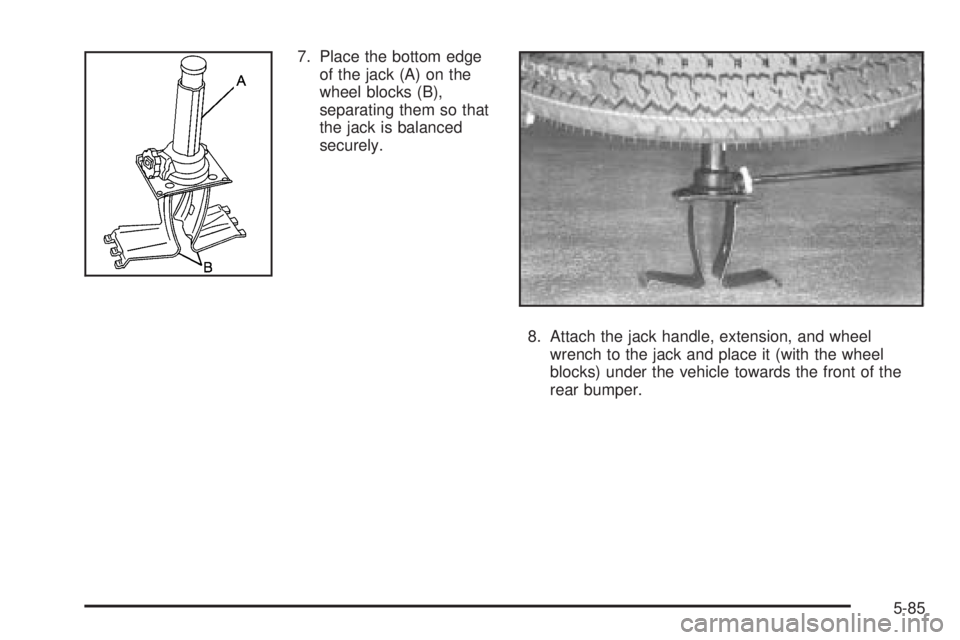
7. Place the bottom edge
of the jack (A) on the
wheel blocks (B),
separating them so that
the jack is balanced
securely.
8. Attach the jack handle, extension, and wheel
wrench to the jack and place it (with the wheel
blocks) under the vehicle towards the front of the
rear bumper.
5-85
Page 363 of 428
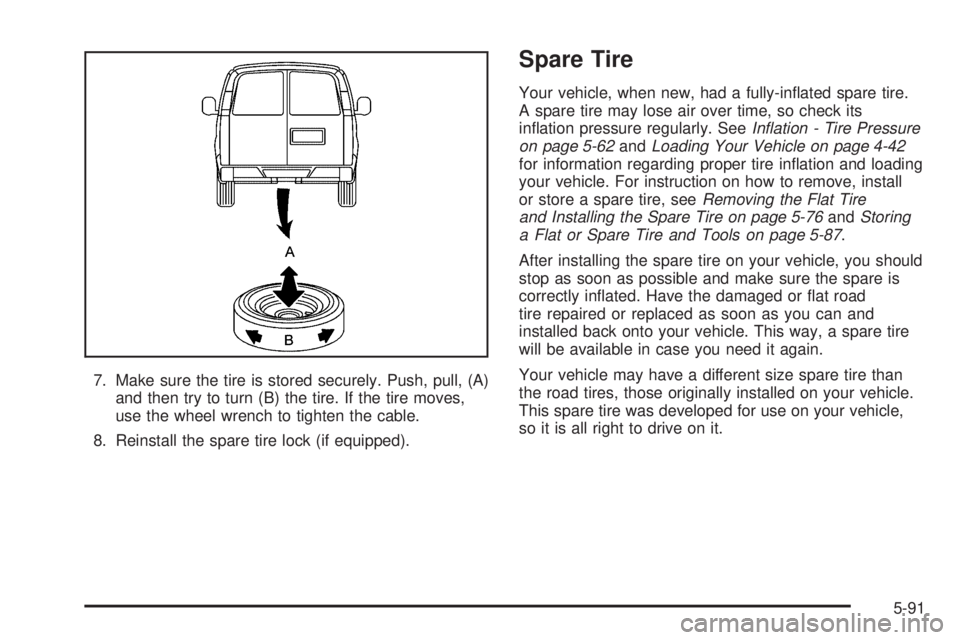
7. Make sure the tire is stored securely. Push, pull, (A)
and then try to turn (B) the tire. If the tire moves,
use the wheel wrench to tighten the cable.
8. Reinstall the spare tire lock (if equipped).
Spare Tire
Your vehicle, when new, had a fully-in�ated spare tire.
A spare tire may lose air over time, so check its
in�ation pressure regularly. SeeIn�ation - Tire Pressure
on page 5-62andLoading Your Vehicle on page 4-42
for information regarding proper tire in�ation and loading
your vehicle. For instruction on how to remove, install
or store a spare tire, seeRemoving the Flat Tire
and Installing the Spare Tire on page 5-76andStoring
a Flat or Spare Tire and Tools on page 5-87.
After installing the spare tire on your vehicle, you should
stop as soon as possible and make sure the spare is
correctly in�ated. Have the damaged or �at road
tire repaired or replaced as soon as you can and
installed back onto your vehicle. This way, a spare tire
will be available in case you need it again.
Your vehicle may have a different size spare tire than
the road tires, those originally installed on your vehicle.
This spare tire was developed for use on your vehicle,
so it is all right to drive on it.
5-91
Page 393 of 428
(i)Drain, �ush and re�ll cooling system. This service can
be complex; you should have your dealer perform this
service. See Engine Coolant on page 5-24 for what to
use. Inspect hoses. Clean radiator, condenser, pressure
cap and �ller neck. Pressure test the cooling system and
pressure cap.
(j)A �uid loss in any vehicle system could indicate a
problem. Have the system inspected and repaired and
the �uid level checked. Add �uid if needed.
(k)If you drive regularly under dusty conditions, inspect
the �lter at each engine oil change.
Owner Checks and Services
These owner checks and services should be performed
at the intervals speci�ed to help ensure the safety,
dependability and emission control performance of your
vehicle. Your GM Goodwrench
®dealer can assist
you with these checks and services.
Be sure any necessary repairs are completed at once.
Whenever any �uids or lubricants are added to your
vehicle, make sure they are the proper ones, as shown
inRecommended Fluids and Lubricants on page 6-12.
At Each Fuel Fill
It is important to perform these underhood checks at
each fuel �ll.
Engine Oil Level Check
Check the engine oil level and add the proper oil if
necessary. SeeEngine Oil on page 5-14for further
details.
Notice:It is important to check your oil regularly
and keep it at the proper level. Failure to keep your
engine oil at the proper level can cause damage
to your engine not covered by your warranty.
Engine Coolant Level Check
Check the engine coolant level and add
DEX-COOL®coolant mixture if necessary. SeeEngine
Coolant on page 5-24for further details.
Windshield Washer Fluid Level Check
Check the windshield washer �uid level in the windshield
washer tank and add the proper �uid if necessary.
At Least Once a Month
Tire In�ation Check
Visually inspect your tires and make sure tires are in�ated
to the correct pressures. Do not forget to check your
spare tire. SeeTires on page 5-56for further details.
Check to make sure the spare tire is stored securely.
Push, pull and then try to turn the spare tire. If it moves,
tighten it. SeeChanging a Flat Tire on page 5-72.
6-9
Page 408 of 428
Emergency Tow:Tow to the nearest dealership for
warranty service or in the event of a
vehicle-disabling accident. Assistance provided
when the vehicle is mired in sand, mud, or snow.
Flat Tire Change:Installation of a spare tire will be
covered at no charge. The customer is responsible
for the repair or replacement of the tire if not
covered by a warrantable failure.
Jump Start:No-start occurrences which require a
battery jump start will be covered at no charge.
Dealer Locator Service
Trip Routing:Your Roadside Assistance
Representative can provide you with speci�c
information regarding this feature.
Trip Interruption Expense Bene�ts:Your
Roadside Assistance Representative can provide
you with speci�c information regarding this feature.
In many instances, mechanical failures are covered
under GMC’s Bumper-to-Bumper warranty. However,
when other services are utilized, our Roadside
Assistance Representatives will explain any payment
obligations you might incur.For prompt and efficient assistance when calling, please
provide the following to the Roadside Assistance
Representative:
Your name, home address, and home telephone
number.
Telephone number of your location.
Location of the vehicle.
Model, year, color, and license plate number of the
vehicle.
Mileage, Vehicle Identi�cation Number (VIN) and
delivery date of the vehicle.
Description of the problem.
While we hope you never have the occasion to use our
service, it is added security while traveling for you
and your family. Remember, we are only a phone call
away. GMC Roadside Assistance: 1-800-462-8782, text
telephone (TTY) users, call 1-888-889-2438.
GMC reserves the right to limit services or reimbursement
to an owner or driver when, in GMC’s judgement, the
claims become excessive in frequency or type of
occurrence.
Roadside Assistance is not part of or included in the
coverage provided by the New Vehicle Limited Warranty.
GMC reserves the right to make any changes or
discontinue the Roadside Assistance program at any
time without noti�cation.
7-6
Page 417 of 428
Check
Engine Light...............................................3-36
Checking Things Under the Hood......................5-10
Chemical Paint Spotting...................................5-99
Child Restraints
Child Restraint Systems...............................1-33
Infants and Young Children...........................1-29
Lower Anchorages and Top Tethers for
Children (LATCH System)..........................1-40
Older Children.............................................1-27
Securing a Child Restraint Designed for
the LATCH System...................................1-42
Securing a Child Restraint in a
Rear Seat Position...................................1-43
Securing a Child Restraint in the
Right Front Seat Position..........................1-45
Top Strap...................................................1-37
Top Strap Anchor Location............................1-38
Where to Put the Restraint...........................1-36
Chime Level Adjustment..................................3-94
Cigarette Lighter.............................................3-19
Cleaning
Aluminum or Chrome-Plated Wheels..............5-98
Exterior Lamps/Lenses.................................5-96
Fabric/Carpet..............................................5-92
Finish Care.................................................5-96
Glass Surfaces............................................5-95
Instrument Panel.........................................5-94
Interior Plastic Components...........................5-95
Leather......................................................5-94Cleaning (cont.)
Tires..........................................................5-98
Underbody Maintenance...............................5-99
Vinyl..........................................................5-94
Washing Your Vehicle...................................5-96
Weatherstrips..............................................5-95
Windshield and Wiper Blades........................5-97
Wood Panels..............................................5-95
Climate Control System
Dual Automatic............................................3-20
Outlet Adjustment........................................3-25
Comfort Guides, Rear Safety Belt.....................1-24
Content Theft-Deterrent....................................2-14
Control of a Vehicle.......................................... 4-5
Coolant
Engine Temperature Gage............................3-34
Heater, Engine............................................2-19
Surge Tank Pressure Cap.............................5-26
Cooling System..............................................5-29
Cruise Control Lever.......................................3-10
Cruise Control Light........................................3-40
Cupholder(s)..................................................2-41
Customer Assistance Information
Courtesy Transportation.................................. 7-7
Customer Assistance for Text
Telephone (TTY) Users............................... 7-4
Customer Assistance Offices........................... 7-4
Customer Satisfaction Procedure..................... 7-2
GM Mobility Reimbursement Program............... 7-5
Reporting Safety Defects to General Motors....7-11
3
Page 421 of 428
J
Jump Starting.................................................5-41
K
Keyless Entry System....................................... 2-3
Keys............................................................... 2-2
L
Labelling, Tire Sidewall....................................5-57
Lamps
Battery Run-Down Protection.........................3-18
Cargo........................................................3-18
Dome........................................................3-17
Dome Lamp Override...................................3-17
Fog ...........................................................3-16
Front Reading.............................................3-18
Puddle.......................................................3-16
LATCH System
Child Restraints...........................................1-40
Securing a Child Restraint Designed for
the LATCH System...................................1-42
Light
Airbag Readiness........................................3-29
Anti-Lock Brake System Warning...................3-33
Battery Warning..........................................3-31
Brake System Warning.................................3-32Light (cont.)
Cruise Control.............................................3-40
Highbeam On.............................................3-40
Low Fuel Warning.......................................3-41
Malfunction Indicator....................................3-36
Passenger Airbag Status Indicator..................3-29
Safety Belt Reminder...................................3-28
Security.....................................................3-40
Tow/Haul Mode...........................................3-40
Lighting
Entry.........................................................3-17
Exit...........................................................3-17
Locks
Delayed Locking........................................... 2-8
Door........................................................... 2-7
Power Door.................................................. 2-8
Programmable Automatic Door Locks............... 2-9
Loss of Control...............................................4-12
Low Fuel Warning Light...................................3-41
Lumbar
Power Controls............................................. 1-3
M
Maintenance Schedule
Additional Required Services........................... 6-6
At Each Fuel Fill........................................... 6-9
At Least Once a Month.................................. 6-9
At Least Once a Year..................................6-10
7
Page 425 of 428
Seats (cont.)
Power Lumbar.............................................. 1-3
Power Seats................................................. 1-2
Rear Seat Operation...................................... 1-6
Reclining Seatbacks...................................... 1-4
Secondary Latch System.................................5-83
Securing a Child Restraint
Designed for the LATCH System...................1-42
Rear Seat Position......................................1-43
Right Front Seat Position..............................1-45
Security Light.................................................3-40
Service........................................................... 5-3
Adding Equipment to the Outside of Your
Vehicle..................................................... 5-5
Doing Your Own Work................................... 5-4
Engine Soon Light.......................................3-36
Publications Ordering Information...................7-11
Servicing Your Airbag-Equipped Vehicle..............1-59
Setting the Time.............................................3-61
Sheet Metal Damage.......................................5-99
Shifting Into Park (P).......................................2-25
Shifting Out of Park (P)...................................2-26
Signals, Turn and Lane-Change.......................... 3-7
Sliding Rear Windows.....................................2-14
Spare Tire.....................................................5-91
Installing....................................................5-76
Removing...................................................5-73
Storing.......................................................5-87
Speci�cations, Capacities...............................5-112
Speedometer..................................................3-28Starting Your Engine.......................................2-18
Steering.......................................................... 4-8
Steering Wheel Controls, Audio.........................3-91
Steering Wheel, Tilt Wheel................................. 3-6
Storage Areas
Center Console Storage Area........................2-41
Cupholder(s)...............................................2-41
Glove Box..................................................2-41
Stuck in Sand, Mud, Ice or Snow......................4-40
Sun Visors.....................................................2-14
Sunroof.........................................................2-43
T
Tachometer....................................................3-28
Tailgate.........................................................2-11
Taillamps.......................................................5-53
Theft-Deterrent, Radio.....................................3-90
Theft-Deterrent Systems...................................2-14
Content Theft-Deterrent................................2-14
Passlock
®...................................................2-16
Tilt Wheel........................................................ 3-6
Tires.............................................................5-56
Aluminum or Chrome-Plated Wheels,
Cleaning.................................................5-98
Buying New Tires........................................5-66
Chains.......................................................5-70
Changing a Flat Tire....................................5-72
Cleaning....................................................5-98
11