2005 GMC SIERRA DENALI buttons
[x] Cancel search: buttonsPage 166 of 428
SERVICE BRAKE SYSTEM
If there is a problem with the brake system, this
message will be displayed on the DIC. If this message
appears, stop as soon as possible and turn off the
vehicle. Restart the vehicle and check for the message
on the DIC display. If the message is still displayed
or appears again when you begin driving, the brake
system needs service. See your GM dealer.
SERVICE CHARGING SYSTEM
On some vehicles, if there is a problem with the battery
charging system, this message will appear on the
DIC. Under certain conditions, the battery warning light
may also turn on in the instrument panel cluster.
SeeBattery Warning Light on page 3-31. The battery
will not be charging at an optimal rate and the vehicle
will lose the ability to enter the fuel economy mode. The
vehicle is safe to drive, however you should have the
electrical system checked by your GM dealer. Pressing
any of the four DIC buttons, if equipped, will
acknowledge the message and clear it from the DIC
display. If your vehicle is not equipped with the four DIC
buttons, pressing the trip odometer reset stem will
acknowledge the message and clear it from the DIC
display.
SERVICE RIDE CONTROL
If a problem occurs with the suspension system, this
message will appear on the DIC. If this message
appears, stop and turn off the vehicle. Restart the
vehicle and check for the message on the DIC display.
If the message is still displayed or appears again
when you begin to drive, the air suspension system
needs service. See your GM dealer.
TIGHTEN FUEL CAP
If the vehicle’s fuel cap is not tightened properly, this
message may appear along with the check engine light
on the instrument panel. SeeMalfunction Indicator
Lamp on page 3-36. Reinstall the fuel cap fully. See
Filling Your Tank on page 5-7. The diagnostic system
can determine if the fuel cap has been left off or
improperly installed. A loose or missing fuel cap will
allow fuel to evaporate into the atmosphere. A few
driving trips with the cap properly installed should turn
the light and message off.
3-52
Page 168 of 428
TURN SIGNAL ON
If a turn signal is left on for 3/4 of a mile (1.2 km), this
message will appear on the display and you will hear a
chime. Move the turn signal/multifunction lever to the
off position. Pressing any of the four DIC buttons,
if equipped, will acknowledge the message and clear it
from the DIC display. If your vehicle is not equipped
with the four DIC buttons, pressing the trip odometer
reset stem will acknowledge the message and clear it
from the DIC display.
DIC Vehicle Customization
Your vehicle may have customization capabilities that
allow you to program some features to one setting
based on your preference. All of the customizable
options listed may not be available on your vehicle. Only
the options available will be displayed on your Driver
Information Center (DIC).
The default settings for the customization features were
set when your vehicle left the factory, but may have
been changed from their default state since then.
To change feature preferences, make sure the ignition
is on and the vehicle is in PARK (P). Press the
customization button to scroll through the available
customizable options.After pressing the customization button, VEHICLE
SETTINGS will momentarily display before going to a
customization option.
Lock Doors
Press the customization button until LOCK DOORS
appears in the display. To select your preference
for automatic locking, press the select button while
LOCK DOORS is displayed on the DIC. Pressing the
select button will scroll through the following choices:
LOCK DOORS: IN GEAR (default):The doors will lock
when the vehicle is shifted out of PARK (P).
LOCK DOORS: WITH SPEED:The doors will lock
when the vehicle speed is above 8 mph (13 km/h) for
three seconds.
Choose one of the available options and press the
customization button while it is displayed on the DIC to
select it and move on to the next feature. For more
information on automatic door locks, seeProgrammable
Automatic Door Locks on page 2-9.
3-54
Page 174 of 428
If you accidentally choose a language that you do not
want or understand, press and hold the customization
button and the trip information button at the same
time. The DIC will begin scrolling through the languages
in their particular language. English will be in English,
Francais will be in French and Espanol will be in
Spanish. When you see the language that you would
like, release both buttons. The DIC will then display the
information in the language you chose.
You can also scroll through the different languages by
pressing and holding the trip reset stem for four
seconds, as long as you are in the odometer mode.
Display Units
Press the customization button until DISPLAY UNITS
appears in the display. To select English or metric, press
the select button while DISPLAY UNITS is displayed
on the DIC. Pressing the select button will scroll through
the following choices:
DISPLAY UNITS: ENGLISH
DISPLAY UNITS: METRIC
If you choose English, all information will be displayed
in English units. For example, distance in miles and fuel
economy in miles per gallon.
Choose one of the available options and press the
customization button while it is displayed on the DIC to
select it and end out of the customizable options.
Audio System(s)
Notice:Before adding any sound equipment to
your vehicle, like a tape player, CB radio, mobile
telephone, or two-way radio, make sure that it can
be added by checking with your dealer. Also,
check federal rules covering mobile radio and
telephone units. If sound equipment can be added,
it is very important to do it properly. Added
sound equipment may interfere with the operation
of your vehicle’s engine, radio, or other systems,
and even damage them. Your vehicle’s systems may
interfere with the operation of sound equipment
that has been added improperly.
Figure out which audio system is in your vehicle, �nd
out what your audio system can do, and how to operate
all of its controls.
Your vehicle may have a feature called Retained
Accessory Power (RAP). With RAP, the audio system
can be played even after the ignition is turned off.
SeeRetained Accessory Power (RAP) on page 2-17for
more information.
3-60
Page 175 of 428
Setting the Time
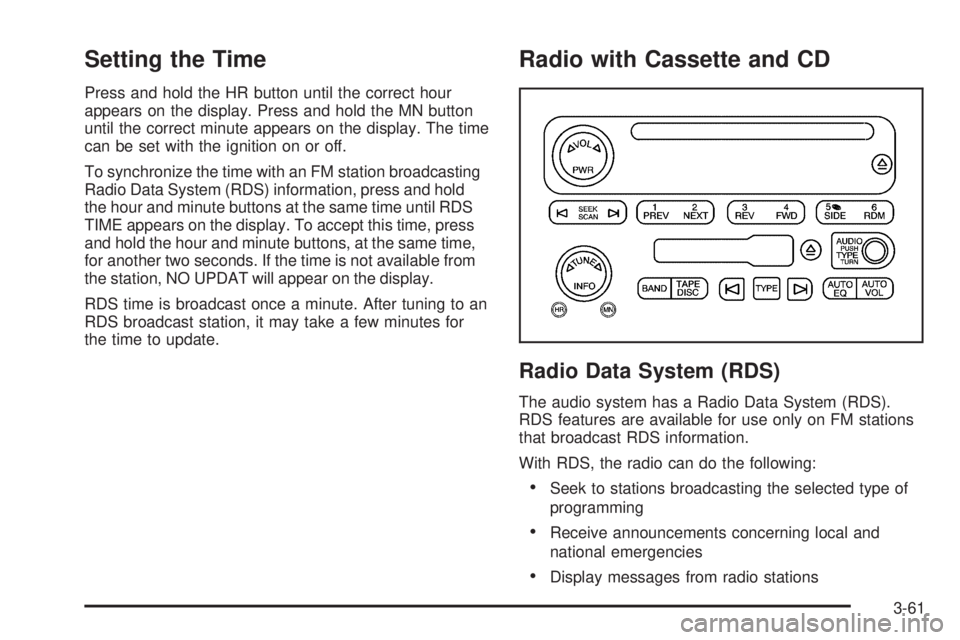
Press and hold the HR button until the correct hour
appears on the display. Press and hold the MN button
until the correct minute appears on the display. The time
can be set with the ignition on or off.
To synchronize the time with an FM station broadcasting
Radio Data System (RDS) information, press and hold
the hour and minute buttons at the same time until RDS
TIME appears on the display. To accept this time, press
and hold the hour and minute buttons, at the same time,
for another two seconds. If the time is not available from
the station, NO UPDAT will appear on the display.
RDS time is broadcast once a minute. After tuning to an
RDS broadcast station, it may take a few minutes for
the time to update.
Radio with Cassette and CD
Radio Data System (RDS)
The audio system has a Radio Data System (RDS).
RDS features are available for use only on FM stations
that broadcast RDS information.
With RDS, the radio can do the following:
Seek to stations broadcasting the selected type of
programming
Receive announcements concerning local and
national emergencies
Display messages from radio stations
3-61
Page 177 of 428
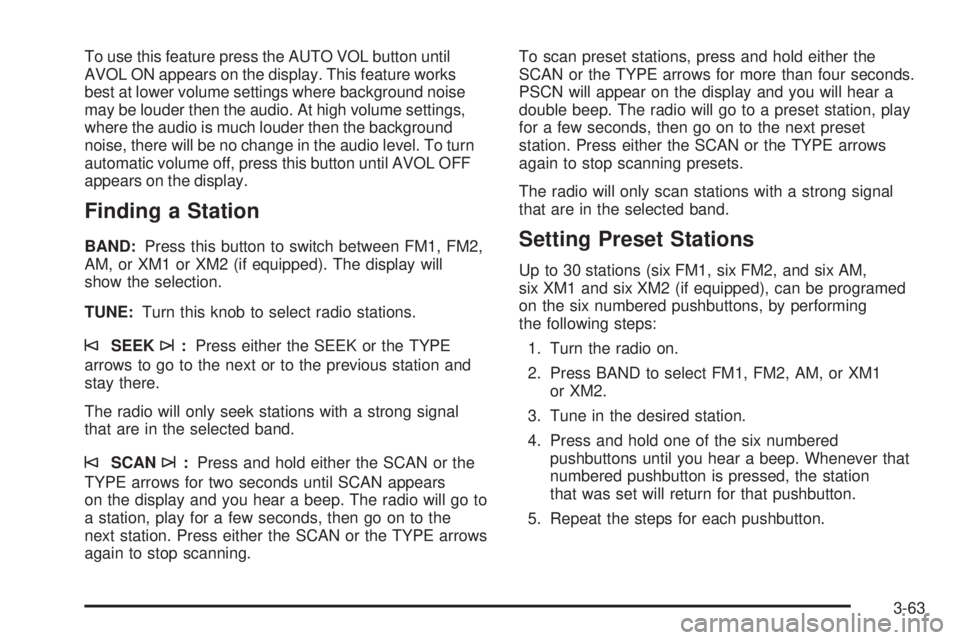
To use this feature press the AUTO VOL button until
AVOL ON appears on the display. This feature works
best at lower volume settings where background noise
may be louder then the audio. At high volume settings,
where the audio is much louder then the background
noise, there will be no change in the audio level. To turn
automatic volume off, press this button until AVOL OFF
appears on the display.
Finding a Station
BAND:Press this button to switch between FM1, FM2,
AM, or XM1 or XM2 (if equipped). The display will
show the selection.
TUNE:Turn this knob to select radio stations.
©SEEK¨:Press either the SEEK or the TYPE
arrows to go to the next or to the previous station and
stay there.
The radio will only seek stations with a strong signal
that are in the selected band.
©SCAN¨:Press and hold either the SCAN or the
TYPE arrows for two seconds until SCAN appears
on the display and you hear a beep. The radio will go to
a station, play for a few seconds, then go on to the
next station. Press either the SCAN or the TYPE arrows
again to stop scanning.To scan preset stations, press and hold either the
SCAN or the TYPE arrows for more than four seconds.
PSCN will appear on the display and you will hear a
double beep. The radio will go to a preset station, play
for a few seconds, then go on to the next preset
station. Press either the SCAN or the TYPE arrows
again to stop scanning presets.
The radio will only scan stations with a strong signal
that are in the selected band.
Setting Preset Stations
Up to 30 stations (six FM1, six FM2, and six AM,
six XM1 and six XM2 (if equipped), can be programed
on the six numbered pushbuttons, by performing
the following steps:
1. Turn the radio on.
2. Press BAND to select FM1, FM2, AM, or XM1
or XM2.
3. Tune in the desired station.
4. Press and hold one of the six numbered
pushbuttons until you hear a beep. Whenever that
numbered pushbutton is pressed, the station
that was set will return for that pushbutton.
5. Repeat the steps for each pushbutton.
3-63
Page 180 of 428

SCAN:Scan the stations within a PTY by performing
the following:
1. Press the TYPE button to activate program type
select mode. TYPE and the last selected PTY will
appear on the display.
2. Turn the TYPE knob or press and release the
TYPE button to select a PTY.
3. Once the desired PTY is displayed, press and hold
either the TYPE or the SCAN arrows for two
seconds, and the radio will begin scanning the
stations in the PTY.
4. Press either the TYPE or the SCAN arrows to stop
at a station.
BAND (Alternate Frequency):Alternate frequency
allows the radio to switch to a stronger station with the
same program type. To turn alternate frequency on,
press and hold BAND for two seconds. AF ON will
appear on the display. The radio may switch to stations
with a stronger frequency.
To turn alternate frequency off, press and hold BAND
again for two seconds. AF OFF will appear on the
display. The radio will not switch to other stations.
This function does not apply for XM™ Satellite Radio
Service.Setting Preset PTYs (RDS Only)
These buttons have factory PTY presets. Up to 12 PTYs
(six FM1 and six FM2), can be programmed on the
six numbered pushbuttons, by performing the following
steps:
1. Press BAND to select FM1 or FM2.
2. Press the TYPE button to activate program type
select mode. TYPE and the last selected PTY will
appear on the display.
3. Turn the TYPE knob or press and release the
TYPE button to select a PTY.
4. Press and hold one of the six numbered
pushbuttons until you hear a beep. Whenever that
numbered pushbutton is pressed, the PTY that
was set will return.
5. Repeat the steps for each pushbutton.
3-66
Page 192 of 428
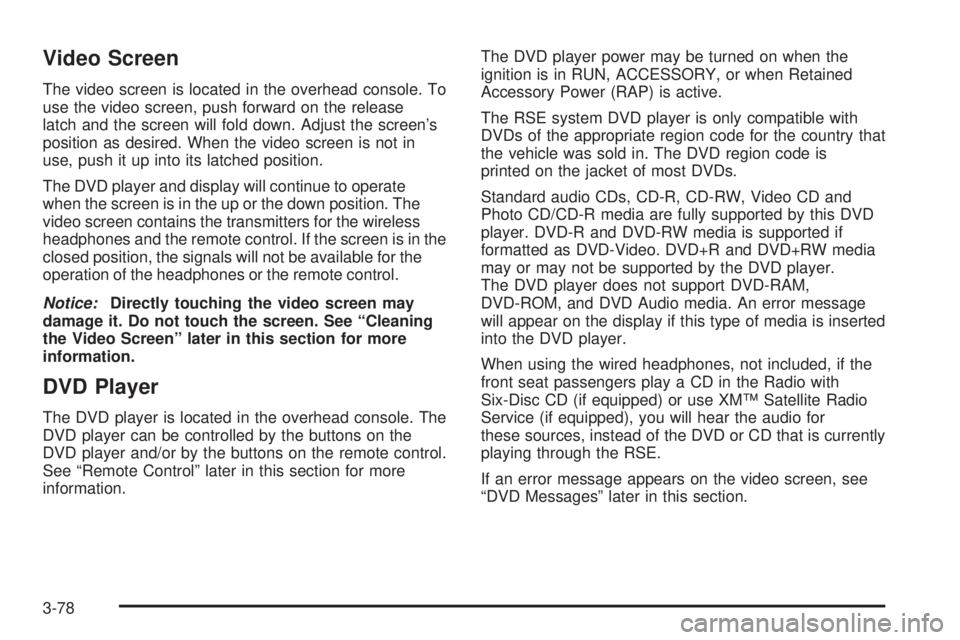
Video Screen
The video screen is located in the overhead console. To
use the video screen, push forward on the release
latch and the screen will fold down. Adjust the screen’s
position as desired. When the video screen is not in
use, push it up into its latched position.
The DVD player and display will continue to operate
when the screen is in the up or the down position. The
video screen contains the transmitters for the wireless
headphones and the remote control. If the screen is in the
closed position, the signals will not be available for the
operation of the headphones or the remote control.
Notice:Directly touching the video screen may
damage it. Do not touch the screen. See “Cleaning
the Video Screen” later in this section for more
information.
DVD Player
The DVD player is located in the overhead console. The
DVD player can be controlled by the buttons on the
DVD player and/or by the buttons on the remote control.
See “Remote Control” later in this section for more
information.The DVD player power may be turned on when the
ignition is in RUN, ACCESSORY, or when Retained
Accessory Power (RAP) is active.
The RSE system DVD player is only compatible with
DVDs of the appropriate region code for the country that
the vehicle was sold in. The DVD region code is
printed on the jacket of most DVDs.
Standard audio CDs, CD-R, CD-RW, Video CD and
Photo CD/CD-R media are fully supported by this DVD
player. DVD-R and DVD-RW media is supported if
formatted as DVD-Video. DVD+R and DVD+RW media
may or may not be supported by the DVD player.
The DVD player does not support DVD-RAM,
DVD-ROM, and DVD Audio media. An error message
will appear on the display if this type of media is inserted
into the DVD player.
When using the wired headphones, not included, if the
front seat passengers play a CD in the Radio with
Six-Disc CD (if equipped) or use XM™ Satellite Radio
Service (if equipped), you will hear the audio for
these sources, instead of the DVD or CD that is currently
playing through the RSE.
If an error message appears on the video screen, see
“DVD Messages” later in this section.
3-78
Page 193 of 428
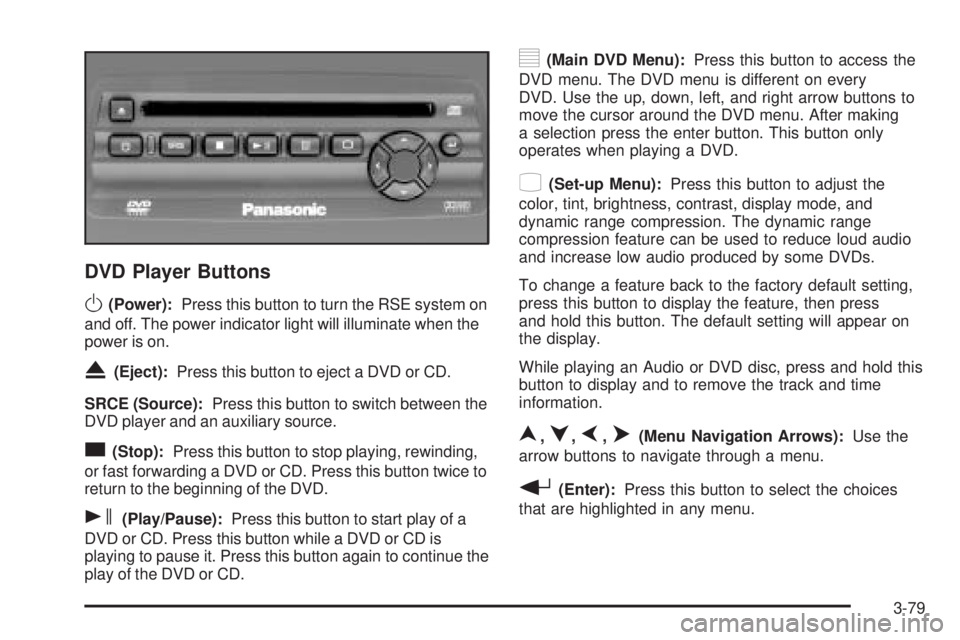
DVD Player Buttons
O(Power):Press this button to turn the RSE system on
and off. The power indicator light will illuminate when the
power is on.
X(Eject):Press this button to eject a DVD or CD.
SRCE (Source):Press this button to switch between the
DVD player and an auxiliary source.
c(Stop):Press this button to stop playing, rewinding,
or fast forwarding a DVD or CD. Press this button twice to
return to the beginning of the DVD.
s(Play/Pause):Press this button to start play of a
DVD or CD. Press this button while a DVD or CD is
playing to pause it. Press this button again to continue the
play of the DVD or CD.
y(Main DVD Menu):Press this button to access the
DVD menu. The DVD menu is different on every
DVD. Use the up, down, left, and right arrow buttons to
move the cursor around the DVD menu. After making
a selection press the enter button. This button only
operates when playing a DVD.
z(Set-up Menu):Press this button to adjust the
color, tint, brightness, contrast, display mode, and
dynamic range compression. The dynamic range
compression feature can be used to reduce loud audio
and increase low audio produced by some DVDs.
To change a feature back to the factory default setting,
press this button to display the feature, then press
and hold this button. The default setting will appear on
the display.
While playing an Audio or DVD disc, press and hold this
button to display and to remove the track and time
information.
n,q,p,o(Menu Navigation Arrows):Use the
arrow buttons to navigate through a menu.
r(Enter):Press this button to select the choices
that are highlighted in any menu.
3-79