2005 GMC SIERRA DENALI CD player
[x] Cancel search: CD playerPage 189 of 428
If any error occurs repeatedly or if an error cannot be
corrected, contact your GM dealer. If the radio displays
an error message, write it down and provide it to
your GM dealer when reporting the problem.
Rear Seat Entertainment System
Your vehicle may have a DVD Rear Seat
Entertainment (RSE) system. The RSE system includes
a DVD player, a video display screen, two sets of
wireless headphones, and a remote control.
Parental Control
This button is located behind the video screen. Press
this button while a DVD or CD is playing to freeze
the video and mute the audio. The video screen will
display Parental Control ON and the power indicator
light on the DVD player will �ash. It will also disable all
other button operations from the remote control and
the DVD player, with the exception of the eject button.
Press this button again to restore operation of the
DVD player.
This button may also be used to turn the DVD player
power on and automatically resume play if the ignition is
in RUN, ACCESSORY, or if RAP is active.
Before You Drive
The RSE system is for rear seat passengers only. The
driver cannot safely view the video screen while
driving and should not try to do so.
Headphones
The RSE system includes two sets of wireless
headphones.
Each set of headphones has an ON/OFF control. An
indicator light will illuminate on the headphones
when they are on. If the light does not illuminate, the
batteries may need to be replaced. See “Battery
Replacement” following for more information.
Each set of headphones has a volume knob. To adjust
the volume, adjust this knob.
The transmitters are located below the video display
screen. The headphones will shut off automatically
if they lose the signal from the system after about
four minutes to save battery power. The signal may be
lost if the system is turned off or if the headphones
are out of range of the transmitters.
3-75
Page 190 of 428
When using the wired headphones, if the front seat
passengers play a CD in the Radio with Six-Disc CD
(if equipped) or use XM™ Satellite Radio Service
(if equipped), you will hear the audio for these sources,
instead of the DVD or CD that is currently playing
through the RSE.
Notice:Do not store the headphones in heat or
direct sunlight. This could damage the headphones
and repairs would not be covered by your warranty.
Keep the headphones stored in a cool, dry place.
Battery Replacement
To change the batteries, do the following:
1. Loosen the screw on the battery compartment door
located on the left side of the headphone earpiece.
2. Replace the two AAA batteries in the compartment.
Make sure that they are installed correctly, using
the diagram on the inside of the battery
compartment.
3. Tighten the screw to close the compartment door.
If the headphones are to be stored for a long period
of time, remove the batteries and keep them in a cool,
dry place.
Stereo RCA Jacks
The RCA jacks are located behind the video screen.
The RCA jacks allow audio and video signals to
be connected from an auxiliary device such as a
camcorder or a video game unit to the RSE system.
Standard RCA cables, not included, are needed
to connect the auxiliary device to the RCA jacks. The
yellow connector inputs video and the red and white
connectors input right and left audio. Refer to the
manufacturer’s instructions for proper connection of the
auxiliary device.
To use the auxiliary inputs on the RSE system, connect
an external auxiliary device to the color-coded RCA
jacks and turn both the auxiliary device and the
RSE system power on. If the RSE system had been
previously in the DVD player mode, pressing the SRCE
button on the faceplate or the remote control will
switch the RSE system between the auxiliary device
and the DVD player.
3-76
Page 191 of 428
How to Change the Video Format when in
the Auxiliary Mode
The auxiliary input video format is preset to NTSC. In
some countries, the video format may be in the
PAL system. To change the video format, perform the
following:
1. Press the display menu button.
2. Press the down arrow button to highlight the Video
Format option.
3. Press the enter button to select Video Format.
4. Press the right or left arrow button to select
the desired video format.
5. Press the enter button to accept the change.
Audio Output
Audio from the DVD player or auxiliary inputs may be
heard through the following possible sources:
Wireless Headphones
Vehicle Speakers
Vehicle wired headphone jacks on the Rear Seat
Audio system (if equipped)The RSE system will always transmit the audio signal
by infrared to the wireless headphones, if there is audio
available. See “Headphones” previously for more
information.
The RSE system is capable of outputting audio to the
vehicle speakers by using the radio. The RSE
system may be selected as an audio source on the
radio if the RSE system power is on. Once the
RSE system is selected as an audio source on the
radio, adjust the speaker volume on the radio, if
necessary. If the RSE system power is not on, the RSE
system will not be an available source on the radio.
Refer to the radio information for the radio that
your vehicle has for more information.
The RSE system is capable of outputting audio to the
wired headphone jacks on the rear seat audio system
(if equipped). The RSE system may be selected as
an audio source on the rear seat audio system if
the RSE system power is on. Refer toRear Seat
Audio (RSA) on page 3-86for more information.
3-77
Page 192 of 428
Video Screen
The video screen is located in the overhead console. To
use the video screen, push forward on the release
latch and the screen will fold down. Adjust the screen’s
position as desired. When the video screen is not in
use, push it up into its latched position.
The DVD player and display will continue to operate
when the screen is in the up or the down position. The
video screen contains the transmitters for the wireless
headphones and the remote control. If the screen is in the
closed position, the signals will not be available for the
operation of the headphones or the remote control.
Notice:Directly touching the video screen may
damage it. Do not touch the screen. See “Cleaning
the Video Screen” later in this section for more
information.
DVD Player
The DVD player is located in the overhead console. The
DVD player can be controlled by the buttons on the
DVD player and/or by the buttons on the remote control.
See “Remote Control” later in this section for more
information.The DVD player power may be turned on when the
ignition is in RUN, ACCESSORY, or when Retained
Accessory Power (RAP) is active.
The RSE system DVD player is only compatible with
DVDs of the appropriate region code for the country that
the vehicle was sold in. The DVD region code is
printed on the jacket of most DVDs.
Standard audio CDs, CD-R, CD-RW, Video CD and
Photo CD/CD-R media are fully supported by this DVD
player. DVD-R and DVD-RW media is supported if
formatted as DVD-Video. DVD+R and DVD+RW media
may or may not be supported by the DVD player.
The DVD player does not support DVD-RAM,
DVD-ROM, and DVD Audio media. An error message
will appear on the display if this type of media is inserted
into the DVD player.
When using the wired headphones, not included, if the
front seat passengers play a CD in the Radio with
Six-Disc CD (if equipped) or use XM™ Satellite Radio
Service (if equipped), you will hear the audio for
these sources, instead of the DVD or CD that is currently
playing through the RSE.
If an error message appears on the video screen, see
“DVD Messages” later in this section.
3-78
Page 193 of 428
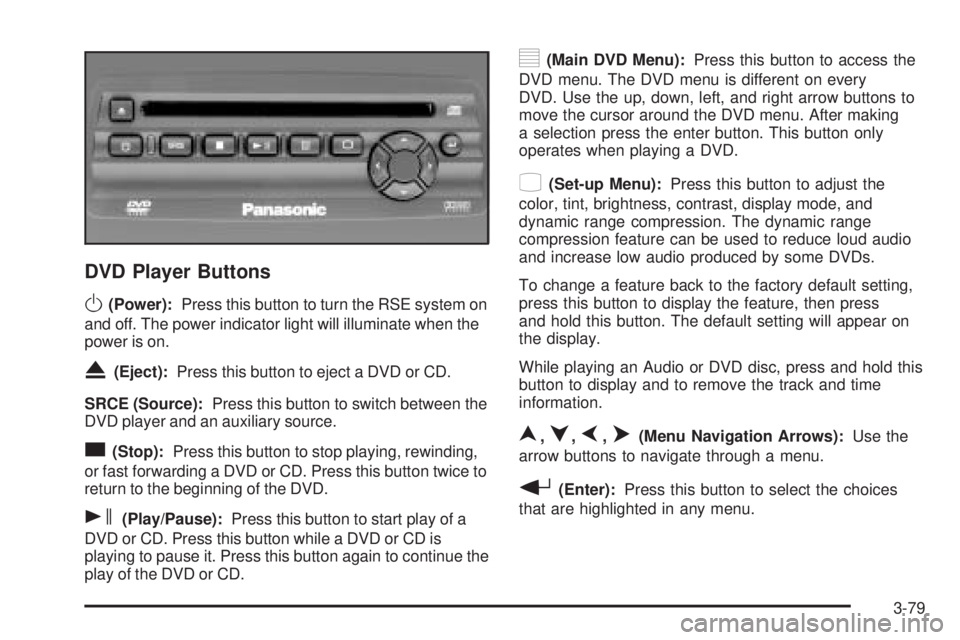
DVD Player Buttons
O(Power):Press this button to turn the RSE system on
and off. The power indicator light will illuminate when the
power is on.
X(Eject):Press this button to eject a DVD or CD.
SRCE (Source):Press this button to switch between the
DVD player and an auxiliary source.
c(Stop):Press this button to stop playing, rewinding,
or fast forwarding a DVD or CD. Press this button twice to
return to the beginning of the DVD.
s(Play/Pause):Press this button to start play of a
DVD or CD. Press this button while a DVD or CD is
playing to pause it. Press this button again to continue the
play of the DVD or CD.
y(Main DVD Menu):Press this button to access the
DVD menu. The DVD menu is different on every
DVD. Use the up, down, left, and right arrow buttons to
move the cursor around the DVD menu. After making
a selection press the enter button. This button only
operates when playing a DVD.
z(Set-up Menu):Press this button to adjust the
color, tint, brightness, contrast, display mode, and
dynamic range compression. The dynamic range
compression feature can be used to reduce loud audio
and increase low audio produced by some DVDs.
To change a feature back to the factory default setting,
press this button to display the feature, then press
and hold this button. The default setting will appear on
the display.
While playing an Audio or DVD disc, press and hold this
button to display and to remove the track and time
information.
n,q,p,o(Menu Navigation Arrows):Use the
arrow buttons to navigate through a menu.
r(Enter):Press this button to select the choices
that are highlighted in any menu.
3-79
Page 194 of 428
Playing a Disc
To play a disc, gently insert the disc with the label side up
into the loading slot. The DVD player will continue loading
the disc and the player will automatically start, if the
vehicle is in RUN, ACCESSORY, or when RAP is active.
If a disc is already in the player, press the play/pause
button on the DVD player faceplate or on the remote
control.
Some DVDs will not allow fast forwarding or skipping of
the copyright information or the previews. Some
DVDs will begin playing after the previews have �nished.
If the DVD does not begin to play the main title, refer
to the on-screen instructions.
Stopping and Resuming Playback
To stop playing a disc, press and release the stop
button on the DVD player faceplate or the remote
control.
To resume playback, press the play/pause button on
the DVD player faceplate or the remote control.
The movie should resume play from where it was last
stopped, if the disc has not been ejected and the
stop button has not been pressed twice. If the disc has
been ejected or if the stop button has been pressed
twice, the disc will resume play at the beginning.
Ejecting a Disc
Press the eject button on the DVD player faceplate to
eject the disc. There is not an eject button on the remote
control.
If a disc is ejected from the player, but is not removed,
the DVD player will reload the disc after a short
period of time. The disc will be stored in the DVD player.
The DVD player will not resume play of the disc
automatically.
Remote Control
To use the remote control, aim it at the transmitter
window below the video screen and press the desired
button. Direct sunlight or very bright light may affect the
ability of the RSE system to receive signals from the
remote control. If the remote control does not seem to
be working, the batteries may need to be replaced.
See “Battery Replacement” later in this section.
Objects blocking the line of sight may also affect the
function of the remote control.
Notice:Storing the remote control in a hot area or
in direct sunlight may damage it, and the repairs
would not be covered by your warranty. Keep
the remote control stored in a cool, dry place.
To extend the life of the batteries, the remote control
does not have a press and hold feature.
3-80
Page 195 of 428
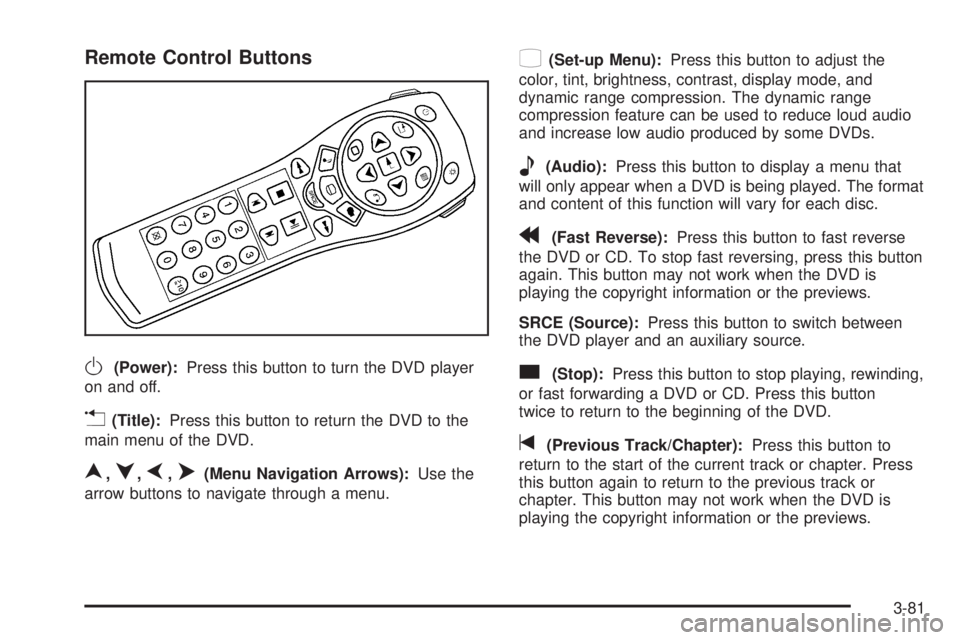
Remote Control Buttons
O(Power):Press this button to turn the DVD player
on and off.
v(Title):Press this button to return the DVD to the
main menu of the DVD.
n,q,p,o(Menu Navigation Arrows):Use the
arrow buttons to navigate through a menu.
z(Set-up Menu):Press this button to adjust the
color, tint, brightness, contrast, display mode, and
dynamic range compression. The dynamic range
compression feature can be used to reduce loud audio
and increase low audio produced by some DVDs.
e(Audio):Press this button to display a menu that
will only appear when a DVD is being played. The format
and content of this function will vary for each disc.
r(Fast Reverse):Press this button to fast reverse
the DVD or CD. To stop fast reversing, press this button
again. This button may not work when the DVD is
playing the copyright information or the previews.
SRCE (Source):Press this button to switch between
the DVD player and an auxiliary source.
c(Stop):Press this button to stop playing, rewinding,
or fast forwarding a DVD or CD. Press this button
twice to return to the beginning of the DVD.
t(Previous Track/Chapter):Press this button to
return to the start of the current track or chapter. Press
this button again to return to the previous track or
chapter. This button may not work when the DVD is
playing the copyright information or the previews.
3-81
Page 197 of 428
Battery Replacement
To change the batteries, do the following:
1. Remove the battery compartment door located on
the bottom of the remote control.
2. Replace the two AA batteries in the compartment.
Make sure that they are installed correctly, using
the diagram on the inside of the battery
compartment.
3. Close the battery door securely.
If the remote control is to be stored for a long period of
time, remove the batteries and keep them in a cool,
dry place.
Problem Recommended Action
No power. The ignition might not be
in on or accessory.
The parental control
button might have been
turned on. The power
indicator light will �ash.
Disc will not play. The system might be off.
The parental control
button might have been
turned on. The power
indicator light will �ash.
The system might be in
auxiliary mode.
The disc is upside down
or is not compatible.
Problem Recommended Action
The picture does not �ll
the screen. There are
black borders on the top
and bottom or on both
sides or it looks
stretched out.Check the display mode
settings in the
display menu.
The disc was ejected, but
it was pulled back into the
DVD player.The disc is being stored in
the DVD player. Press the
eject button again to eject
the disc.
In auxiliary mode, the
picture moves or scrolls.Check the auxiliary input
connections at both
devices.
Change the Video Format
to PAL or NTSC. See
“Stereo RCA Jacks”
previously for how to
change the video format.
The language in the audio
or on the screen is wrong.Check the audio or
language selection in the
main DVD menu.
3-83