Page 24 of 248

MANUAL HEATING AND AIR CONDITIONING SYSTEM
(IF EQUIPPED)
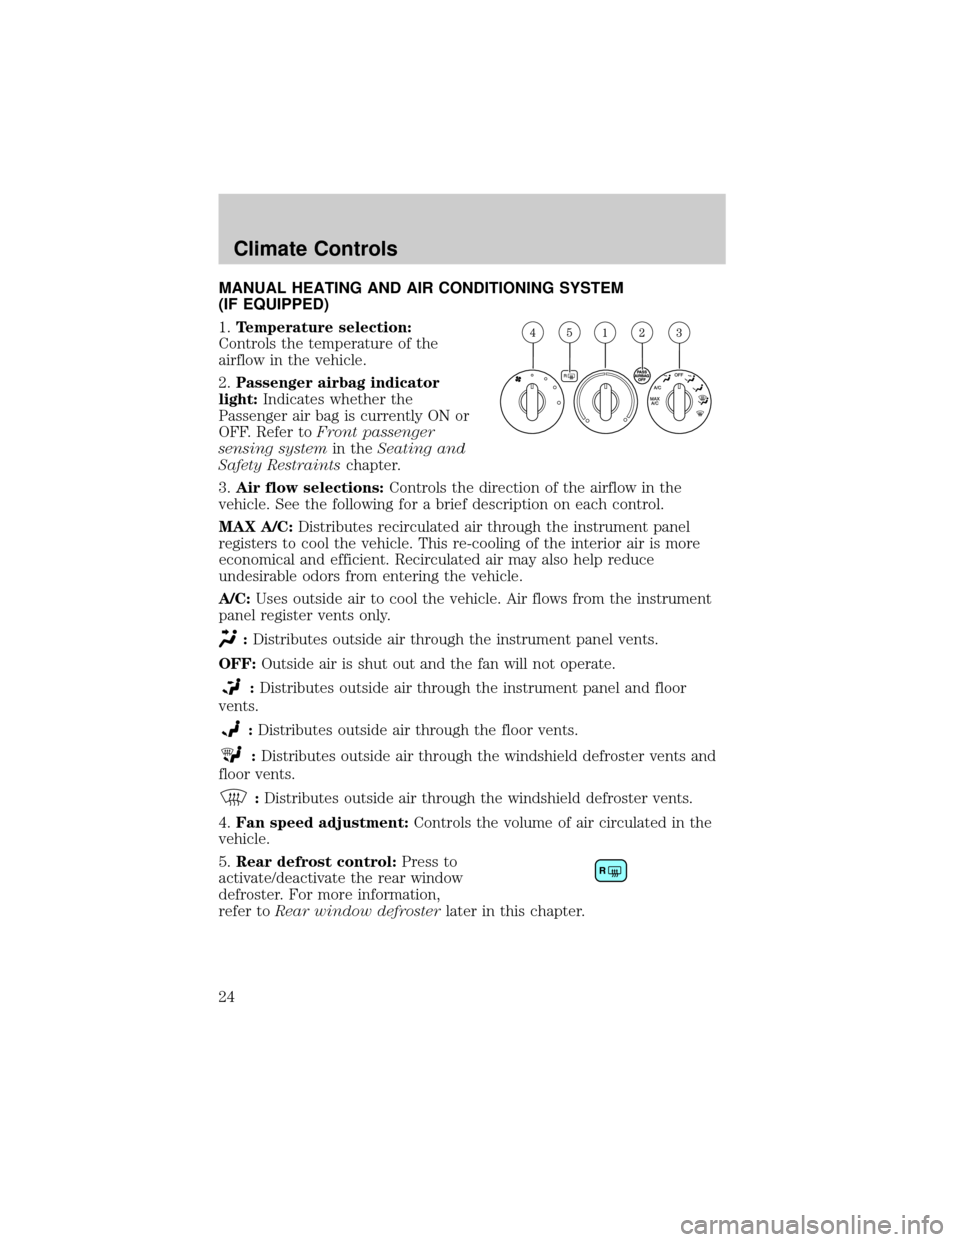
1.Temperature selection:
Controls the temperature of the
airflow in the vehicle.
2.Passenger airbag indicator
light:Indicates whether the
Passenger air bag is currently ON or
OFF. Refer toFront passenger
sensing systemin theSeating and
Safety Restraintschapter.
3.Air flow selections:Controls the direction of the airflow in the
vehicle. See the following for a brief description on each control.
MAX A/C:Distributes recirculated air through the instrument panel
registers to cool the vehicle. This re-cooling of the interior air is more
economical and efficient. Recirculated air may also help reduce
undesirable odors from entering the vehicle.
A/C:Uses outside air to cool the vehicle. Air flows from the instrument
panel register vents only.
:Distributes outside air through the instrument panel vents.
OFF:Outside air is shut out and the fan will not operate.
:Distributes outside air through the instrument panel and floor
vents.
:Distributes outside air through the floor vents.
:Distributes outside air through the windshield defroster vents and
floor vents.
:Distributes outside air through the windshield defroster vents.
4.Fan speed adjustment:Controls the volume of air circulated in the
vehicle.
5.Rear defrost control:Press to
activate/deactivate the rear window
defroster. For more information,
refer toRear window defrosterlater in this chapter.
Climate Controls
Climate Controls
24
Page 25 of 248

OPERATING TIPS
²To reduce fog build up on the windshield during humid weather, place
the air flow selector in the
position.
²To reduce humidity buildup within the cabin, do not drive with the
selector in the OFF or MAX A/C position.
²To improve A/C cool down, drive with the windows slightly open for
the first 2±3 minutes after starting the vehicle or until the vehicle has
ªaired out.º
²Do not put objects under the front seats that will interfere with the
airflow to the back seats.
²Remove any snow, ice or leaves from the air intake area at the base of
the windshield.
²For best cooling results when using the MAX A/C mode, move the
temperature control to full cold and initially set the fan to highest
speed, then adjust the temperature and fan to maintain comfort.
To aid in side window defogging/demisting in cold weather:
1. Select
.
2. Adjust the temperature control to maintain comfort.
3. Set the fan speed to the highest setting.
4. Direct the outer instrument panel vents towards the side windows.
To increase airflow to the outer instrument panel vents, close the vents
located in the middle of the instrument panel.
Do not place objects on top of the instrument panel as these
objects may become projectiles in a collision or sudden stop.
Climate Controls
25
Page 27 of 248

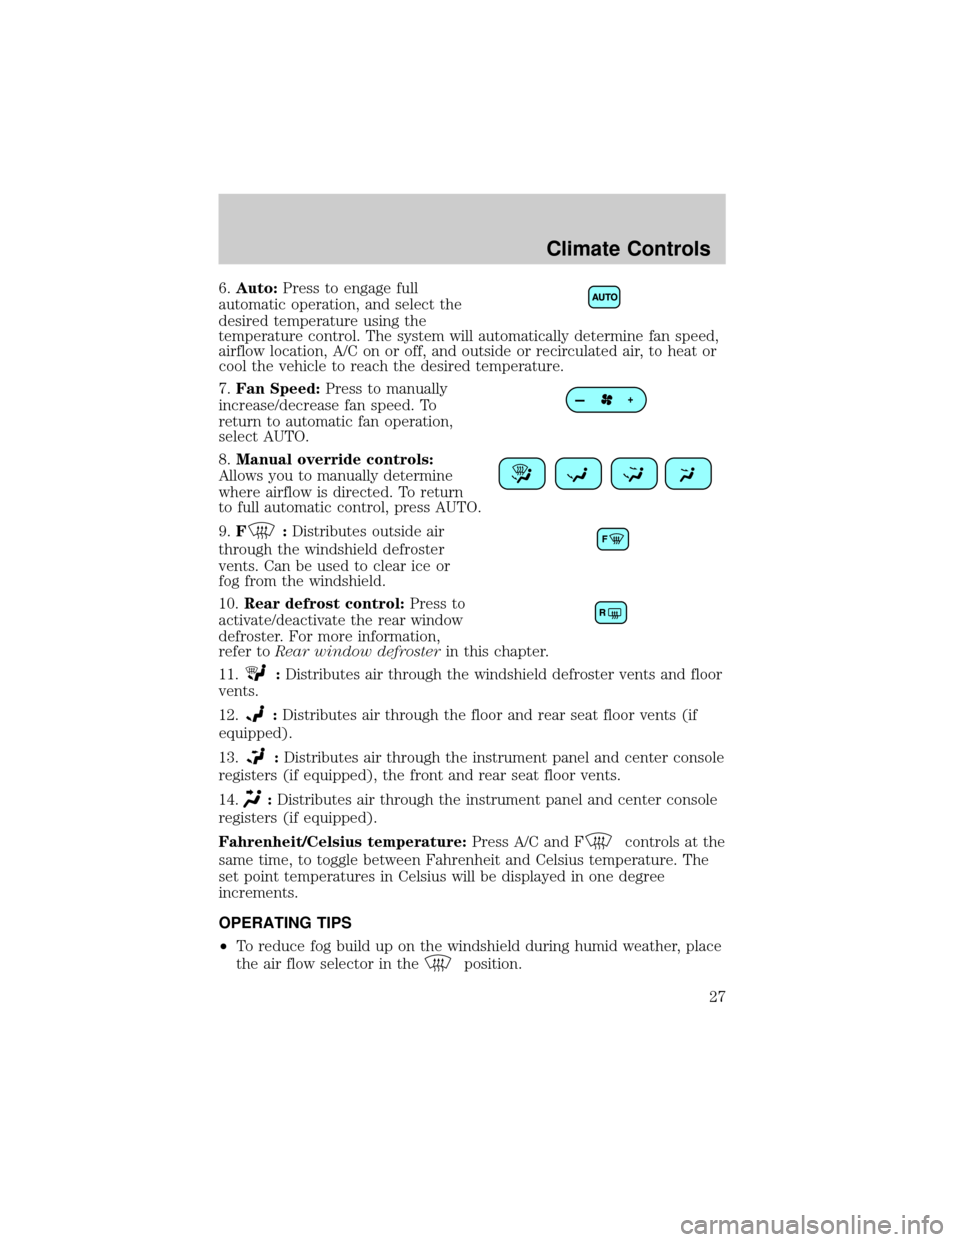
6.Auto:Press to engage full
automatic operation, and select the
desired temperature using the
temperature control. The system will automatically determine fan speed,
airflow location, A/C on or off, and outside or recirculated air, to heat or
cool the vehicle to reach the desired temperature.
7.Fan Speed:Press to manually
increase/decrease fan speed. To
return to automatic fan operation,
select AUTO.
8.Manual override controls:
Allows you to manually determine
where airflow is directed. To return
to full automatic control, press AUTO.
9.F
:Distributes outside air
through the windshield defroster
vents. Can be used to clear ice or
fog from the windshield.
10.Rear defrost control:Press to
activate/deactivate the rear window
defroster. For more information,
refer toRear window defrosterin this chapter.
11.
:Distributes air through the windshield defroster vents and floor
vents.
12.
:Distributes air through the floor and rear seat floor vents (if
equipped).
13.
:Distributes air through the instrument panel and center console
registers (if equipped), the front and rear seat floor vents.
14.
:Distributes air through the instrument panel and center console
registers (if equipped).
Fahrenheit/Celsius temperature:Press A/C and F
controls at the
same time, to toggle between Fahrenheit and Celsius temperature. The
set point temperatures in Celsius will be displayed in one degree
increments.
OPERATING TIPS
²To reduce fog build up on the windshield during humid weather, place
the air flow selector in the
position.
Climate Controls
27
Page 28 of 248

²Do not put objects under the front seats that will interfere with the
airflow to the back seats.
²Remove any snow, ice or leaves from the air intake area at the base of
the windshield.
²For maximum cooling performance (MAX A/C), select AUTO and set
to desired temperature. In the manual override mode, press
, A/C
and
, then set the temperature to 60ÉF (16ÉC) and the fan to
the highest setting. To improve the A/C cool down of the vehicle
cabin, drive with the windows slightly open for the first 2±3 minutes
after starting the vehicle or until the vehicle has ªaired out.º
To aid in side window defogging/demisting in cold weather:
1. Select
.
2. Select A/C.
3. Adjust the temperature control to maintain comfort.
4. Set the fan speed to the highest setting.
5. Direct the outer instrument panel vents towards the side windows.
To increase airflow to the outer instrument panel vents, close the vents
located in the middle of the instrument panel.
Do not place objects on top of the instrument panel as these
objects may become projectiles in a collision or sudden stop.
REAR WINDOW DEFROSTER
The rear defroster control is located
on the instrument panel and works
to clear the rear window of thin ice
and fog.
Do not use razor blades or other sharp objects to clean the inside
of the rear window or to remove decals from the inside of the
rear window. This may cause damage to the heated grid lines and
will not be covered by your warranty.
Activating the rear window defroster will also activate the heated mirrors
(if equipped). For more information refer toHeated outside mirrorsin
theDriver controls chapter.
R
Climate Controls
28
Page 30 of 248

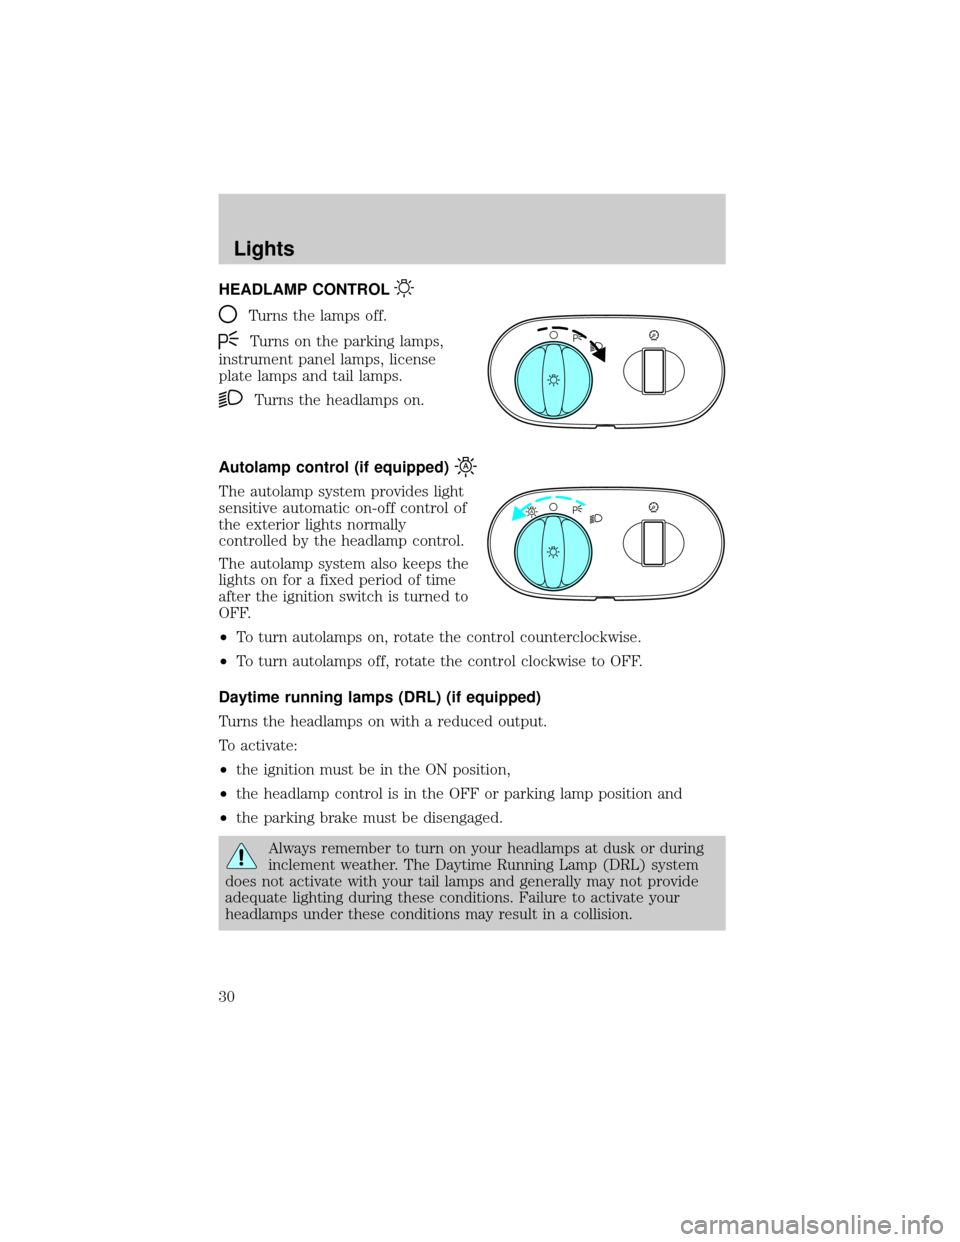
HEADLAMP CONTROL
Turns the lamps off.
Turns on the parking lamps,
instrument panel lamps, license
plate lamps and tail lamps.
Turns the headlamps on.
Autolamp control (if equipped)
The autolamp system provides light
sensitive automatic on-off control of
the exterior lights normally
controlled by the headlamp control.
The autolamp system also keeps the
lights on for a fixed period of time
after the ignition switch is turned to
OFF.
²To turn autolamps on, rotate the control counterclockwise.
²To turn autolamps off, rotate the control clockwise to OFF.
Daytime running lamps (DRL) (if equipped)
Turns the headlamps on with a reduced output.
To activate:
²the ignition must be in the ON position,
²the headlamp control is in the OFF or parking lamp position and
²the parking brake must be disengaged.
Always remember to turn on your headlamps at dusk or during
inclement weather. The Daytime Running Lamp (DRL) system
does not activate with your tail lamps and generally may not provide
adequate lighting during these conditions. Failure to activate your
headlamps under these conditions may result in a collision.
A
Lights
Lights
30
Page 31 of 248
High beams
Push the lever toward the
instrument panel to activate. Pull
the lever towards you to deactivate.
Flash to pass
Pull toward you slightly to activate
and release to deactivate.
PANEL DIMMER CONTROL
Use to adjust the brightness of the
instrument panel and all applicable
switches in the vehicle during
headlamp and parklamp operation.
Move the control to the full upright
position, past detent, to turn on the
interior lamps.
A
Lights
31
Page 35 of 248

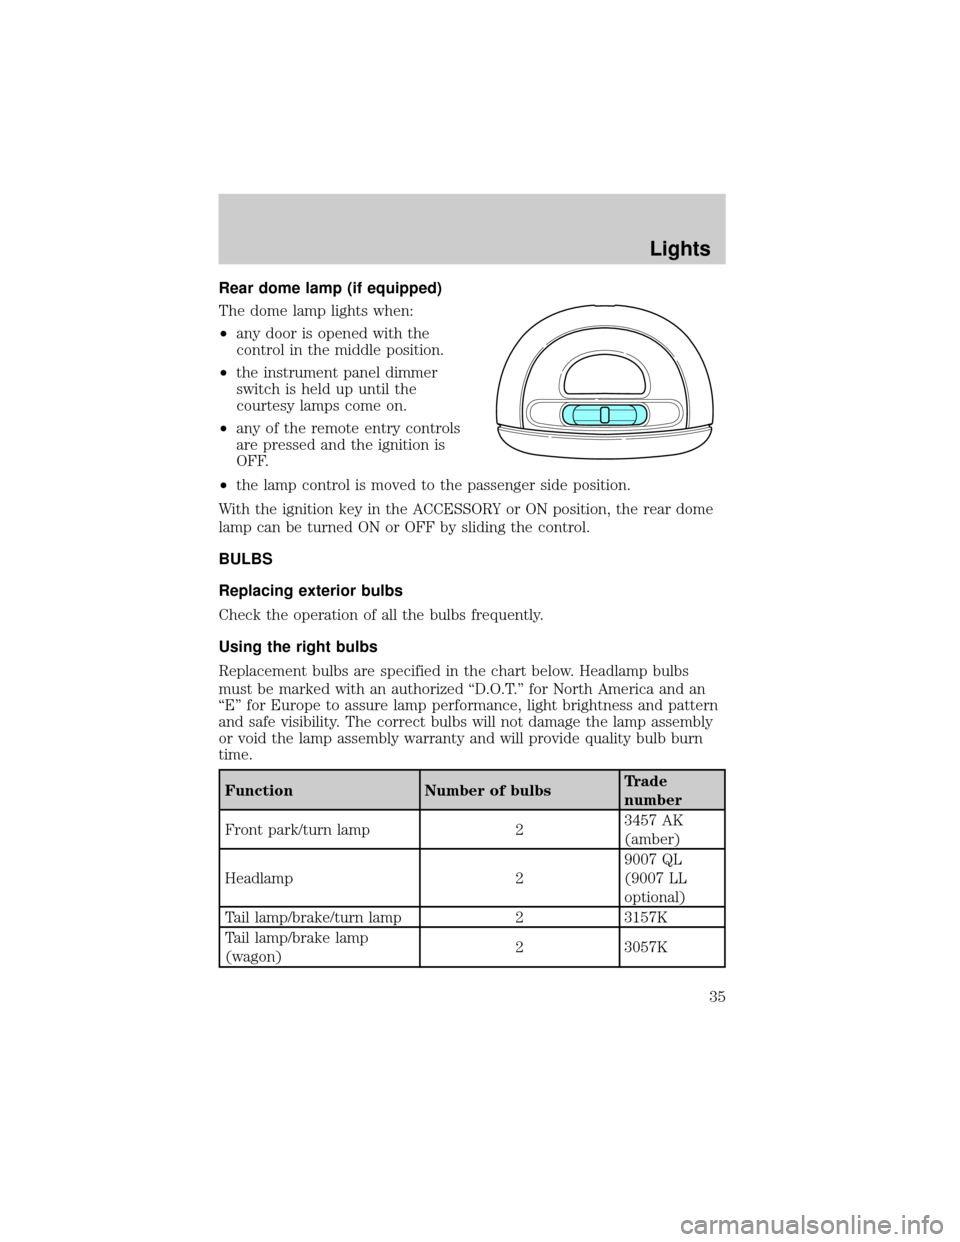
Rear dome lamp (if equipped)
The dome lamp lights when:
²any door is opened with the
control in the middle position.
²the instrument panel dimmer
switch is held up until the
courtesy lamps come on.
²any of the remote entry controls
are pressed and the ignition is
OFF.
²the lamp control is moved to the passenger side position.
With the ignition key in the ACCESSORY or ON position, the rear dome
lamp can be turned ON or OFF by sliding the control.
BULBS
Replacing exterior bulbs
Check the operation of all the bulbs frequently.
Using the right bulbs
Replacement bulbs are specified in the chart below. Headlamp bulbs
must be marked with an authorized ªD.O.T.º for North America and an
ªEº for Europe to assure lamp performance, light brightness and pattern
and safe visibility. The correct bulbs will not damage the lamp assembly
or void the lamp assembly warranty and will provide quality bulb burn
time.
Function Number of bulbsTrade
number
Front park/turn lamp 23457 AK
(amber)
Headlamp 29007 QL
(9007 LL
optional)
Tail lamp/brake/turn lamp 2 3157K
Tail lamp/brake lamp
(wagon)2 3057K
Lights
35
Page 36 of 248
Function Number of bulbsTrade
number
Rear turn lamp (wagon) 2 3456K
Backup lamp 2 921
Backup lamp (wagon) 2 3156
License plate lamp 2 168
High-mount brake lamp
(wagon)2 912
High-mount brake lamp
(sedan)Must replace the hi-mount brake lamp
assembly
Rear side marker lamp
(wagon)2 194
Cargo lamp (wagon) 1 578
Dome lamp 1 12V6W
Dome/map lamp 3 578
Visor vanity lamp
(passenger/driver)2 DE 3021
Luggage compartment
lamp1 212±2
All replacement bulbs are clear in color except where noted.
To replace all instrument panel lights - see your dealer.
Replacing the interior bulbs
Check the operation of all bulbs frequently.
Lights
36