2005 FORD SUPER DUTY change time
[x] Cancel search: change timePage 26 of 304
Balance:Press to adjust the audio between the left and right speakers.
Use
//SEEK.
Fade:Press to adjust the audio between the front and rear speakers.
Use
//SEEK.
Speed sensitive volume (if equipped):Radio volume automatically
changes slightly with vehicle speed to compensate for road and wind
noise. Press MENU to access and use
//SEEKto adjust.
Setting the clock:Press MENU until SELECT HOUR or SELECT
MINUTE is displayed. Press
//SEEKto adjust the
hours/minutes.
If your vehicle is equipped with an in-dash clock, refer to “Setting the
clock” in theDriver Controlschapter.
Autoset:Allows you to set the strongest local radio stations without
losing your original manually set preset stations for AM/FM1/FM2 . Press
MENU to access. Use
//SEEKto set.
When the six strongest stations are filled, the station stored in preset 1
will begin playing. If there are less than six strong stations, the system
will store the last one in the remaining presets.
Clean tape reminder:After 20 hours of cassette operation, the radio
will notify you that it is time to clean the cassette player head. After
cleaning the player head, you can clear the reminder through menu
control and selecting YES.
5.AUX:Press to toggle between
FES/DVD and AUX modes. If no
auxiliary sources are available, NO
AUX AUDIO will be displayed. To return to radio mode, press AM/FM.
6.Tape eject:Press to eject a tape.
7.Text:In CD mode, displays track
title, artist name, and disc title (if
available).
8.Shuffle:Press to play CD tracks
in random order.
REVIEW COPY
2005 F250/350/450/550(f23), Owners Guide (post-2002-fmt)(own2002),
Market:USA_English(fus)
Entertainment Systems
26
Page 32 of 304

•Station overload: When you pass a broadcast tower, a stronger signal
may overtake a weaker one and play while the weak station frequency
is displayed.
CASSETTE/PLAYER CARE
Do:
•Use only cassettes that are 90 minutes long or less.
•Tighten very loose tapes by inserting a finger or pencil into the hole
and turning the hub.
•Remove loose labels before inserting tapes.
•Allow tapes which have been subjected to extreme heat, humidity or
cold to reach a moderate temperature before playing.
•Clean the cassette player head with a cassette cleaning cartridge after
10–12 hours of play to maintain good sound/operation.
Don’t:
•Expose tapes to direct sunlight, extreme humidity, heat or cold.
•Leave tapes in the cassette player for a long time when not being
played.
CD/CD PLAYER CARE
Do:
•Handle discs by their edges only. Never touch the playing surface.
•Inspect discs before playing. Clean only with an approved CD cleaner
and wipe from the center out.
Don’t:
•Expose discs to direct sunlight or heat sources for extended periods
of time.
•Insert more than one disc into each slot of the CD changer magazine.
•Clean using a circular motion.
CD units are designed to play commercially pressed 4.75 in (12 cm)
audio compact discs only. Due to technical incompatibility, certain
recordable and re-recordable compact discs may not function
correctly when used in Ford CD players. Irregular shaped CDs,
CDs with a scratch protection film attached, and CDs with
homemade paper (adhesive) labels should not be inserted into
the CD player. The label may peel and cause the CD to become
REVIEW COPY
2005 F250/350/450/550(f23), Owners Guide (post-2002-fmt)(own2002),
Market:USA_English(fus)
Entertainment Systems
32
Page 40 of 304

HEADLAMP CONTROL
Turns the lamps off.
Turns on the parking lamps,
instrument panel lamps, license
plate lamps and tail lamps.
Turns the headlamps on.
Autolamp control (if equipped)
The autolamp system provides light
sensitive automatic on-off control of
the exterior lights normally
controlled by the headlamp control.
The autolamp system also keeps the
lights on for approximately 20
seconds after the ignition switch is
turned to OFF.
To change the delay time of the
autolamp feature, do the following:
1. Start with the ignition in OFF and the autolamps selected.
2. Deselect the autolamps.
3. Put the ignition in RUN.
4. Put the ignition in OFF.
5. Select the autolamps. Steps 2 through 5 must be performed within a
10 second period. At this point, the headlamps and parking lamps will
turn on.
6. Deselect the autolamps after the desired autolamp delay time
(maximum of 3 minutes). At this point, the headlamps and parking
lamps will turn off.
REVIEW COPY
2005 F250/350/450/550(f23), Owners Guide (post-2002-fmt)(own2002),
Market:USA_English(fus)
Lights
Lights
40
Page 150 of 304
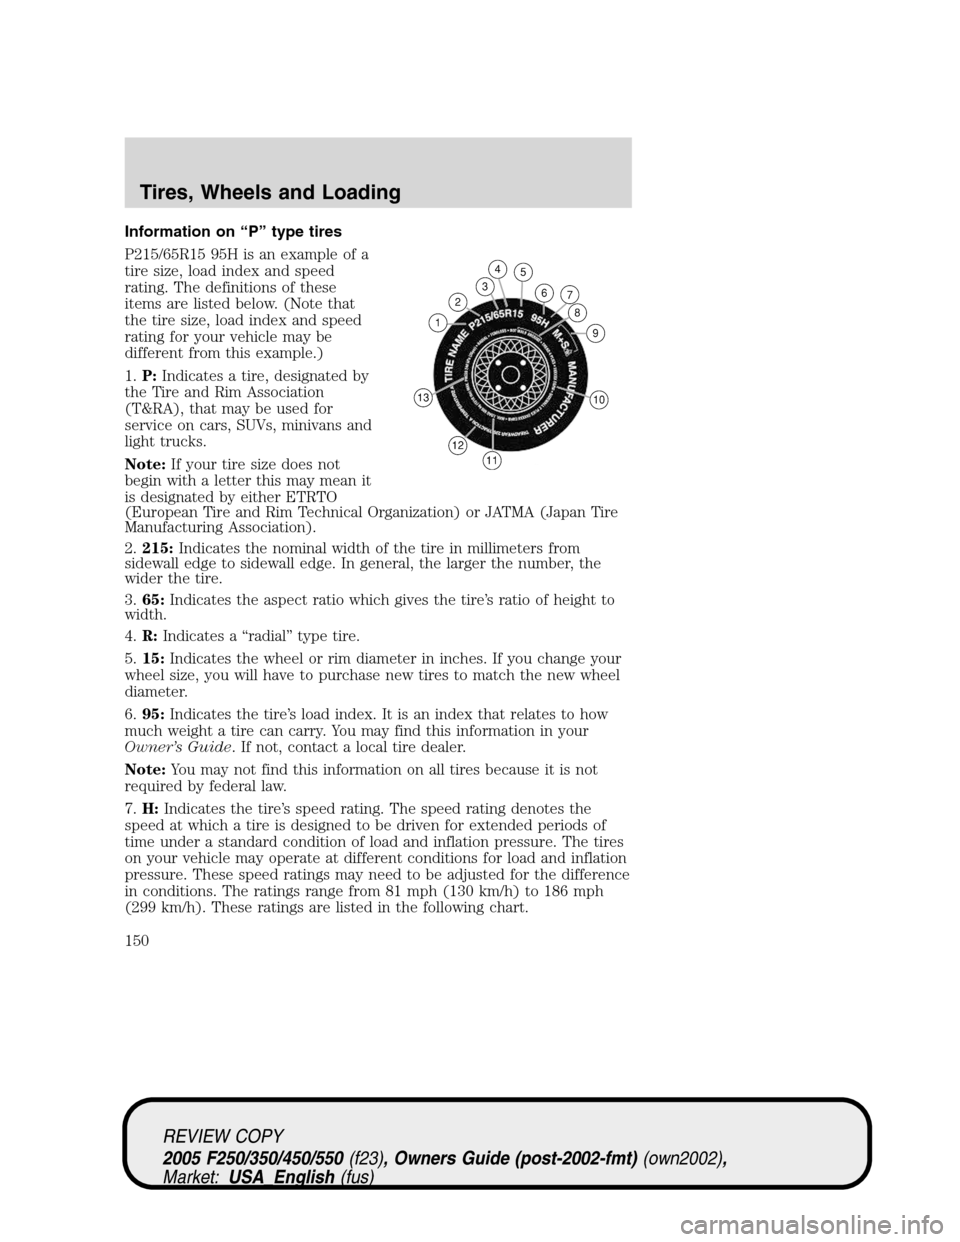
Information on “P” type tires
P215/65R15 95H is an example of a
tire size, load index and speed
rating. The definitions of these
items are listed below. (Note that
the tire size, load index and speed
rating for your vehicle may be
different from this example.)
1.P:Indicates a tire, designated by
the Tire and Rim Association
(T&RA), that may be used for
service on cars, SUVs, minivans and
light trucks.
Note:If your tire size does not
begin with a letter this may mean it
is designated by either ETRTO
(European Tire and Rim Technical Organization) or JATMA (Japan Tire
Manufacturing Association).
2.215:Indicates the nominal width of the tire in millimeters from
sidewall edge to sidewall edge. In general, the larger the number, the
wider the tire.
3.65:Indicates the aspect ratio which gives the tire’s ratio of height to
width.
4.R:Indicates a “radial” type tire.
5.15:Indicates the wheel or rim diameter in inches. If you change your
wheel size, you will have to purchase new tires to match the new wheel
diameter.
6.95:Indicates the tire’s load index. It is an index that relates to how
much weight a tire can carry. You may find this information in your
Owner’s Guide. If not, contact a local tire dealer.
Note:You may not find this information on all tires because it is not
required by federal law.
7.H:Indicates the tire’s speed rating. The speed rating denotes the
speed at which a tire is designed to be driven for extended periods of
time under a standard condition of load and inflation pressure. The tires
on your vehicle may operate at different conditions for load and inflation
pressure. These speed ratings may need to be adjusted for the difference
in conditions. The ratings range from 81 mph (130 km/h) to 186 mph
(299 km/h). These ratings are listed in the following chart.
REVIEW COPY
2005 F250/350/450/550(f23), Owners Guide (post-2002-fmt)(own2002),
Market:USA_English(fus)
Tires, Wheels and Loading
150
Page 200 of 304

Maintain steering wheel control at all times, especially in rough terrain.
Since sudden changes in terrain can result in abrupt steering wheel
motion, make sure you grip the steering wheel from the outside. Do not
grip the spokes.
Drive cautiously to avoid vehicle damage from concealed objects such as
rocks and stumps.
You should either know the terrain or examine maps of the area before
driving. Map out your route before driving in the area. To maintain
steering and braking control of your vehicle, you must have all four
wheels on the ground and they must be rolling, not sliding or spinning.
Basic operating principles
•Do not use 4WD on dry, hard surfaced roads. Doing so will produce
excessive noise, increase tire wear and may damage drive components.
4WD modes are only intended for consistently slippery or loose
surfaces.
•Drive slower in strong crosswinds which can affect the normal steering
characteristics of your vehicle.
•Be extremely careful when driving on pavement made slippery by
loose sand, water, gravel, snow or ice.
If your vehicle goes off the edge of the pavement
•If your vehicle goes off the edge of the pavement, slow down, but
avoid severe brake application, ease the vehicle back onto the
pavement only after reducing your speed. Do not turn the steering
wheel too sharply while returning to the road surface.
•It may be safer to stay on the apron or shoulder of the road and slow
down gradually before returning to the pavement. You may lose
control if you do not slow down or if you turn the steering wheel too
sharply or abruptly.
•It often may be less risky to strike small objects, such as highway
reflectors, with minor damage to your vehicle rather than attempt a
sudden return to the pavement which could cause the vehicle to slide
sideways out of control or roll over. Remember, your safety and the
safety of others should be your primary concern.
REVIEW COPY
2005 F250/350/450/550(f23), Owners Guide (post-2002-fmt)(own2002),
Market:USA_English(fus)
Driving
200
Page 235 of 304
unsatisfactory, Ford of Canada participates in an impartial third party
mediation/arbitration program administered by the Canadian Motor
Vehicle Arbitration Plan (CAMVAP).
The CAMVAP program is a straight-forward and relatively speedy
alternative to resolve a disagreement when all other efforts to produce a
settlement have failed. This procedure is without cost to you and is
designed to eliminate the need for lengthy and expensive legal
proceedings.
In the CAMVAP program, impartial third-party arbitrators conduct
hearings at mutually convenient times and places in an informal
environment. These impartial arbitrators review the positions of the
parties, make decisions and, when appropriate, render awards to resolve
disputes. CAMVAP decisions are fast, fair, and final; the arbitrator’s
award is binding both to you and Ford of Canada.
CAMVAP services are available in all territories and provinces. For more
information, without charge or obligation, call your CAMVAP Provincial
Administrator directly at 1-800-207-0685.
FORD EXTENDED SERVICE PLAN
You can get more protection for your new car or light truck by
purchasing Ford Extended Service Plan (Ford ESP) coverage. It provides
the following:
•Benefits during the warranty period depending on the plan you
purchase (such as: reimbursement for rentals; coverage for certain
maintenance and wear items).
•Protection against covered repair costs after your Bumper-to-Bumper
Warranty expires.
You may purchase Ford ESP from any participating Ford and Lincoln
Mercury and Ford of Canada dealer. There are several plans available in
various time, distance and deductible combinations which can be tailored
to fit your own driving needs. Ford ESP also offers reimbursement
benefits for towing and rental coverage.
When you buy Ford ESP, you receive Peace-of-Mind protection
throughout the United States and Canada, provided by a network of
more than 5,000 participating Ford or Lincoln Mercury and Ford of
Canada dealers.
If you did not take advantage of the Ford Extended Service Plan at the
time of purchasing your vehicle, you may still be eligible. Since this
information is subject to change, please ask your dealer for complete
REVIEW COPY
2005 F250/350/450/550(f23), Owners Guide (post-2002-fmt)(own2002),
Market:USA_English(fus)
Customer Assistance
235
Page 267 of 304
5. Follow one of the simple calculations in order to determine fuel
economy:
Calculation 1:Divide total miles traveled by total gallons used.
Calculation 2:Multiply liters used by 100, then divide by total
kilometers traveled.
Keep a record for at least one month and record the type of driving (city
or highway). This will provide an accurate estimate of the vehicle’s fuel
economy under current driving conditions. Additionally, keeping records
during summer and winter will show how temperature impacts fuel
economy. In general, lower temperatures give lower fuel economy.
Driving style — good driving and fuel economy habits
Give consideration to the lists that follow and you may be able to change
a number of variables and improve your fuel economy.
Habits
•Smooth, moderate operation can yield up to 10% savings in fuel.
•Steady speeds without stopping will usually give the best fuel
economy.
•Idling for long periods of time (greater than one minute) may waste
fuel.
•Anticipate stopping; slowing down may eliminate the need to stop.
•Sudden or hard accelerations may reduce fuel economy.
•Slow down gradually.
•Driving at reasonable speeds (traveling at 55 mph [88 km/h] uses 15%
less fuel than traveling at 65 mph [105 km/h]).
•Revving the engine before turning it off may reduce fuel economy.
•Using the air conditioner or defroster may reduce fuel economy.
•You may want to turn off the speed control in hilly terrain if
unnecessary shifting between third and fourth gear occurs.
Unnecessary shifting of this type could result in reduced fuel
economy.
•Warming up a vehicle on cold mornings is not required and may
reduce fuel economy.
•Resting your foot on the brake pedal while driving may reduce fuel
economy.
•Combine errands and minimize stop-and-go driving.
REVIEW COPY
2005 F250/350/450/550(f23), Owners Guide (post-2002-fmt)(own2002),
Market:USA_English(fus)
Maintenance and Specifications
267
Page 273 of 304
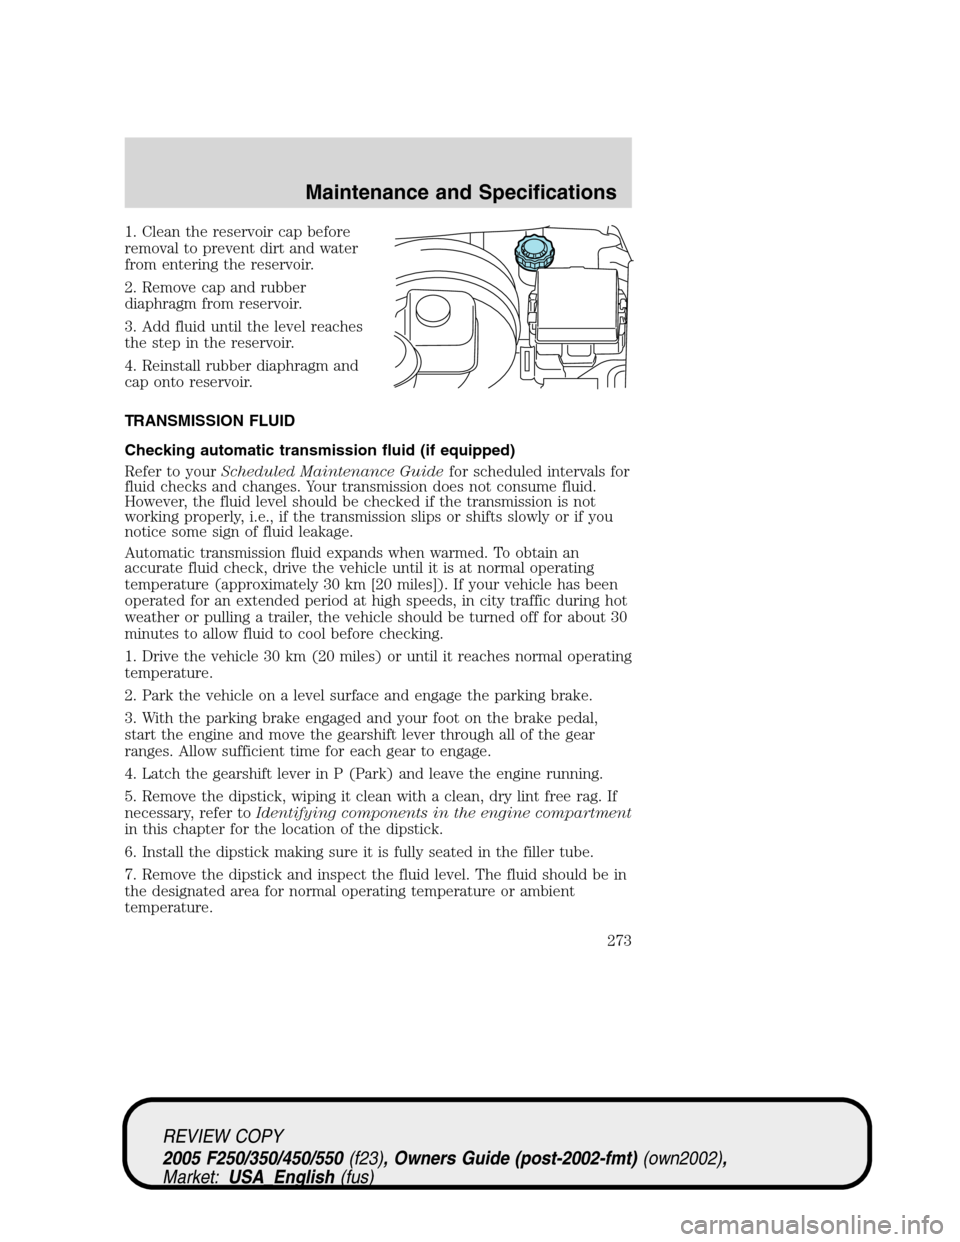
1. Clean the reservoir cap before
removal to prevent dirt and water
from entering the reservoir.
2. Remove cap and rubber
diaphragm from reservoir.
3. Add fluid until the level reaches
the step in the reservoir.
4. Reinstall rubber diaphragm and
cap onto reservoir.
TRANSMISSION FLUID
Checking automatic transmission fluid (if equipped)
Refer to yourScheduled Maintenance Guidefor scheduled intervals for
fluid checks and changes. Your transmission does not consume fluid.
However, the fluid level should be checked if the transmission is not
working properly, i.e., if the transmission slips or shifts slowly or if you
notice some sign of fluid leakage.
Automatic transmission fluid expands when warmed. To obtain an
accurate fluid check, drive the vehicle until it is at normal operating
temperature (approximately 30 km [20 miles]). If your vehicle has been
operated for an extended period at high speeds, in city traffic during hot
weather or pulling a trailer, the vehicle should be turned off for about 30
minutes to allow fluid to cool before checking.
1. Drive the vehicle 30 km (20 miles) or until it reaches normal operating
temperature.
2. Park the vehicle on a level surface and engage the parking brake.
3. With the parking brake engaged and your foot on the brake pedal,
start the engine and move the gearshift lever through all of the gear
ranges. Allow sufficient time for each gear to engage.
4. Latch the gearshift lever in P (Park) and leave the engine running.
5. Remove the dipstick, wiping it clean with a clean, dry lint free rag. If
necessary, refer toIdentifying components in the engine compartment
in this chapter for the location of the dipstick.
6. Install the dipstick making sure it is fully seated in the filler tube.
7. Remove the dipstick and inspect the fluid level. The fluid should be in
the designated area for normal operating temperature or ambient
temperature.
REVIEW COPY
2005 F250/350/450/550(f23), Owners Guide (post-2002-fmt)(own2002),
Market:USA_English(fus)
Maintenance and Specifications
273