Page 1 of 304
Introduction 4
Instrument Cluster 12
Warning and control lights 12
Gauges 16
Entertainment Systems 20
AM/FM stereo 20
AM/FM stereo with CD 22
AM/FM stereo cassette with CD 25
AM/FM stereo with in-dash six CD 28
Climate Controls 34
Heater only 34
Manual heating and air conditioning 35
Electronic automatic temperature control 37
Lights 40
Headlamps 40
Turn signal control 46
Bulb replacement 47
Driver Controls 55
Windshield wiper/washer control 55
Steering wheel adjustment 56
Moon roof 57
Power windows 58
Mirrors 60
Speed control 63
Message center 67
Table of Contents
1
REVIEW COPY
2005 F250/350/450/550(f23), Owners Guide (post-2002-fmt)(own2002),
Market:USA_English(fus)
Table of Contents
Page 13 of 304

Warning lights and gauges can alert you to a vehicle condition that may
become serious enough to cause expensive repairs. A warning light may
illuminate when a problem exists with one of your vehicle’s functions.
Many lights will illuminate when you start your vehicle to make sure the
bulbs work. If any light remains on after starting the vehicle, have the
respective system inspected immediately.
If your vehicle is equipped with a Diesel engine, it has a unique cluster,
refer toStarting the engine in your 6.0 Liter Power Stroke Direct
Injection Turbo Diesel Owner’s Guide Supplement.
Service engine soon:TheService
engine soonindicator light
illuminates when the ignition is first
turned to the ON position to check
the bulb. Solid illumination after the engine is started indicates the On
Board Diagnostics System (OBD-II) has detected a malfunction. Refer to
On board diagnostics (OBD-II)in theMaintenance and Specifications
chapter. If the light is blinking, engine misfire is occurring which could
damage your catalytic converter. Drive in a moderate fashion (avoid
heavy acceleration and deceleration) and have your vehicle serviced
immediately.
Under engine misfire conditions, excessive exhaust temperatures
could damage the catalytic converter, the fuel system, interior
floor coverings or other vehicle components, possibly causing a fire.
Electronic throttle control:
Illuminates when the engine has
defaulted to a ’limp-home’ operation.
Report the fault to a dealer at the
earliest opportunity.
On vehicles equipped with a message center, “ENGINE FAILSAFE
MODE” will be displayed, refer toMessage Centerin theDriver
Controlschapter.
Brake system warning light:To
confirm the brake system warning
light is functional, it will
momentarily illuminate when the
ignition is turned to the ON position
when the engine is not running, or in a position between ON and START,
or by applying the parking brake when the ignition is turned to the ON
P!
BRAKE
REVIEW COPY
2005 F250/350/450/550(f23), Owners Guide (post-2002-fmt)(own2002),
Market:USA_English(fus)
Instrument Cluster
13
Page 15 of 304

Four wheel drive low:Illuminates
when four-wheel drive low is
engaged.
Four wheel drive indicator:
Illuminates when four-wheel drive is
engaged.
Speed control:Illuminates when
the speed control is activated. Turns
off when the speed control system
is deactivated.
Turn signal:Illuminates when the
left or right turn signal or the
hazard lights are turned on. If the
indicators stay on or flash faster, check for a burned out bulb.
High beams:Illuminates when the
high beam headlamps are turned on.
Key-in-ignition warning chime:Sounds when the key is left in the
ignition in the OFF, LOCK or ACCESSORY position and the driver’s door
is opened.
Headlamps on warning chime:Sounds when the headlamps or parking
lamps are on, the ignition is off (the key is not in the ignition) and the
driver’s door is opened.
Parking brake ON warning chime:Sounds when the parking brake is
set, the engine is running and the vehicle is driven more than 3 mph (5 km).
LOW
RANGE
4x4
REVIEW COPY
2005 F250/350/450/550(f23), Owners Guide (post-2002-fmt)(own2002),
Market:USA_English(fus)
Instrument Cluster
15
Page 43 of 304

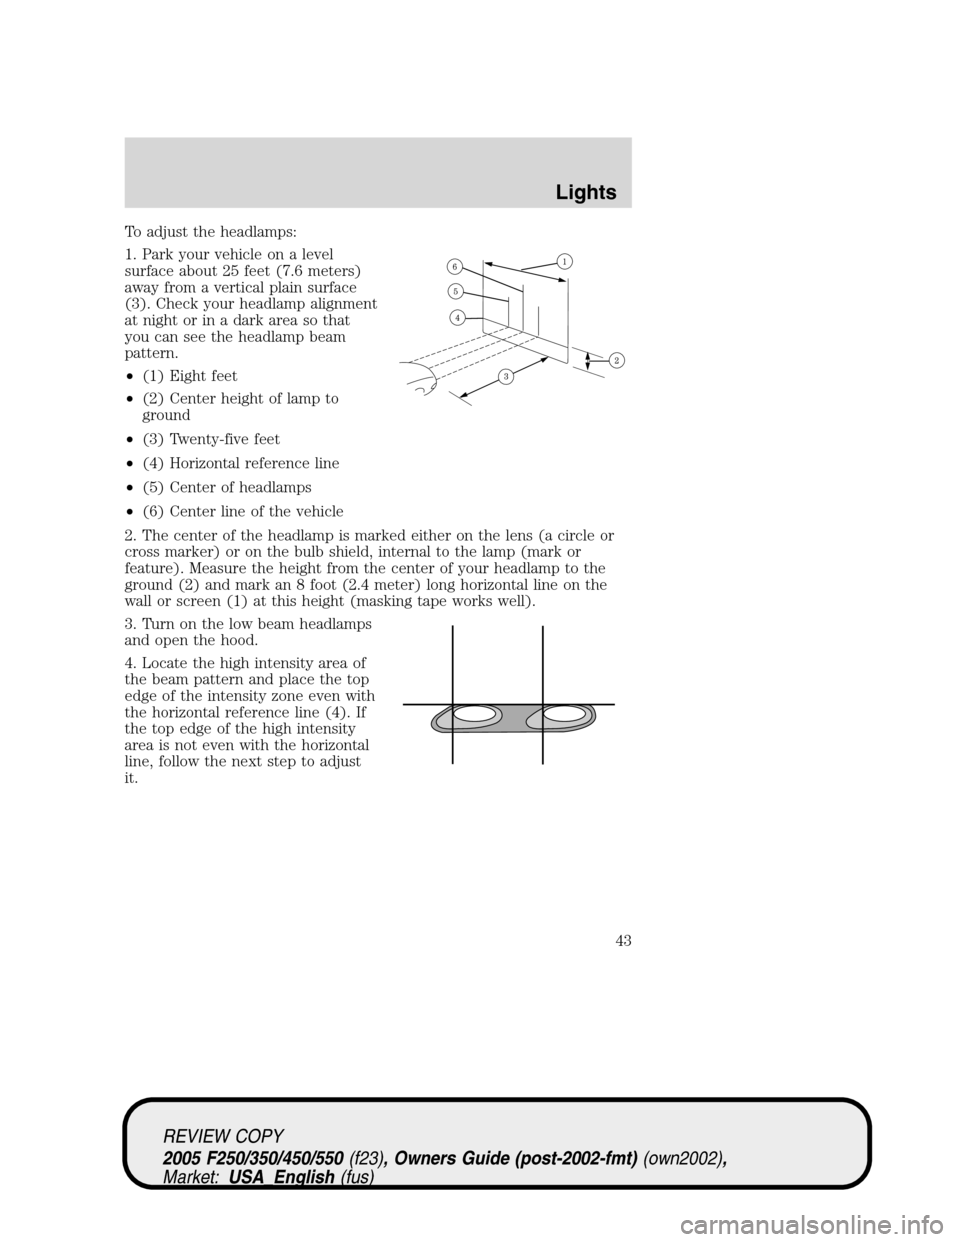
To adjust the headlamps:
1. Park your vehicle on a level
surface about 25 feet (7.6 meters)
away from a vertical plain surface
(3). Check your headlamp alignment
at night or in a dark area so that
you can see the headlamp beam
pattern.
•(1) Eight feet
•(2) Center height of lamp to
ground
•(3) Twenty-five feet
•(4) Horizontal reference line
•(5) Center of headlamps
•(6) Center line of the vehicle
2. The center of the headlamp is marked either on the lens (a circle or
cross marker) or on the bulb shield, internal to the lamp (mark or
feature). Measure the height from the center of your headlamp to the
ground (2) and mark an 8 foot (2.4 meter) long horizontal line on the
wall or screen (1) at this height (masking tape works well).
3. Turn on the low beam headlamps
and open the hood.
4. Locate the high intensity area of
the beam pattern and place the top
edge of the intensity zone even with
the horizontal reference line (4). If
the top edge of the high intensity
area is not even with the horizontal
line, follow the next step to adjust
it.
REVIEW COPY
2005 F250/350/450/550(f23), Owners Guide (post-2002-fmt)(own2002),
Market:USA_English(fus)
Lights
43
Page 47 of 304
BULBS
Replacing exterior bulbs
Check the operation of all the bulbs frequently.
Function Number of
bulbsTrade number
Headlamps (aerodynamic) 2 9008
Headlamps (sealed beam) 2 H6054
Park lamp with
aerodynamic headlamp2 3157A
Park lamp with sealed
beam headlamp2 4157K/3157
Sidemarker 2 194
Tail/stop/turn/sidemarker 2 4157K/3157
Backup 2 3156
High-mount stoplamp 1 922
Foglamp 2 9145
License plate lamp 2 194
Cargo lamp 2 906
Roofmarker 5 194
Rear fender clearance* 4 W5W
Interior visor lamp (if
equipped)4 194
Rear identification 3 194
All replacement bulbs are clear in color except where noted.
To replace all instrument panel lights - see your dealer
* Dual rear wheels, or if equipped.
REVIEW COPY
2005 F250/350/450/550(f23), Owners Guide (post-2002-fmt)(own2002),
Market:USA_English(fus)
Lights
47
Page 48 of 304

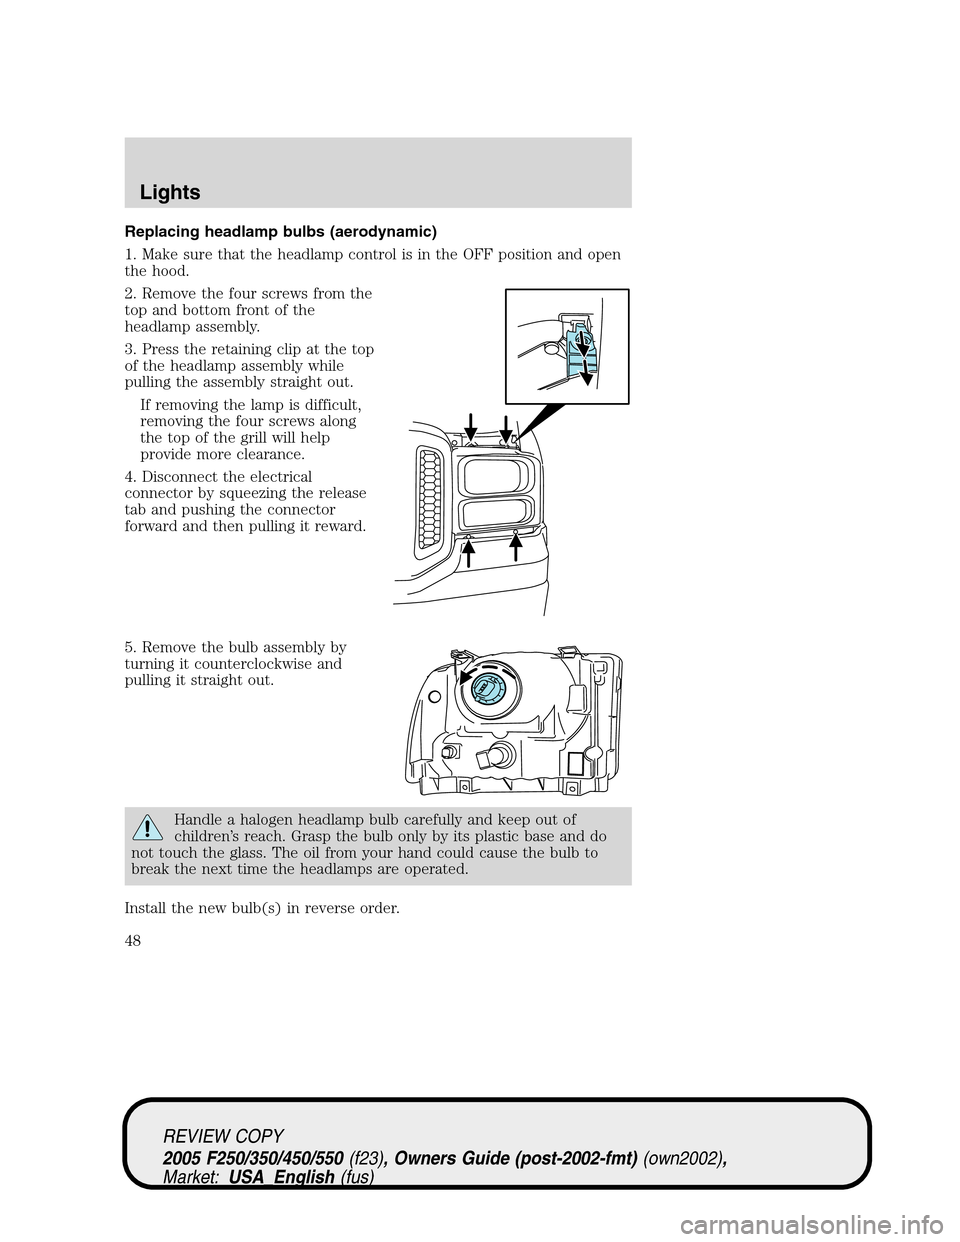
Replacing headlamp bulbs (aerodynamic)
1. Make sure that the headlamp control is in the OFF position and open
the hood.
2. Remove the four screws from the
top and bottom front of the
headlamp assembly.
3. Press the retaining clip at the top
of the headlamp assembly while
pulling the assembly straight out.
If removing the lamp is difficult,
removing the four screws along
the top of the grill will help
provide more clearance.
4. Disconnect the electrical
connector by squeezing the release
tab and pushing the connector
forward and then pulling it reward.
5. Remove the bulb assembly by
turning it counterclockwise and
pulling it straight out.
Handle a halogen headlamp bulb carefully and keep out of
children’s reach. Grasp the bulb only by its plastic base and do
not touch the glass. The oil from your hand could cause the bulb to
break the next time the headlamps are operated.
Install the new bulb(s) in reverse order.
REVIEW COPY
2005 F250/350/450/550(f23), Owners Guide (post-2002-fmt)(own2002),
Market:USA_English(fus)
Lights
48
Page 49 of 304
Replacing park/turn and sidemarker lamp bulbs (aerodynamic)
1. Make sure that the headlamp control is in the OFF position and open
the hood.
2. Remove the four screws from the
top and bottom front of the
headlamp assembly.
3. Press the retaining clip at the top
of the headlamp assembly while
pulling the assembly straight out.
If removing the lamp is difficult,
removing the four screws along
the top of the grill will help
provide more clearance.
4. Remove the bulb assembly, (1)
sidemarker or (2) park/turn by
turning it counterclockwise and
pulling it straight out.
5. Pull the old bulb out from the
socket.
Install the new bulb(s) in reverse order.
REVIEW COPY
2005 F250/350/450/550(f23), Owners Guide (post-2002-fmt)(own2002),
Market:USA_English(fus)
Lights
49
Page 50 of 304
Replacing headlamp bulbs (sealed beam)
1. Make sure that the headlamp control is in the OFF position and open
the hood.
2. Remove the four screws from the
top and bottom front of the
headlamp assembly.
3. Press the retaining clip at the top
of the headlamp assembly while
pulling the assembly straight out.
If removing the lamp is difficult,
removing the four screws along
the top of the grill will help
provide more clearance.
4. Disconnect the electrical
connector from the park lamp/bezel.
5. Remove the four screws and the
headlamp retaining ring from
headlamp.
Install the new bulb(s) in reverse order.
REVIEW COPY
2005 F250/350/450/550(f23), Owners Guide (post-2002-fmt)(own2002),
Market:USA_English(fus)
Lights
50