2005 FORD SUPER DUTY transmission
[x] Cancel search: transmissionPage 188 of 304
3 (Third)
Transmission operates up to third gear only.
Used for improved traction on slippery roads. Selecting 3 (Third)
provides engine braking.
2 (Second)
Use 2 (Second) to start-up on slippery roads or to provide additional
engine braking on downgrades.
1 (First)
•Provides maximum engine braking.
•Allows upshifts by moving gearshift lever.
•The transmission will not downshift into 1 (First) at high speeds; it
will downshift to a lower gear and then shift into 1 (First) when the
vehicle reaches slower speeds.
Forced downshifts
•Allowed in
(Overdrive) or Drive.
•Depress the accelerator to the floor.
•Allows transmission to select an appropriate gear.
If your vehicle gets stuck in mud or snow
If your vehicle gets stuck in mud or snow, it may be rocked out by
shifting between forward and reverse gears, stopping between shifts in a
steady pattern. Press lightly on the accelerator in each gear.
Do not rock the vehicle if the engine is not at normal operating
temperature or damage to the transmission may occur.
Do not rock the vehicle for more than a minute or damage to the
transmission and tires may occur, or the engine may overheat.
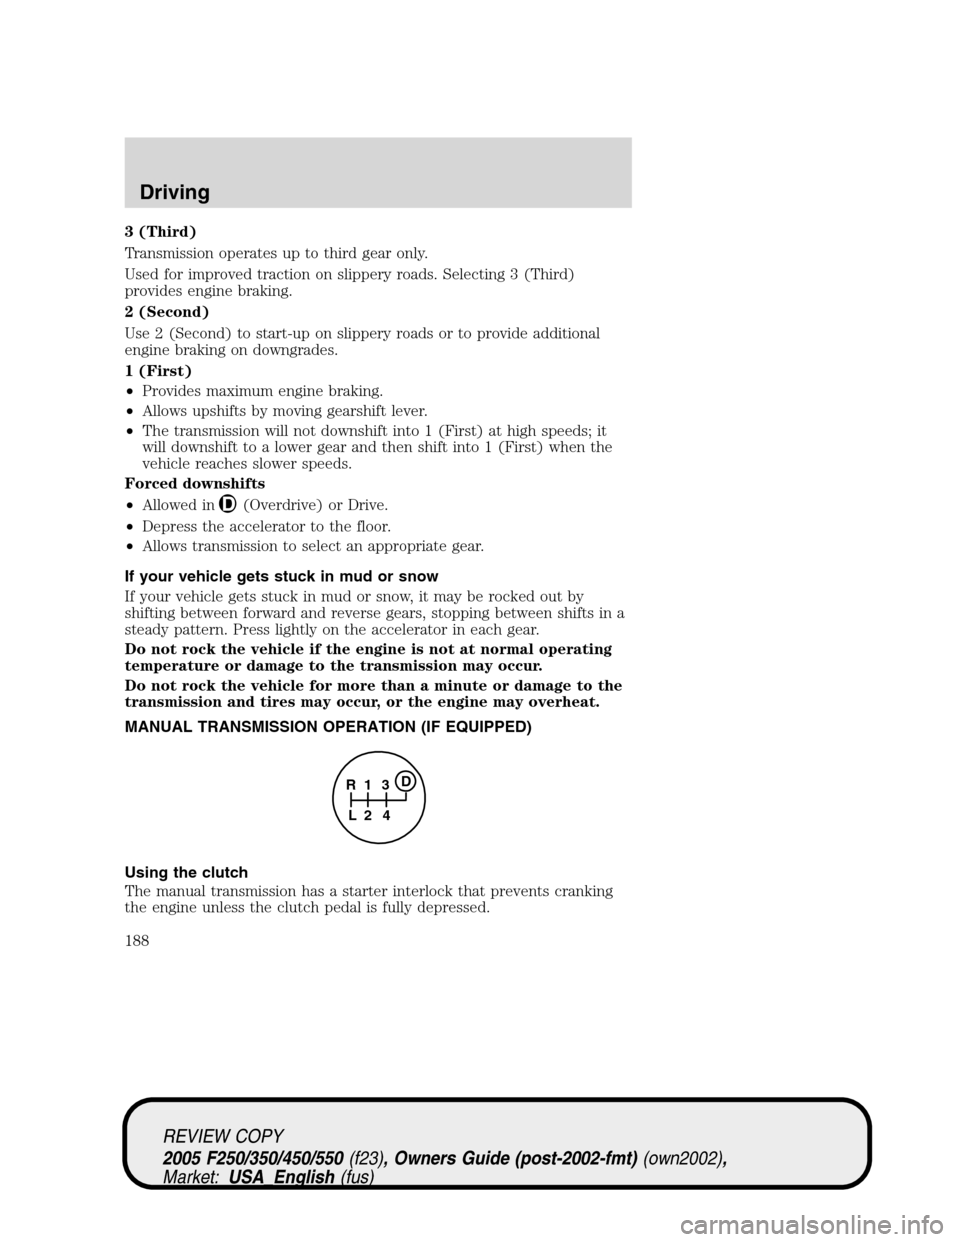
MANUAL TRANSMISSION OPERATION (IF EQUIPPED)
Using the clutch
The manual transmission has a starter interlock that prevents cranking
the engine unless the clutch pedal is fully depressed.
1
24 R
L3D
REVIEW COPY
2005 F250/350/450/550(f23), Owners Guide (post-2002-fmt)(own2002),
Market:USA_English(fus)
Driving
188
Page 189 of 304
To start the vehicle:
1. Make sure the parking brake is fully set.
2. Press the clutch pedal to the floor, then put the gearshift lever in the
neutral position.
3. Start the engine, then press the brake pedal and release the parking
brake.
4. Move the gearshift lever to 1st gear, then slowly release the clutch
pedal while slowly pressing on the accelerator.
During each shift, the clutch pedal must be fully depressed to the floor.
Failure to fully depress the clutch pedal to the floor may cause increased
shift efforts, prematurely wear transmission components or damage the
transmission. Make sure the floor mat is properly positioned so it doesn’t
interfere with the full extension of the clutch pedal.
Do not drive with your foot resting on the clutch pedal or use the clutch
pedal to hold your vehicle at a standstill while waiting on a hill. These
actions will reduce the life of the clutch.
Recommended shift speeds
Do not overspeed the engine when going downhill or steep grades. If
equipped, use the tachometer and do not allow engine speed to exceed
the redline area. Operating the engine beyond the recommended speeds
can cause severe engine damage.
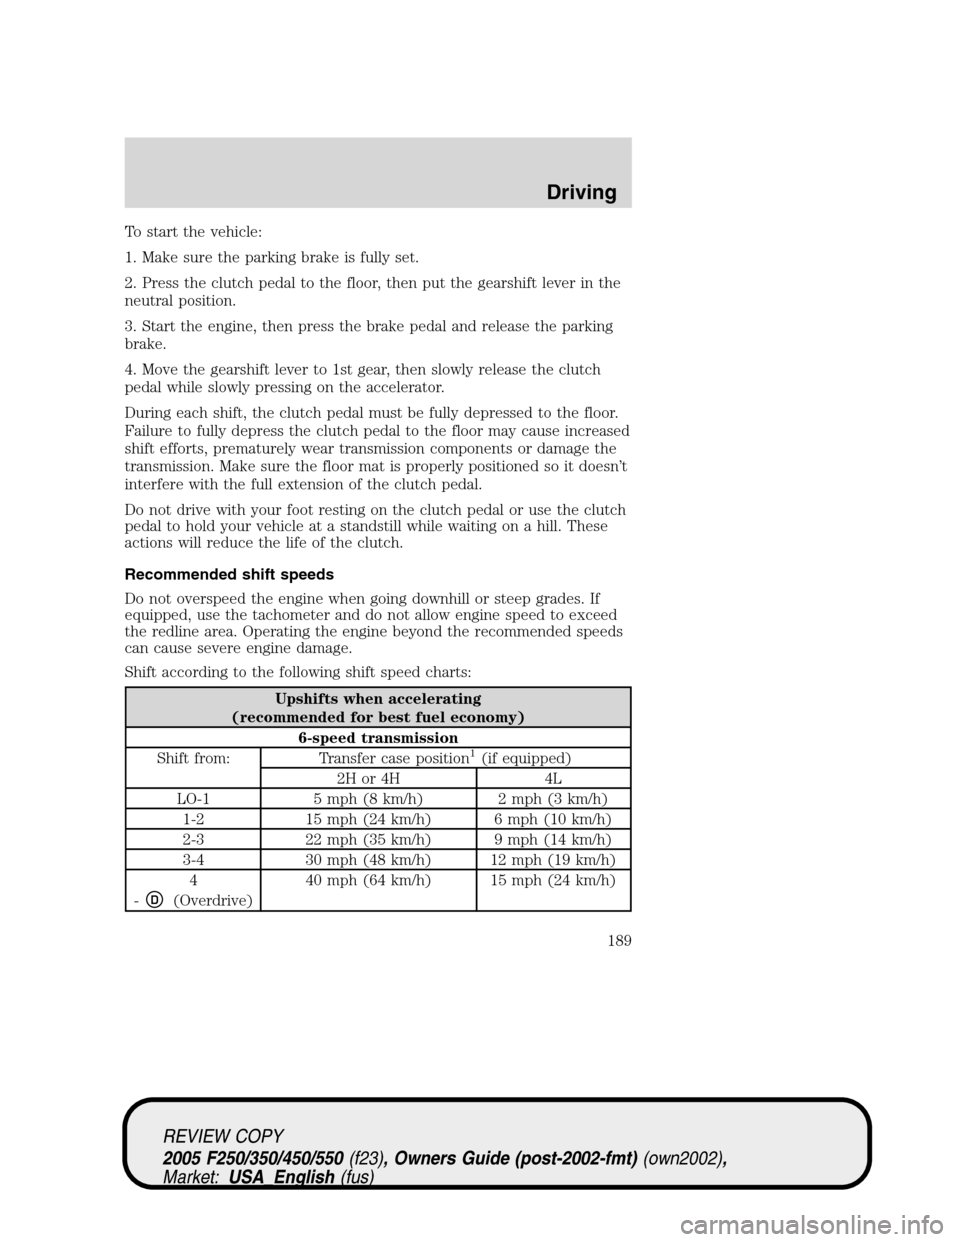
Shift according to the following shift speed charts:
Upshifts when accelerating
(recommended for best fuel economy)
6-speed transmission
Shift from: Transfer case position
1(if equipped)
2H or 4H 4L
LO-1 5 mph (8 km/h) 2 mph (3 km/h)
1-2 15 mph (24 km/h) 6 mph (10 km/h)
2-3 22 mph (35 km/h) 9 mph (14 km/h)
3-4 30 mph (48 km/h) 12 mph (19 km/h)
4
-
D(Overdrive)40 mph (64 km/h) 15 mph (24 km/h)
REVIEW COPY
2005 F250/350/450/550(f23), Owners Guide (post-2002-fmt)(own2002),
Market:USA_English(fus)
Driving
189
Page 190 of 304
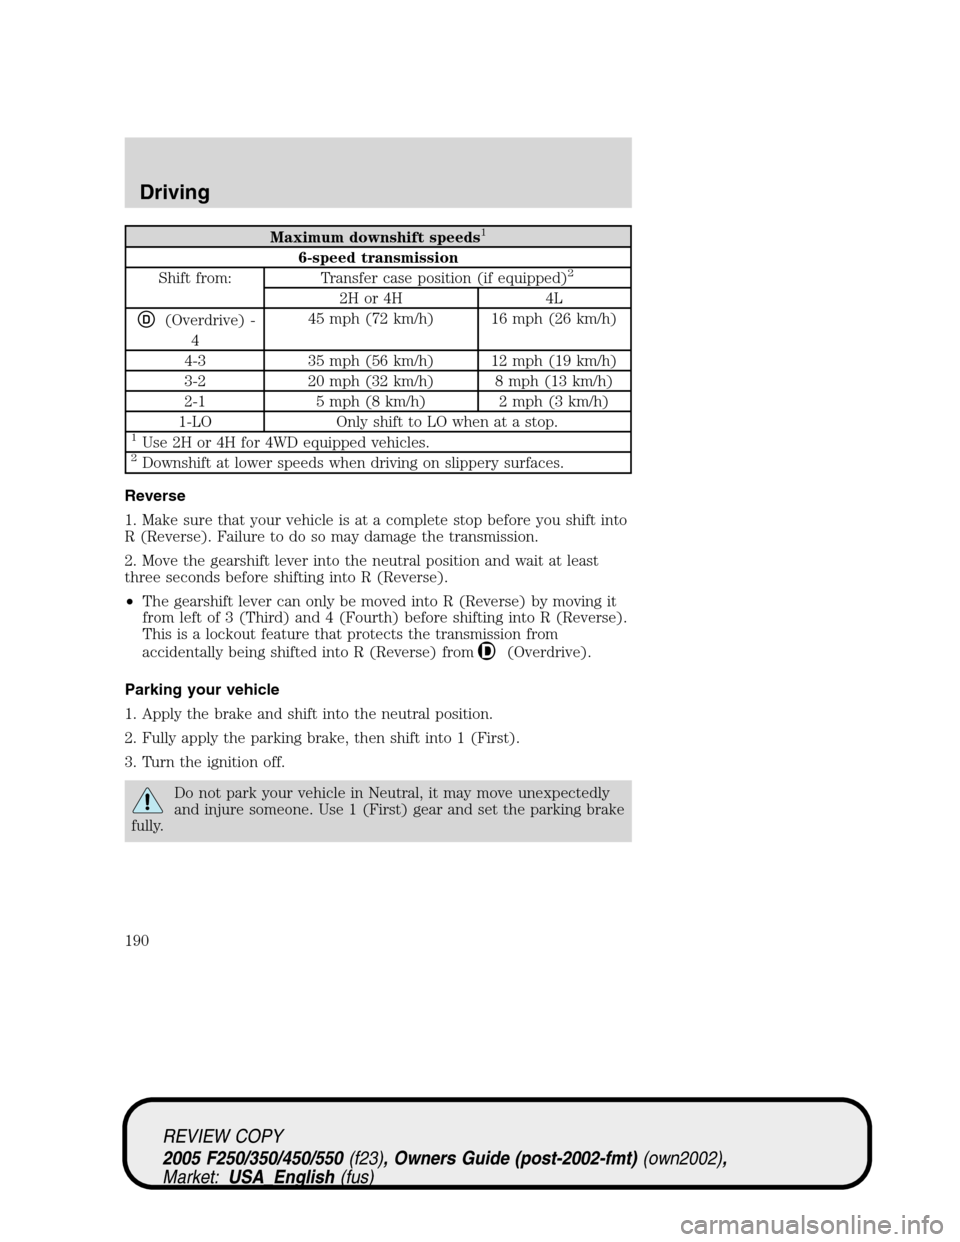
Maximum downshift speeds1
6-speed transmission
Shift from: Transfer case position (if equipped)2
2H or 4H 4L
D(Overdrive) -
445 mph (72 km/h) 16 mph (26 km/h)
4-3 35 mph (56 km/h) 12 mph (19 km/h)
3-2 20 mph (32 km/h) 8 mph (13 km/h)
2-1 5 mph (8 km/h) 2 mph (3 km/h)
1-LO Only shift to LO when at a stop.
1Use 2H or 4H for 4WD equipped vehicles.2Downshift at lower speeds when driving on slippery surfaces.
Reverse
1. Make sure that your vehicle is at a complete stop before you shift into
R (Reverse). Failure to do so may damage the transmission.
2. Move the gearshift lever into the neutral position and wait at least
three seconds before shifting into R (Reverse).
•The gearshift lever can only be moved into R (Reverse) by moving it
from left of 3 (Third) and 4 (Fourth) before shifting into R (Reverse).
This is a lockout feature that protects the transmission from
accidentally being shifted into R (Reverse) from
(Overdrive).
Parking your vehicle
1. Apply the brake and shift into the neutral position.
2. Fully apply the parking brake, then shift into 1 (First).
3. Turn the ignition off.
Do not park your vehicle in Neutral, it may move unexpectedly
and injure someone. Use 1 (First) gear and set the parking brake
fully.
REVIEW COPY
2005 F250/350/450/550(f23), Owners Guide (post-2002-fmt)(own2002),
Market:USA_English(fus)
Driving
190
Page 194 of 304
LOW (4WD Low) can be engaged, the vehicle speed must be
below 3 mph (5 km/h) with the brake pedal depressed and the
transmission in N (Neutral). This vehicle is equipped with a
non-synchronous low range gearset which will not allow the
transfer case to shift into 4X4 LOW (4WD Low) if vehicle speed
is above 3 mph (5 km/h). It is recommended that a shift to 4X4
LOW (4WD Low) is performed while the vehicle speed is below 3
mph (5 km/h).
The 4WD system:
•provides 4x4 High engagement and disengagement while the vehicle is
moving.
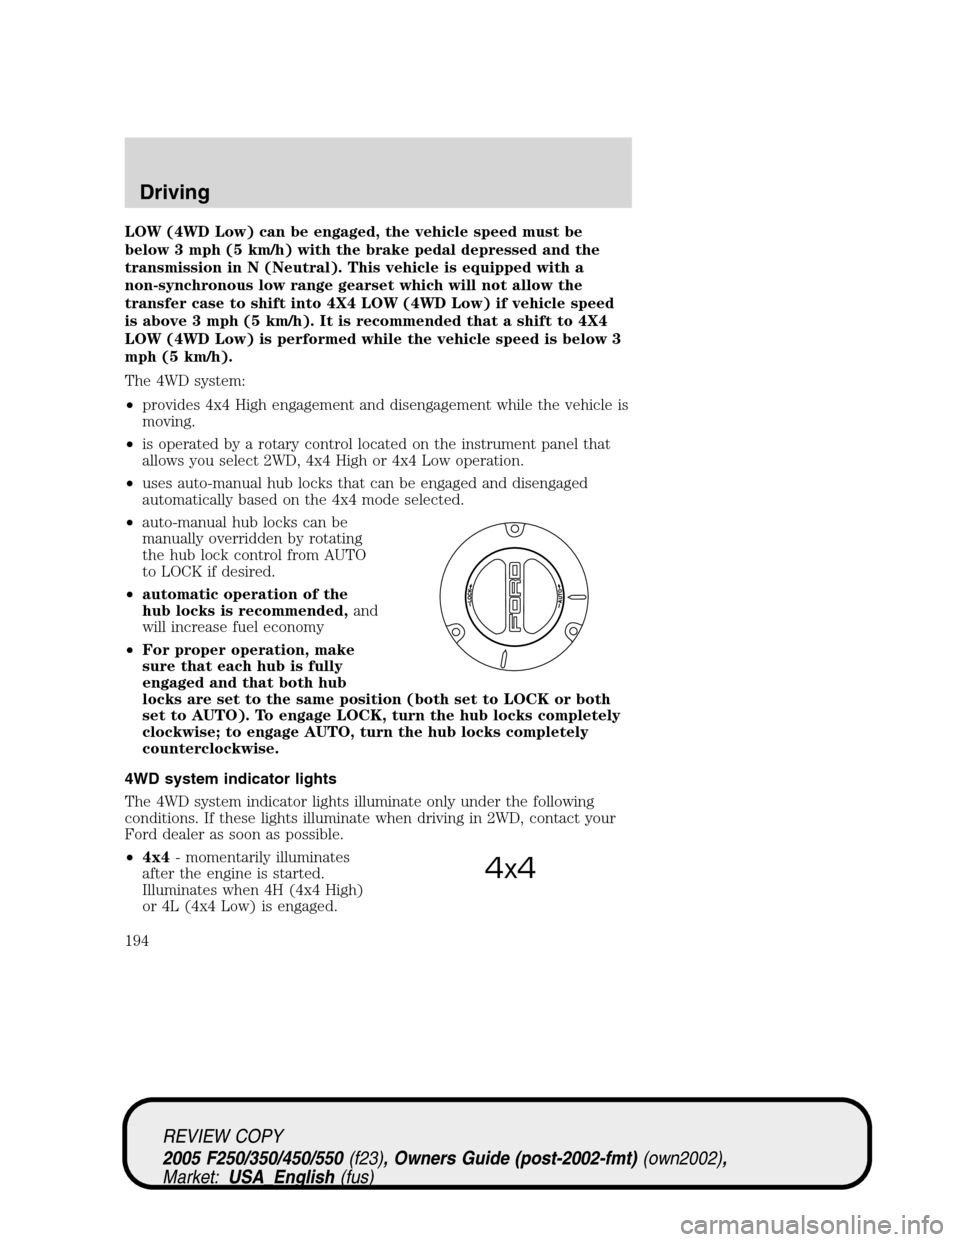
•is operated by a rotary control located on the instrument panel that
allows you select 2WD, 4x4 High or 4x4 Low operation.
•uses auto-manual hub locks that can be engaged and disengaged
automatically based on the 4x4 mode selected.
•auto-manual hub locks can be
manually overridden by rotating
the hub lock control from AUTO
to LOCK if desired.
•automatic operation of the
hub locks is recommended,and
will increase fuel economy
•For proper operation, make
sure that each hub is fully
engaged and that both hub
locks are set to the same position (both set to LOCK or both
set to AUTO). To engage LOCK, turn the hub locks completely
clockwise; to engage AUTO, turn the hub locks completely
counterclockwise.
4WD system indicator lights
The 4WD system indicator lights illuminate only under the following
conditions. If these lights illuminate when driving in 2WD, contact your
Ford dealer as soon as possible.
•4x4- momentarily illuminates
after the engine is started.
Illuminates when 4H (4x4 High)
or 4L (4x4 Low) is engaged.
4x4
REVIEW COPY
2005 F250/350/450/550(f23), Owners Guide (post-2002-fmt)(own2002),
Market:USA_English(fus)
Driving
194
Page 196 of 304
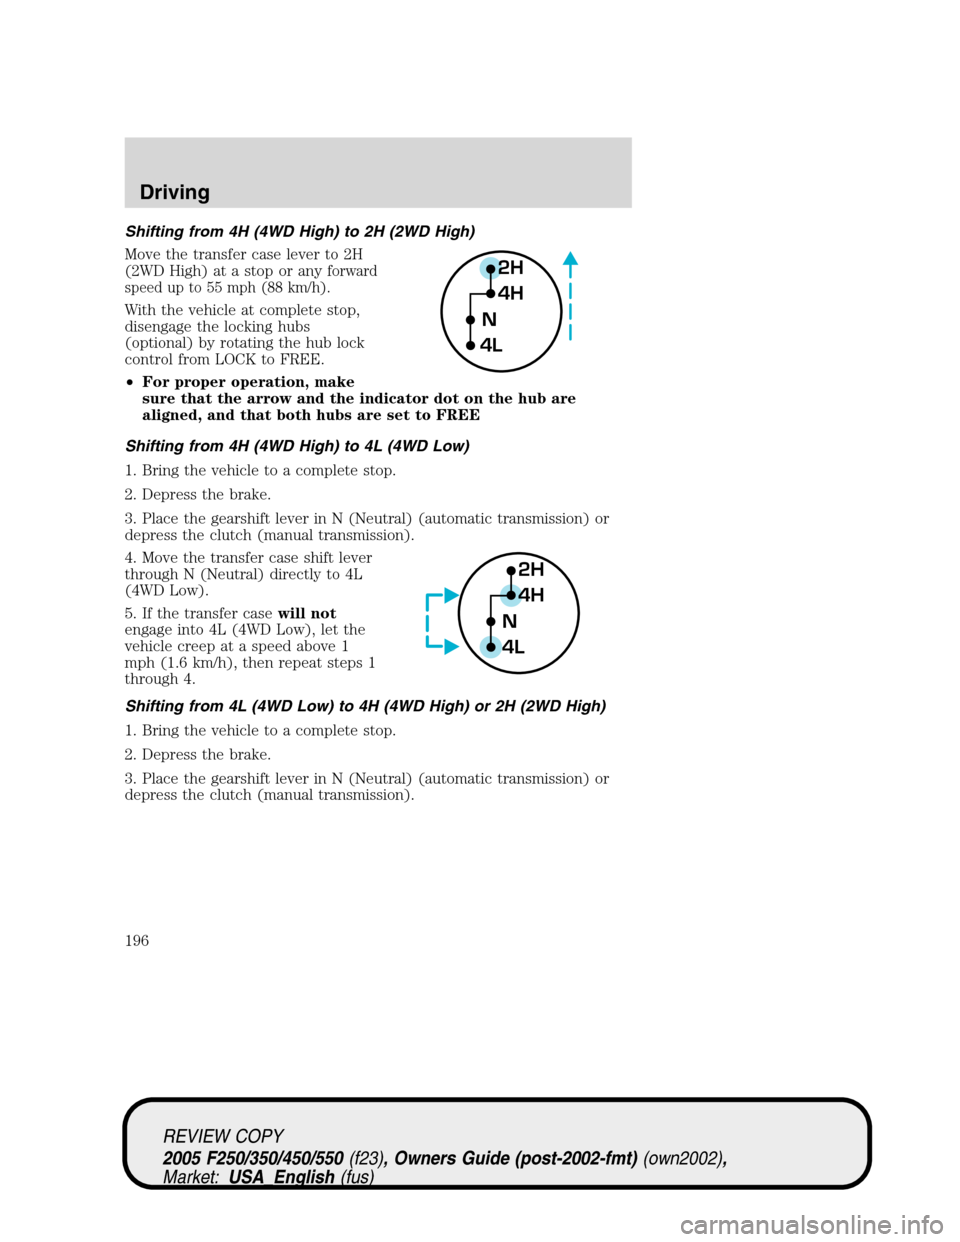
Shifting from 4H (4WD High) to 2H (2WD High)
Move the transfer case lever to 2H
(2WD High) at a stop or any
forward
speed up to 55 mph (88 km/h).
With the vehicle at complete stop,
disengage the locking hubs
(optional) by rotating the hub lock
control from LOCK to FREE.
•For proper operation, make
sure that the arrow and the indicator dot on the hub are
aligned, and that both hubs are set to FREE
Shifting from 4H (4WD High) to 4L (4WD Low)
1. Bring the vehicle to a complete stop.
2. Depress the brake.
3. Place the gearshift lever in N (Neutral) (automatic transmission) or
depress the clutch (manual transmission).
4. Move the transfer case shift lever
through N (Neutral) directly to 4L
(4WD Low).
5. If the transfer casewill not
engage into 4L (4WD Low), let the
vehicle creep at a speed above 1
mph (1.6 km/h), then repeat steps 1
through 4.
Shifting from 4L (4WD Low) to 4H (4WD High) or 2H (2WD High)
1. Bring the vehicle to a complete stop.
2. Depress the brake.
3. Place the gearshift lever in N (Neutral) (automatic transmission) or
depress the clutch (manual transmission).
2H
4H
4LN
2H
4H
4LN
REVIEW COPY
2005 F250/350/450/550(f23), Owners Guide (post-2002-fmt)(own2002),
Market:USA_English(fus)
Driving
196
Page 197 of 304
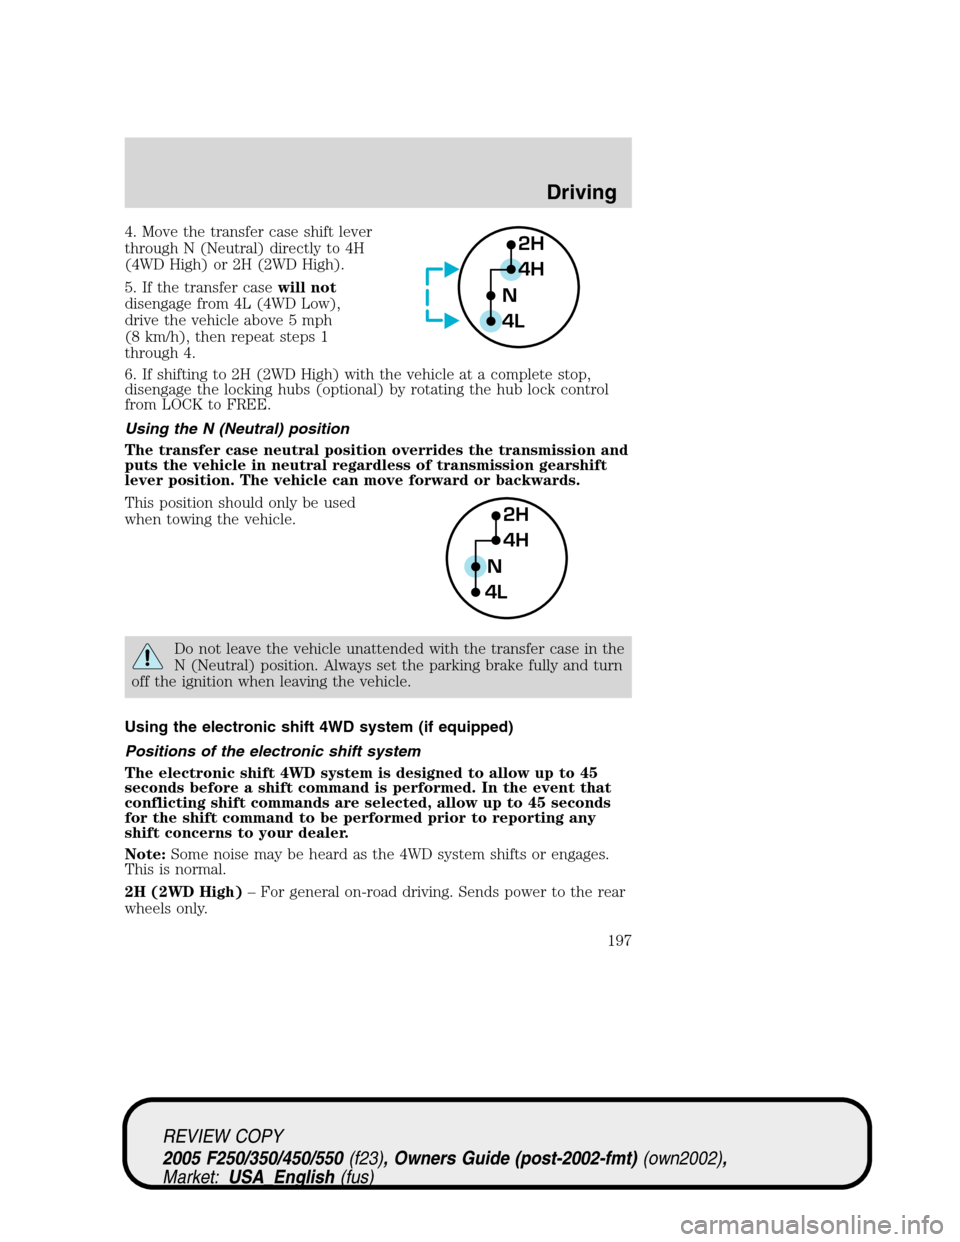
4. Move the transfer case shift lever
through N (Neutral) directly to 4H
(4WD High) or 2H (2WD High).
5. If the transfer casewill not
disengage from 4L (4WD Low),
drive the vehicle above 5 mph
(8 km/h), then repeat steps 1
through 4.
6. If shifting to 2H (2WD High) with the vehicle at a complete stop,
disengage the locking hubs (optional) by rotating the hub lock control
from LOCK to FREE.
Using the N (Neutral) position
The transfer case neutral position overrides the transmission and
puts the vehicle in neutral regardless of transmission gearshift
lever position. The vehicle can move forward or backwards.
This position should only be used
when towing the vehicle.
Do not leave the vehicle unattended with the transfer case in the
N (Neutral) position. Always set the parking brake fully and turn
off the ignition when leaving the vehicle.
Using the electronic shift 4WD system (if equipped)
Positions of the electronic shift system
The electronic shift 4WD system is designed to allow up to 45
seconds before a shift command is performed. In the event that
conflicting shift commands are selected, allow up to 45 seconds
for the shift command to be performed prior to reporting any
shift concerns to your dealer.
Note:Some noise may be heard as the 4WD system shifts or engages.
This is normal.
2H (2WD High)– For general on-road driving. Sends power to the rear
wheels only.
2H
4H
4LN
2H
4H
4LN
REVIEW COPY
2005 F250/350/450/550(f23), Owners Guide (post-2002-fmt)(own2002),
Market:USA_English(fus)
Driving
197
Page 198 of 304
4H (4WD High)– For winter and off-road conditions. Sends power to
front and rear wheels.
4L (4WD Low)– For low-speed off-road applications that require extra
power such as steep grades, deep sand or pulling a boat out of the water.
Sends power to front and rear wheels.
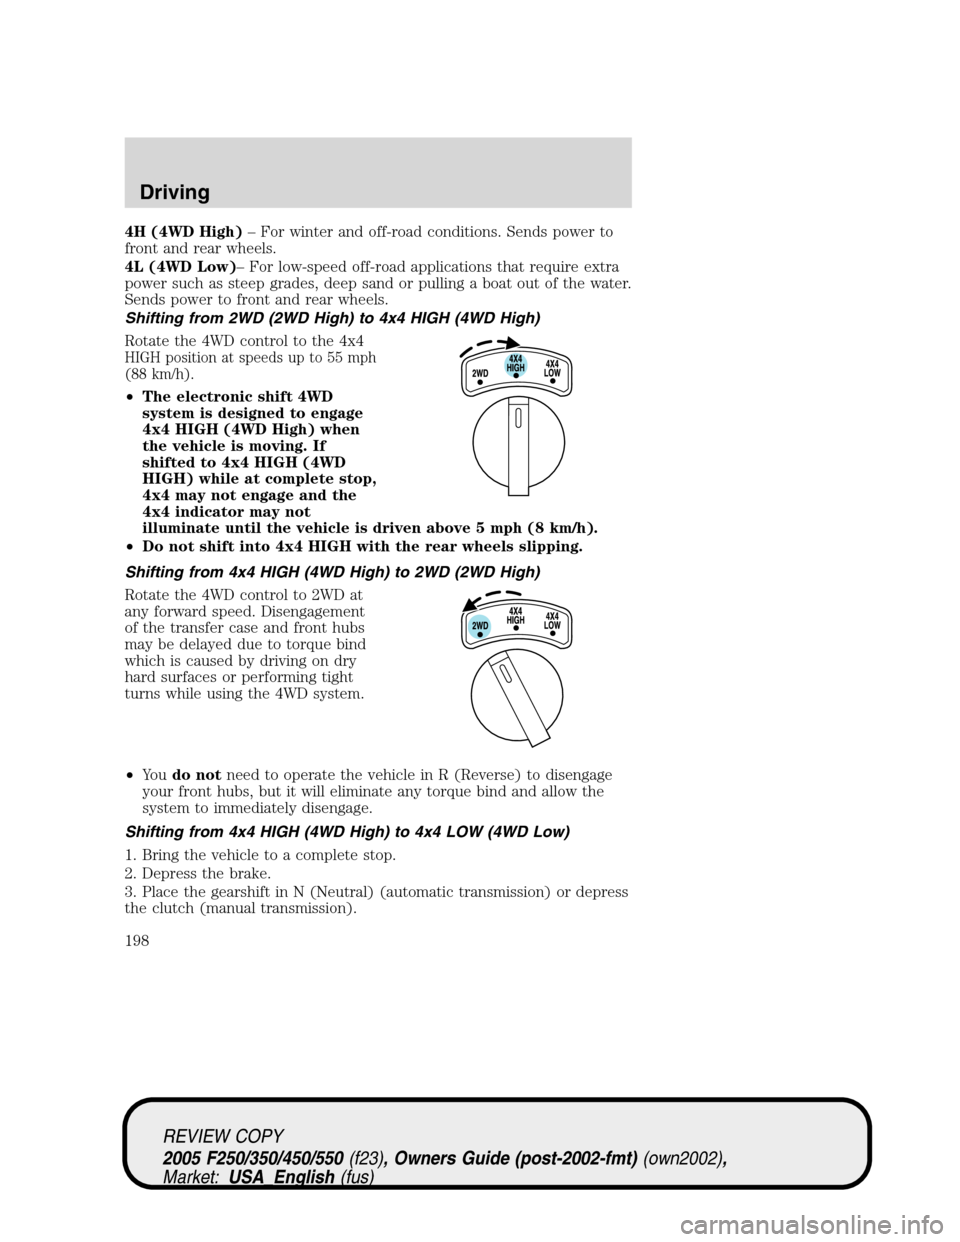
Shifting from 2WD (2WD High) to 4x4 HIGH (4WD High)
Rotate the 4WD control to the 4x4
HIGH position at speeds up to 55 mph
(88 km/h).
•The electronic shift 4WD
system is designed to engage
4x4 HIGH (4WD High) when
the vehicle is moving. If
shifted to 4x4 HIGH (4WD
HIGH) while at complete stop,
4x4 may not engage and the
4x4 indicator may not
illuminate until the vehicle is driven above 5 mph (8 km/h).
•Do not shift into 4x4 HIGH with the rear wheels slipping.
Shifting from 4x4 HIGH (4WD High) to 2WD (2WD High)
Rotate the 4WD control to 2WD at
any forward speed. Disengagement
of the transfer case and front hubs
may be delayed due to torque bind
which is caused by driving on dry
hard surfaces or performing tight
turns while using the 4WD system.
•Yo udo notneed to operate the vehicle in R (Reverse) to disengage
your front hubs, but it will eliminate any torque bind and allow the
system to immediately disengage.
Shifting from 4x4 HIGH (4WD High) to 4x4 LOW (4WD Low)
1. Bring the vehicle to a complete stop.
2. Depress the brake.
3. Place the gearshift in N (Neutral) (automatic transmission) or depress
the clutch (manual transmission).
REVIEW COPY
2005 F250/350/450/550(f23), Owners Guide (post-2002-fmt)(own2002),
Market:USA_English(fus)
Driving
198
Page 199 of 304

4. Move the 4WD control to the 4x4
LOW position.
5. Hold the shift conditions until the
LOW RANGE indicator light
illuminates.
6. If the LOW RANGE indicator light
does notilluminate within 15
seconds, let the vehicle creep at a
speed above 1 mph (1.6 km/h), then
repeat steps 1 through 5 before
reporting any shift concerns to your dealer.
Shifting from 4x4 LOW (4WD Low) to 4x4 HIGH (4WD High) or 2WD
(2WD High)
1. Bring the vehicle to a complete stop.
2. Depress the brake.
3. Place the gearshift in N (Neutral) (automatic transmission) or depress
the clutch (manual transmission).
4. Move the 4WD control to the 4x4
HIGH (4WD High) or 2WD (2WD
High) position.
5. Hold the shift conditions until the
LOW RANGE indicator light shuts
off.
6. If the LOW RANGE indicator light
does notshut off within 15 seconds,
drive the vehicle above 5 mph (8 km/h),
then repeat steps 1 through 5 before
reporting any shift concerns to your dealer.
Driving off-road with truck and utility vehicles
4WD vehicles are specially equipped for driving on sand, snow, mud and
rough terrain and have operating characteristics that are somewhat
different from conventional vehicles, both on and off the road.
How your vehicle differs from other vehicles
Truck and utility vehicles can differ from some other vehicles. Your
vehicle may be higher to allow it to travel over rough terrain without
getting hung up or damaging underbody components.
The differences that make your vehicle so versatile also make it handle
differently than an ordinary passenger car.
REVIEW COPY
2005 F250/350/450/550(f23), Owners Guide (post-2002-fmt)(own2002),
Market:USA_English(fus)
Driving
199