2005 FORD SUPER DUTY check engine light
[x] Cancel search: check engine lightPage 7 of 72
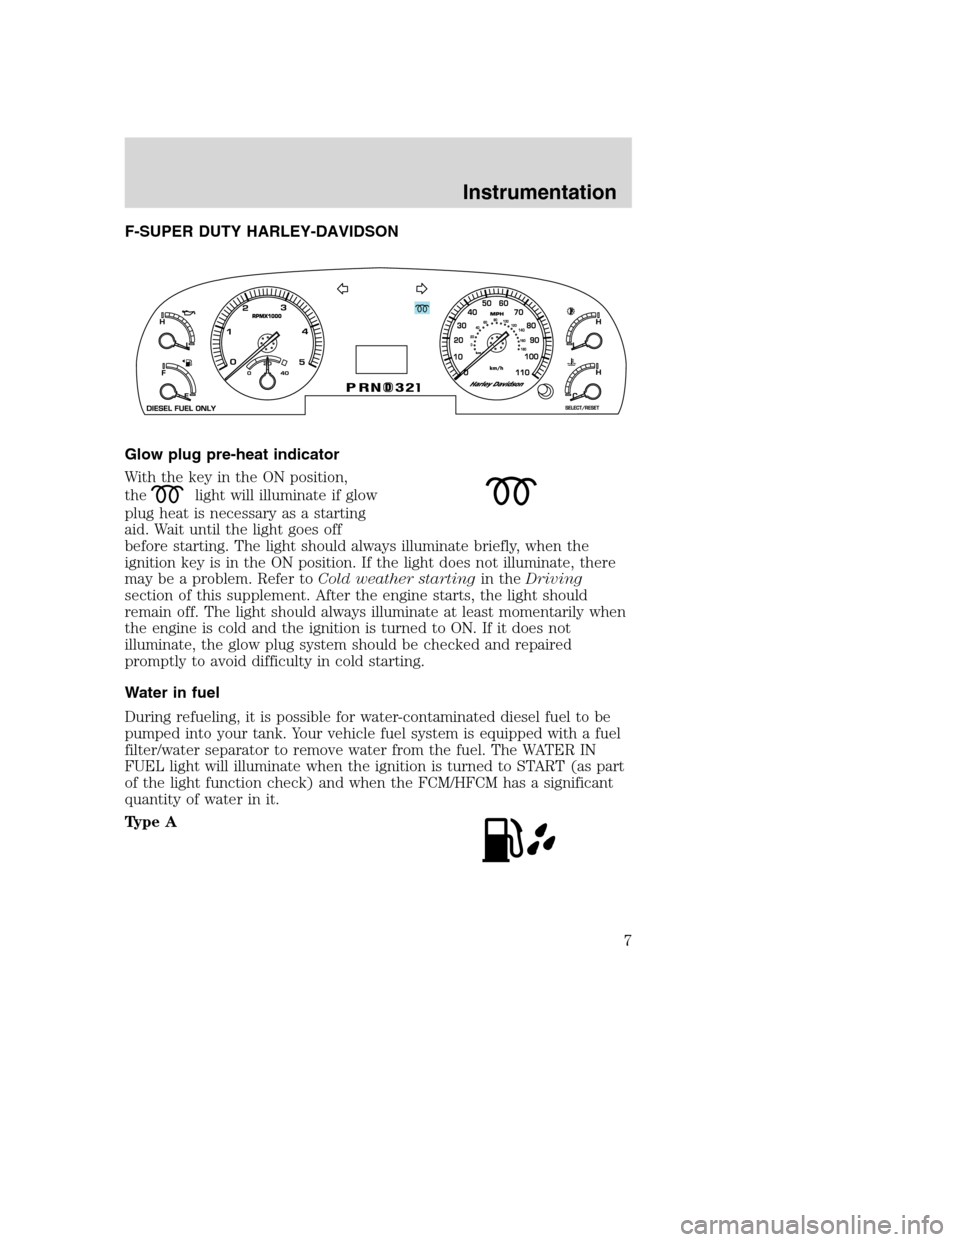
F-SUPER DUTY HARLEY-DAVIDSON
Glow plug pre-heat indicator
With the key in the ON position,
the
light will illuminate if glow
plug heat is necessary as a starting
aid. Wait until the light goes off
before starting. The light should always illuminate briefly, when the
ignition key is in the ON position. If the light does not illuminate, there
may be a problem. Refer toCold weather startingin theDriving
section of this supplement. After the engine starts, the light should
remain off. The light should always illuminate at least momentarily when
the engine is cold and the ignition is turned to ON. If it does not
illuminate, the glow plug system should be checked and repaired
promptly to avoid difficulty in cold starting.
Water in fuel
During refueling, it is possible for water-contaminated diesel fuel to be
pumped into your tank. Your vehicle fuel system is equipped with a fuel
filter/water separator to remove water from the fuel. The WATER IN
FUEL light will illuminate when the ignition is turned to START (as part
of the light function check) and when the FCM/HFCM has a significant
quantity of water in it.
Type A
Instrumentation
7
Page 9 of 72
The vehicle may be driven with the engine air filter warning light
illuminated/or when the underhood air filter restriction gauge has moved
to the CHANGE FILTER mark for up to 400 km (250 miles) without
damaging the engine or related components. However, the air filter
element must be replaced at the earliest opportunity. Refer toAir filter
restriction gauge (if equipped)in this section of the supplement for
more information.
Transmission Tow/Haul Feature
(if equipped):Illuminates when
the Tow/Haul feature has been
selected. Refer to theDriving
chapter for transmission function and operation. If the light flashes
steadily or does not illuminate, have the transmission serviced soon, or
damage may occur.
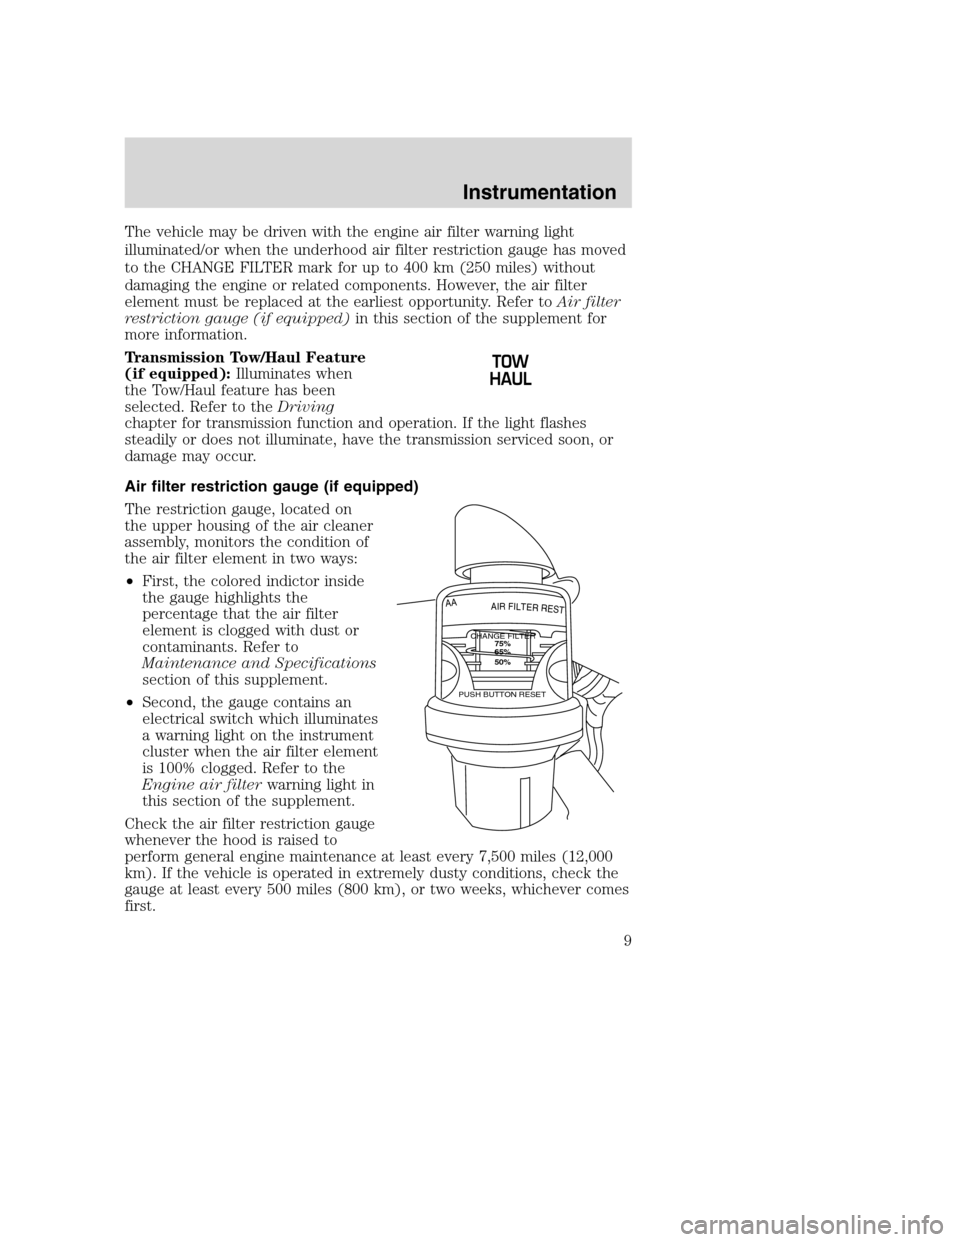
Air filter restriction gauge (if equipped)
The restriction gauge, located on
the upper housing of the air cleaner
assembly, monitors the condition of
the air filter element in two ways:
•First, the colored indictor inside
the gauge highlights the
percentage that the air filter
element is clogged with dust or
contaminants. Refer to
Maintenance and Specifications
section of this supplement.
•Second, the gauge contains an
electrical switch which illuminates
a warning light on the instrument
cluster when the air filter element
is 100% clogged. Refer to the
Engine air filterwarning light in
this section of the supplement.
Check the air filter restriction gauge
whenever the hood is raised to
perform general engine maintenance at least every 7,500 miles (12,000
km). If the vehicle is operated in extremely dusty conditions, check the
gauge at least every 500 miles (800 km), or two weeks, whichever comes
first.
AIRFILTERRESTAA
CHANGE FILTER
PUSH BUTTON RESET75%
50%65%
Instrumentation
9
Page 32 of 72
FCM/HFCM drain procedure
1. Stop the vehicle andshut offthe engine.
The vehicle must be stopped with the engine off when draining
the HFCM/FCM. Fuel may ignite if the separator is drained while
the engine is running or vehicle is moving.
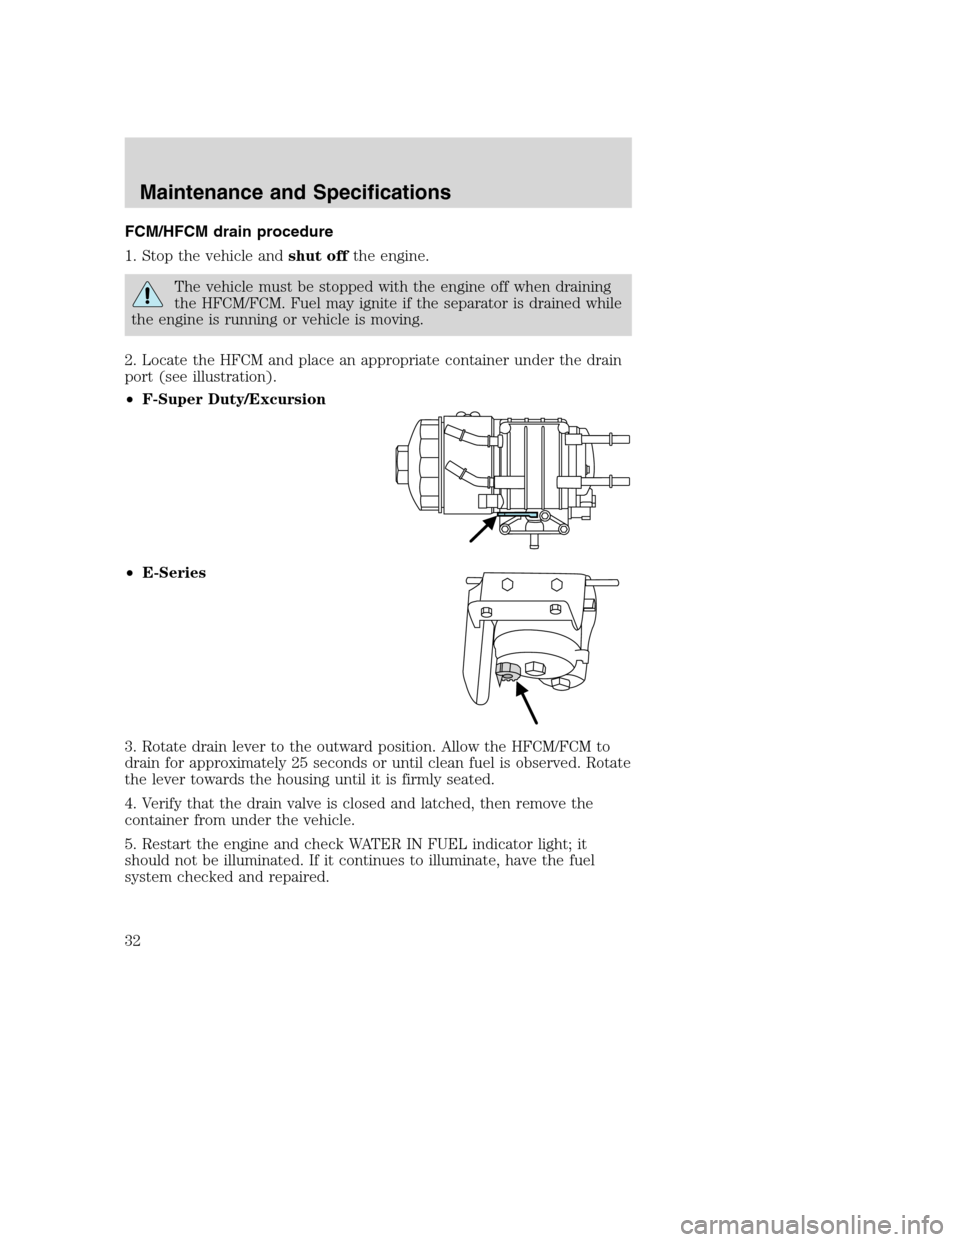
2. Locate the HFCM and place an appropriate container under the drain
port (see illustration).
•F-Super Duty/Excursion
•E-Series
3. Rotate drain lever to the outward position. Allow the HFCM/FCM to
drain for approximately 25 seconds or until clean fuel is observed. Rotate
the lever towards the housing until it is firmly seated.
4. Verify that the drain valve is closed and latched, then remove the
container from under the vehicle.
5. Restart the engine and check WATER IN FUEL indicator light; it
should not be illuminated. If it continues to illuminate, have the fuel
system checked and repaired.
Maintenance and Specifications
32
Page 42 of 72
remove the coolant pressure relief cap on the radiator of a vehicle with
an overflow system, follow these steps to add engine coolant.
To reduce the risk of personal injury, make sure the engine is
cool before unscrewing the coolant pressure relief cap. The
cooling system is under pressure; steam and hot liquid can come out
forcefully when the cap is loosened slightly.
1. Before you begin, turn the engine off and let it cool.
2. When the engine is cool, wrap a thick cloth around the coolant
pressure relief cap on the coolant reservoir (a translucent plastic bottle).
Slowly turn cap counterclockwise (left) until pressure begins to release.
3. Step back while the pressure releases.
4. When you are sure that all the pressure has been released, use the
cloth to turn it counterclockwise and remove the cap.
5. Fill the coolant reservoir slowly with the proper coolant mixture (see
above), to within the“COLD FILL RANGE”or the“FULL COLD”level on
the reservoir. If you removed the radiator cap in an overflow system, fill
the radiator until the coolant is visible and radiator is almost full.
6. Replace the cap. Turn until tightly installed. (Cap must be tightly
installed to prevent coolant loss.)
After any coolant has been added, check the coolant concentration (refer
toChecking engine coolant). If the concentration is not 50/50
(protection to–34°F/–36°C), drain some coolant and adjust the
concentration. It may take several drains and additions to obtain a 50/50
coolant concentration.
Whenever coolant has been added, the coolant level in the coolant
reservoir should be checked the next few times you drive the vehicle. If
necessary, add enough 50/50 concentration of engine coolant and
distilled water to bring the liquid level to the proper level.
If you have to add more than 1.0 quart (1.0 liter) of engine coolant per
month, have your dealer check the engine cooling system. Your cooling
system may have a leak. Operating an engine with a low level of coolant
can result in engine overheating and possible engine damage.
Recycled engine coolant
Ford Motor Company does NOT recommend the use of recycled engine
coolant in vehicles originally equipped with Motorcraft Premium Gold
Engine Coolant since a Ford-approved recycling process is not yet
available.
Maintenance and Specifications
42
Page 45 of 72
The complexity of the diesel engine makes it so the owner is discouraged
from attempting to perform maintenance other than the services
described in this supplement.
If you experience difficult starting, rough idling, excessive exhaust
smoke, a decrease in engine performance or excess fuel consumption,
perform the following checks:
•a plugged air inlet system or engine air filter element.
•water in the fuel filter/water separator.
•a clogged fuel filter.
•contaminated fuel.
•air in the fuel system, due to loose connections.
•an open or pinched sensor hose.
•low engine oil level.
•wrong fuel or oil viscosity for climactic conditions.
If these checks do not help you correct the engine performance problem
you are experiencing, consult an authorized dealer.
FUELING
Do not use starting fluid such as ether or gasoline in the diesel
air intake system. Such fluids can cause immediate explosive
damage to the engine and possible personal injury.
If you fuel your vehicle at a truck stop, you may notice that the fuel
nozzle may shut off every 5–10 seconds. This is due to the flow rates
being designed for larger heavy duty trucks. You may have to fuel at a
slower rate (don’t depress the nozzle trigger fully).
Do not run your diesel vehicle out of fuel as this will allow air to enter
the fuel system which will make restarting difficult. Longer engine
cranking time may be required once air is in the fuel system. If air enters
the fuel system (either through running the fuel tank(s) empty or during
a fuel filter change), the engine will self-purge the trapped air once it
starts running. The engine may run roughly and produce white smoke
while air is in the fuel system; this is normal and should stop after a
short time.
MINOR TROUBLESHOOTING GUIDE
If the engine won’t crank
Turn on the headlights. If the lights are dim, do not go on at all or if
when the ignition is turned to 5 (START) the lights become dim or go
Maintenance and Specifications
45
Page 52 of 72
Company’s specifications, and we stand behind them. Maintenance parts
installed at your Ford or Lincoln Mercury dealership carry a nationwide,
12 months, 12,000 mile parts and labor limited warranty. Your dealer can
give you details.
Value Shopping for Your Vehicle’s Maintenance Needs
Your dealership recognizes the competitive landscape of maintenance and
light repair automotive services. With factory-trained technicians, and
one-stop service from routine maintenance like oil changes and tire
rotations to repairs like brake service, check out the value your Ford and
Lincoln Mercury dealers can offer.
WHICH MAINTENANCE SCHEDULE SHOULD YOU FOLLOW?
Owner Checks and Services
Refer to Mileage Intervals for Additional Checks and Services
Certain basic maintenance checks and inspections should be performed
by the owner or a service technician at the intervals indicated. Service
information and supporting specifications are provided in the Owner’s
Guide.
Any adverse condition should be brought to the attention of your dealer
or qualified service technician as soon as possible for the proper service
advice. The owner maintenance service checks are generally not covered
by warranties so you may be charged for labor, parts or lubricants used.
Maximum Oil Change Interval:
Normal Schedule: 7,500 miles or 6 months, whichever occurs first.
Special Operating Conditions: 5,000 miles, 6 months or 200 hours of
engine operation, see appropriate schedule.
Check every month:
•Check function of all interior and exterior lights
•Check tires for wear and adjust air pressure (including spare tire)
•Check engine oil level
•Check windshield washer fluid level
•Check and drain fuel filter/water separator
Check every six months:
•Check lap/shoulder belts and seat latches for wear and function
•Check that externally-mounted spare tire is tight (see Owner’s Guide)
General Owner’s Information
52
Page 64 of 72
•Inspect air filter restriction gauge, replace filter as required
•Inspect and lubricate steering linkage, ball joints, suspension,
driveshaft and u-joints.
•Inspect engine cooling system and hoses
•Inspect brake pads, shoes, rotors, drums, brake lines and hoses and
parking brake system.
•Inspect exhaust system and heat shields
•Check wheels for end play and noise
•Inspect and lubricate 4x4 front axle u-joints
Date:
Odometer reading:
R.O.#Dealer’s Stamp:
Exceptions
In addition, there are several exceptions to the Normal Schedule. They
are listed below:
Normal vehicle axle maintenance
Rear axles and power take off (PTO) units containing synthetic lubricant
and light duty trucks equipped with Ford-design axles are lubricated for
life. These lubricants are not to be checked or changed unless a leak is
suspected, service is required or the axle assembly has been submerged
in water. The axle and PTO lubricant should be changed anytime the
axle and PTO have been submerged in water. Non-synthetic rear axle
lubricants should be replaced every 3,000 miles or 3 months, whichever
occurs first, during extended trailer tow operation above 21 Celsius (70
degrees Fahrenheit) ambient and wide open throttle for extended
periods above 45 mph. The 3,000 mile lube change interval may be
waived if the axle was filled with 75W140 synthetic gear lubricant
meeting Ford specification WSL-M2C192-A, part number F1TZ-19580-B
or equivalent. Add four ounces of additive friction modifier
C8AZ-19B546-A (EST-M2C118-A) or equivalent for complete refill of
Traction-Lok rear axles. The axle lubricant should be changed anytime
an axle has been submerged in water.
E-450, F-450 and F-550 Series axle maintenance
Replace rear axle lubricant every 100,000 miles under normal driving
conditions on all F-450 and F-550 commercial applications. For F-450
General Owner’s Information
64