Page 2 of 288
Seating and Safety Restraints 106
Seating 106
Safety restraints 118
Air bags 131
Child restraints 144
Tires, Wheels and Loading 158
Tire Information 159
Tire Inflation 160
Changing tires 163
Lug Nut Torque 170
Vehicle loading 180
Trailer towing 186
Recreational towing 189
Driving 190
Starting 190
Brakes 194
Traction control 196
Transmission operation 197
Roadside Emergencies 209
Getting roadside assistance 209
Hazard flasher switch 210
Fuel pump shut-off switch 210
Fuses and relays 211
Jump starting 218
Wrecker towing 223
Customer Assistance 225
Reporting safety defects (U.S. only) 233
Cleaning 234
Table of Contents
2
REVIEW COPY
2005 Freestyle(219), Owners Guide (post-2002-fmt)(own2002),
Market:USA_English(fus)
Page 5 of 288

SAFETY AND ENVIRONMENT PROTECTION
Warning symbols in this guide
How can you reduce the risk of personal injury to yourself or others? In
this guide, answers to such questions are contained in comments
highlighted by the warning triangle symbol. These comments should be
read and observed.
Warning symbols on your vehicle
When you see this symbol, it is
imperative that you consult the
relevant section of this guide before
touching or attempting adjustment
of any kind.
Protecting the environment
We must all play our part in
protecting the environment. Correct
vehicle usage and the authorized
disposal of waste, cleaning and
lubrication materials are significant
steps towards this aim. Information in this respect is highlighted in this
guide with the tree symbol.
BREAKING-IN YOUR VEHICLE
Your vehicle does not need an extensive break-in. Try not to drive
continuously at the same speed for the first 1,000 miles (1,600 km) of
new vehicle operation. Vary your speed frequently in order to give the
moving parts a chance to break in.
Drive your new vehicle at least 500 miles (800 km) before towing a
trailer.
Do not add friction modifier compounds or special break-in oils during
the first few thousand miles (kilometers) of operation, since these
additives may prevent piston ring seating. SeeEngine oilin the
Maintenance and Specificationschapter for more information on oil
usage.
REVIEW COPY
2005 Freestyle(219), Owners Guide (post-2002-fmt)(own2002),
Market:USA_English(fus)
Introduction
5
Page 115 of 288
Ensure that the rear latch hooks are
properly engaged with the floor
striker.
Note: Ensure that the seat and
seatback are latched securely in
position. Keep floor area free of
objects that would prevent proper
seat engagement. Do not adjust or
release the seat floor latch while
vehicle is in motion. Do not operate
the vehicle with seats in tumbled position.
Always latch the vehicle seat to the floor, whether the seat is
occupied or empty. If not latched, the seat may cause injury
during a sudden stop.
Stowing the third row bench or split bench seat (if equipped)
1. Push the head restraint release
buttons and move the head
restraints fully down. Remove all
objects from the seat and stowage
tub.
REVIEW COPY
2005 Freestyle(219), Owners Guide (post-2002-fmt)(own2002),
Market:USA_English(fus)
Seating and Safety Restraints
115
Page 116 of 288
2. From the rear of the vehicle, fold seatback by pulling and holding the
number 1 strap while pushing the seatback forward. Release strap once
seatback starts rotating forward.
3. Release the cushion latches by pulling the number 2 strap while
pulling on the strap located at the top of the seatback to tumble the seat
all the way into the tub in the floor.
Do not use the seat anchors as cargo tie downs.
Note:Do not use the third row seatback as a load floor when the
seatback is folded.
Unstowing the third row seat
Note:Ensure that there are no objects such as books, purses or brief
cases on the load floor before unstowing the seat. Failure to remove all
objects from the top of the load floor prior to unstowing it may cause
damage to the seat.
Note:Ensure the area under the load floor is free of objects before
unstowing it.
REVIEW COPY
2005 Freestyle(219), Owners Guide (post-2002-fmt)(own2002),
Market:USA_English(fus)
Seating and Safety Restraints
116
Page 165 of 288

the road tires and wheels that were originally provided by Ford. If the
dissimilar spare tire or wheel is damaged, it should be replaced rather
than repaired.
When driving with the dissimilar spare tire/wheel,do not:
•Exceed 70 mph (113 km/h)
•Use more than one dissimilar spare tire/wheel at a time
•Use commercial car washing equipment
•Use snow chains on the end of the vehicle with the dissimilar spare
tire/wheel
The usage of a dissimilar spare tire/wheel can lead to impairment of the
following:
•Handling, stability and braking performance
•Comfort and noise
•Ground clearance and parking at curbs
•Winter weather driving capability
•Wet weather driving capability
•All-Wheel driving capability (if applicable)
•Load leveling adjustment (if applicable)
When driving with the dissimilar spare tire/wheel additional caution
should be given to:
•Towing a trailer
•Driving vehicles equipped with a camper body
•Driving vehicles with a load on the cargo rack
Drive cautiously when using a dissimilar spare tire/wheel and seek
service as soon as possible.
Removing the spare tire and jack
If the 3rd row seat (if equipped) is stowed in the floor, you will need to
unstow it to access the spare tire and jack. Refer toUnstowing the 3rd
row seatin theSeating and Safety Restraintchapter for this
procedure.
REVIEW COPY
2005 Freestyle(219), Owners Guide (post-2002-fmt)(own2002),
Market:USA_English(fus)
Tires, Wheels and Loading
165
Page 169 of 288

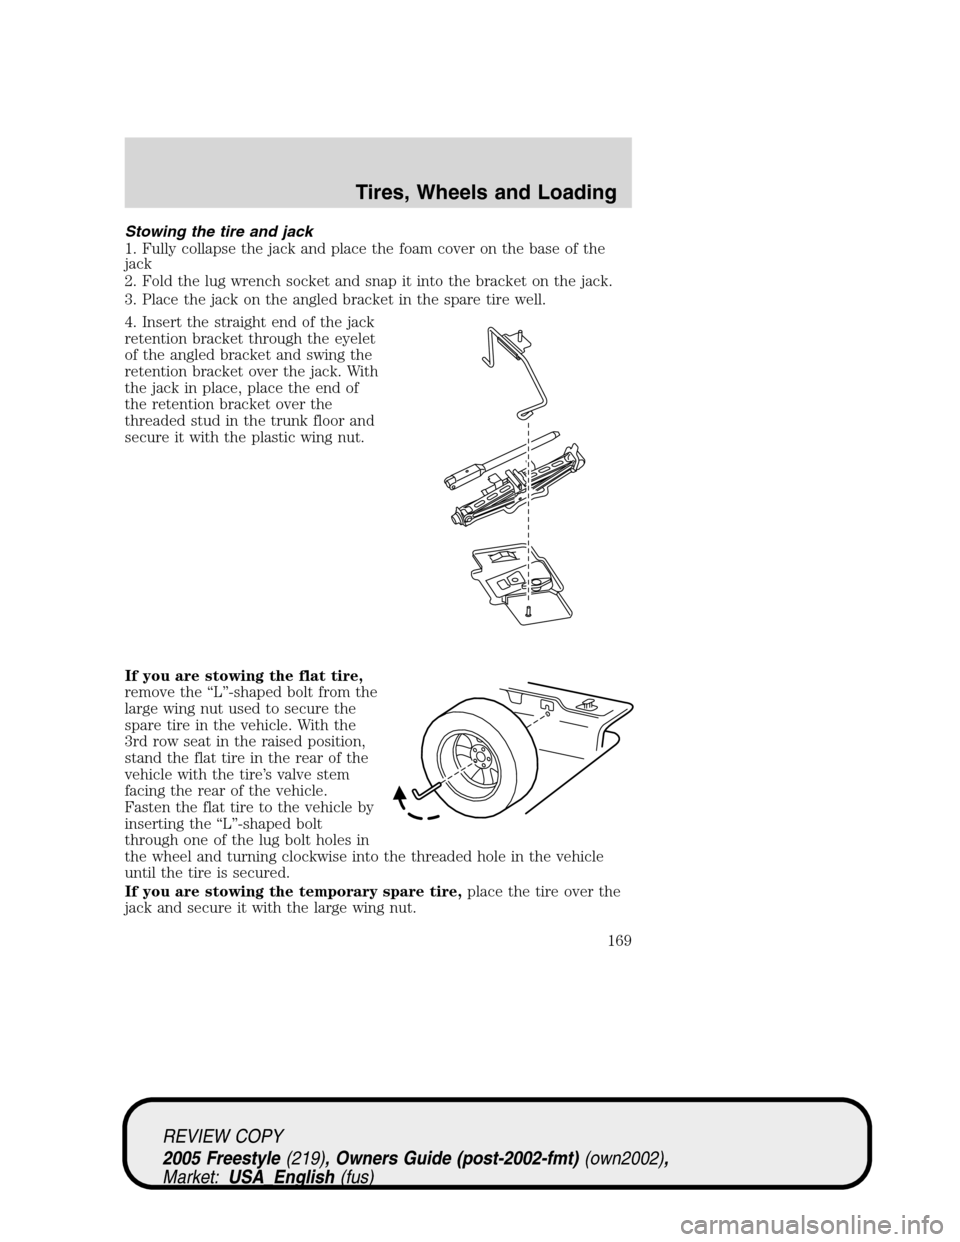
Stowing the tire and jack
1. Fully collapse the jack and place the foam cover on the base of the
jack
2. Fold the lug wrench socket and snap it into the bracket on the jack.
3. Place the jack on the angled bracket in the spare tire well.
4. Insert the straight end of the jack
retention bracket through the eyelet
of the angled bracket and swing the
retention bracket over the jack. With
the jack in place, place the end of
the retention bracket over the
threaded stud in the trunk floor and
secure it with the plastic wing nut.
If you are stowing the flat tire,
remove the“L”-shaped bolt from the
large wing nut used to secure the
spare tire in the vehicle. With the
3rd row seat in the raised position,
stand the flat tire in the rear of the
vehicle with the tire’s valve stem
facing the rear of the vehicle.
Fasten the flat tire to the vehicle by
inserting the“L”-shaped bolt
through one of the lug bolt holes in
the wheel and turning clockwise into the threaded hole in the vehicle
until the tire is secured.
If you are stowing the temporary spare tire,place the tire over the
jack and secure it with the large wing nut.
REVIEW COPY
2005 Freestyle(219), Owners Guide (post-2002-fmt)(own2002),
Market:USA_English(fus)
Tires, Wheels and Loading
169
Page 182 of 288
Cargo Weight–includes all weight added to the Base Curb Weight,
including cargo and optional equipment. When towing, trailer tongue load
or king pin weight is also part of cargo weight.
GAW (Gross Axle Weight)–is the total weight placed on each axle
(front and rear)–including vehicle curb weight and all payload.
REVIEW COPY
2005 Freestyle(219), Owners Guide (post-2002-fmt)(own2002),
Market:USA_English(fus)
Tires, Wheels and Loading
182
Page 183 of 288
GAWR (Gross Axle Weight Rating)–is the maximum allowable
weight that can be carried by a single axle (front or rear).These
numbers are shown on the Safety Compliance Certification Label
located on the driver’s door or B-Pillar. The total load on each
axle must never exceed its GAWR.
Exceeding the Safety Certification Label axle weight rating limits
could result in substandard vehicle handling or performance,
engine, transmission and/or structural damage, serious damage to the
vehicle, loss of control and personal injury.
Note:For trailer towing information refer toTrailer towingfound in
this chapter or theRV and Trailer Towing Guideprovided by your
dealership.
GVW (Gross Vehicle Weight)–is the Vehicle Curb Weight + cargo +
passengers.
REVIEW COPY
2005 Freestyle(219), Owners Guide (post-2002-fmt)(own2002),
Market:USA_English(fus)
Tires, Wheels and Loading
183