2005 FORD F250 SUPER DUTY center
[x] Cancel search: centerPage 1 of 312

Introduction 4
Instrument Cluster 12Warning and control lights 12
Gauges 16
Entertainment Systems 20AM/FM stereo 20
AM/FM stereo with CD 22
AM/FM stereo cassette with CD 25
AM/FM stereo with in-dash six CD 28
Climate Controls 33Heater only 33
Manual heating and air conditioning 34
Automatic temperature control 36
Lights 39Headlamps 39
Turn signal control 44
Bulb replacement 45
Driver Controls 54Windshield wiper/washer control 54
Steering wheel adjustment 55
Moon roof 56
Power windows 57
Mirrors 59
Speed control 62
Message center 66
Locks and Security 79Keys 79
Locks 79Table of Contents
1
2005 F250/350/450/550 (f23)
Owners Guide (post-2002-fmt)
USA_English (fus)Table of Contents
Page 13 of 312

Many lights will illuminate when you start your vehicle to make sure the
bulbs work. If any light remains on after starting the vehicle, have the
respective system inspected immediately.
If your vehicle is equipped with a Diesel engine, it has a unique cluster,
refer to Starting the engine in your 6.0 Liter Power Stroke Direct
Injection Turbo Diesel Owner’s Guide Supplement.
Service engine soon: The Service
engine soon indicator light
illuminates when the ignition is first
turned to the ON position to check
the bulb. Solid illumination after the engine is started indicates the On
Board Diagnostics System (OBD-II) has detected a malfunction. Refer to
On board diagnostics (OBD-II) in the Maintenance and Specifications
chapter. If the light is blinking, engine misfire is occurring which could
damage your catalytic converter. Drive in a moderate fashion (avoid
heavy acceleration and deceleration) and have your vehicle serviced
immediately.
Under engine misfire conditions, excessive exhaust temperatures
could damage the catalytic converter, the fuel system, interior
floor coverings or other vehicle components, possibly causing a fire.
Electronic throttle control:
Illuminates when the engine has
defaulted to a ’limp-home’ operation.
Report the fault to a dealer at the
earliest opportunity.
On vehicles equipped with a message center, “ENGINE FAILSAFE
MODE” will be displayed, refer to Message Center in the Driver
Controls chapter.
Brake system warning light: To
confirm the brake system warning
light is functional, it will
momentarily illuminate when the
ignition is turned to the ON position
when the engine is not running, or in a position between ON and START,
or by applying the parking brake when the ignition is turned to the ON
position. If the brake system warning light does not illuminate at this
time, seek service immediately from your dealership. Illumination after
releasing the parking brake indicates low brake fluid level and the brake
system should be inspected immediately by your servicing dealership.
P!
BRAKE
2005 F250/350/450/550 (f23)
Owners Guide (post-2002-fmt)
USA_English (fus) Instrument Cluster
13
Page 17 of 312
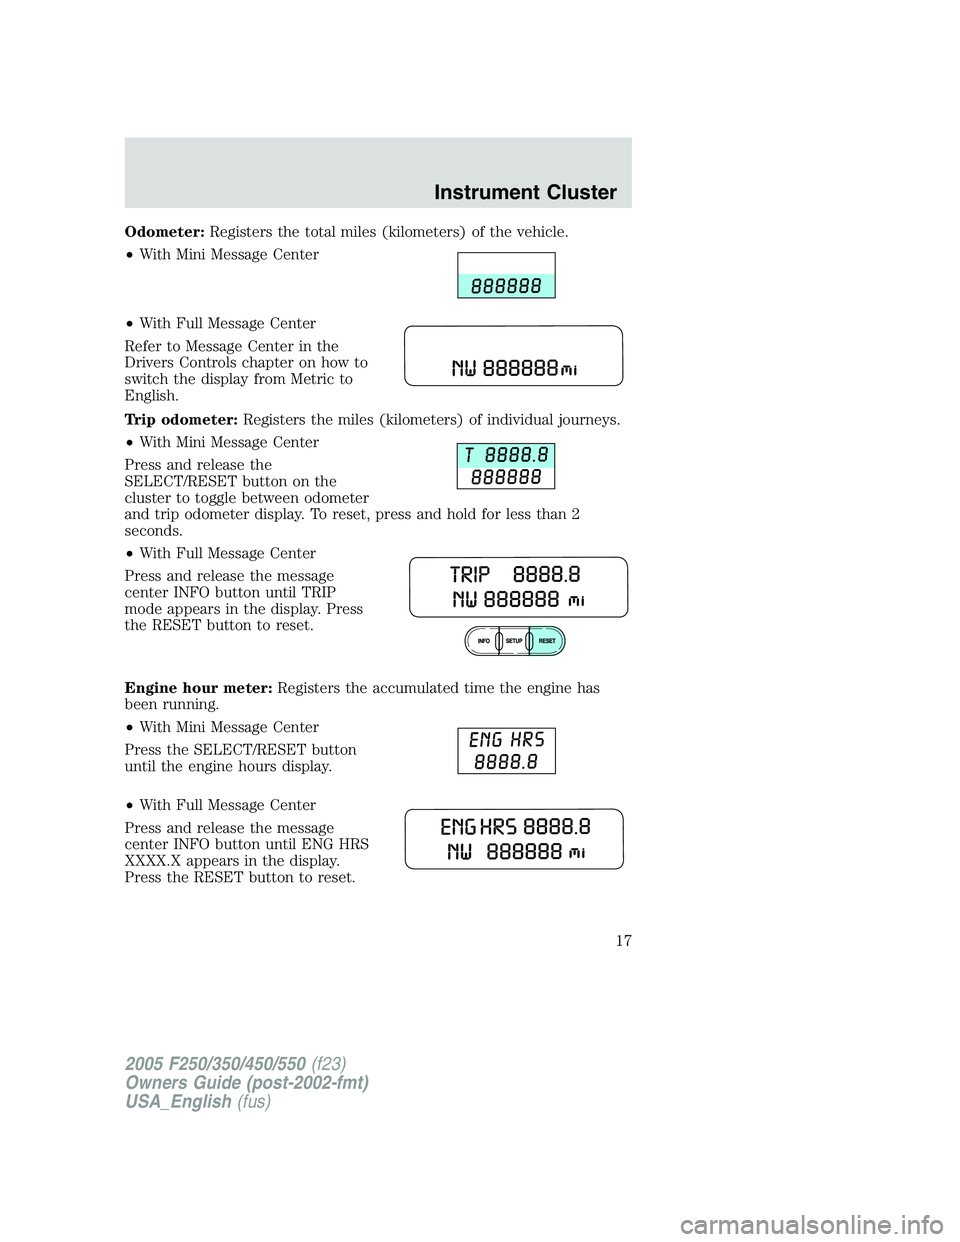
Odometer: Registers the total miles (kilometers) of the vehicle.
• With Mini Message Center
• With Full Message Center
Refer to Message Center in the
Drivers Controls chapter on how to
switch the display from Metric to
English.
Trip odometer: Registers the miles (kilometers) of individual journeys.
• With Mini Message Center
Press and release the
SELECT/RESET button on the
cluster to toggle between odometer
and trip odometer display. To reset, press and hold for less than 2
seconds.
• With Full Message Center
Press and release the message
center INFO button until TRIP
mode appears in the display. Press
the RESET button to reset.
Engine hour meter: Registers the accumulated time the engine has
been running.
• With Mini Message Center
Press the SELECT/RESET button
until the engine hours display.
• With Full Message Center
Press and release the message
center INFO button until ENG HRS
XXXX.X appears in the display.
Press the RESET button to reset.
2005 F250/350/450/550 (f23)
Owners Guide (post-2002-fmt)
USA_English (fus) Instrument Cluster
17
Page 32 of 312

• Allow tapes which have been subjected to extreme heat, humidity or
cold to reach a moderate temperature before playing.
• Clean the cassette player head with a cassette cleaning cartridge after
10–12 hours of play to maintain good sound/operation.
Don’t:
• Expose tapes to direct sunlight, extreme humidity, heat or cold.
• Leave tapes in the cassette player for a long time when not being
played.
CD/CD PLAYER CARE
Do:
• Handle discs by their edges only. Never touch the playing surface.
• Inspect discs before playing. Clean only with an approved CD cleaner
and wipe from the center out.
Don’t:
• Expose discs to direct sunlight or heat sources for extended periods
of time.
• Insert more than one disc into each slot of the CD changer magazine.
• Clean using a circular motion.
CD units are designed to play commercially pressed 4.75 in (12
cm) audio compact discs only. Due to technical incompatibility,
certain recordable and re-recordable compact discs may not
function correctly when used in Ford CD players. Irregular
shaped CDs, CDs with a scratch protection film attached, and CDs
with homemade paper (adhesive) labels should not be inserted
into the CD player. The label may peel and cause the CD to
become jammed. It is recommended that homemade CDs be
identified with permanent felt tip marker rather than adhesive
labels. Ball point pens may damage CDs. Please contact your
dealer for further information.
AUDIO SYSTEM WARRANTY AND SERVICE
Refer to the Warranty Guide for audio system warranty information. If
service is necessary, see your dealer or qualified technician.
2005 F250/350/450/550 (f23)
Owners Guide (post-2002-fmt)
USA_English (fus)Entertainment Systems
32
Page 34 of 312
To aid in side window defogging/demisting in cold weather:
1. Select .
2. Adjust the temperature control to maintain comfort.
3. Set the fan speed to the highest setting.
4. Direct the outer instrument panel vents toward the side windows.
To increase airflow to the outer instrument panel vents, close the vents
located in the middle of the instrument panel.
Do not place objects on top of the instrument panel as these
objects may become projectiles in a collision or sudden stop.
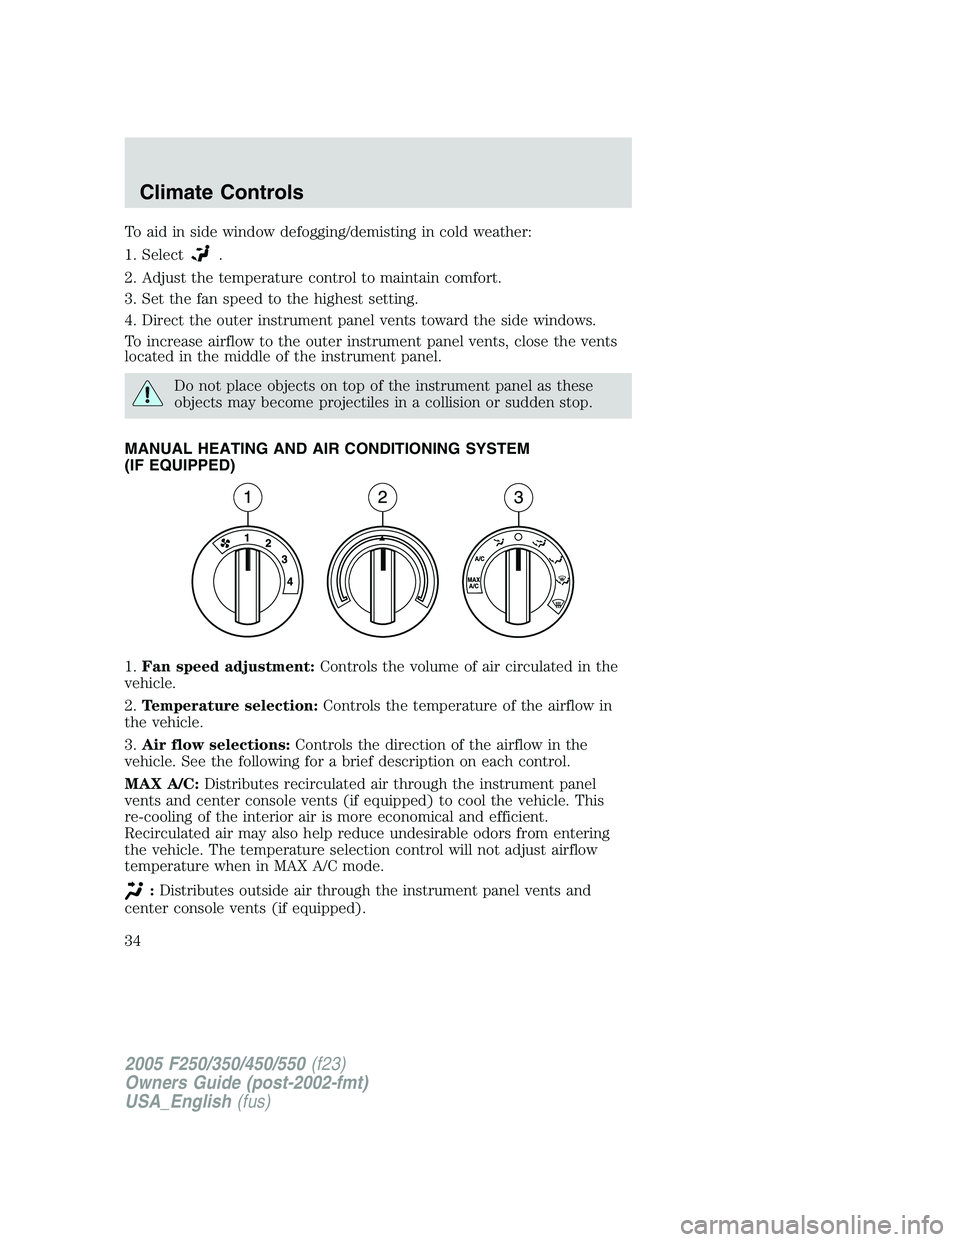
MANUAL HEATING AND AIR CONDITIONING SYSTEM
(IF EQUIPPED)
1. Fan speed adjustment: Controls the volume of air circulated in the
vehicle.
2. Temperature selection: Controls the temperature of the airflow in
the vehicle.
3. Air flow selections: Controls the direction of the airflow in the
vehicle. See the following for a brief description on each control.
MAX A/C: Distributes recirculated air through the instrument panel
vents and center console vents (if equipped) to cool the vehicle. This
re-cooling of the interior air is more economical and efficient.
Recirculated air may also help reduce undesirable odors from entering
the vehicle. The temperature selection control will not adjust airflow
temperature when in MAX A/C mode.
: Distributes outside air through the instrument panel vents and
center console vents (if equipped).
2005 F250/350/450/550 (f23)
Owners Guide (post-2002-fmt)
USA_English (fus)Climate Controls
34
Page 35 of 312
: Distributes outside air through the instrument panel vents, floor
vents and center console vents (if equipped).
O (OFF): Outside air is shut out and the climate system is turned off.
: Distributes outside air through the floor vents.
: Distributes outside air through the windshield defroster vents,
floor vents and demister vents.
: Distributes outside air through the windshield defroster vents and
demister vents.
Operating tips
• To reduce fog build up on the windshield during humid weather, place
the air flow selector in the position.
• To reduce humidity build up inside the vehicle, do not drive with the
air flow selector in the O (OFF) position.
• Do not put objects under the front seats that will interfere with the
airflow to the rear seats.
• Remove any snow, ice or leaves from the air intake area at the base of
the windshield.
• To improve the A/C cool down, drive with the windows slightly open
for 2–3 minutes after start up or until the vehicle has been “aired out.”
For maximum cooling performance (MAX A/C) in MAX A/C mode:
• Move the temperature control to the coolest setting.
• Set the fan to the highest speed initially, then adjust in order to
maintain comfort.
To aid in side window defogging and demisting in cold weather:
1. Select .
2. Select A/C.
3. Set the temperature control to maintain comfort.
4. Set the fan speed to highest setting.
5. Direct the outer instrument panel vents towards the side windows.
Do not place objects on top of the instrument panel as these
objects may become projectiles in a collision or sudden stop.
2005 F250/350/450/550 (f23)
Owners Guide (post-2002-fmt)
USA_English (fus) Climate Controls
35
Page 37 of 312
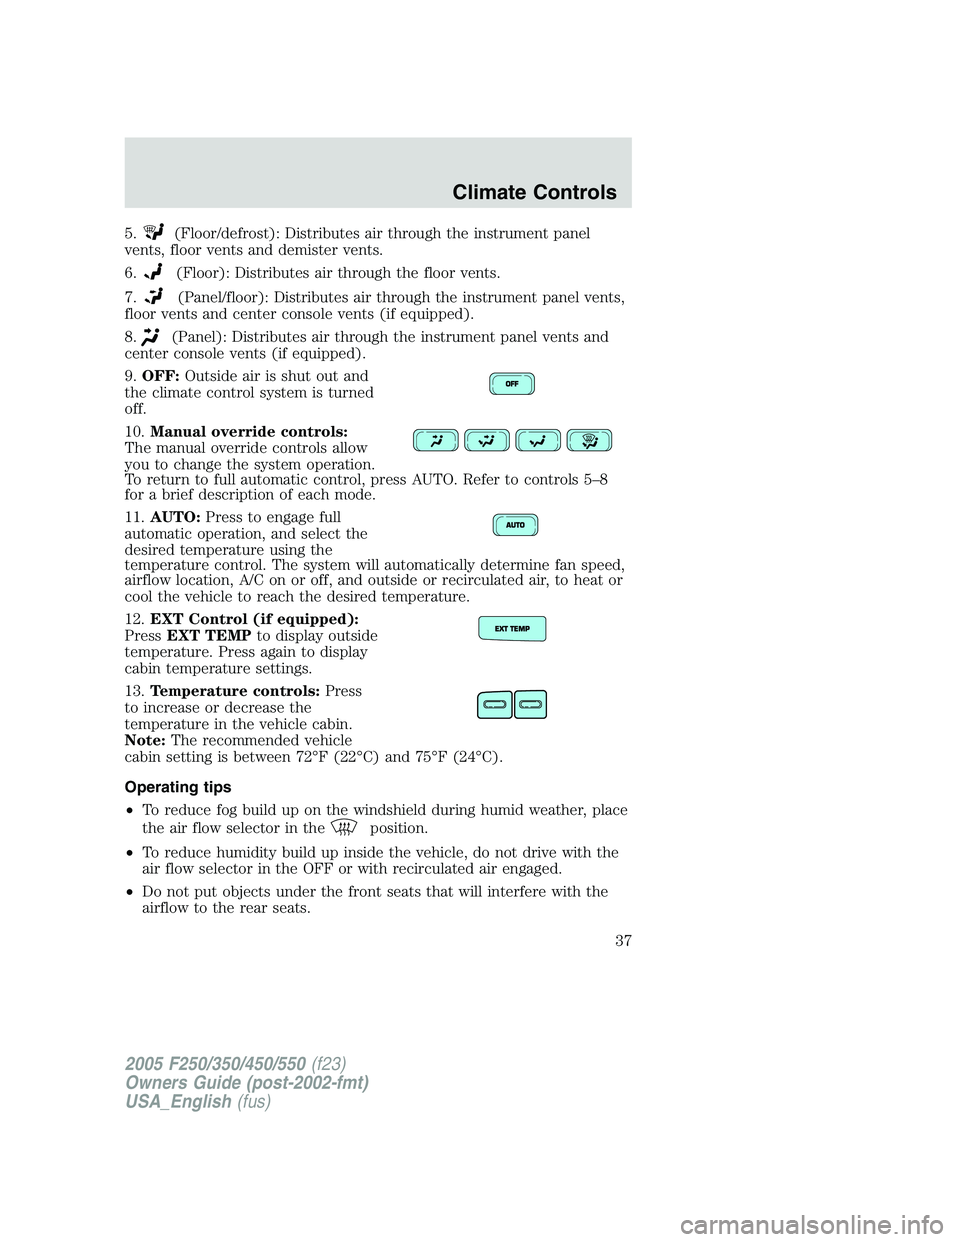
5. (Floor/defrost): Distributes air through the instrument panel
vents, floor vents and demister vents.
6. (Floor): Distributes air through the floor vents.
7. (Panel/floor): Distributes air through the instrument panel vents,
floor vents and center console vents (if equipped).
8. (Panel): Distributes air through the instrument panel vents and
center console vents (if equipped).
9. OFF: Outside air is shut out and
the climate control system is turned
off.
10. Manual override controls:
The manual override controls allow
you to change the system operation.
To return to full automatic control, press AUTO. Refer to controls 5–8
for a brief description of each mode.
11. AUTO: Press to engage full
automatic operation, and select the
desired temperature using the
temperature control. The system will automatically determine fan speed,
airflow location, A/C on or off, and outside or recirculated air, to heat or
cool the vehicle to reach the desired temperature.
12. EXT Control (if equipped):
Press EXT TEMP to display outside
temperature. Press again to display
cabin temperature settings.
13. Temperature controls: Press
to increase or decrease the
temperature in the vehicle cabin.
Note: The recommended vehicle
cabin setting is between 72°F (22°C) and 75°F (24°C).
Operating tips
• To reduce fog build up on the windshield during humid weather, place
the air flow selector in the position.
• To reduce humidity build up inside the vehicle, do not drive with the
air flow selector in the OFF or with recirculated air engaged.
• Do not put objects under the front seats that will interfere with the
airflow to the rear seats.
2005 F250/350/450/550 (f23)
Owners Guide (post-2002-fmt)
USA_English (fus) Climate Controls
37
Page 42 of 312
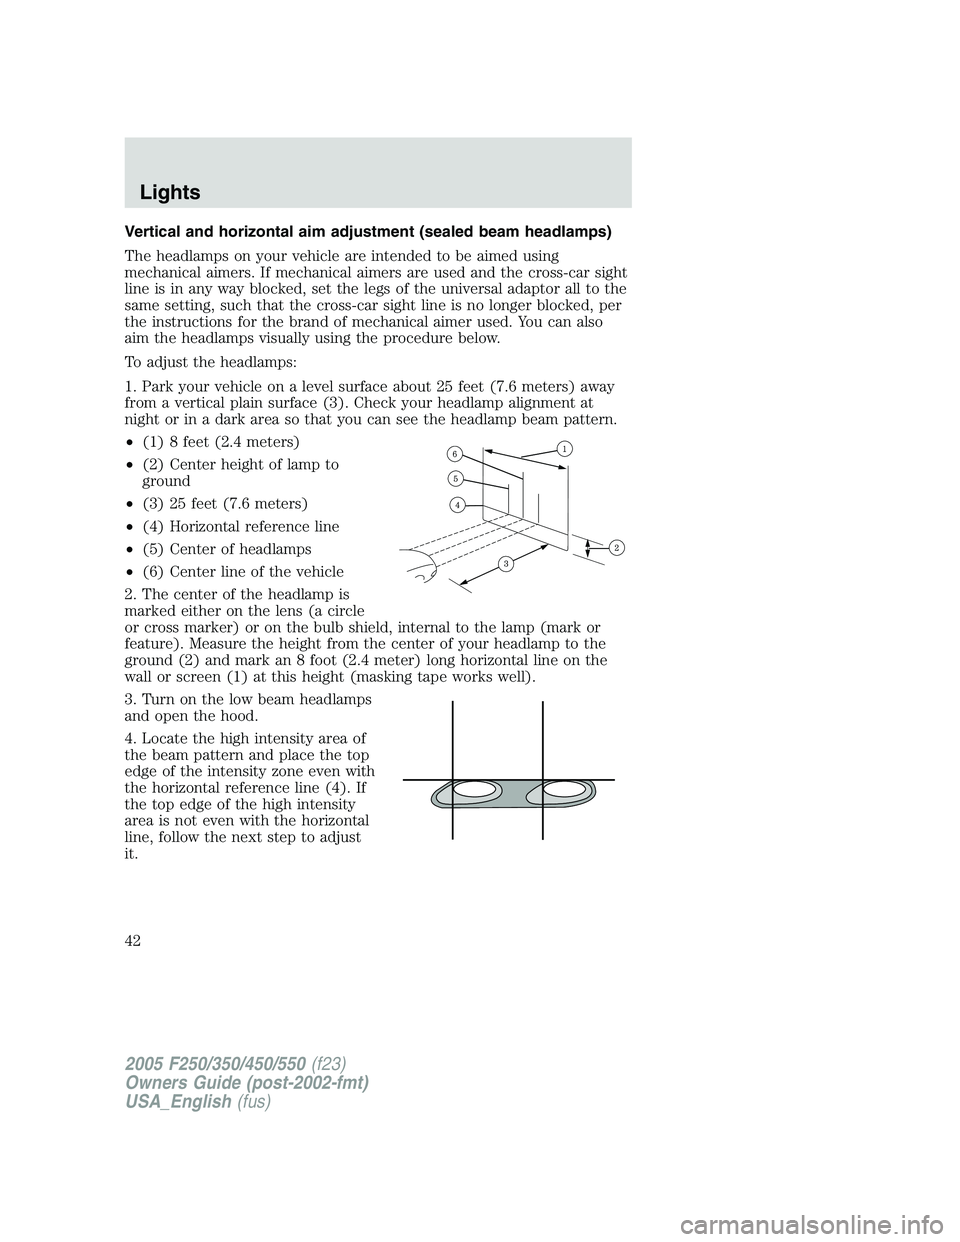
Vertical and horizontal aim adjustment (sealed beam headlamps)
The headlamps on your vehicle are intended to be aimed using
mechanical aimers. If mechanical aimers are used and the cross-car sight
line is in any way blocked, set the legs of the universal adaptor all to the
same setting, such that the cross-car sight line is no longer blocked, per
the instructions for the brand of mechanical aimer used. You can also
aim the headlamps visually using the procedure below.
To adjust the headlamps:
1. Park your vehicle on a level surface about 25 feet (7.6 meters) away
from a vertical plain surface (3). Check your headlamp alignment at
night or in a dark area so that you can see the headlamp beam pattern.
• (1) 8 feet (2.4 meters)
• (2) Center height of lamp to
ground
• (3) 25 feet (7.6 meters)
• (4) Horizontal reference line
• (5) Center of headlamps
• (6) Center line of the vehicle
2. The center of the headlamp is
marked either on the lens (a circle
or cross marker) or on the bulb shield, internal to the lamp (mark or
feature). Measure the height from the center of your headlamp to the
ground (2) and mark an 8 foot (2.4 meter) long horizontal line on the
wall or screen (1) at this height (masking tape works well).
3. Turn on the low beam headlamps
and open the hood.
4. Locate the high intensity area of
the beam pattern and place the top
edge of the intensity zone even with
the horizontal reference line (4). If
the top edge of the high intensity
area is not even with the horizontal
line, follow the next step to adjust
it.
2005 F250/350/450/550 (f23)
Owners Guide (post-2002-fmt)
USA_English (fus)Lights
42