2005 FORD F250 spare wheel
[x] Cancel search: spare wheelPage 142 of 312
3. Remove the jack, jack handle, lug wrench and spare tire from the
stowage locations.
4. Use the tip of the lug wrench to remove any wheel trim.
5. Loosen each wheel lug nut one-half turn counterclockwise but do not
remove them until the wheel is raised off the ground.
When one of the rear wheels is off the ground, the transmission
alone will not prevent the vehicle from moving or slipping off the
jack, even if the transmission is in P (Park) (automatic transmission)
or R (Reverse) (manual transmission). To prevent the vehicle from
moving when you change the tire, be sure that the parking brake is set
and the diagonally opposite wheel is blocked.
If the vehicle slips off the jack, you or someone else could be
seriously injured.
The following steps apply to F–250/F–350 Single Rear Wheel
(SRW) vehicles only (unless otherwise noted):
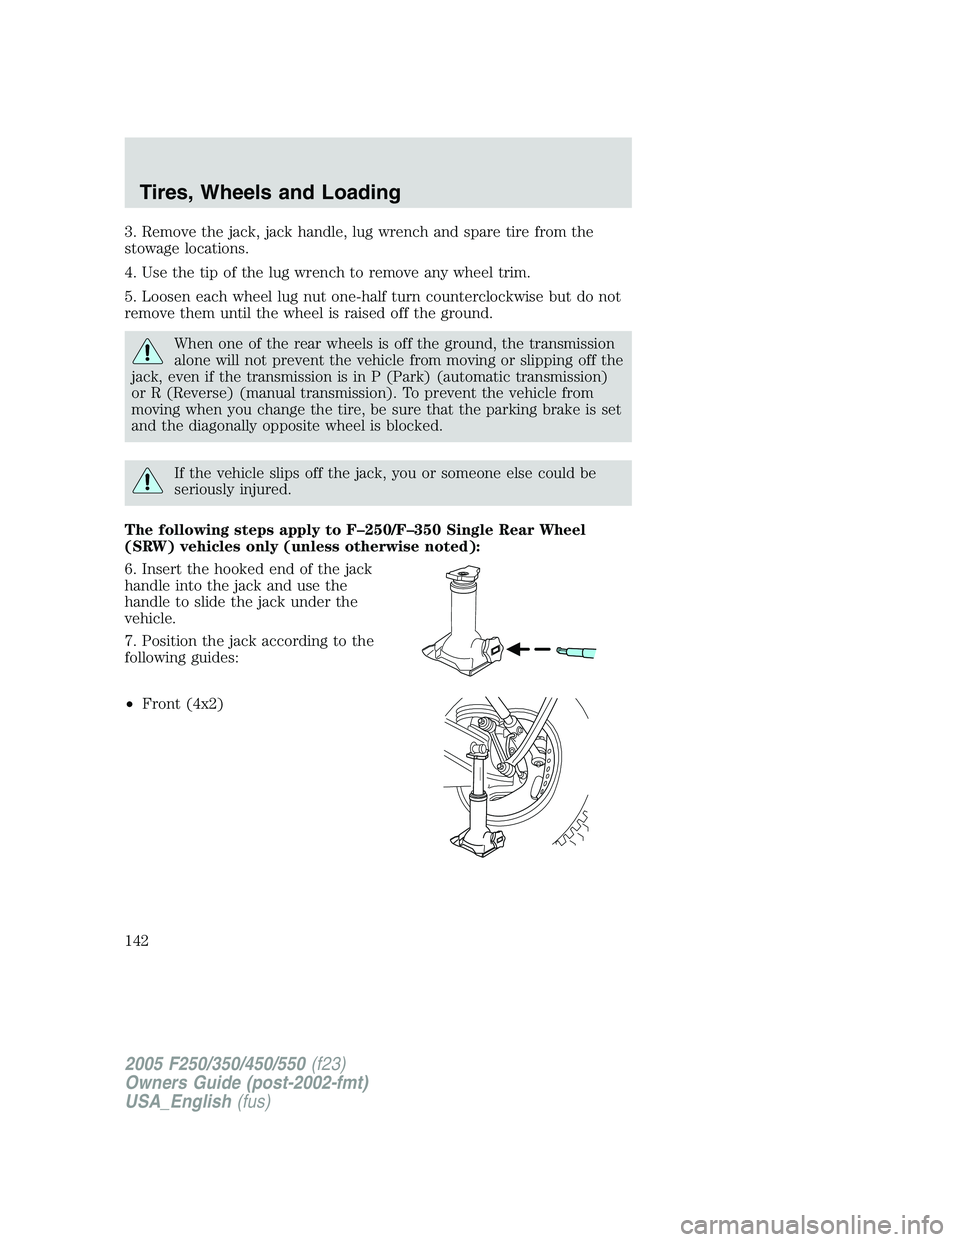
6. Insert the hooked end of the jack
handle into the jack and use the
handle to slide the jack under the
vehicle.
7. Position the jack according to the
following guides:
•Front (4x2)
2005 F250/350/450/550(f23)
Owners Guide (post-2002-fmt)
USA_English(fus)
Tires, Wheels and Loading
142
Page 144 of 312
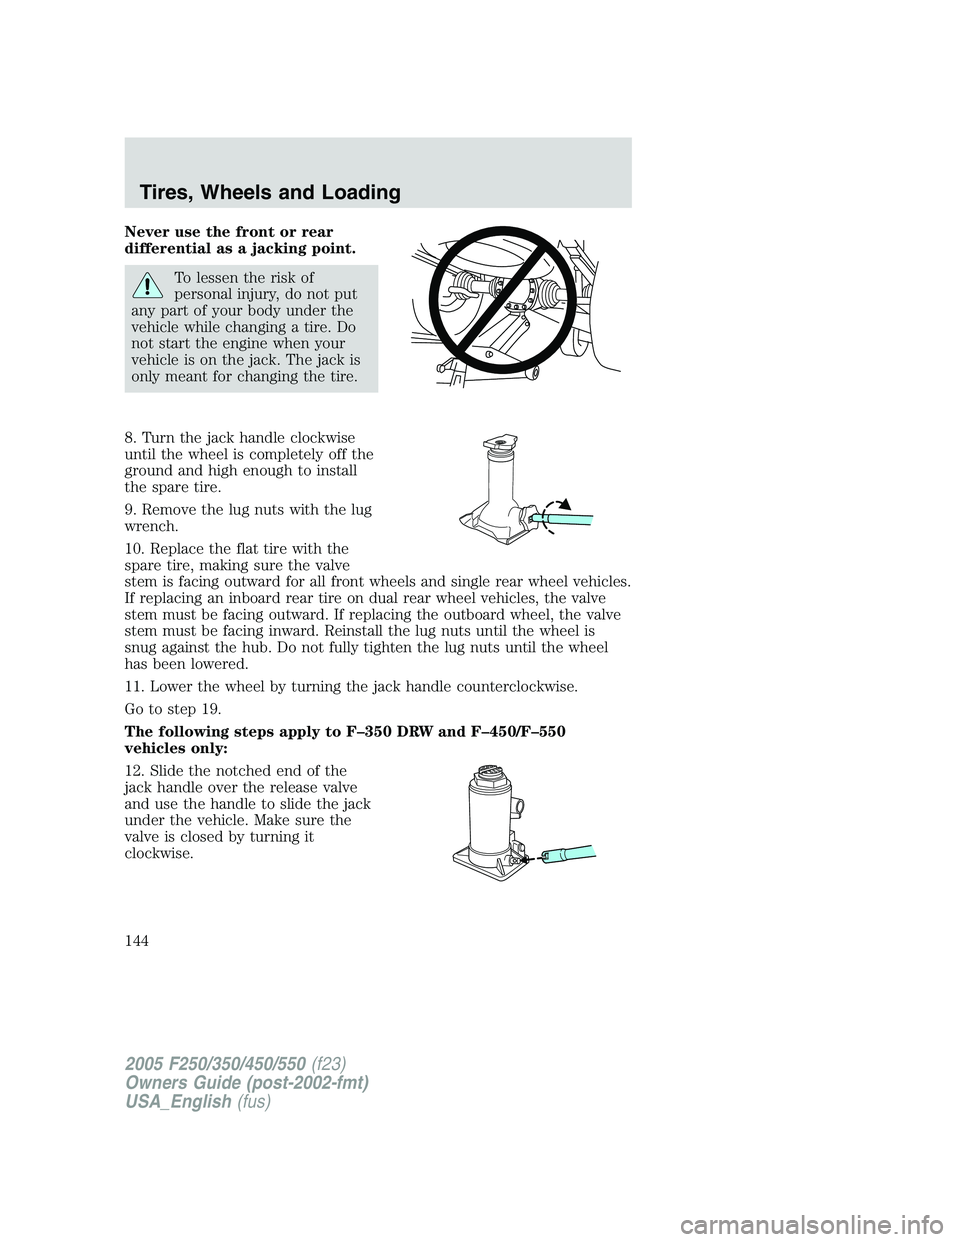
Never use the front or rear
differential as a jacking point.
To lessen the risk of
personal injury, do not put
any part of your body under the
vehicle while changing a tire. Do
not start the engine when your
vehicle is on the jack. The jack is
only meant for changing the tire.
8. Turn the jack handle clockwise
until the wheel is completely off the
ground and high enough to install
the spare tire.
9. Remove the lug nuts with the lug
wrench.
10. Replace the flat tire with the
spare tire, making sure the valve
stem is facing outward for all front wheels and single rear wheel vehicles.
If replacing an inboard rear tire on dual rear wheel vehicles, the valve
stem must be facing outward. If replacing the outboard wheel, the valve
stem must be facing inward. Reinstall the lug nuts until the wheel is
snug against the hub. Do not fully tighten the lug nuts until the wheel
has been lowered.
11. Lower the wheel by turning the jack handle counterclockwise.
Go to step 19.
The following steps apply to F–350 DRW and F–450/F–550
vehicles only:
12. Slide the notched end of the
jack handle over the release valve
and use the handle to slide the jack
under the vehicle. Make sure the
valve is closed by turning it
clockwise.
2005 F250/350/450/550(f23)
Owners Guide (post-2002-fmt)
USA_English(fus)
Tires, Wheels and Loading
144
Page 146 of 312
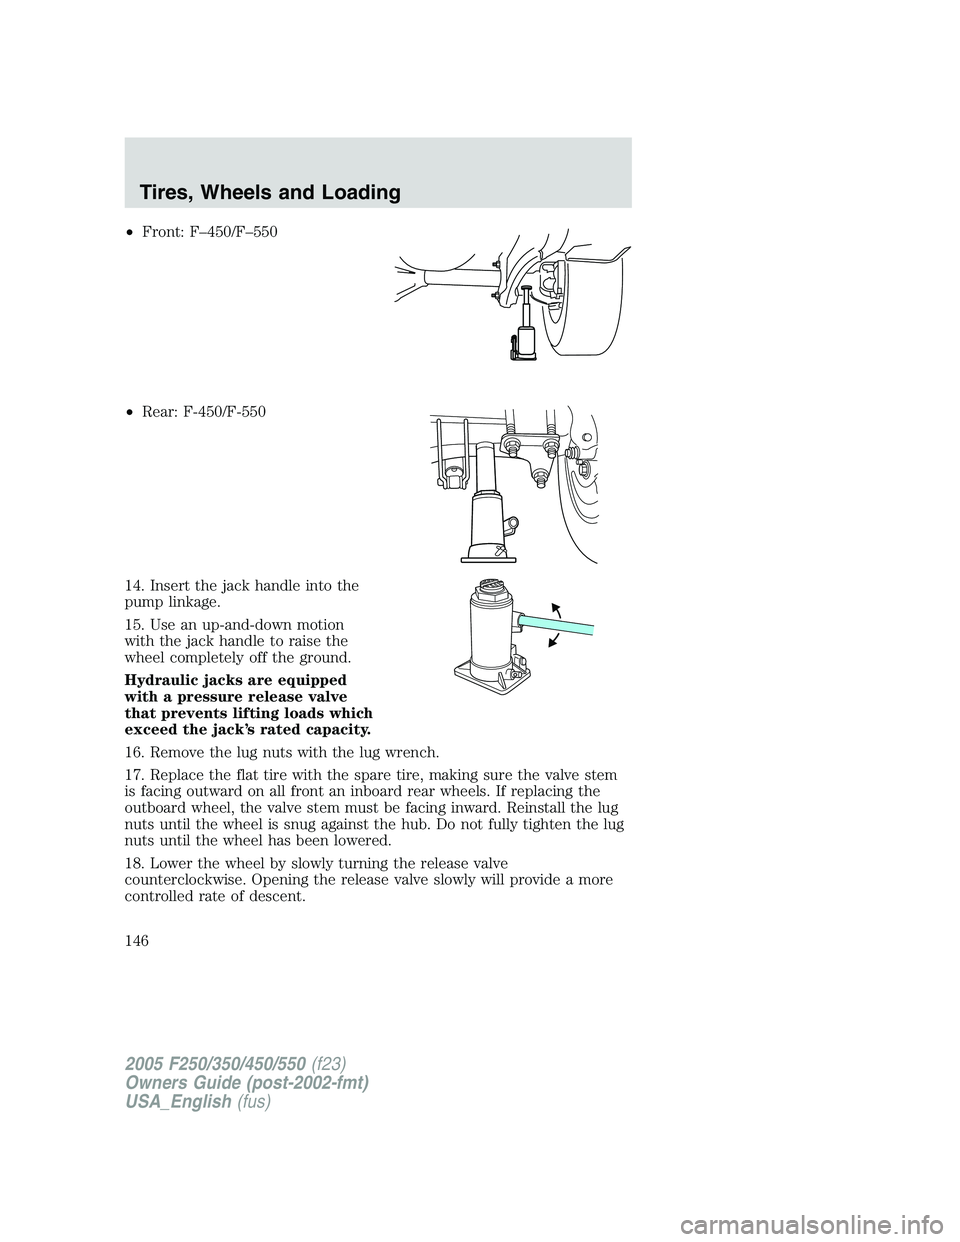
•Front: F–450/F–550
•Rear: F-450/F-550
14. Insert the jack handle into the
pump linkage.
15. Use an up-and-down motion
with the jack handle to raise the
wheel completely off the ground.
Hydraulic jacks are equipped
with a pressure release valve
that prevents lifting loads which
exceed the jack’s rated capacity.
16. Remove the lug nuts with the lug wrench.
17. Replace the flat tire with the spare tire, making sure the valve stem
is facing outward on all front an inboard rear wheels. If replacing the
outboard wheel, the valve stem must be facing inward. Reinstall the lug
nuts until the wheel is snug against the hub. Do not fully tighten the lug
nuts until the wheel has been lowered.
18. Lower the wheel by slowly turning the release valve
counterclockwise. Opening the release valve slowly will provide a more
controlled rate of descent.
2005 F250/350/450/550(f23)
Owners Guide (post-2002-fmt)
USA_English(fus)
Tires, Wheels and Loading
146
Page 147 of 312
The following steps apply to all vehicles:
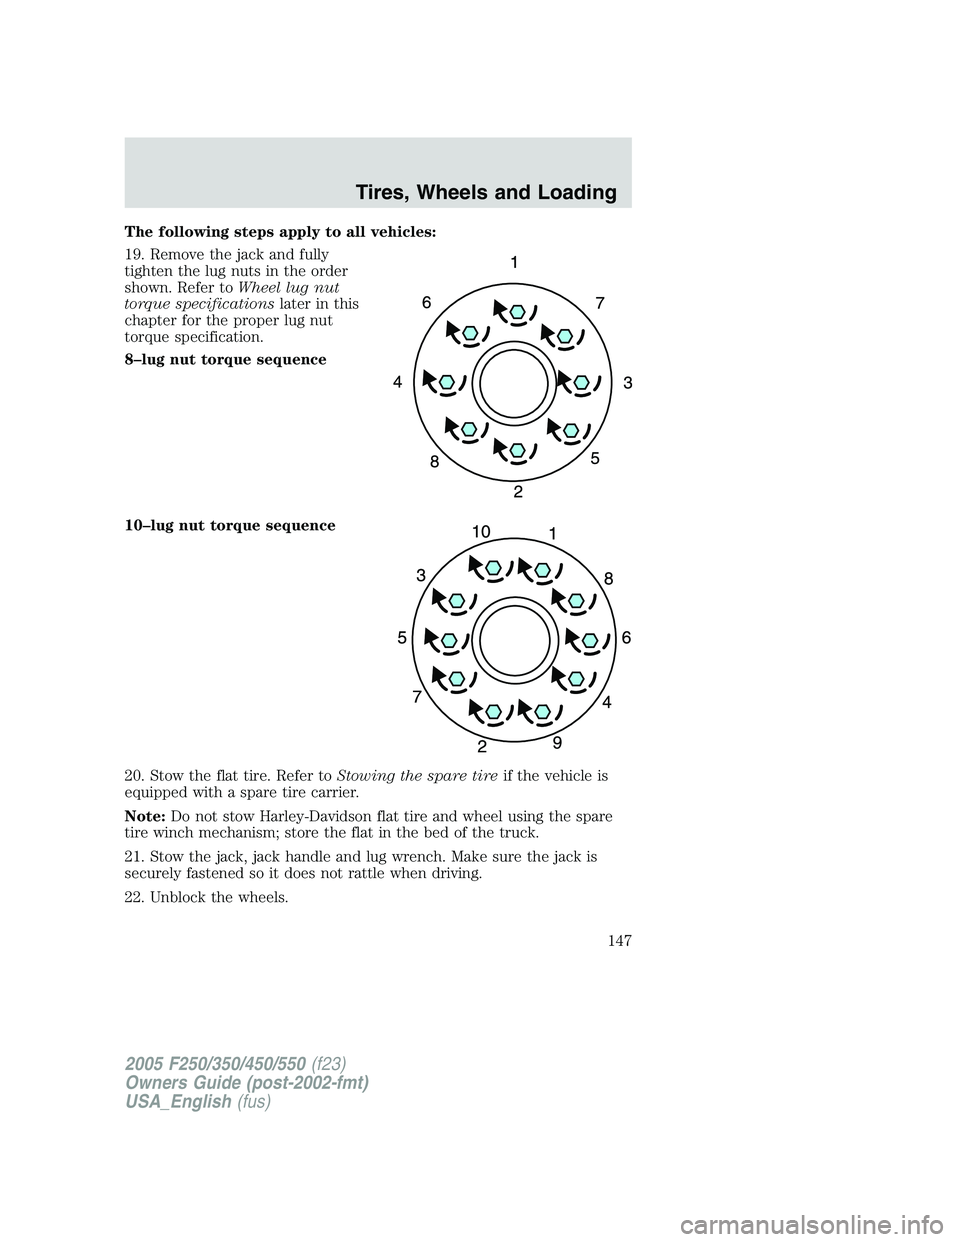
19. Remove the jack and fully
tighten the lug nuts in the order
shown. Refer toWheel lug nut
torque specificationslater in this
chapter for the proper lug nut
torque specification.
8–lug nut torque sequence
10–lug nut torque sequence
20. Stow the flat tire. Refer toStowing the spare tireif the vehicle is
equipped with a spare tire carrier.
Note:Do not stow Harley-Davidson flat tire and wheel using the spare
tire winch mechanism; store the flat in the bed of the truck.
21. Stow the jack, jack handle and lug wrench. Make sure the jack is
securely fastened so it does not rattle when driving.
22. Unblock the wheels.
2005 F250/350/450/550(f23)
Owners Guide (post-2002-fmt)
USA_English(fus)
Tires, Wheels and Loading
147
Page 148 of 312
Stowing the flat/spare tire
Note:Failure to follow spare tire stowage instructions may result in
failure of cable or loss of spare tire.
1. Lay the tire on the ground with the valve stem facing in the direction
specified on the Tire Changing Instructions located with the jack
hardware.
2. Slide the wheel partially under the vehicle and install the retainer
through the wheel center. Pull on the cable to align the components at
the end of the cable.
3. Turn the jack handle clockwise until the tire is raised to its stowed
position underneath the vehicle. The effort to turn the jack handle
increases significantly and the spare tire carrier ratchets or slips when
the tire is raised to the maximum tightness. Tighten to the best of your
ability, to the point where the ratchet/slip occurs, if possible. The spare
tire carrier will not allow you to overtighten. If the spare tire carrier
ratchets or slips with little effort, take the vehicle to your dealer for
assistance at your earliest convenience.
4. Check that the tire lies flat against the frame and is properly
tightened. Try to push or pull, then turn the tire to be sure it will not
move. Loosen and retighten, if necessary. Failure to properly stow the
spare tire may result in failure of the winch cable and loss of the tire.
5. Repeat this tightness check procedure when servicing the spare tire
pressure (every six months, perScheduled Maintenance Guide),or at
any time that the spare tire is disturbed through service of other
components.
6. If removed, install the spare tire lock (if equipped) into the bumper
drive tube with the spare tire lock key (if equipped) and jack handle.
WHEEL LUG NUT TORQUE SPECIFICATIONS
On vehicles equipped with single rear wheels, retighten the lug nuts to
the specified torque at 500 miles (800 km) after any wheel disturbance
(tire rotation, changing a flat tire, wheel removal, etc.).
On vehicles equipped with dual rear wheels, retighten the wheel lug nuts
to the specified torque at 100 miles (160 km), and again at 500 miles
(800 km) of new vehicle operation and after any wheel disturbance (tire
rotation, changing a flat tire, wheel removal, etc.).
2005 F250/350/450/550(f23)
Owners Guide (post-2002-fmt)
USA_English(fus)
Tires, Wheels and Loading
148
Page 155 of 312
TIRE CARE
Improper or inadequate vehicle maintenance can also cause tires to wear
abnormally. Here are some of the important maintenance items:
Tire wear
Measure and inspect the tire tread on all your tires periodically.
Advanced and unusual tire wear can reduce the ability of tread to grip
the road in adverse (wet, snowy, etc.) conditions. Visually check your
tires for uneven wear, looking for high and low areas or unusually
smooth areas. Also check for signs of tire damage.
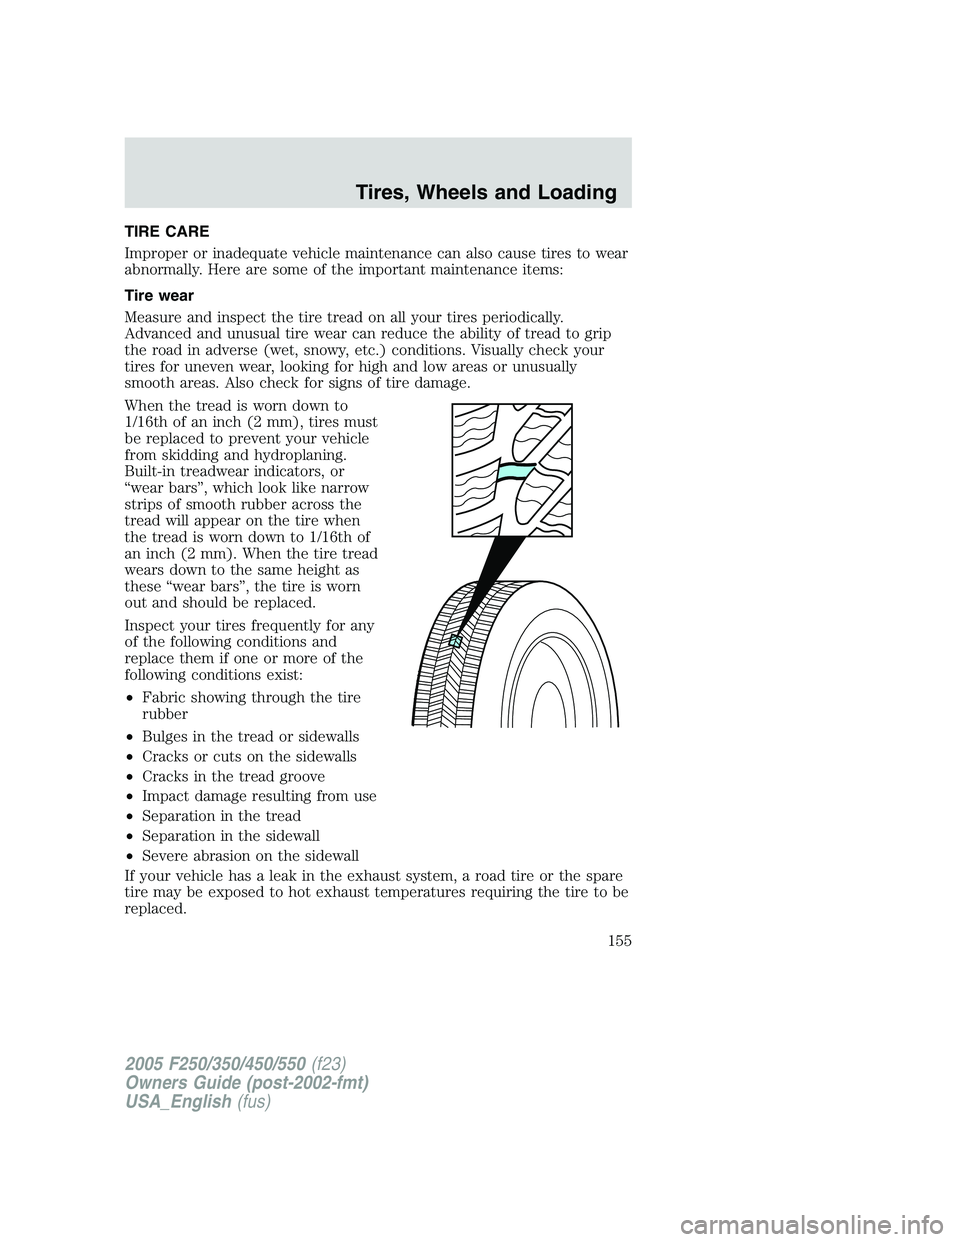
When the tread is worn down to
1/16th of an inch (2 mm), tires must
be replaced to prevent your vehicle
from skidding and hydroplaning.
Built-in treadwear indicators, or
“wear bars”, which look like narrow
strips of smooth rubber across the
tread will appear on the tire when
the tread is worn down to 1/16th of
an inch (2 mm). When the tire tread
wears down to the same height as
these “wear bars”, the tire is worn
out and should be replaced.
Inspect your tires frequently for any
of the following conditions and
replace them if one or more of the
following conditions exist:
•Fabric showing through the tire
rubber
•Bulges in the tread or sidewalls
•Cracks or cuts on the sidewalls
•Cracks in the tread groove
•Impact damage resulting from use
•Separation in the tread
•Separation in the sidewall
•Severe abrasion on the sidewall
If your vehicle has a leak in the exhaust system, a road tire or the spare
tire may be exposed to hot exhaust temperatures requiring the tire to be
replaced.
2005 F250/350/450/550(f23)
Owners Guide (post-2002-fmt)
USA_English(fus)
Tires, Wheels and Loading
155
Page 156 of 312
Safety practices
Driving habits have a great deal to do with your tire mileage and safety.
•Observe posted speed limits
•Avoid fast starts, stops and turns
•Avoid potholes and objects on the road
•Do not run over curbs or hit the tire against a curb when parking
If your vehicle is stuck in snow, mud, sand, etc.,do notrapidly
spin the tires; spinning the tires can tear the tire and cause an
explosion. A tire can explode in as little as three to five seconds.
Never spin the tires in excess of the 35 mph (55 km/h) point
indicated on the speedometer.
Highway hazards
No matter how carefully you drive there’s always the possibility that you
may eventually have a flat tire on the highway. Drive slowly to the
closest safe area out of traffic. This may further damage the flat tire, but
your safety is more important.
If you feel a sudden vibration or ride disturbance while driving, or you
suspect your tire or vehicle has been damaged, immediately reduce your
speed. Drive with caution until you can safely pull off the road. Stop and
inspect the tires for damage. If a tire is under-inflated or damaged,
deflate it, remove wheel and replace it with your spare tire and wheel. If
you cannot detect a cause, have the vehicle towed to the nearest repair
facility or tire dealer to have the vehicle inspected.
Tire and wheel alignment
A bad jolt from hitting a curb or pothole can cause the front end of your
vehicle to become misaligned or cause damage to your tires. If your
vehicle seems to pull to one side when you’re driving, the wheels may be
out of alignment. Have a qualified technician at a Ford or
Lincoln/Mercury dealer check the wheel alignment periodically.
Wheel misalignment in the front or the rear can cause uneven and rapid
treadwear of your tires and should be corrected by a qualified technician
at a Ford or Lincoln/Mercury dealer. Front wheel drive (FWD) vehicles
and those with an independent rear suspension (if equipped) may
require alignment of all four wheels.
2005 F250/350/450/550(f23)
Owners Guide (post-2002-fmt)
USA_English(fus)
Tires, Wheels and Loading
156
Page 159 of 312
Sometimes irregular tire wear can be corrected by rotating the tires.
Note:If your tires show uneven wear ask a qualified technician at a
reputable repair facility to check for and correct any wheel misalignment,
tire imbalance or mechanical problem involved before tire rotation.
Note:Your vehicle may be equipped with a dissimilar spare tire/wheel. A
dissimilar spare tire/wheel is defined as a spare tire and/or wheel that is
different in brand, size or appearance from the road tires and wheels. If
you have a dissimilar spare tire/wheel it is intended for temporary use
only and should not be used in a tire rotation.
Note:After having your tires rotated, inflation pressure must be checked
and adjusted to the vehicle requirements.
SNOW TIRES AND CHAINS
Snow tires must be the same size and grade as the tires you
currently have on your vehicle.
Note:Do not use snow chains on front tires of Harley-Davidson vehicles.
The tires on your vehicle have all weather treads to provide traction in
rain and snow. However, in some climates, you may need to use snow
tires and chains. If you need to use chains, it is recommended that steel
wheels (of the same size and specifications) be used, as chains may chip
aluminum wheels.
Follow these guidelines when using snow tires and chains:
•Use only SAE Class S chains.
•Install chains securely, verifying that the chains do not touch any
wiring, brake lines or fuel lines.
•Drive cautiously. If you hear the chains rub or bang against your
vehicle, stop and re-tighten the chains. If this does not work, remove
the chains to prevent damage to your vehicle.
•If possible, avoid fully loading your vehicle.
•Remove the tire chains when they are no longer needed. Do not use
tire chains on dry roads.
•The suspension insulation and bumpers will help prevent vehicle
damage. Do not remove these components from your vehicle when
using snow tires and chains.
2005 F250/350/450/550(f23)
Owners Guide (post-2002-fmt)
USA_English(fus)
Tires, Wheels and Loading
159