Page 8 of 368
These are some of the symbols you may see on your vehicle.
Vehicle Symbol Glossary
Safety Alert
See Owner’s Guide
Fasten Safety BeltAir Bag-Front
Air Bag-SideChild Seat
Child Seat Installation
WarningChild Seat Lower
Anchor
Child Seat Tether
AnchorBrake System
Anti-Lock Brake SystemBrake Fluid -
Non-Petroleum Based
Powertrain MalfunctionSpeed Control
Master Lighting SwitchHazard Warning Flasher
Fog Lamps-FrontFuse Compartment
Fuel Pump ResetWindshield Wash/Wipe
Windshield
Defrost/DemistRear Window
Defrost/Demist
REVIEW COPY
2005 Expedition(exd), Owners Guide (post-2002-fmt)(own2002),
Market:USA_English(fus)
Introduction
8
Page 97 of 368
fourth time to disengage the feature (all lights will be off).Note:The
passenger heated seat will turn off automatically after 15 minutes of use.
5.
R(Rear defroster): Press to defrost the rear window. Refer to the
Rear window defrostersection in this chapter for more information.
6.Passenger cooled seat:Press to turn on the passenger side cooled
seat. Press once for full cool (three lights above passenger cooled seat
control will be illuminated). Press a second time to select medium cool
(two lights). Press a third time to select low cool (one light). Press a
fourth time to disengage the feature (all lights will be off).Note:The
passenger cooled seat will turn off automatically after 30 minutes of use.
7.
(Defrost): Distributes outside air through the windshield
defroster ducts and the demister outlets. Can be used to clear ice or fog
from the windshield. The system will automatically provide outside air to
reduce window fogging.
8.
Airflow direction control:Press to toggle through the air
distribution modes listed below. The selected mode will illuminate in the
display.
—Distributes air through the windshield defroster ducts, demister
outlets and the front and rear seat floor ducts. The system will
automatically provide outside air to reduce window fogging.
:Distributes air through the floor and rear seat floor ducts. The
system will automatically provide outside air to reduce window fogging.
: Distributes air through the instrument panel, center console
registers, and the front and rear seat floor ducts.
:Distributes air through the instrument panel and center console
registers.
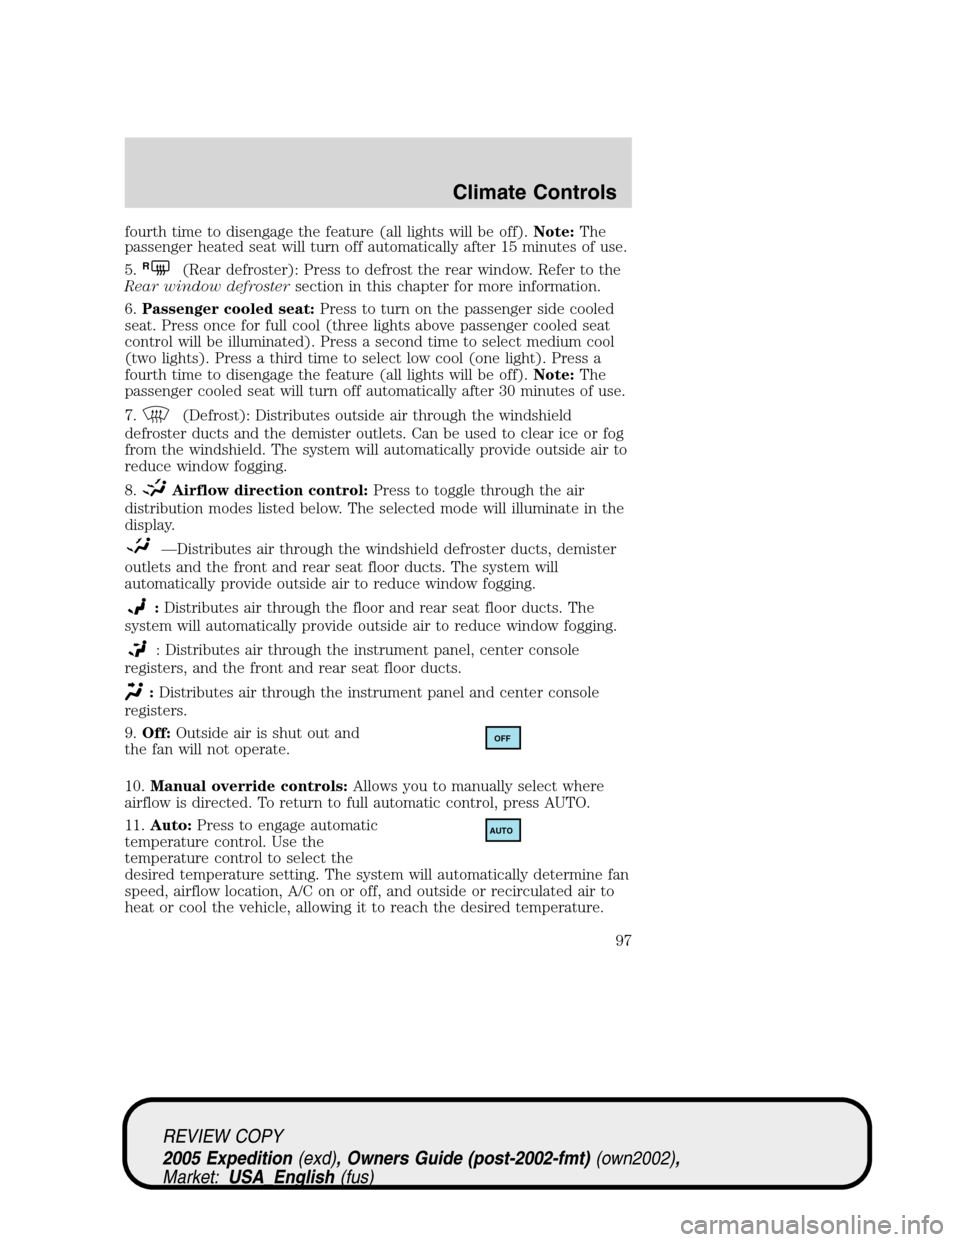
9.Off:Outside air is shut out and
the fan will not operate.
10.Manual override controls:Allows you to manually select where
airflow is directed. To return to full automatic control, press AUTO.
11.Auto:Press to engage automatic
temperature control. Use the
temperature control to select the
desired temperature setting. The system will automatically determine fan
speed, airflow location, A/C on or off, and outside or recirculated air to
heat or cool the vehicle, allowing it to reach the desired temperature.
OFF
AUTO
REVIEW COPY
2005 Expedition(exd), Owners Guide (post-2002-fmt)(own2002),
Market:USA_English(fus)
Climate Controls
97
Page 102 of 368
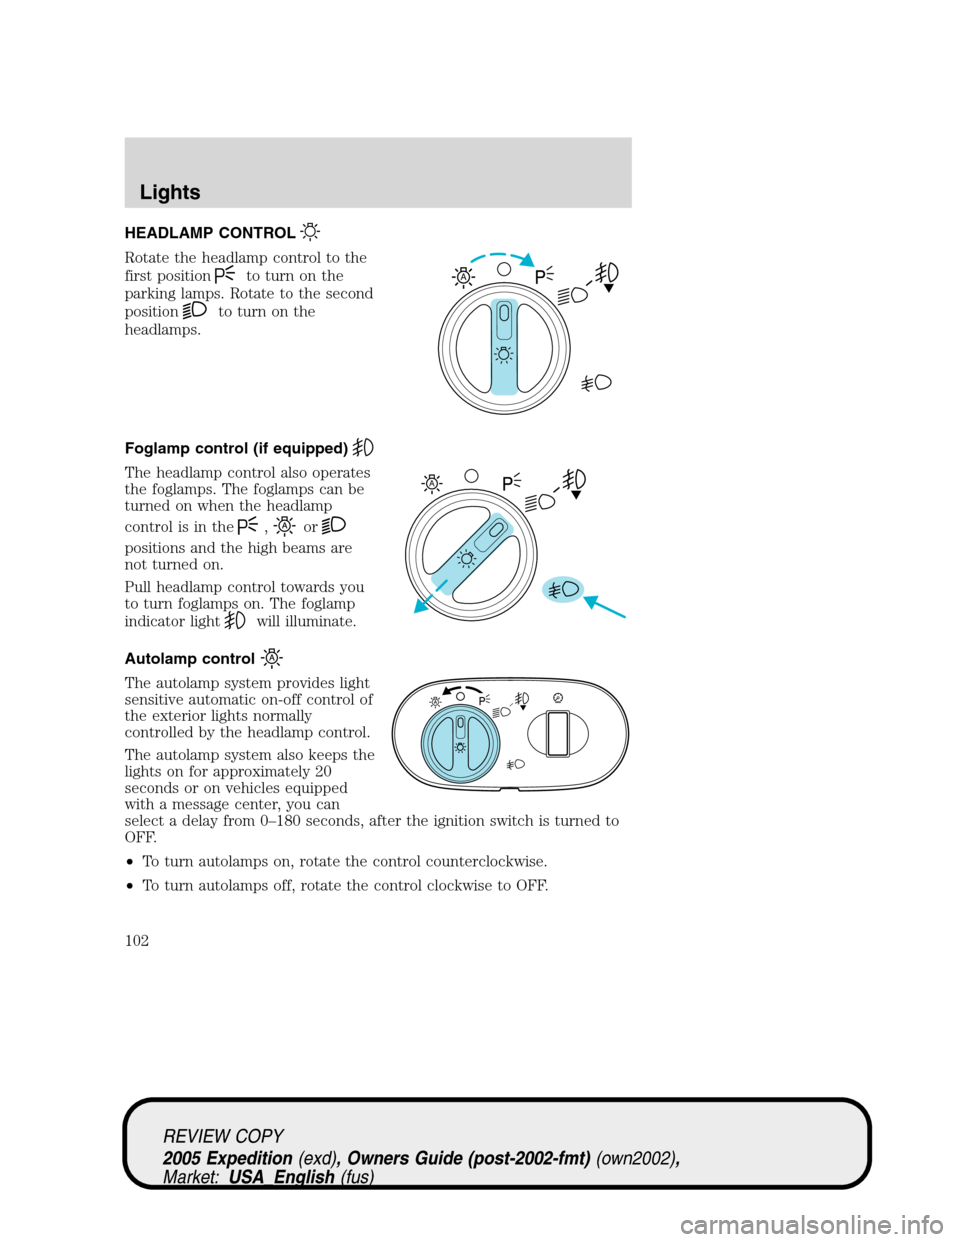
HEADLAMP CONTROL
Rotate the headlamp control to the
first position
to turn on the
parking lamps. Rotate to the second
position
to turn on the
headlamps.
Foglamp control (if equipped)
The headlamp control also operates
the foglamps. The foglamps can be
turned on when the headlamp
control is in the
,or
positions and the high beams are
not turned on.
Pull headlamp control towards you
to turn foglamps on. The foglamp
indicator light
will illuminate.
Autolamp control
The autolamp system provides light
sensitive automatic on-off control of
the exterior lights normally
controlled by the headlamp control.
The autolamp system also keeps the
lights on for approximately 20
seconds or on vehicles equipped
with a message center, you can
select a delay from 0–180 seconds, after the ignition switch is turned to
OFF.
•To turn autolamps on, rotate the control counterclockwise.
•To turn autolamps off, rotate the control clockwise to OFF.
A
A
REVIEW COPY
2005 Expedition(exd), Owners Guide (post-2002-fmt)(own2002),
Market:USA_English(fus)
Lights
Lights
102
Page 103 of 368
Daytime running lamps (DRL) (if equipped)
Turns the foglamps on at full intensity output. To activate:
•the ignition must be in the ON position and
•the headlamp control must be in the OFF or Parking lamps position.
Always remember to turn on your headlamps at dusk or during
inclement weather. The Daytime Running Lamp (DRL) system
does not activate the tail lamps and generally may not provide
adequate lighting during these conditions. Failure to activate your
headlamps under these conditions may result in a collision.
High beams
Push the lever toward the
instrument panel to activate. Pull
the lever towards you to deactivate.
Flash to pass
Pull toward you slightly to activate
and release to deactivate.
INT2OFFOFFINT1
INT2OFFOFFINT1
REVIEW COPY
2005 Expedition(exd), Owners Guide (post-2002-fmt)(own2002),
Market:USA_English(fus)
Lights
103
Page 107 of 368
Using the right bulbs
Replacement bulbs are specified in the chart below. Headlamp bulbs
must be marked with an authorized “D.O.T.” for North America to ensure
lamp performance, light brightness and pattern and safe visibility. The
correct bulbs will not damage the lamp assembly or void the lamp
assembly warranty and will provide quality bulb burn time.
Function Number of bulbs Trade number
Headlamps (low-beam) 2 9006
Headlamps (high-beam) 2 9005
Front
park/turn/sidemarker
lamps2 3457 K
Foglamps 2 899
Front row map lamps 2 579
Front row map/dome
lamps3 578
Rear cargo lamp 1 578
2nd row reading lamp 2 578
Turn/tail/brake/sidemarker
lamps2 3157
Approach/mirror turn
signal lamps (if
equipped)2 906
Mirror approach lamps –
non turn signal (if
equipped)2 *See your dealer
Liftgate bulb 2 916
Backup lamp 2 3156
License lamp 2 168
High-mount brake lamp 5 W5W
All replacement bulbs are clear in color except where noted.
To replace all instrument panel lights - see your dealer
* To obtain replacement approach lamp assembly bulbs, see your
dealer and reference Ford part no. 2L1Z–13B374–BB for the passenger
side mirror and 2L1Z–13B375–BB for the driver side mirror.
REVIEW COPY
2005 Expedition(exd), Owners Guide (post-2002-fmt)(own2002),
Market:USA_English(fus)
Lights
107
Page 111 of 368
Replacing foglamp bulbs
Handle a halogen headlamp bulb carefully and keep out of
children’s reach. Grasp the bulb only by its plastic base and do
not touch the glass. The oil from your hand could cause the bulb to
break the next time the headlamps are operated.
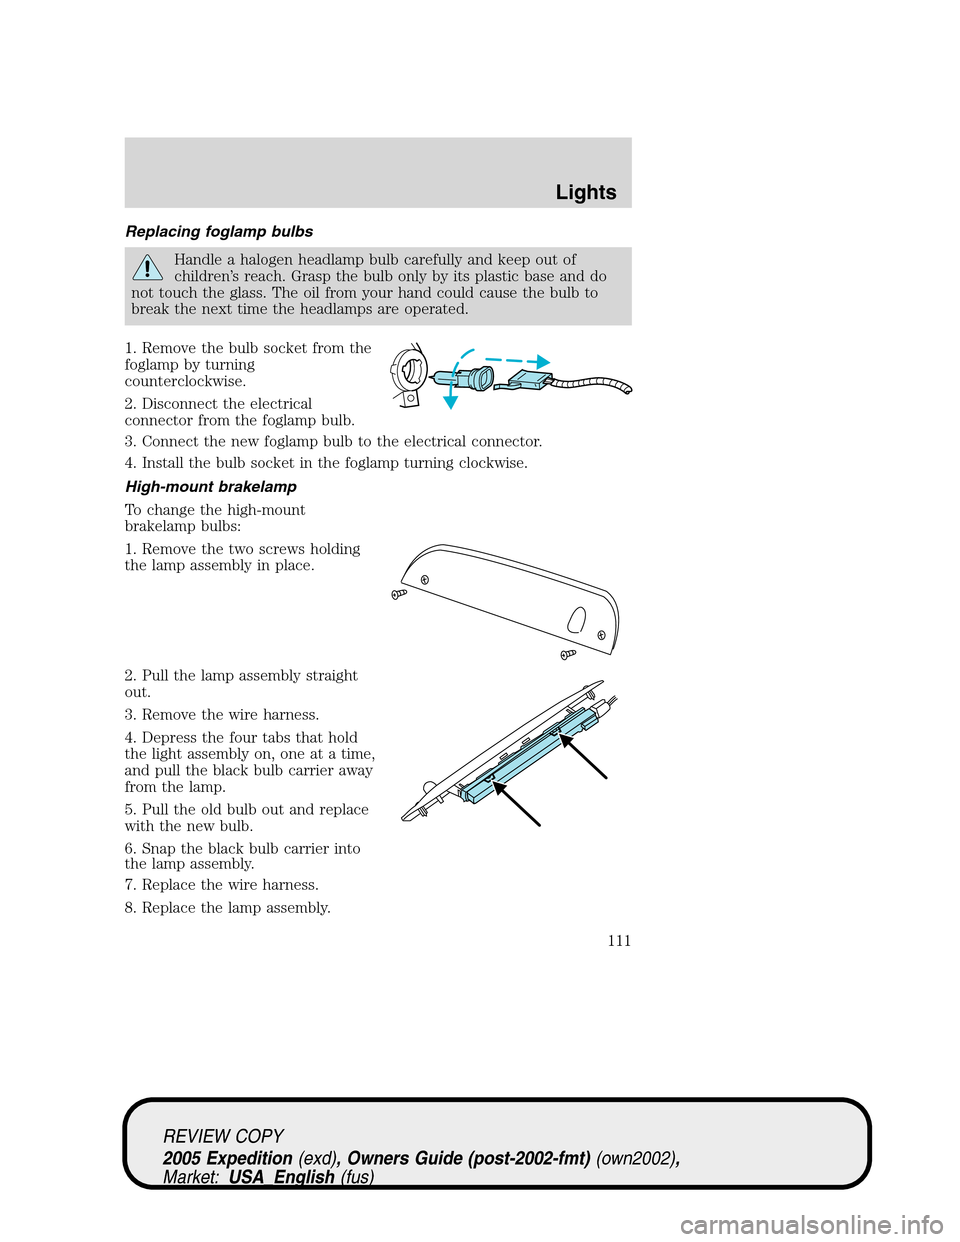
1. Remove the bulb socket from the
foglamp by turning
counterclockwise.
2. Disconnect the electrical
connector from the foglamp bulb.
3. Connect the new foglamp bulb to the electrical connector.
4. Install the bulb socket in the foglamp turning clockwise.
High-mount brakelamp
To change the high-mount
brakelamp bulbs:
1. Remove the two screws holding
the lamp assembly in place.
2. Pull the lamp assembly straight
out.
3. Remove the wire harness.
4. Depress the four tabs that hold
the light assembly on, one at a time,
and pull the black bulb carrier away
from the lamp.
5. Pull the old bulb out and replace
with the new bulb.
6. Snap the black bulb carrier into
the lamp assembly.
7. Replace the wire harness.
8. Replace the lamp assembly.
REVIEW COPY
2005 Expedition(exd), Owners Guide (post-2002-fmt)(own2002),
Market:USA_English(fus)
Lights
111
Page 292 of 368
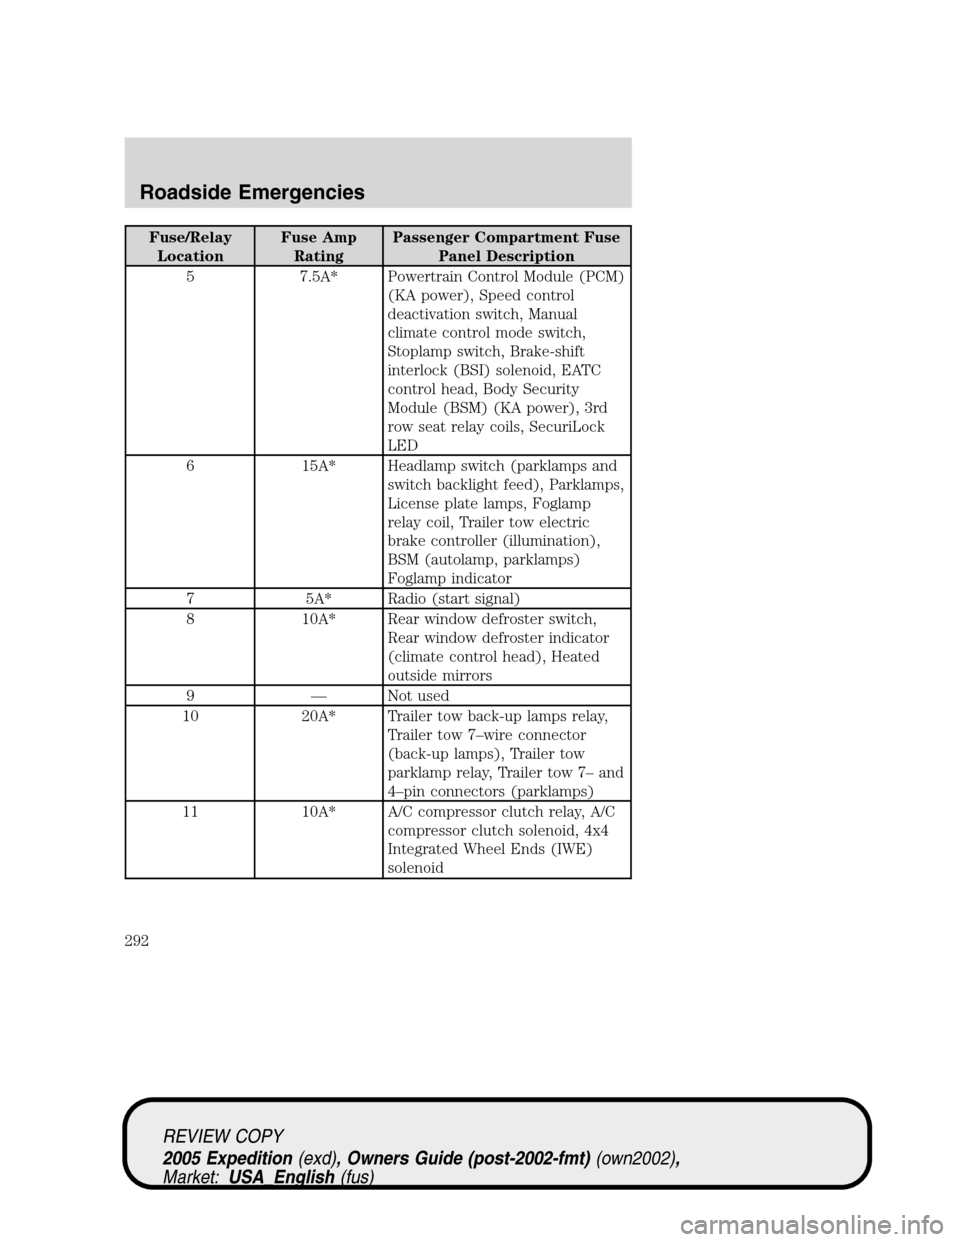
Fuse/Relay
LocationFuse Amp
RatingPassenger Compartment Fuse
Panel Description
5 7.5A* Powertrain Control Module (PCM)
(KA power), Speed control
deactivation switch, Manual
climate control mode switch,
Stoplamp switch, Brake-shift
interlock (BSI) solenoid, EATC
control head, Body Security
Module (BSM) (KA power), 3rd
row seat relay coils, SecuriLock
LED
6 15A* Headlamp switch (parklamps and
switch backlight feed), Parklamps,
License plate lamps, Foglamp
relay coil, Trailer tow electric
brake controller (illumination),
BSM (autolamp, parklamps)
Foglamp indicator
7 5A* Radio (start signal)
8 10A* Rear window defroster switch,
Rear window defroster indicator
(climate control head), Heated
outside mirrors
9 — Not used
10 20A* Trailer tow back-up lamps relay,
Trailer tow 7–wire connector
(back-up lamps), Trailer tow
parklamp relay, Trailer tow 7– and
4–pin connectors (parklamps)
11 10A* A/C compressor clutch relay, A/C
compressor clutch solenoid, 4x4
Integrated Wheel Ends (IWE)
solenoid
REVIEW COPY
2005 Expedition(exd), Owners Guide (post-2002-fmt)(own2002),
Market:USA_English(fus)
Roadside Emergencies
292
Page 297 of 368
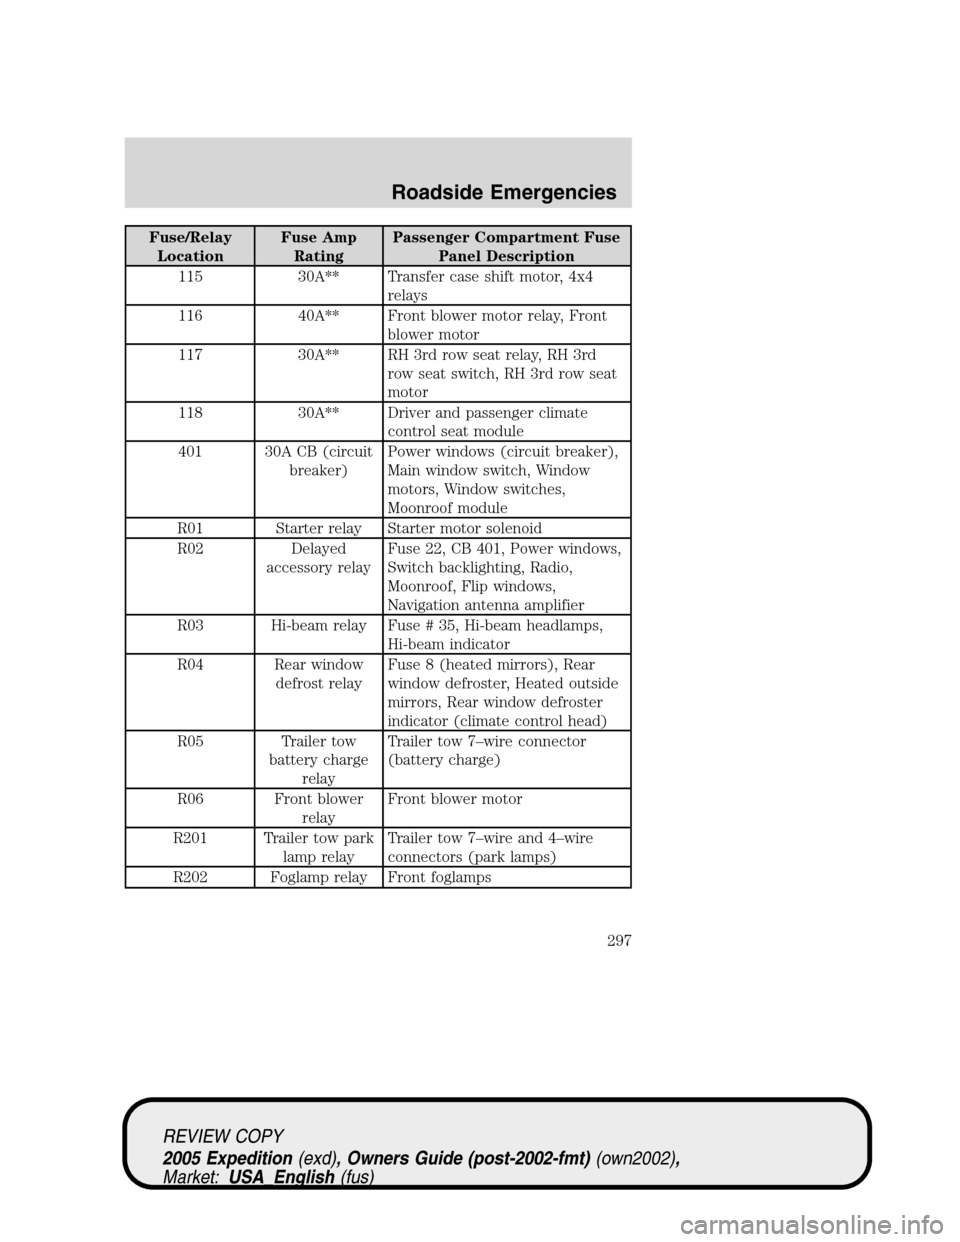
Fuse/Relay
LocationFuse Amp
RatingPassenger Compartment Fuse
Panel Description
115 30A** Transfer case shift motor, 4x4
relays
116 40A** Front blower motor relay, Front
blower motor
117 30A** RH 3rd row seat relay, RH 3rd
row seat switch, RH 3rd row seat
motor
118 30A** Driver and passenger climate
control seat module
401 30A CB (circuit
breaker)Power windows (circuit breaker),
Main window switch, Window
motors, Window switches,
Moonroof module
R01 Starter relay Starter motor solenoid
R02 Delayed
accessory relayFuse 22, CB 401, Power windows,
Switch backlighting, Radio,
Moonroof, Flip windows,
Navigation antenna amplifier
R03 Hi-beam relay Fuse # 35, Hi-beam headlamps,
Hi-beam indicator
R04 Rear window
defrost relayFuse 8 (heated mirrors), Rear
window defroster, Heated outside
mirrors, Rear window defroster
indicator (climate control head)
R05 Trailer tow
battery charge
relayTrailer tow 7–wire connector
(battery charge)
R06 Front blower
relayFront blower motor
R201 Trailer tow park
lamp relayTrailer tow 7–wire and 4–wire
connectors (park lamps)
R202 Foglamp relay Front foglamps
REVIEW COPY
2005 Expedition(exd), Owners Guide (post-2002-fmt)(own2002),
Market:USA_English(fus)
Roadside Emergencies
297