Page 60 of 280

MULTI-FUNCTION LEVER
Windshield wiper:Rotate the end
of the control away from you to
increase the speed of the wipers;
rotate towards you to decrease the
speed of the wipers.
Speed dependent wipers:When
the wiper control is on, the speed of
the wipers will automatically adjust
with the vehicle speed. The faster your vehicle is travelling the faster the
wipers will go.
Windshield washer:Push the end
of the stalk:
•briefly: causes a single swipe of
the wipers without washer fluid.
•a quick push and hold: the wipers
will swipe three times with washer fluid.
•a long push and hold: the wipers and washer fluid will be activated for
up to ten seconds.
Rear window wiper/washer controls
For rear wiper operation, rotate the
rear window wiper and washer
control to the desired position.
Select:
INT 1—3.5 second interval rear
wiper.
INT 2—10.5 second interval rear
wiper.
OFF—Rear wiper and washer off.
For rear wash cycle, rotate (and hold as desired) the rear wiper/washer
control to either
position.
From either position, the control will automatically return to the INT2 or
OFF position.
REVIEW COPY
2005 U137 Excursion(hdw), Owners Guide (post-2002-fmt)(own2002),
Market:USA_English(fus)
Driver Controls
Driver Controls
60
Page 61 of 280

Changing the wiper blades
1. Pull the wiper arm away from the
vehicle. Turn the blade at an angle
from the wiper arm. Push the lock
pin manually to release the blade
and pull the wiper blade down
toward the windshield to remove it
from the arm.
2. Attach the new wiper to the
wiper arm and press it into place
until a click is heard.
3. Replace wiper blades every 6 months for optimum performance.
4. Poor wiper quality can sometimes be improved by cleaning the wiper
blades, refer toWindow and wiper bladesin theCleaningchapter.
5. To prolong the life of the wiper blades, it is highly recommended to
scrape off the ice on the windshield before turning on the wipers. The
layer of ice has many sharp edges and can damage the micro edge of the
wiper rubber element.
TILT STEERING WHEEL
To adjust the steering wheel:
1. Pull and hold the steering wheel
release control toward you.
2. Move the steering wheel up or
down until you find the desired
location.
3. Release the steering wheel
release control. This will lock the
steering wheel in position.
Never adjust the steering wheel when the vehicle is moving.
REVIEW COPY
2005 U137 Excursion(hdw), Owners Guide (post-2002-fmt)(own2002),
Market:USA_English(fus)
Driver Controls
61
Page 63 of 280

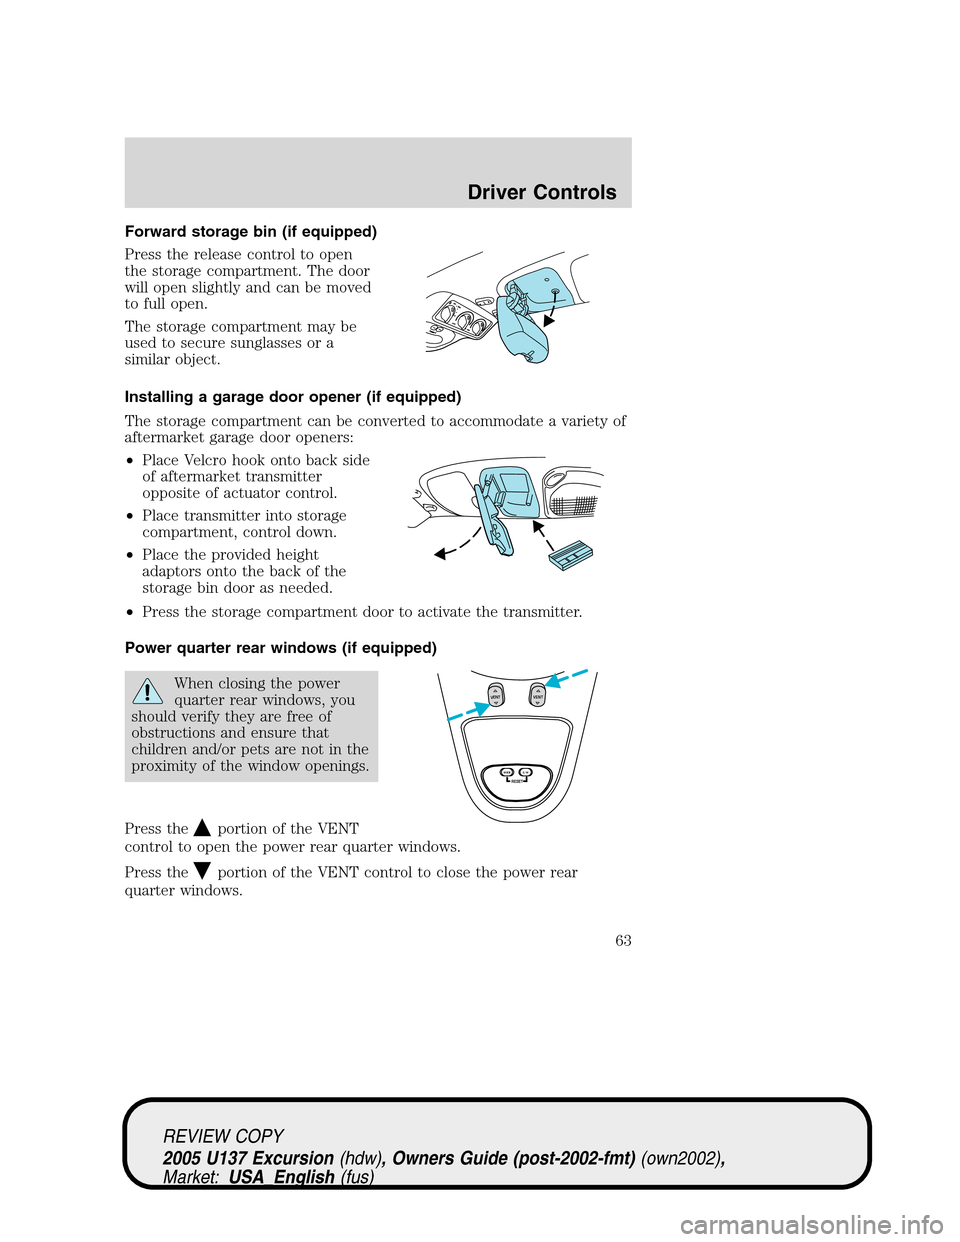
Forward storage bin (if equipped)
Press the release control to open
the storage compartment. The door
will open slightly and can be moved
to full open.
The storage compartment may be
used to secure sunglasses or a
similar object.
Installing a garage door opener (if equipped)
The storage compartment can be converted to accommodate a variety of
aftermarket garage door openers:
•Place Velcro hook onto back side
of aftermarket transmitter
opposite of actuator control.
•Place transmitter into storage
compartment, control down.
•Place the provided height
adaptors onto the back of the
storage bin door as needed.
•Press the storage compartment door to activate the transmitter.
Power quarter rear windows (if equipped)
When closing the power
quarter rear windows, you
should verify they are free of
obstructions and ensure that
children and/or pets are not in the
proximity of the window openings.
Press the
portion of the VENT
control to open the power rear quarter windows.
Press the
portion of the VENT control to close the power rear
quarter windows.
RESET
VENTV
EN
T
MODE E/M
REVIEW COPY
2005 U137 Excursion(hdw), Owners Guide (post-2002-fmt)(own2002),
Market:USA_English(fus)
Driver Controls
63
Page 65 of 280
•Located in the left side storage
compartment in the third row
seating position.
•Located on the right trim panel in
the rear cargo area.
POWER WINDOWS
Do not leave children unattended in the vehicle and do not let
children play with the power windows. They may seriously injure
themselves.
When closing the power windows, you should verify they are free
of obstructions and ensure that children and/or pets are not in
the proximity of the window openings.
Press and hold the bottom part of
the rocker switch to open the
window. Press and hold the top part
of the rocker switch to close the
window.
REVIEW COPY
2005 U137 Excursion(hdw), Owners Guide (post-2002-fmt)(own2002),
Market:USA_English(fus)
Driver Controls
65
Page 66 of 280

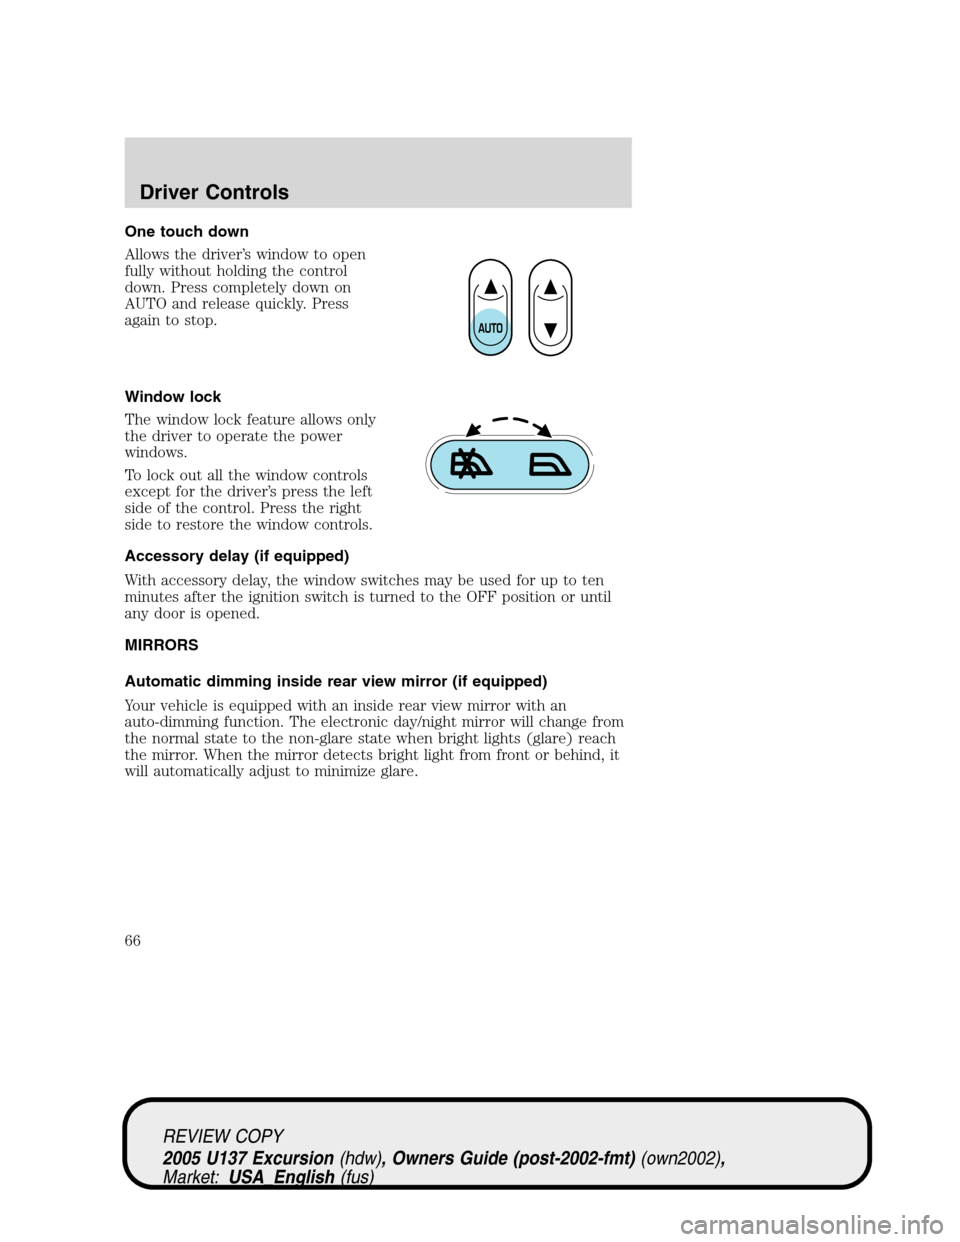
One touch down
Allows the driver’s window to open
fully without holding the control
down. Press completely down on
AUTO and release quickly. Press
again to stop.
Window lock
The window lock feature allows only
the driver to operate the power
windows.
To lock out all the window controls
except for the driver’s press the left
side of the control. Press the right
side to restore the window controls.
Accessory delay (if equipped)
With accessory delay, the window switches may be used for up to ten
minutes after the ignition switch is turned to the OFF position or until
any door is opened.
MIRRORS
Automatic dimming inside rear view mirror (if equipped)
Your vehicle is equipped with an inside rear view mirror with an
auto-dimming function. The electronic day/night mirror will change from
the normal state to the non-glare state when bright lights (glare) reach
the mirror. When the mirror detects bright light from front or behind, it
will automatically adjust to minimize glare.
REVIEW COPY
2005 U137 Excursion(hdw), Owners Guide (post-2002-fmt)(own2002),
Market:USA_English(fus)
Driver Controls
66
Page 83 of 280

The cargo doors and liftgate should be closed before driving your
vehicle. Make sure the liftgate and/or the cargo doors are closed
to prevent exhaust fumes from being drawn into the vehicle. Leaving
the liftgate and/or the cargo doors open could cause serious damage to
the TriDoors and its components. If you must drive with the cargo
doors and liftgate window open, keep the vents open so outside air
comes into the vehicle.
LUGGAGE RACK
Maximum load is 200 lb (90 kg) on the roof rack structure, or 100 lbs (45
kg) on the roof panel rails. Distribute the load equally on the cross bars.
To adjust the cross-bar position:
1. Release the latch at both ends of
the cross-bar (both cross-bars are
adjustable).
2. Slide cross-bar to the desired
location.
3. Tighten the latch at both ends of
the cross-bar.
To remove the cross-bar assembly
from the roof rack side rails:
1. Loosen the latch at both ends of
the cross-bar (both cross-bars are
adjustable).
2. Slide cross-bar to the end of the
rail.
3. Press down on the locking feature
inside the side rail and slide the cross-bar over it.
4. Slide the assemblies off the end.
Vehicles with a higher center of gravity such as utility and
four-wheel drive vehicles handle differently than vehicles with a
lower center of gravity. Utility and four-wheel drive vehicles are not
designed for cornering at speeds as high as passenger cars any more than
low-slung sport cars are designed to perform satisfactorily under off-road
conditions. Avoid sharp turns, excessive speed and abrupt maneuvers in
these vehicles. Failure to drive cautiously could result in an increase risk
of loss of vehicle control, vehicle rollover, personal injury and death.
REVIEW COPY
2005 U137 Excursion(hdw), Owners Guide (post-2002-fmt)(own2002),
Market:USA_English(fus)
Driver Controls
83
Page 106 of 280

Removing the third row seat
From the rear of the vehicle, with the liftgate window and cargo doors
open:
1. Pull the seat release lever located
on the lower right side of the
seatback while pushing the seatback
down onto the seat cushion.
•The seatback will latch onto the
cushion.
2. Lift the seat release bar located
at the center of the seat near the
floor to release the floor latches.
3. While pulling up on the release
bar, lift the seat up and out of the floor tubs and roll seat rearward.
4. With assistance, lift the seat out of the vehicle.
Installing the third row seat
Always latch the vehicle seat to the floor, whether the seat is
occupied or empty. If not latched, the seat may cause injury
during a sudden stop.
When reinstalling a rear seat in your vehicle it must be placed in
its original position. Improper installation of the seat will prevent
correct use of the safety belts and could increase the risk of injury.
Refer to the warning label on the seat belt.
For proper latching, ensure that the
floor tubs are clear of debris.
From the rear of the vehicle, with
the liftgate open:
1. With assistance, lift the seat into
the rear of the vehicle. Roll the seat
forward and guide the front locators
over the seat locator pins of the front floor tubs.
•When the rear of the seat is 4–5in(10–13 cm) above the rear pins,
let the seat drop. This will ensure that the seat will properly latch into
the floor.
2. Push up on the seat to verify that it is latched into the floor.
REVIEW COPY
2005 U137 Excursion(hdw), Owners Guide (post-2002-fmt)(own2002),
Market:USA_English(fus)
Seating and Safety Restraints
106
Page 172 of 280

If you smell exhaust fumes inside your vehicle, have your dealer
inspect your vehicle immediately. Do not drive if you smell
exhaust fumes.
Important ventilating information
If the engine is idling while the vehicle is stopped for a long period of
time, open the windows at least one inch (2.5 cm) or adjust the heating
or air conditioning to bring in fresh air.
BRAKES
Occasional brake noise is normal. If a metal-to-metal, continuous grinding
or continuous squeal sound is present, the brake linings may be worn-out
and should be inspected by a qualified service technician. If the vehicle
has continuous vibration or shudder in the steering wheel while braking,
the vehicle should be inspected by a qualified service technician.
Refer toBrake system warning
lightin theInstrument Cluster
chapter for information on the brake
system warning light.
Four-wheel anti-lock brake system (ABS)
Your vehicle is equipped with an Anti-lock Braking System (ABS). This
system helps you maintain steering control during emergency stops by
keeping the brakes from locking. Noise from the ABS pump motor and
brake pedal pulsation may be observed during ABS braking and the
brake pedal may suddenly travel a little further as soon as ABS braking
is done and normal brake operation resumes. These are normal
characteristics of the ABS and should be no reason for concern.
ABS warning lamp
The ABS lamp in the instrument
cluster momentarily illuminates
when the ignition is turned on. If
the light does not illuminate during
start up, remains on or flashes, the
ABS may be disabled and may need to be serviced.
ABS
REVIEW COPY
2005 U137 Excursion(hdw), Owners Guide (post-2002-fmt)(own2002),
Market:USA_English(fus)
Driving
172