2005 FIAT DUCATO 244 electric window
[x] Cancel search: electric windowPage 13 of 258

12GETTING TO KNOW YOUR VEHICLE
OPERATION
The electronic alarm fitted on the Fi-
at Ducato is controlled by the receiv-
er located on the front ceiling light and
is switched on by means of the radio-
frequency remote control.
Volumetric protection sensors C-
fig. 8 are located in the ceiling light.
The alarm can only be switched on
when the ignition key is removed from
STOPor PARKposition.
The electronic alarm control unit in-
cludes also the alarm siren that can be
cut out.
To switch the electronic alarm
on: press button D-fig. 6 on the re-
mote control briefly. You will hear a
beep and the direction indicators will
flash for approximately three seconds
(only in countries where this is al-
lowed).
Led A-fig. 9, set on the right side of
the steering column, will blink when
the system is on.To switch the electronic alarm
off: press the remote control button
C-fig. 6. You will hear two beeps and
the direction indicators will flash twice
(only in countries where this is al-
lowed).
To cut out the volumetric sur-
veillance:you can cut out the volu-
metric protection function before
switching the electronic alarm on. Pro-
ceed as follows: take the key in rapid
sequence from STOP to MAR and
then back to STOP. Then remove the
key.Led Awill light up for approximate-
ly two seconds to confirm that the
function has been cut out.
The volumetric surveillance function
will be restored (before switching the
electronic alarm on) after the key has
been turned to MARfor at least 30
seconds.
To operate an electrical device pow-
ered by the ignition key (e.g.: electric
windows), turn the key to MAR, op-
erate the control and turn the key
back to STOP within 30 seconds. In
this way the volumetric surveillance
function will not be reactivated.
To cut out the siren:when switch-
ing the electronic alarm on, keep con-
trol button Cpressed for over 4 sec-
onds and then release it.
You will hear five beeps to confirm
that the siren is cut out and that the
alarm is on.
fig. 9
F0D0209m
Page 84 of 258

83GETTING TO KNOW YOUR VEHICLE
CENTRAL DOOR LOCKING
IMPORTANTCentral door locking
is active on all doors if front doors (cab
doors) are used for opening/closing.
When operating one of the rear or
side door lock, only that door will be
locked/unlocked.
From the outside
When the doors are closed, insert
and turn the key in the lock of one of
the driver’s cab doors.
From the inside
When the doors are closed, press
(to lock) or lift (to unlock) one of the
driver’s cab door safety sill buttons.
IMPORTANT If one of the cab
doors is not shut properly or there is
a failure in the system, the central
locking feature will not work and, af-
ter some attempts, the device will stop
working for about 2 minutes. In these
two minutes, the doors can be locked
or unlocked manually without the
electrical system coming into play.After the two minutes, the control
unit is ready to receive commands
once more. If the reason for the mal-
functioning has been removed, the de-
vice will start to work properly again.
If not, it will cut once more.
FRONT DOOR WINDOW
REGULATORS
Manual control
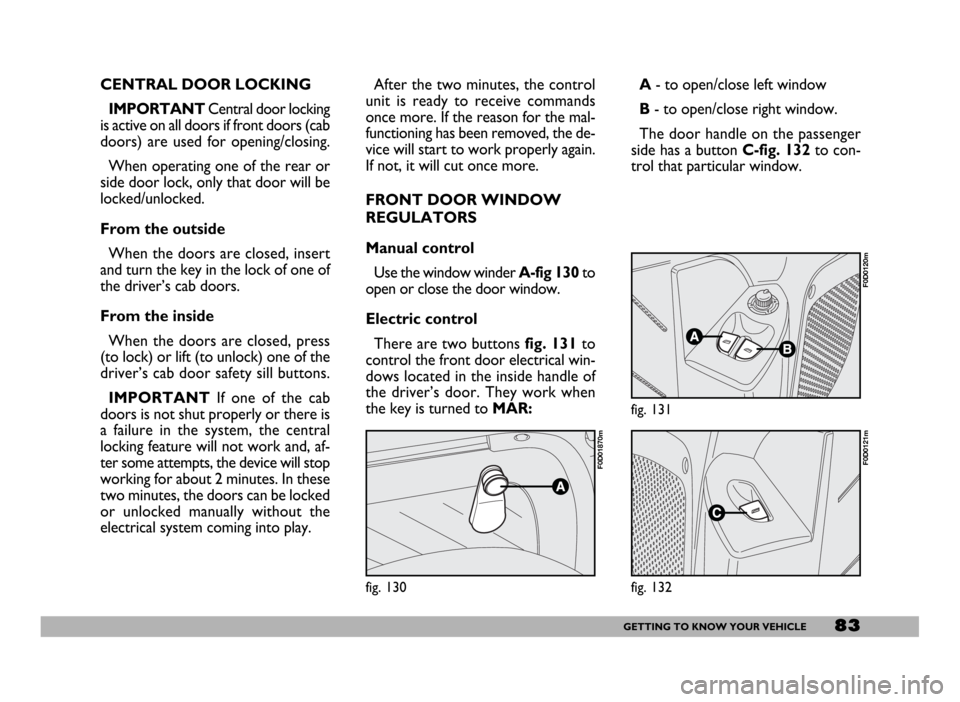
Use the window winderA-fig 130to
open or close the door window.
Electric control
There are two buttons fig. 131to
control the front door electrical win-
dows located in the inside handle of
the driver’s door. They work when
the key is turned to MAR:A- to open/close left window
B- to open/close right window.
The door handle on the passenger
side has a button C-fig. 132to con-
trol that particular window.
fig. 130
F0D01870m
fig. 131
F0D0120m
fig. 132
F0D0121m
Page 85 of 258

84GETTING TO KNOW YOUR VEHICLE
Improper use of the electri-
cal windows can be danger-
ous. Before and during their oper-
ation ensure that any passengers in
the vehicle are not at risk from the
moving glass either by personal ob-
jects getting caught in the mecha-
nism or by being injured by it di-
rectly.
WARNING
Always remove the ignition
key when you get out of the
vehicle to prevent the electric win-
dows being operated accidentally
and constituting a danger to the
people left in the vehicle
WARNING
BONNET
OPENING
Proceed as follows:
– Pull the lever on the left-hand side
of the steering column A-fig. 133.
– Lift the bonnet from the front by
raising lever B-fig. 134.
– Release the support rod from its
clipC-fig. 135and insert it in recess
Din the bonnet.
fig. 133
F0D0053m
fig. 134
F0D0180m
The bonnet might fall vio-
lently if the support rod is
not positioned properly.
WARNING
Perform this operation on-
ly when the vehicle is sta-
tionary.
WARNING
Page 181 of 258

180VEHICLE MAINTENANCE
WINDSCREEN
WIPER
BLADES
Periodically clean the rubber part
with suitable products. We recom-
mend TUTELA PROFESSIONAL
SC35.
Change the blades if the rubber edge
is warped or worn out. You should in
any case change them approximately
once a year.Changing the windscreen
wiper blade
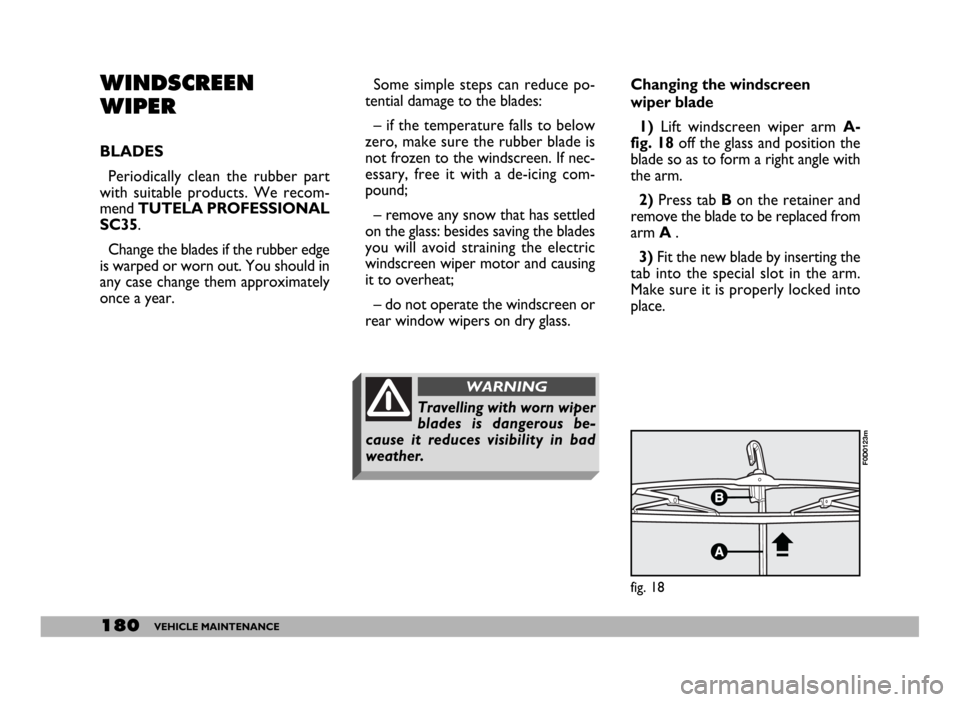
1)Lift windscreen wiper arm A-
fig. 18off the glass and position the
blade so as to form a right angle with
the arm.
2) Press tab Bon the retainer and
remove the blade to be replaced from
arm A .
3)Fit the new blade by inserting the
tab into the special slot in the arm.
Make sure it is properly locked into
place.
fig. 18
F0D0123m
Some simple steps can reduce po-
tential damage to the blades:
– if the temperature falls to below
zero, make sure the rubber blade is
not frozen to the windscreen. If nec-
essary, free it with a de-icing com-
pound;
– remove any snow that has settled
on the glass: besides saving the blades
you will avoid straining the electric
windscreen wiper motor and causing
it to overheat;
– do not operate the windscreen or
rear window wipers on dry glass.
Travelling with worn wiper
blades is dangerous be-
cause it reduces visibility in bad
weather.
WARNING
Page 184 of 258

183VEHICLE MAINTENANCE
Do not wash the vehicle after it has
been parked in the sun or while the
bonnet is hot: it could take the shine
off the paint.
Outside plastic parts must be
cleaned following the usual vehicle
washing procedure.
Where possible avoid parking the
vehicle under trees; the resinous sub-
stances that certain species of tree
shed dull the paintwork and increase
the possibility of rust forming.To better protect the paintwork,
polish with protective wax from time
to time, that leaves a protective layer
on the paintwork.
When the paintwork tends to lose
its shine because of the build-up of
smog, use a wax (polish) which has a
slightly abrasive as well as protective
action.
Front headlights
IMPORTANTNever use aromat-
ic substances (e.g.: petrol) or ketones
(e.g.: acetone) for cleaning front head-
light plastic lens.
Windows
Use specific window cleaners to
clean the windows. Use very clean
cloths to avoid scratching the glass or
damaging its transparency.
IMPORTANTTo prevent damage
to the electric heater element, wipe
the inside of the heated rear window
(where fitted) gently in the same di-
rection as the elements.Engine compartment
At the end of each winter season,
carefully clean the engine compart-
ment. Have this done at a garage.
IMPORTANTThe engine com-
partment should be washed while the
engine is cold and with the ignition key
at STOP. After washing, make sure
that the various protections (e.g. rub-
ber boots and various guards) have
not be removed or damaged.
Detergents pollute wa-
ter. For this reason, the
vehicle must be washed
in an area equipped for the col-
lection and purification of the liq-
uids used while washing.
IMPORTANTBird droppings
must be washed off immediately and
with great care as their acid is partic-
ularly aggressive.
Detergents pollute wa-
ter. The vehicle must
therefore be washed in an
area equipped for the collection
and purification of the liquids
used while washing.
Page 244 of 258

243TECHNICAL SPECIFICATIONS
FUEL CONSUMPTION - CO2EMISSIONS
RUNNING AND USE CONDITIONS AFFECTING FUEL CONSUMPTION
(examples and differences with respect to goods transportation vehicle data)
IMPORTANT
Although fuel consumption mea-
surements procedure aim at defining
realistic values, fuel consumption is in-
fluenced by factors such as:
Driving style and vehicle usehigh
speed, frequent acceleration, frequent
gear shifting, door-to-door deliveries,
etc.
Just for passenger transportation
versions with 2.3 and 2.8 JTD engines,
reduced consumption can be obtained
by starting (on level road) in 2nd gear
instead of 1st gear.
Traffic and road conditions
queues, bending roads, steep roads,
bad road surface, etc.Weather conditions and tem-
peratures
low temperatures, thinner air, wind,
rain etc…;
Vehicle conditions
Poor maintenance (tyre pressure, fil-
ters, spark plugs, etc.), damaged body-
work
Load conditions
Heavy weights, not optimal load dis-
tribution, large weights on roof rack,
etc.
Use of electric devices
Climate control, heater and electric
devices in general
Special conditions of use
Special vehicle conditions of use: roof
rack, trailer, open side windows, type
of tyres, etc.Special trim and adaptations
caravan, motor home, mega box, can-
vas cover, etc.
Some of these conditions are illus-
trated in these figures on the next
pages.
For more information, refer to the
advice in the chapter “Cheap running
that respects the environment.
The fuel consumption values shown
in the table in following pages were de-
fined according to the type-approval
specifications in European Directives.
Consumption values are defined by
means of the following procedures:
– an urban cycle: consisting of a
cold start and a simulated drive in city
streets;
– an extra-urban cycle: consisting
in frequent accelerations, in all gears,
Page 249 of 258

248INDEX
Cruise Control ............................ 68
Current socket ............................ 76
Dashboard ................................. 5
Demisting ...................................... 56
Diesel fuel filter ........................... 173
Differential .................................... 216
Digital clock .................................. 32
Dimensions ........................... 222-224
Dipped beam headlights ............ 65
- bulb replacement ................... 143
Direction indicators ................... 66
- front bulb replacement ......... 145
- rear bulb replacement .......... 146
- side bulb replacement ........... 145
Doors ............................................ 79
- 270° opening ........................... 82
- central door locking .............. 83
- driver’s cab doors .................. 79
- rear door ................................. 81
- remote control ....................... 9- side sliding door ..................... 80
- window regulators ................ 83
Driving style affecting fuel
consumption .............................. 124
Electric windows ....................... 83
Electronic alarm .......................... 11
Electronic automatic gearbox .. 110
Electronic control units ............. 177
- speed limiter ........................... 177
Emergency starting .............. 107-135
Emission control devices ........... 128
Engine ............................................ 214
- starting diesel engines ........... 106
- starting petrol engines .......... 105
- stopping the engine ............... 108
- supply/ignition ......................... 215
- warming up the engine ......... 107
Engine/bodywork codes ............ 187
Engine compartment .................. 183
Engine coolant gauge .................. 30
Engine coolant level .................... 170Engine marking ............................ 185
Engine oil ....................................... 169
- consumption ........................... 170
Engine oil level ............................. 169
Engine oil level gauge ................. 32
EOBD system .............................. 95
Fiat Code (system) ................... 7
First aid kit .................................... 161
Flashing the headlights ............... 66
Fluids and lubricants ................... 241
Front/rear ceiling light
replacement ............................... 148
Front fog light replacement ...... 145
Fuel cut-off switch ...................... 72
Fuel gauge ..................................... 31
Fuses (replacement) ................... 149
Getting to know
your vehicle............................ 5
Getting the best out of
your vehicle............................ 105